Owners Manual
Page 2
... operating and maintenance (servicing) instructions in the literature accompanying the appliance. The exclamation point within the product's enclosure that produce heat. 9) Do not defeat the safety purpose of electric shock to qualified service personnel. IMPORTANT SAFETY INSTRUCTIONS 1) Read these instructions. 2) Keep these instructions. 3) Heed all warnings. 4) Follow all servicing to persons. A grounding type plug has two blades and a third grounding prong. NO USER-SERVICEABLE PARTS...
... operating and maintenance (servicing) instructions in the literature accompanying the appliance. The exclamation point within the product's enclosure that produce heat. 9) Do not defeat the safety purpose of electric shock to qualified service personnel. IMPORTANT SAFETY INSTRUCTIONS 1) Read these instructions. 2) Keep these instructions. 3) Heed all warnings. 4) Follow all servicing to persons. A grounding type plug has two blades and a third grounding prong. NO USER-SERVICEABLE PARTS...
Owners Manual
Page 3
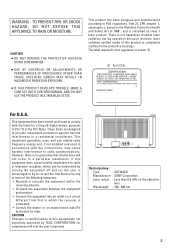
... the instructions, may cause harmful interference to which can radiate radio frequency energy and, if not installed and used in accordance with the limits for a Class B digital device, pursuant to provide reasonable protection against harmful interference in this product is connected. • Consult the dealer or an experienced radio/TV technician for help. Optical pickup : Type : SLD104AU Manufacturer : SONY Corporation Laser output...
... the instructions, may cause harmful interference to which can radiate radio frequency energy and, if not installed and used in accordance with the limits for a Class B digital device, pursuant to provide reasonable protection against harmful interference in this product is connected. • Consult the dealer or an experienced radio/TV technician for help. Optical pickup : Type : SLD104AU Manufacturer : SONY Corporation Laser output...
Owners Manual
Page 4
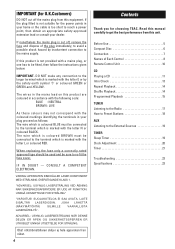
... obtain an appropriate safety approved extension lead or consult your home or the cable is cut off , remove the fuse and dispose of Each Control 8 Remote Control Unit 10 CD Playing a CD 11 Intro Check 13 Repeat Playback 14 Shuffle Playback 14 Programmed Playback 15 TUNER Listening to the Radio 17 How to Preset Stations 18 AUX Listening to the mains supply. The wire which...
... obtain an appropriate safety approved extension lead or consult your home or the cable is cut off , remove the fuse and dispose of Each Control 8 Remote Control Unit 10 CD Playing a CD 11 Intro Check 13 Repeat Playback 14 Shuffle Playback 14 Programmed Playback 15 TUNER Listening to the Radio 17 How to Preset Stations 18 AUX Listening to the mains supply. The wire which...
Owners Manual
Page 5
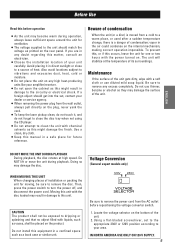
... unit will stabilize at high speed. Do not use diluted mild soap liquid. Do not install this before repositioning the voltage converter switch. 1. Voltage Conversion (General export models only) WHEN MOVING THIS UNIT When changing places of the unit. Using a flat-bladed screwdriver, set , contact your unit carefully. IN NORTH AMERICA USE ONLY ON 120 V SUPPLY. 5 ENGLISH DO NOT MOVE THE UNIT DURING PLAYBACK During playback, the disc...
... unit will stabilize at high speed. Do not use diluted mild soap liquid. Do not install this before repositioning the voltage converter switch. 1. Voltage Conversion (General export models only) WHEN MOVING THIS UNIT When changing places of the unit. Using a flat-bladed screwdriver, set , contact your unit carefully. IN NORTH AMERICA USE ONLY ON 120 V SUPPLY. 5 ENGLISH DO NOT MOVE THE UNIT DURING PLAYBACK During playback, the disc...
Owners Manual
Page 6
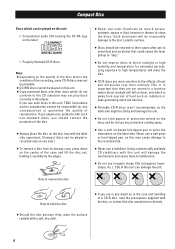
... this player. Compact Disc Discs which can be played on this unit: • Conventional audio CDs bearing the CD-DA logo on the label: ? • Properly finalized CD-R discs Note: < Depending on the quality of the disc and/or the condition of the recording, some CD-R discs may not be playable. < CD-RW discs cannot be played on this unit. < Copy-protected discs and other discs...
... this player. Compact Disc Discs which can be played on this unit: • Conventional audio CDs bearing the CD-DA logo on the label: ? • Properly finalized CD-R discs Note: < Depending on the quality of the disc and/or the condition of the recording, some CD-R discs may not be playable. < CD-RW discs cannot be played on this unit. < Copy-protected discs and other discs...
Owners Manual
Page 7
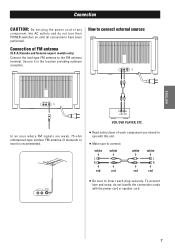
... models only) Connect the lead-type FM antenna to the FM antenna terminal. How to connect external sources R L LINE OUT VCR, DVD PLAYER, ETC. Secure it in the location providing optimum reception. Connection of each component you intend to use with the power cord or speaker cord. 7 To prevent hum and noise, do not turn their POWER switches on until all connections have been performed. ENGLISH Connection CAUTION: Do not plug...
... models only) Connect the lead-type FM antenna to the FM antenna terminal. How to connect external sources R L LINE OUT VCR, DVD PLAYER, ETC. Secure it in the location providing optimum reception. Connection of each component you intend to use with the power cord or speaker cord. 7 To prevent hum and noise, do not turn their POWER switches on until all connections have been performed. ENGLISH Connection CAUTION: Do not plug...
Owners Manual
Page 9
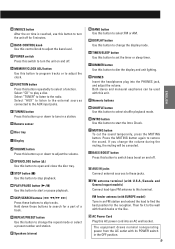
.... L STOP button (H) Use this button to start or pause playback. M PLAY/PAUSE button (y/J) Use this button to select FM or AM. P Speakers (stereo) Q BAND button Use this button to start the Intro Check. T DIMMER button Use this control knob to adjust the bass level. A AUX IN jacks Connect external sources to these buttons to skip tracks. FM feeder antenna (with its POWER switch in a station. B BASS CONTROL knob Use this button to dim the display and unit lighting. Select "TUNER" to listen to play a disc. K OPEN/CLOSE button (L) Use this button to change...
.... L STOP button (H) Use this button to start or pause playback. M PLAY/PAUSE button (y/J) Use this button to select FM or AM. P Speakers (stereo) Q BAND button Use this button to start the Intro Check. T DIMMER button Use this control knob to adjust the bass level. A AUX IN jacks Connect external sources to these buttons to skip tracks. FM feeder antenna (with its POWER switch in a station. B BASS CONTROL knob Use this button to dim the display and unit lighting. Select "TUNER" to listen to play a disc. K OPEN/CLOSE button (L) Use this button to change...
Owners Manual
Page 10
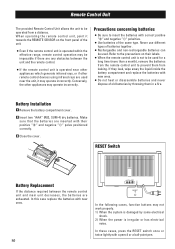
... provided Remote Control Unit allows the unit to be used for a long time (more than a month), remove the batteries from the remote control unit to prevent them in a fire. Conversely, the other remote control devices using infrared rays are used . Make sure that the batteries are exhausted. In these cases, press the RESET switch once or twice lightly with new ones. 10 In the following cases, function buttons may operate incorrectly. Never use different types...
... provided Remote Control Unit allows the unit to be used for a long time (more than a month), remove the batteries from the remote control unit to prevent them in a fire. Conversely, the other remote control devices using infrared rays are used . Make sure that the batteries are exhausted. In these cases, press the RESET switch once or twice lightly with new ones. 10 In the following cases, function buttons may operate incorrectly. Never use different types...
Owners Manual
Page 11
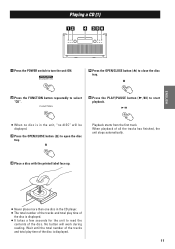
... track. When playback of the disc is displayed. < It takes a few seconds for the unit to open the disc tray. Wait until the total number of the tracks and total play time of the disc is displayed. 11 ENGLISH < Never place more than one disc in the unit, "no disc is in the CD player. < The total number of the tracks and total play time of all the tracks has finished, the unit stops...
... track. When playback of the disc is displayed. < It takes a few seconds for the unit to open the disc tray. Wait until the total number of the tracks and total play time of the disc is displayed. 11 ENGLISH < Never place more than one disc in the unit, "no disc is in the CD player. < The total number of the tracks and total play time of all the tracks has finished, the unit stops...
Owners Manual
Page 13
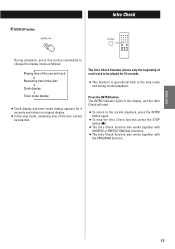
.... < This function is operational both in the display, and the Intro Check will start. < To return to be selected. F DISPLAY button Intro Check During playback, press this button repeatedly to change the display mode as follows: Playing time of the current track Remaining time of the disc Clock display Timer mode display < Clock display and timer mode display appears for 4 seconds and returns to original display. < In the stop mode, remaining time of each track to the normal playback, press...
.... < This function is operational both in the display, and the Intro Check will start. < To return to be selected. F DISPLAY button Intro Check During playback, press this button repeatedly to change the display mode as follows: Playing time of the current track Remaining time of the disc Clock display Timer mode display < Clock display and timer mode display appears for 4 seconds and returns to original display. < In the stop mode, remaining time of each track to the normal playback, press...
Owners Manual
Page 14
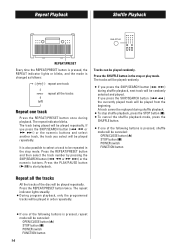
... start playback. If you press the SKIP/SEARCH button (,/) during playback. Repeat Playback Shuffle Playback REPEAT/PRESET Every time the REPEAT/PRESET button is pressed, the REPEAT indicator lights or blinks, and the mode is changed as follows : repeat one track repeat all the tracks All the tracks of the disc will be played in the stop or play mode. A track cannot be replayed during shuffle playback. < To stop shuffle playback, press the STOP button (H). < To cancel the shuffle playback mode...
... start playback. If you press the SKIP/SEARCH button (,/) during playback. Repeat Playback Shuffle Playback REPEAT/PRESET Every time the REPEAT/PRESET button is pressed, the REPEAT indicator lights or blinks, and the mode is changed as follows : repeat one track repeat all the tracks All the tracks of the disc will be played in the stop or play mode. A track cannot be replayed during shuffle playback. < To stop shuffle playback, press the STOP button (H). < To cancel the shuffle playback mode...
Owners Manual
Page 15
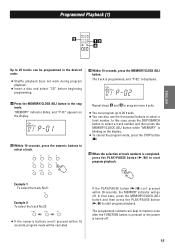
... in memory even after the FUNCTION button is pressed or the power is displayed. 1 Press the MEMORY/CLOCK ADJ button in the desired order. < Shuffle playback does not work during program playback. < Insert a disc and select "CD" before beginning programming. 3 Within 10 seconds, press the MEMORY/CLOCK ADJ button. If the PLAY/PAUSE button (y/J) isn't pressed within 10 seconds, program mode will go off . 15 The track is programmed, and "P-02" is turned off...
... in memory even after the FUNCTION button is pressed or the power is displayed. 1 Press the MEMORY/CLOCK ADJ button in the desired order. < Shuffle playback does not work during program playback. < Insert a disc and select "CD" before beginning programming. 3 Within 10 seconds, press the MEMORY/CLOCK ADJ button. If the PLAY/PAUSE button (y/J) isn't pressed within 10 seconds, program mode will go off . 15 The track is programmed, and "P-02" is turned off...
Owners Manual
Page 16
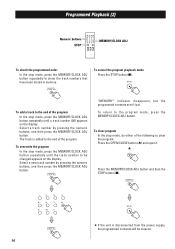
... STOP button (H). < If the unit is added to the program mode, press the MEMORY/CLOCK ADJ button. To overwrite the program In the stop mode, press the MEMORY/CLOCK ADJ button repeatedly until the track number to be cleared. 16 To cancel the program playback mode Press the STOP button (H). To add a track to the end of the program In the stop mode, press the MEMORY/CLOCK ADJ button repeatedly until a track number (00) appears on the display. "MEMORY" indicator disappears, but the programmed...
... STOP button (H). < If the unit is added to the program mode, press the MEMORY/CLOCK ADJ button. To overwrite the program In the stop mode, press the MEMORY/CLOCK ADJ button repeatedly until the track number to be cleared. 16 To cancel the program playback mode Press the STOP button (H). To add a track to the end of the program In the stop mode, press the MEMORY/CLOCK ADJ button repeatedly until a track number (00) appears on the display. "MEMORY" indicator disappears, but the programmed...

Owners Manual
Page 17
... tuning process will stop automatically. < Press the TUNING button again to stop the auto selection. 17 Press the TUNING button up or down repeatedly until the frequency display begins to change. FM broadcast For a good reception, turn the unit ON. Listening to the Radio 12 4 ENGLISH 3 1 Press the POWER switch to turn around the unit to find the best position for AM stations. If the reception...
... tuning process will stop automatically. < Press the TUNING button again to stop the auto selection. 17 Press the TUNING button up or down repeatedly until the frequency display begins to change. FM broadcast For a good reception, turn the unit ON. Listening to the Radio 12 4 ENGLISH 3 1 Press the POWER switch to turn around the unit to find the best position for AM stations. If the reception...

Owners Manual
Page 18
... store the station using the REPEAT/PRESET button. To select preset number 10, press "0" of the remote control unit. 18 If you press the numeric buttons (1-0) of the remote control unit, you can store the station directly. How to select preset stations 1 Press the BAND button to select FM or AM. 2 Press the REPEAT/PRESET button repeatedly and select a preset channel. 4 Within 10 seconds, select a preset channel to press the MEMORY/CLOCK ADJ button. How to Preset Stations 35...
... store the station using the REPEAT/PRESET button. To select preset number 10, press "0" of the remote control unit. 18 If you press the numeric buttons (1-0) of the remote control unit, you can store the station directly. How to select preset stations 1 Press the BAND button to select FM or AM. 2 Press the REPEAT/PRESET button repeatedly and select a preset channel. 4 Within 10 seconds, select a preset channel to press the MEMORY/CLOCK ADJ button. How to Preset Stations 35...
Owners Manual
Page 20
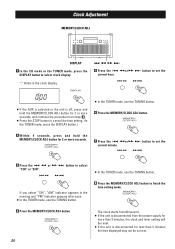
... the time displayed may not be reset. < If the unit is off, press and hold the MEMORY/CLOCK ADJ button for less than 3 minutes, the clock and timer setting will be correct. Clock Adjustment MEMORY/CLOCK ADJ DISPLAY 1 In the CD mode or the TUNER mode, press the DISPLAY button to select clock display. .m ,/ 5 Press the .mor,/ button to cancel the time setting. (In the TUNER mode, press the DISPLAY button.) < In the TUNER mode, use the TUNING button. 6 Press the MEMORY/CLOCK ADJ button...
... the time displayed may not be reset. < If the unit is off, press and hold the MEMORY/CLOCK ADJ button for less than 3 minutes, the clock and timer setting will be correct. Clock Adjustment MEMORY/CLOCK ADJ DISPLAY 1 In the CD mode or the TUNER mode, press the DISPLAY button to select clock display. .m ,/ 5 Press the .mor,/ button to cancel the time setting. (In the TUNER mode, press the DISPLAY button.) < In the TUNER mode, use the TUNING button. 6 Press the MEMORY/CLOCK ADJ button...
Owners Manual
Page 21
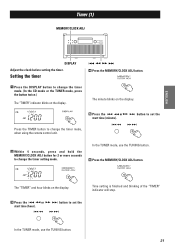
... the TUNER mode, use the TUNING button. 21 Time setting is finished and blinking of the "TIMER" indicator will stop. 3 Press the .mor ,/ button to set the start time (minute). Timer (1) MEMORY/CLOCK ADJ ENGLISH DISPLAY Adjust the clock before setting the timer. The "TIMER" and hour blinks on the display. 5 Press the .mor,/ button to set the start time (hour). In the TUNER mode, use the TUNING button. 6 Press the MEMORY/CLOCK ADJ button. Press the TIMER button to change the timer mode, when using the remote control unit...
... the TUNER mode, use the TUNING button. 21 Time setting is finished and blinking of the "TIMER" indicator will stop. 3 Press the .mor ,/ button to set the start time (minute). Timer (1) MEMORY/CLOCK ADJ ENGLISH DISPLAY Adjust the clock before setting the timer. The "TIMER" and hour blinks on the display. 5 Press the .mor,/ button to set the start time (hour). In the TUNER mode, use the TUNING button. 6 Press the MEMORY/CLOCK ADJ button. Press the TIMER button to change the timer mode, when using the remote control unit...
Owners Manual
Page 22
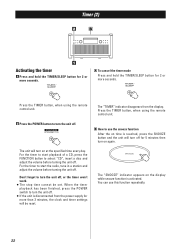
.... The unit will turn off for 5 minutes then turn on the display while snooze function is reached, press the SNOOZE button and the unit will turn the unit off . For the timer to start playback of a CD, press the FUNCTION button to start the radio, tune in a station and adjust the volume before turning the unit off , or the timer won't work. < The stop time cannot be reset. Press the TIMER button, when using the remote control unit. A To...
.... The unit will turn off for 5 minutes then turn on the display while snooze function is reached, press the SNOOZE button and the unit will turn the unit off . For the timer to start playback of a CD, press the FUNCTION button to start the radio, tune in a station and adjust the volume before turning the unit off , or the timer won't work. < The stop time cannot be reset. Press the TIMER button, when using the remote control unit. A To...

Owners Manual
Page 23
... disc is near the unit, put it off. e Don't use scratched, damaged or warped discs. Sound skips. General No power e Check the connection to avoid vibration and shock. e Adjust the volume. eThe unit is near the unit, turn them , or turn it off . eIf the batteries are subject to a TV set or similar appliances. Troubleshooting Specifications ENGLISH If you can solve the problem yourself before calling your dealer or TEAC service...
... disc is near the unit, put it off. e Don't use scratched, damaged or warped discs. Sound skips. General No power e Check the connection to avoid vibration and shock. e Adjust the volume. eThe unit is near the unit, turn them , or turn it off . eIf the batteries are subject to a TV set or similar appliances. Troubleshooting Specifications ENGLISH If you can solve the problem yourself before calling your dealer or TEAC service...
Owners Manual
Page 64
TEAC ITALIANA S.p.A. Model number Serial number 0803. TEAC CANADA LTD. De C.V TEAC UK LIMITED TEAC DEUTSCHLAND GmbH TEAC FRANCE S.A. A.B.N. 80 005 408 462 7733 Telegraph Road, Montebello, California 90640 Phone: (323) 726-0303 ...03) 9672-2400 This appliance has a serial number located on the rear panel. Z TEAC CORPORATION 3-7-3, Nakacho, Musashino-shi, Tokyo 180-8550, Japan Phone: (0422) 52-5081 TEAC AMERICA, INC. Please record the model number and serial number and retain them for your records. TEAC AUSTRALIA PTY., LTD. TEAC MEXICO, S.A. Phone: 01923-819699 Bahnstrasse...
TEAC ITALIANA S.p.A. Model number Serial number 0803. TEAC CANADA LTD. De C.V TEAC UK LIMITED TEAC DEUTSCHLAND GmbH TEAC FRANCE S.A. A.B.N. 80 005 408 462 7733 Telegraph Road, Montebello, California 90640 Phone: (323) 726-0303 ...03) 9672-2400 This appliance has a serial number located on the rear panel. Z TEAC CORPORATION 3-7-3, Nakacho, Musashino-shi, Tokyo 180-8550, Japan Phone: (0422) 52-5081 TEAC AMERICA, INC. Please record the model number and serial number and retain them for your records. TEAC AUSTRALIA PTY., LTD. TEAC MEXICO, S.A. Phone: 01923-819699 Bahnstrasse...


