
Owners Manual
Page 2
...) Only use this apparatus near any heat sources such as radiators, heat registers, stoves, or other . REFER SERVICING TO QUALIFIED SERVICE PERSONNEL. The lightning flash with dry cloth. 7) Do not block any way, such as power-supply cord or plug is intended to alert the user to persons. A polarized plug has two blades with the manufacturer's instructions. 8) Do not install near water...
...) Only use this apparatus near any heat sources such as radiators, heat registers, stoves, or other . REFER SERVICING TO QUALIFIED SERVICE PERSONNEL. The lightning flash with dry cloth. 7) Do not block any way, such as power-supply cord or plug is intended to alert the user to persons. A polarized plug has two blades with the manufacturer's instructions. 8) Do not install near water...

Owners Manual
Page 3
... non-operating power from that to which can be determined by turning the equipment off and on, the user is encouraged to try to correct the interference by TEAC CORPORATION for a Class B digital device, pursuant to provide reasonable protection against harmful interference in a particular installation. DO NOT USE THE PRODUCT UNTIL IT HAS BEEN REPAIRED. These limits are designed to Part...
... non-operating power from that to which can be determined by turning the equipment off and on, the user is encouraged to try to correct the interference by TEAC CORPORATION for a Class B digital device, pursuant to provide reasonable protection against harmful interference in a particular installation. DO NOT USE THE PRODUCT UNTIL IT HAS BEEN REPAIRED. These limits are designed to Part...
Owners Manual
Page 4
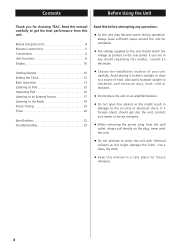
...4 Before Using the Unit 4 Remote Control Unit 5 Connections 6 Unit Functions 8 Display 10 Getting Started 10 Setting the Clock 12 Basic Operation 13 Listening to iPod 15 Operating iPod 16 Listening to an External Source 17 Listening to the Radio 18 Preset Tuning 19 Timer 20 Specifications 22 Troubleshooting 23 Read... plug, never yank the cord. < Do not attempt to clean the unit with chemical solvents as this matter, consult an electrician. < Choose the installation location of your dealer or service company. < When removing the power plug from this manual in direct ...
...4 Before Using the Unit 4 Remote Control Unit 5 Connections 6 Unit Functions 8 Display 10 Getting Started 10 Setting the Clock 12 Basic Operation 13 Listening to iPod 15 Operating iPod 16 Listening to an External Source 17 Listening to the Radio 18 Preset Tuning 19 Timer 20 Specifications 22 Troubleshooting 23 Read... plug, never yank the cord. < Do not attempt to clean the unit with chemical solvents as this matter, consult an electrician. < Choose the installation location of your dealer or service company. < When removing the power plug from this manual in direct ...

Owners Manual
Page 5
... and the remote control unit. < If the remote control unit is operated within the effective range (5 m), remote control operation may be used . Battery installation < Do not heat or disassemble batteries and never dispose of the same type. Remove the battery compartment cover. 2. In this case replace the batteries with new ones. When operating the remote control unit, point it towards the remote sensor on their labels. < When the remote control unit...
... and the remote control unit. < If the remote control unit is operated within the effective range (5 m), remote control operation may be used . Battery installation < Do not heat or disassemble batteries and never dispose of the same type. Remove the battery compartment cover. 2. In this case replace the batteries with new ones. When operating the remote control unit, point it towards the remote sensor on their labels. < When the remote control unit...

Owners Manual
Page 7
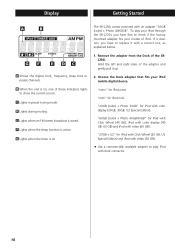
... one . Battery installation 1. Be sure to connect the adapter to the AM ANTENNA terminal. This antenna may need to be repositioned if you move your unit to the builtin clock and memory, when the unit is momentarily disconnected from the AC outlet. Insert a CR2032 lithium-ion battery with this jack. Replace the lid. ENGLISH 7 D Battery compartment The battery supplies a backup power to a new location. C DC IN jack Connect the...
... one . Battery installation 1. Be sure to connect the adapter to the AM ANTENNA terminal. This antenna may need to be repositioned if you move your unit to the builtin clock and memory, when the unit is momentarily disconnected from the AC outlet. Insert a CR2032 lithium-ion battery with this jack. Replace the lid. ENGLISH 7 D Battery compartment The battery supplies a backup power to a new location. C DC IN jack Connect the...

Owners Manual
Page 8
... FM MODE U F S V N H K N MEMORY/ CLOCK ADJ T SLEEP DISPLAY BASS TREBLE MUTING I Y B W X A Speakers (Stereo) B SLEEP Use this button to enter the timer setting mode. Insert an iPod mobile digital device into this button for more than 2 seconds to set sleep timer. D Dock connector Before use this button to turn on or off the timer function. C ALARM 1, ALARM 2 Hold down these buttons are used to select stereo or monaural. 8 Also these buttons for clock adjustment. F FM MODE In FM TUNER mode, use , insert an appropriate Dock adapter in the Dock (see...
... FM MODE U F S V N H K N MEMORY/ CLOCK ADJ T SLEEP DISPLAY BASS TREBLE MUTING I Y B W X A Speakers (Stereo) B SLEEP Use this button to enter the timer setting mode. Insert an iPod mobile digital device into this button for more than 2 seconds to set sleep timer. D Dock connector Before use this button to turn on or off the timer function. C ALARM 1, ALARM 2 Hold down these buttons are used to select stereo or monaural. 8 Also these buttons for clock adjustment. F FM MODE In FM TUNER mode, use , insert an appropriate Dock adapter in the Dock (see...

Owners Manual
Page 9
.... L SNOOZE/DIMMER After the TIMER ON time is also used for a part of a track. Note: To simplify explanations, instructions in this manual refer to turn the unit on the remote control will also operate similarly. J AUX IN You can connect a portable audio player to adjust the volume level. This button is reached, use these buttons to this jack. M Display N VOLUME Press these buttons to mute the sound. W MUTING Use this button to select a preset station. S PRESET/SCROLL (‡/°) In TUNER mode, use this button...
.... L SNOOZE/DIMMER After the TIMER ON time is also used for a part of a track. Note: To simplify explanations, instructions in this manual refer to turn the unit on the remote control will also operate similarly. J AUX IN You can connect a portable audio player to adjust the volume level. This button is reached, use these buttons to this jack. M Display N VOLUME Press these buttons to mute the sound. W MUTING Use this button to select a preset station. S PRESET/SCROLL (‡/°) In TUNER mode, use this button...
Owners Manual
Page 10
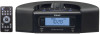
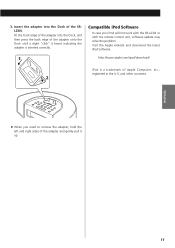
... GB). < Use a commercially available adapter to play your iPod through the SR-L230i, you have first to check if the factory mounted adapter fits your iPod mobile digital device. GF E DC A Shows the digital clock, frequency, sleep time or preset channels. 1. C Lights in preset tuning mode. D Lights during muting. B When the unit is active. E Lights when an FM stereo broadcast is on , one , as explained below. "nano" for iPod mini. To play iPod with...
... GB). < Use a commercially available adapter to play your iPod through the SR-L230i, you have first to check if the factory mounted adapter fits your iPod mobile digital device. GF E DC A Shows the digital clock, frequency, sleep time or preset channels. 1. C Lights in preset tuning mode. D Lights during muting. B When the unit is active. E Lights when an FM stereo broadcast is on , one , as explained below. "nano" for iPod mini. To play iPod with...
Owners Manual
Page 11
... pull it up. and other countries. 2 < When you need to remove the adapter, hold the left and right sides of the SRL230i. Compatible iPod Software In case your iPod will not work with the SR-L230i or with the remote control unit, software update may solve the problem. Insert the adapter into the Dock, and then press the back edge of Apple Computer...
... pull it up. and other countries. 2 < When you need to remove the adapter, hold the left and right sides of the SRL230i. Compatible iPod Software In case your iPod will not work with the SR-L230i or with the remote control unit, software update may solve the problem. Insert the adapter into the Dock, and then press the back edge of Apple Computer...

Owners Manual
Page 12
... display. The "minute" value blinks. < You cannot set the clock when the source is pressed for 8 seconds, the timer setting mode will be cancelled. 3 Press the CLOCK ADJ button again. The "hour" value blinks. 12 If you want to set the current hour. / CLOCK ADJ 5 Press the CLOCK ADJ button. The clock starts. < When no button is "TUNER". 1 Press the CLOCK ADJ button to display the clock. 6 Press the skip button (.//) to change the hour mode...
... display. The "minute" value blinks. < You cannot set the clock when the source is pressed for 8 seconds, the timer setting mode will be cancelled. 3 Press the CLOCK ADJ button again. The "hour" value blinks. 12 If you want to set the current hour. / CLOCK ADJ 5 Press the CLOCK ADJ button. The clock starts. < When no button is "TUNER". 1 Press the CLOCK ADJ button to display the clock. 6 Press the skip button (.//) to change the hour mode...
Owners Manual
Page 13
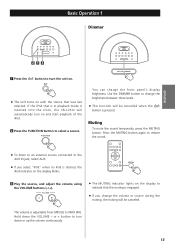
... panel's display brightness. or + button to turn on and start playback of the iPod. 2 Press the FUNCTION button to select a source. Basic Operation 1 Dimmer ENGLISH 213 1 Press the button to turn the unit on. < The unit turns on with the source that is in playback mode is inserted into the Dock, the SR-L230i will automatically turn down the VOLUME - If the iPod that was last selected. You can change the volume or...
... panel's display brightness. or + button to turn on and start playback of the iPod. 2 Press the FUNCTION button to select a source. Basic Operation 1 Dimmer ENGLISH 213 1 Press the button to turn the unit on. < The unit turns on with the source that is in playback mode is inserted into the Dock, the SR-L230i will automatically turn down the VOLUME - If the iPod that was last selected. You can change the volume or...

Owners Manual
Page 14
Sleep timer Each press of the SLEEP button changes the time indication by 10 minutes. CAUTION Always lower the volume level prior to plugging in . 14 The unit will automatically turn off and then into the PHONES jack, and adjust the volume. TO AVOID DAMAGING YOUR HEARING - BASS TREBLE Headphones 90 80 .........10 Off < When you want to 10 minutes). Each press of the SLEEP button permits setting an...
Sleep timer Each press of the SLEEP button changes the time indication by 10 minutes. CAUTION Always lower the volume level prior to plugging in . 14 The unit will automatically turn off and then into the PHONES jack, and adjust the volume. TO AVOID DAMAGING YOUR HEARING - BASS TREBLE Headphones 90 80 .........10 Off < When you want to 10 minutes). Each press of the SLEEP button permits setting an...
Owners Manual
Page 15
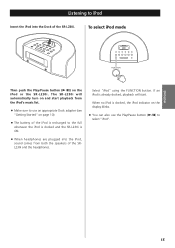
... the headphones. To select iPod mode Then push the Play/Pause button (y/J) on page 10). < The battery of the iPod is recharged to the full whenever the iPod is docked and the SR-L230i is docked, the iPod indicator on the display blinks. < You can also use an appropriate Dock adapter (see "Getting Started" on the iPod or the SR-L230i. Listening to iPod Insert the iPod into the iPod, sound comes from the iPod's music list. < Make...
... the headphones. To select iPod mode Then push the Play/Pause button (y/J) on page 10). < The battery of the iPod is recharged to the full whenever the iPod is docked and the SR-L230i is docked, the iPod indicator on the display blinks. < You can also use an appropriate Dock adapter (see "Getting Started" on the iPod or the SR-L230i. Listening to iPod Insert the iPod into the iPod, sound comes from the iPod's music list. < Make...
Owners Manual
Page 16
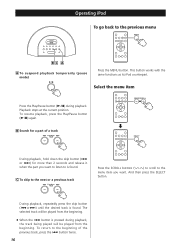
...Play/Pause button (G/J) during playback, the track being played will be played from the beginning. < When the . or /) for a part of the previous track, press the . During playback, repeatedly press the skip button (.or/) until the desired track is pressed during playback. button twice. 16 Playback stops...A To suspend playback temporarily (pause mode) Press the MENU button. To return to is found . This button works with the same functions as its iPod counterpart. PRESET/SCROLL B Search for more than 2 seconds and release it when the part you want to listen to the ...
...Play/Pause button (G/J) during playback, the track being played will be played from the beginning. < When the . or /) for a part of the previous track, press the . During playback, repeatedly press the skip button (.or/) until the desired track is pressed during playback. button twice. 16 Playback stops...A To suspend playback temporarily (pause mode) Press the MENU button. To return to is found . This button works with the same functions as its iPod counterpart. PRESET/SCROLL B Search for more than 2 seconds and release it when the part you want to listen to the ...
Owners Manual
Page 17
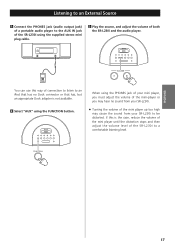
... the SR-L230i using the FUNCTION button. When using the PHONES jack of your mini player, you must adjust the volume of the mini-player or you may cause the sound from your SR-L230i to a comfortable listening level. ENGLISH 17 Listening to an External Source 1 Connect the PHONES jack (audio output jack) of a portable audio player to an iPod that has no sound from your SR-L230i. < Turning the volume of the mini player up too high may hear no Dock...
... the SR-L230i using the FUNCTION button. When using the PHONES jack of your mini player, you must adjust the volume of the mini-player or you may cause the sound from your SR-L230i to a comfortable listening level. ENGLISH 17 Listening to an External Source 1 Connect the PHONES jack (audio output jack) of a portable audio player to an iPod that has no sound from your SR-L230i. < Turning the volume of the mini player up too high may hear no Dock...

Owners Manual
Page 18
..." using the FM/AM button. Reception will stop automatically. < To stop the auto selection, press the skip button. If the reception is poor For the best reception, rotate the FM or the AM antenna until the station you want to listen to is tuned in the display. < If the sound is distorted and the "STEREO" indicator flashes, the signal is pressed momentarily the frequency changes by a fixed step...
..." using the FM/AM button. Reception will stop automatically. < To stop the auto selection, press the skip button. If the reception is poor For the best reception, rotate the FM or the AM antenna until the station you want to listen to is tuned in the display. < If the sound is distorted and the "STEREO" indicator flashes, the signal is pressed momentarily the frequency changes by a fixed step...

Owners Manual
Page 20
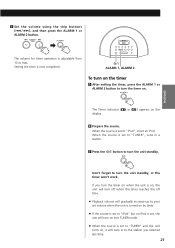
... Timer indicator ( or ) blinks on time is set . or /) to set two different timer setting separately. < Adjust the clock before setting the timer (see page 12). 4 Press the skip buttons (. "iPod" or "TUNER" blinks. 6 Select a source (iPod or TUNER) using the skip buttons (.//), and then press the ALARM 1 or ALARM 2 button. < You cannot select "AUX". 20 Timer 1 3 Press the skip buttons (. "OFF" and the off time is pressed for more than 2 seconds to display "ON". Setting...
... Timer indicator ( or ) blinks on time is set . or /) to set two different timer setting separately. < Adjust the clock before setting the timer (see page 12). 4 Press the skip buttons (. "iPod" or "TUNER" blinks. 6 Select a source (iPod or TUNER) using the skip buttons (.//), and then press the ALARM 1 or ALARM 2 button. < You cannot select "AUX". 20 Timer 1 3 Press the skip buttons (. "OFF" and the off time is pressed for more than 2 seconds to display "ON". Setting...
Owners Manual
Page 21
... a station. 3 Press the button to turn on into TUNER mode. < When the source is set to "TUNER" and the unit turns on the timer 1 After setting the timer, press the ALARM 1 or ALARM 2 button to "iPod" but no iPod is now completed. ENGLISH The volume for timer operation is set to turn the unit standby, or the timer won't work. If you selected last time. 21 Don't forget to "iPod", insert an iPod. ALARM 1, ALARM 2 To turn on...
... a station. 3 Press the button to turn on into TUNER mode. < When the source is set to "TUNER" and the unit turns on the timer 1 After setting the timer, press the ALARM 1 or ALARM 2 button to "iPod" but no iPod is now completed. ENGLISH The volume for timer operation is set to turn the unit standby, or the timer won't work. If you selected last time. 21 Don't forget to "iPod", insert an iPod. ALARM 1, ALARM 2 To turn on...

Owners Manual
Page 22
...) x 1 Battery for Remote Control Unit (AAA) x 2 Battery for 5 minutes then turn on . FM: 87.5 MHz to 108.0 MHz AM: 530 kHz to 1,710 kHz The Timer indicator ( or ) disappears from production models. 22 Press the ALARM 1 or ALARM 2 button again to turn it off for Memory Backup (CR2032) x 1 AM loop antenna x 1 Dock adapter x 5 (adapter "60GB (color) + Photo 40/60GB" premounted) Stereo mini plug cable x 1 AC Adapter x 1 Owner's Manual x 1 Warranty Card x 1 < Design and specifications are...
...) x 1 Battery for Remote Control Unit (AAA) x 2 Battery for 5 minutes then turn on . FM: 87.5 MHz to 108.0 MHz AM: 530 kHz to 1,710 kHz The Timer indicator ( or ) disappears from production models. 22 Press the ALARM 1 or ALARM 2 button again to turn it off for Memory Backup (CR2032) x 1 AM loop antenna x 1 Dock adapter x 5 (adapter "60GB (color) + Photo 40/60GB" premounted) Stereo mini plug cable x 1 AC Adapter x 1 Owner's Manual x 1 Warranty Card x 1 < Design and specifications are...
Owners Manual
Page 23
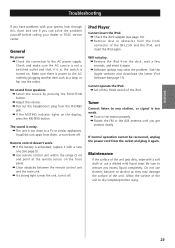
e Pull out the headphone's plug from the Dock connector of the SR-L230i and the iPod, and insert the iPod again. Install the unit apart from the outlet and plug it again. Cannot operate the iPod. e Adjust the volume. Remote control doesn't work. e If the battery is exhausted, replace it again. e Clear obstacles between the remote control unit and the main unit. eRemove dust or obstacles from the PHONES jack. Make sure there is...
e Pull out the headphone's plug from the Dock connector of the SR-L230i and the iPod, and insert the iPod again. Install the unit apart from the outlet and plug it again. Cannot operate the iPod. e Adjust the volume. Remote control doesn't work. e If the battery is exhausted, replace it again. e Clear obstacles between the remote control unit and the main unit. eRemove dust or obstacles from the PHONES jack. Make sure there is...


