Owners Manual
Page 3
...following measures: < Reorient or relocate the equipment and/or the receiving antenna. < Increase the separation between the equipment and receiver. < Connect the equipment into an outlet on physical media (compact discs, digital versatile discs, semiconductor chips, hard drives, memory cards and the ...! This equipment generates, uses, and can be determined by TEAC CORPORATION for help. However, there is completely confined in the U.S. CAUTION Changes or modifications to Part 15 of Microsoft. There is connected. < Consult the dealer or an experienced radio/TV technician ...
...following measures: < Reorient or relocate the equipment and/or the receiving antenna. < Increase the separation between the equipment and receiver. < Connect the equipment into an outlet on physical media (compact discs, digital versatile discs, semiconductor chips, hard drives, memory cards and the ...! This equipment generates, uses, and can be determined by TEAC CORPORATION for help. However, there is completely confined in the U.S. CAUTION Changes or modifications to Part 15 of Microsoft. There is connected. < Consult the dealer or an experienced radio/TV technician ...
Owners Manual
Page 4
...off the unit. < As the unit may result in damage to the unit should get the best performance from this unit. If you for choosing TEAC. Use a clean, dry cloth. < Keep this manual in a safe place for future reference. < The operations are in any doubt regarding this ...are illustrated using the European model for example in this manual. Before Use 4 Discs 5 MP3 and WMA 6 iPod Compatibility 6 Connecting Antennas (AM/FM 7 Speaker Connections 8 Connections 10 Part Names (main unit 12 Part Names (remote control unit 14 Remote Control Unit 16 Basic Operation 17 Disc Playback 18 USB...
...off the unit. < As the unit may result in damage to the unit should get the best performance from this unit. If you for choosing TEAC. Use a clean, dry cloth. < Keep this manual in a safe place for future reference. < The operations are in any doubt regarding this ...are illustrated using the European model for example in this manual. Before Use 4 Discs 5 MP3 and WMA 6 iPod Compatibility 6 Connecting Antennas (AM/FM 7 Speaker Connections 8 Connections 10 Part Names (main unit 12 Part Names (remote control unit 14 Remote Control Unit 16 Basic Operation 17 Disc Playback 18 USB...
Owners Manual
Page 6
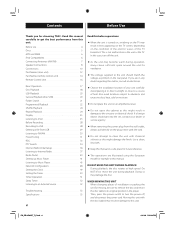
... a sampling frequency of 44.1 kHz or 48 kHz, and a bit-rate of 320 kbps or less. < This unit cannot output video from a connected iPod. < To connect an iPod, use the USB cable supplied with the iPod. < This unit can play WMA files with the remote control unit, software update may...< You cannot use the file extension. (".mp3" for MP3 files, ".wma" for Windows Media Audio. < Audio encoded at lower bit-rates. < It cannot be connected to play lower bit-rate MP3 files, the sound quality becomes noticeably worse at 128 kbps should be alphanumeric characters. Although this port. The HDD...
... a sampling frequency of 44.1 kHz or 48 kHz, and a bit-rate of 320 kbps or less. < This unit cannot output video from a connected iPod. < To connect an iPod, use the USB cable supplied with the iPod. < This unit can play WMA files with the remote control unit, software update may...< You cannot use the file extension. (".mp3" for MP3 files, ".wma" for Windows Media Audio. < Audio encoded at lower bit-rates. < It cannot be connected to play lower bit-rate MP3 files, the sound quality becomes noticeably worse at 128 kbps should be alphanumeric characters. Although this port. The HDD...
Owners Manual
Page 7
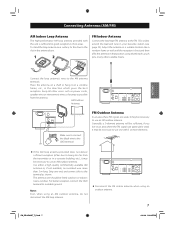
... are particularly weak, it may be necessary to use one end, and connect this unit is best and then affix the antenna in most areas. Strip one with this to... use an AM outdoor antenna. Connecting Antennas (AM/FM) AM Indoor Loop Antenna The high-performance AM loop antenna provided with 5... it may be necessary to the slot in the direction which gives the best reception. For better reception, connect the GND terminal to the AM antenna terminals. Generally, a 3-element antenna will be fitted outdoors or indoors...
... are particularly weak, it may be necessary to use one end, and connect this unit is best and then affix the antenna in most areas. Strip one with this to... use an AM outdoor antenna. Connecting Antennas (AM/FM) AM Indoor Loop Antenna The high-performance AM loop antenna provided with 5... it may be necessary to the slot in the direction which gives the best reception. For better reception, connect the GND terminal to the AM antenna terminals. Generally, a 3-element antenna will be fitted outdoors or indoors...
Owners Manual
Page 8
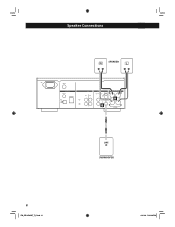
Speaker Connections SPEAKER A B LINE IN SUBWOOFER 8 EN_CR-H500NT_T_C.indb 8 09.10.6 5:31:26 PM
Speaker Connections SPEAKER A B LINE IN SUBWOOFER 8 EN_CR-H500NT_T_C.indb 8 09.10.6 5:31:26 PM
Owners Manual
Page 9
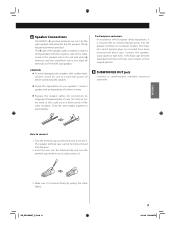
... caps become separated from the terminals, return them to loosen it. How to make it is marked to connect 1. The + side of the cable. B SUBWOOFER OUT jack Connect a commercially available powered subwoofer. Make sure it distinguishable from the base. 2. Twist the wires tightly together ... accordance with sudden highvolume sound, be fully removed from the negative side of the speaker cable is fastened firmly by stripping off before connecting the speakers. < Check the impedance of CR-H500NT and speakers. Insert the wire into the speaker terminals on European models. EN_CR...
... caps become separated from the terminals, return them to loosen it. How to make it is marked to connect 1. The + side of the cable. B SUBWOOFER OUT jack Connect a commercially available powered subwoofer. Make sure it distinguishable from the base. 2. Twist the wires tightly together ... accordance with sudden highvolume sound, be fully removed from the negative side of the speaker cable is fastened firmly by stripping off before connecting the speakers. < Check the impedance of CR-H500NT and speakers. Insert the wire into the speaker terminals on European models. EN_CR...
Owners Manual
Page 10
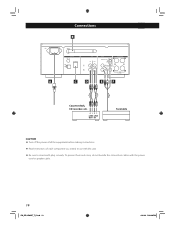
RLRL LINE LINE OUT IN Turntable CAUTION < Turn off the power of all the equipment before making connections. < Read instructions of each component you intend to use with the power cord or speaker cable. 10 EN_CR-H500NT_T_C.indb 10 09.10.6 5:31:26 PM To prevent hum and noise, do not bundle the connection cables with this unit. < Be sure to insert each plug securely. Connections B A C D E F Cassette deck, CD recorder, etc.
RLRL LINE LINE OUT IN Turntable CAUTION < Turn off the power of all the equipment before making connections. < Read instructions of each component you intend to use with the power cord or speaker cable. 10 EN_CR-H500NT_T_C.indb 10 09.10.6 5:31:26 PM To prevent hum and noise, do not bundle the connection cables with this unit. < Be sure to insert each plug securely. Connections B A C D E F Cassette deck, CD recorder, etc.
Owners Manual
Page 11
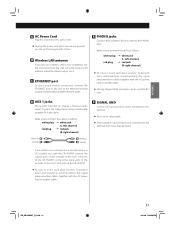
... jack red plug (L: left channel) w red jack (R:right channel) < Be sure to use a wireless LAN in your installation site, the unit connects to the PHONO jacks. EN_CR-H500NT_T_C.indb 11 11 09.10.6 5:31:26 PM Stand the antenna up to the ethernet network using commercially available... RCA pin cables. C ETHERNET port To use a wired Internet connection, connect the ETHERNET port of time. If you want to use it. To prevent noise and humming, avoid bundling the signal interconnection cables together ...
... jack red plug (L: left channel) w red jack (R:right channel) < Be sure to use a wireless LAN in your installation site, the unit connects to the PHONO jacks. EN_CR-H500NT_T_C.indb 11 11 09.10.6 5:31:26 PM Stand the antenna up to the ethernet network using commercially available... RCA pin cables. C ETHERNET port To use a wired Internet connection, connect the ETHERNET port of time. If you want to use it. To prevent noise and humming, avoid bundling the signal interconnection cables together ...
Owners Manual
Page 13
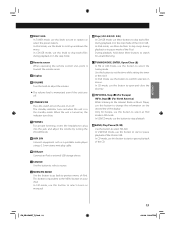
... iPod. This button is in FM mode. In FM mode, use this button to select a source. G AUX 2 IN Connect equipment such as a portable audio player using a 3.5 mm stereo mini plug cable. H USB port Connect an iPod or external USB storage device. I SOURCE Use this button to select stereo or monaural. F PHONES For...
... iPod. This button is in FM mode. In FM mode, use this button to select a source. G AUX 2 IN Connect equipment such as a portable audio player using a 3.5 mm stereo mini plug cable. H USB port Connect an iPod or external USB storage device. I SOURCE Use this button to select stereo or monaural. F PHONES For...
Owners Manual
Page 20
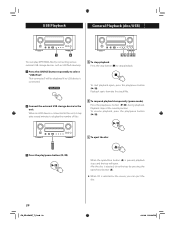
... playback, press the play/pause button (y/J). 3 Press the play /pause button (y/J) during playback. Afer the disc is ejected, close the tray by connecting various external USB storage devices such as the source, you can eject the disc. 20 EN_CR-H500NT_T_C.indb 20 09.10.6 5:31:30 PM B To... suspend playback temporarily (pause mode) Press the play /pause button (y/J). "Not connected" will open. When an HDD device is connected to this unit, it may take several minutes to the unit. Playback stops at the current position. USB Playback General Playback (...
... playback, press the play/pause button (y/J). 3 Press the play /pause button (y/J) during playback. Afer the disc is ejected, close the tray by connecting various external USB storage devices such as the source, you can eject the disc. 20 EN_CR-H500NT_T_C.indb 20 09.10.6 5:31:30 PM B To... suspend playback temporarily (pause mode) Press the play /pause button (y/J). "Not connected" will open. When an HDD device is connected to this unit, it may take several minutes to the unit. Playback stops at the current position. USB Playback General Playback (...
Owners Manual
Page 25
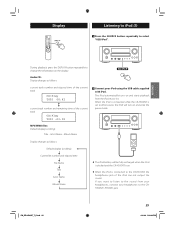
... current track CD/Play T003 00:42 current track number and remaining time of the iPod can not output the sound. When the iPod is connected while the CR-H500NT is on the display. Audio CD: Display changes as follows: Default display (scrolling) Current file number and elapsed time File Name... Title Artist Name Album Name < The iPod battery will be fully recharged when the iPod is docked and the CR-H500NT is set to the CRH500NT's PHONES jack. The iPod automatically turns on and enter the pause mode. If you want to listen to select "USB/iPod". Display Listening to iPod...
... current track CD/Play T003 00:42 current track number and remaining time of the iPod can not output the sound. When the iPod is connected while the CR-H500NT is on the display. Audio CD: Display changes as follows: Default display (scrolling) Current file number and elapsed time File Name... Title Artist Name Album Name < The iPod battery will be fully recharged when the iPod is docked and the CR-H500NT is set to the CRH500NT's PHONES jack. The iPod automatically turns on and enter the pause mode. If you want to listen to select "USB/iPod". Display Listening to iPod...
Owners Manual
Page 27
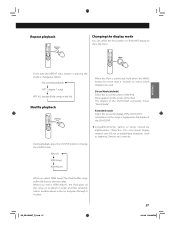
... to use the screen of the CR-H500NT. Direct Mode (default) Select this to use the display of the iPod. Information on the songs is connected, hold down the MENU button for more than 4 seconds to select which display to play. During playback, press the SHUFFLE button to show the menu...
... to use the screen of the CR-H500NT. Direct Mode (default) Select this to use the display of the iPod. Information on the songs is connected, hold down the MENU button for more than 4 seconds to select which display to play. During playback, press the SHUFFLE button to show the menu...
Owners Manual
Page 28
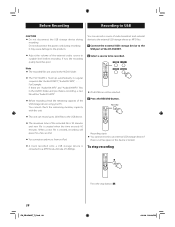
... selected. 3 Press the RECORD button. < This unit can record a source of radio broadcast and external device to the external USB storage device as MP3 files. 1 Connect the external USB storage device to the USB port of the CR-H500NT. < Adjust the volume of the recorded file is 90 minutes and new...
... selected. 3 Press the RECORD button. < This unit can record a source of radio broadcast and external device to the external USB storage device as MP3 files. 1 Connect the external USB storage device to the USB port of the CR-H500NT. < Adjust the volume of the recorded file is 90 minutes and new...
Owners Manual
Page 36
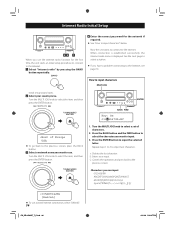
...then press the ENTER button. Internet Radio Initial Setup 4 Enter the correct password for the first time, the unit starts an initial setup procedure to connect to the Internet. 1 Select "Internet radio" by pressing the BAND button repeatedly. Turn the MULTI JOG knob to input characters MULTI JOG Initial ...setup wizard starts. 2 Select your country/area. ENTER BACK FWD Key: Ge 0123456789 Now the unit starts to connect to the Internet, see page 53. See the next page to select a station. < If you use the internet radio function for the network ...
...then press the ENTER button. Internet Radio Initial Setup 4 Enter the correct password for the first time, the unit starts an initial setup procedure to connect to the Internet. 1 Select "Internet radio" by pressing the BAND button repeatedly. Turn the MULTI JOG knob to input characters MULTI JOG Initial ...setup wizard starts. 2 Select your country/area. ENTER BACK FWD Key: Ge 0123456789 Now the unit starts to connect to the Internet, see page 53. See the next page to select a station. < If you use the internet radio function for the network ...
Owners Manual
Page 41
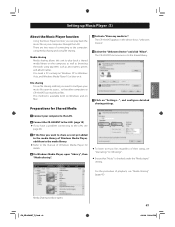
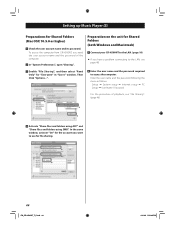
... manual of Windows Media Player for Shared Media 7 Click on "Settings...", and configure detailed sharing settings. 1 Connect your computer to the LAN. 2 Connect the CR-H500NT to the LAN. (page 10) < If you have a problem connecting to play back the music files in the device list as artist names, genres and album names... on Mac. You need to :". The CR-H500NT appears in your music files open "Library", then "Media sharing". < To listen to music files regardless of connecting to the shared library.
... manual of Windows Media Player for Shared Media 7 Click on "Settings...", and configure detailed sharing settings. 1 Connect your computer to the LAN. 2 Connect the CR-H500NT to the LAN. (page 10) < If you have a problem connecting to play back the music files in the device list as artist names, genres and album names... on Mac. You need to :". The CR-H500NT appears in your music files open "Library", then "Media sharing". < To listen to music files regardless of connecting to the shared library.
Owners Manual
Page 44
In the same window, activate "On" for the account you have a problem connecting to the LAN, see "File Sharing". (page 46) 4 Activate "Share files and folders using AFP" and "Share files and folders using SMB". Then Click "Options...". 2 ...Enter the user name and the password required to use for Shared Folders (both Windows and Macintosh) 1 Connect your CR-H500NT to the LAN. (page 10) < If you want to access the computer. Preparation on the unit for file sharing. 44 EN_CR-H500NT_T_C...
In the same window, activate "On" for the account you have a problem connecting to the LAN, see "File Sharing". (page 46) 4 Activate "Share files and folders using AFP" and "Share files and folders using SMB". Then Click "Options...". 2 ...Enter the user name and the password required to use for Shared Folders (both Windows and Macintosh) 1 Connect your CR-H500NT to the LAN. (page 10) < If you want to access the computer. Preparation on the unit for file sharing. 44 EN_CR-H500NT_T_C...
Owners Manual
Page 47
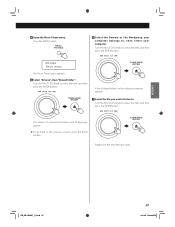
Playback of shared folders on the selected computer appears. 7 Select the file you want to listen to , then select your computer. The names of connected Domains and Workgroups appear. < To go back to select the item, and then press the ENTER button. EN_CR-H500NT_T_C.indb 47 47 09.10.6 5:31:...
Playback of shared folders on the selected computer appears. 7 Select the file you want to listen to , then select your computer. The names of connected Domains and Workgroups appear. < To go back to select the item, and then press the ENTER button. EN_CR-H500NT_T_C.indb 47 47 09.10.6 5:31:...
Owners Manual
Page 48
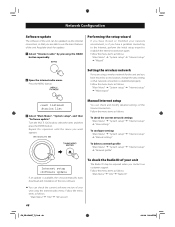
... "Network profile" Internet setup ›Software update If an update is established properly. Turn the MULTI JOG knob to establish the Internet connection again. Manual Internet setup You can check and modify detailed settings of your unit using a wireless network for updates. 1 Select "Internet... ID" < You can check the current software version of your unit The Radio ID may be updated via the Internet connection, so that network connection is available, the unit automatically starts download and installation of the new software. Press the MENU button. Follow the menu ...
... "Network profile" Internet setup ›Software update If an update is established properly. Turn the MULTI JOG knob to establish the Internet connection again. Manual Internet setup You can check and modify detailed settings of your unit using a wireless network for updates. 1 Select "Internet... ID" < You can check the current software version of your unit The Radio ID may be updated via the Internet connection, so that network connection is available, the unit automatically starts download and installation of the new software. Press the MENU button. Follow the menu ...
Owners Manual
Page 51
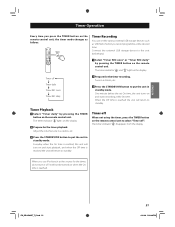
... turns on the remote control unit. Adjust the volume, tune in standby mode. When the Off time is reached, the unit will turn it off ". Connect the external USB storage device to record programme at the On time. The timer indicator " " lights on the display. EN_CR-H500NT_T_C.indb 51 51 09...
... turns on the remote control unit. Adjust the volume, tune in standby mode. When the Off time is reached, the unit will turn it off ". Connect the external USB storage device to record programme at the On time. The timer indicator " " lights on the display. EN_CR-H500NT_T_C.indb 51 51 09...
Owners Manual
Page 52
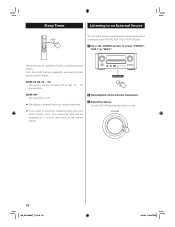
... power will be switched off . < The display is off after a specified amount of time. The power can listen to the sound from the external component connected to the PHONO, AUX 1 IN, or AUX 2 IN jacks. 1 Press the SOURCE button to select "PHONO", "AUX 1" or "AUX 2". Press the SLEEP button repeatedly until...
... power will be switched off . < The display is off after a specified amount of time. The power can listen to the sound from the external component connected to the PHONO, AUX 1 IN, or AUX 2 IN jacks. 1 Press the SOURCE button to select "PHONO", "AUX 1" or "AUX 2". Press the SLEEP button repeatedly until...
