Owners Manual
Page 2
... the power-supply cord or plug is a safety feature. Article 810 of the product and to cords at plugs, convenience receptacles, and the point where they are required, be fatal. 17) Overloading - PART H) 15) Lightning - An outside antenna or cable system is grounded so as to provide some protection against them might be sure the service technician has used replacement parts specified by the operating instructions as...
... the power-supply cord or plug is a safety feature. Article 810 of the product and to cords at plugs, convenience receptacles, and the point where they are required, be fatal. 17) Overloading - PART H) 15) Lightning - An outside antenna or cable system is grounded so as to provide some protection against them might be sure the service technician has used replacement parts specified by the operating instructions as...
Owners Manual
Page 3
... NOT REMOVE THE EXTERNAL CASES OR CABINETS TO EXPOSE THE ELECTRONICS. For CANADA AC POWER CORD CONNECTION CAUTION: TO PREVENT ELECTRIC SHOCK, MATCH WIDE BLADE OF PLUG TO WIDE SLOT, FULLY INSERT. Rear panel of the FCC Rules. This equipment generates, uses, and can radiate radio frequency energy and, if not installed and used in accordance with a protective grounding connection. < Batteries (battery pack or batteries installed...
... NOT REMOVE THE EXTERNAL CASES OR CABINETS TO EXPOSE THE ELECTRONICS. For CANADA AC POWER CORD CONNECTION CAUTION: TO PREVENT ELECTRIC SHOCK, MATCH WIDE BLADE OF PLUG TO WIDE SLOT, FULLY INSERT. Rear panel of the FCC Rules. This equipment generates, uses, and can radiate radio frequency energy and, if not installed and used in accordance with a protective grounding connection. < Batteries (battery pack or batteries installed...
Owners Manual
Page 4
... not pull on the plug. Doing so may result in malfunction or other electronic components. < Do not open the cabinet as this might result in damage to a source of installation or packing the unit for choosing TEAC. Read this manual carefully to the Radio 21 Preset Tuning 22 Setting the Clock 23 Setting the Timer 24 Troubleshooting 26 Specifications 27 Read this before operation < As the unit...
... not pull on the plug. Doing so may result in malfunction or other electronic components. < Do not open the cabinet as this might result in damage to a source of installation or packing the unit for choosing TEAC. Read this manual carefully to the Radio 21 Preset Tuning 22 Setting the Clock 23 Setting the Timer 24 Troubleshooting 26 Specifications 27 Read this before operation < As the unit...
Owners Manual
Page 5
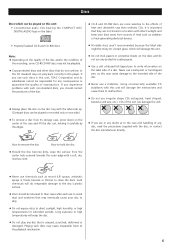
... disc, or contact the disc manufacturer directly. Such chemicals will do irreparable damage to the disc's plastic surface. < Discs should contact the producers of the disc. < Always place the disc on the disc tray with the label side up. (Compact discs can be played or recorded only on one side.) < To remove a disc from its subsidiaries cannot be returned to their cases after each use...
... disc, or contact the disc manufacturer directly. Such chemicals will do irreparable damage to the disc's plastic surface. < Discs should contact the producers of the disc. < Always place the disc on the disc tray with the label side up. (Compact discs can be played or recorded only on one side.) < To remove a disc from its subsidiaries cannot be returned to their cases after each use...

Owners Manual
Page 6
Side panel of each plug securely. FM antenna AM antenna Speaker (R) Speaker (L) Subwoofer CB E A G CAUTION: Make sure to insert each component you intend to use with this unit. < Be sure to fasten the Dock's cable with the power cord. Connections CAUTION < Turn off the power of all the equipment before making connections. < Read instructions of the main unit D F Dock 6 To prevent hum and noise, do not bundle the connection cords with this clip.
Side panel of each plug securely. FM antenna AM antenna Speaker (R) Speaker (L) Subwoofer CB E A G CAUTION: Make sure to insert each component you intend to use with this unit. < Be sure to fasten the Dock's cable with the power cord. Connections CAUTION < Turn off the power of all the equipment before making connections. < Read instructions of the main unit D F Dock 6 To prevent hum and noise, do not bundle the connection cords with this clip.

Owners Manual
Page 7
... your CD-X10i. Outdoor FM Antenna (75Ω) G POWER switch of the player using the included speakers, make sure the speakers you move your settings, it will be repositioned if you use a 75-ohm unbalanced-type outdoor FM antenna using an optional (not supplied) matching transformer connected to an external antenna. Generally, a 3-element antenna will be erased. Connect the LINE OUT or PHONES jack (audio output jack) of the Subwoofer Use this jack. A iPod Dock Connect the Dock to the "TO DOCK" port...
... your CD-X10i. Outdoor FM Antenna (75Ω) G POWER switch of the player using the included speakers, make sure the speakers you move your settings, it will be repositioned if you use a 75-ohm unbalanced-type outdoor FM antenna using an optional (not supplied) matching transformer connected to an external antenna. Generally, a 3-element antenna will be erased. Connect the LINE OUT or PHONES jack (audio output jack) of the Subwoofer Use this jack. A iPod Dock Connect the Dock to the "TO DOCK" port...
Owners Manual
Page 9
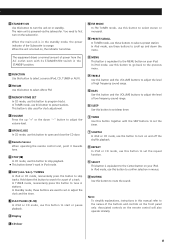
... MODE In FM TUNER mode, use these buttons are used for a part of low frequency sound range. C FM/AM Use this button to select stereo or monaural. Q BASS Use this button and the VOLUME buttons to preset stations. When the unit is turned on the remote control will also operate similarly. In iPod mode, use this button to select AM or FM. In TUNER mode, use this button to stop playback. < This button doesn't work in the STANDBY position. F OPEN/CLOSE In CD mode, use this button to adjust...
... MODE In FM TUNER mode, use these buttons are used for a part of low frequency sound range. C FM/AM Use this button to select stereo or monaural. Q BASS Use this button and the VOLUME buttons to preset stations. When the unit is turned on the remote control will also operate similarly. In iPod mode, use this button to select AM or FM. In TUNER mode, use this button to stop playback. < This button doesn't work in the STANDBY position. F OPEN/CLOSE In CD mode, use this button to adjust...
Owners Manual
Page 10
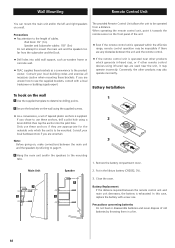
... the main unit and/or the left and right speakers on the wall 1 1 Use the supplied template to be operated from the subwoofer and the Dock. < Drill holes into the pilot hole. Note: 3 Before going on, make connections between the remote control unit and main unit decreases, the battery is supplied. iPod Dock: 39" (1m) Speaker and Subwoofer cables: 118" (3m) Do not attempt to mount the...
... the main unit and/or the left and right speakers on the wall 1 1 Use the supplied template to be operated from the subwoofer and the Dock. < Drill holes into the pilot hole. Note: 3 Before going on, make connections between the remote control unit and main unit decreases, the battery is supplied. iPod Dock: 39" (1m) Speaker and Subwoofer cables: 118" (3m) Do not attempt to mount the...
Owners Manual
Page 11
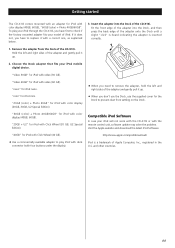
....apple.com/ipod/download/ iPod is a trademark of the adapter and gently pull it with the remote control unit, software update may solve the problem. Compatible iPod Software In case your iPod will not work with the CD-X10i or with a correct one, as explained below. 1. To play iPod with dock connector (with video (30 GB). Choose the Dock adapter that fits your model of the CD-X10i. Insert the adapter into the Dock, and then...
....apple.com/ipod/download/ iPod is a trademark of the adapter and gently pull it with the remote control unit, software update may solve the problem. Compatible iPod Software In case your iPod will not work with the CD-X10i or with a correct one, as explained below. 1. To play iPod with dock connector (with video (30 GB). Choose the Dock adapter that fits your model of the CD-X10i. Insert the adapter into the Dock, and then...
Owners Manual
Page 12
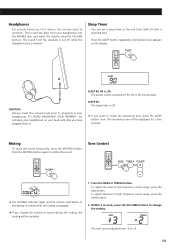
... button. 1 23 4 1 Turn on the subwoofer. 2 Press the STANDBY/ON switch on . < To listen to an external source connected to the AUX IN jack, select AUX. < In iPod and AUX modes, the display always shows the clock and the volume level. < If you press and hold the TIME SET button for 3 seconds in CD or TUNER mode, the clock will be displayed for a few seconds. 4 Play the source and adjust the volume using the VOLUME buttons. 12 The ring surrounding the STANDBY/ON button lights...
... button. 1 23 4 1 Turn on the subwoofer. 2 Press the STANDBY/ON switch on . < To listen to an external source connected to the AUX IN jack, select AUX. < In iPod and AUX modes, the display always shows the clock and the volume level. < If you press and hold the TIME SET button for 3 seconds in CD or TUNER mode, the clock will be displayed for a few seconds. 4 Play the source and adjust the volume using the VOLUME buttons. 12 The ring surrounding the STANDBY/ON button lights...
Owners Manual
Page 13
... . < If you change the setting. SLEEP 90, 60 or 30: The power will be canceled. 1. The sound from your headphones into the PHONES jack, and adjust the volume using the VOLUME buttons. Sleep Timer You can be adjusted from -5 to change the volume or source during the muting, the muting will be displayed for a few seconds. Do not place your headphones on the display to plugging in . Muting To...
... . < If you change the setting. SLEEP 90, 60 or 30: The power will be canceled. 1. The sound from your headphones into the PHONES jack, and adjust the volume using the VOLUME buttons. Sleep Timer You can be adjusted from -5 to change the volume or source during the muting, the muting will be displayed for a few seconds. Do not place your headphones on the display to plugging in . Muting To...
Owners Manual
Page 14
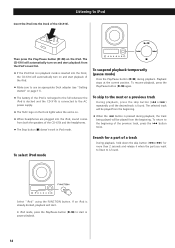
... button (H) doesn't work in playback mode is inserted into the Dock, the CD-X10i will be played from the beginning. < When the . Then press the Play/Pause button (y/J) on and start playback of the iPod. < Make sure to use an appropriate Dock adapter (see "Getting started" on page 11). < The battery of the iPod is recharged to the full whenever the iPod is docked and the CD-X10i is connected to the AC power supply...
... button (H) doesn't work in playback mode is inserted into the Dock, the CD-X10i will be played from the beginning. < When the . Then press the Play/Pause button (y/J) on and start playback of the iPod. < Make sure to use an appropriate Dock adapter (see "Getting started" on page 11). < The battery of the iPod is recharged to the full whenever the iPod is docked and the CD-X10i is connected to the AC power supply...
Owners Manual
Page 18
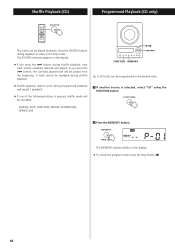
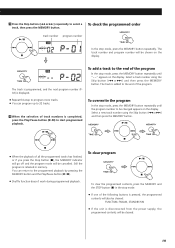
... appears on the display. < To cancel the program mode, press the Stop button (H). 18 The MEMORY indicator blinks on the display. < If you press the . button, the currently played track will be cancelled: SHUFFLE, STOP, FUNCTION, FM/AM, STANDBY/ON, OPEN/CLOSE FUNCTION MEMORY Up to 32 tracks can be programmed in the stop mode. If you press the / button during shuffle playback...
... appears on the display. < To cancel the program mode, press the Stop button (H). 18 The MEMORY indicator blinks on the display. < If you press the . button, the currently played track will be cancelled: SHUFFLE, STOP, FUNCTION, FM/AM, STANDBY/ON, OPEN/CLOSE FUNCTION MEMORY Up to 32 tracks can be programmed in the stop mode. If you press the / button during shuffle playback...
Owners Manual
Page 19
... number and program number will be cleared. 19 The track is completed, press the Play/Pause button (G/J) to the programmed playback by pressing the MEMORY button and the Play/Pause button (G/J). < Shuffle function doesn't work during programmed playback. Still the program is disconnected from the power supply, the programmed contents will be cancelled. To overwrite the program In the stop mode, press the MEMORY button repeatedly until the program number...
... number and program number will be cleared. 19 The track is completed, press the Play/Pause button (G/J) to the programmed playback by pressing the MEMORY button and the Play/Pause button (G/J). < Shuffle function doesn't work during programmed playback. Still the program is disconnected from the power supply, the programmed contents will be cancelled. To overwrite the program In the stop mode, press the MEMORY button repeatedly until the program number...
Owners Manual
Page 20
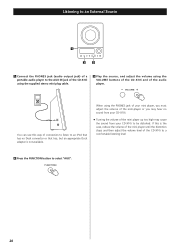
... then adjust the volume level of the CD-X10i to a comfortable listening level 2 Press the FUNCTION button to select "AUX". 20 If this way of connection to listen to an iPod that has no sound from your CD-X10i to the AUX IN jack of the CD-X10i using the supplied stereo mini plug cable. 3 Play the source, and adjust the volume using the VOLUME buttons of the CD-X10i and of the audio player. Listening to an External Source 1 2 3 1 Connect the PHONES jack (audio output jack) of a portable audio player...
... then adjust the volume level of the CD-X10i to a comfortable listening level 2 Press the FUNCTION button to select "AUX". 20 If this way of connection to listen to an iPod that has no sound from your CD-X10i to the AUX IN jack of the CD-X10i using the supplied stereo mini plug cable. 3 Play the source, and adjust the volume using the VOLUME buttons of the CD-X10i and of the audio player. Listening to an External Source 1 2 3 1 Connect the PHONES jack (audio output jack) of a portable audio player...
Owners Manual
Page 23
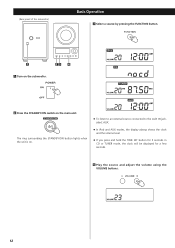
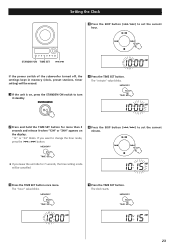
..." value blinks. 1 If the unit is on, press the STANDBY/ON switch to set the current hour. STANDBY/ON TIME SET If the power switch of the subwoofer turned off, the settings kept in memory (clock, preset stations, timer setting) will be erased. 5 Press the TIME SET button. If you want to change the hour mode, press the .or/ button. 6 Press the SKIP button (.//) to turn it standby 2 Press and hold the TIME SET button for 7 seconds, the time setting mode will...
..." value blinks. 1 If the unit is on, press the STANDBY/ON switch to set the current hour. STANDBY/ON TIME SET If the power switch of the subwoofer turned off, the settings kept in memory (clock, preset stations, timer setting) will be erased. 5 Press the TIME SET button. If you want to change the hour mode, press the .or/ button. 6 Press the SKIP button (.//) to turn it standby 2 Press and hold the TIME SET button for 7 seconds, the time setting mode will...
Owners Manual
Page 24
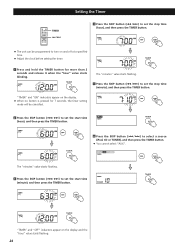
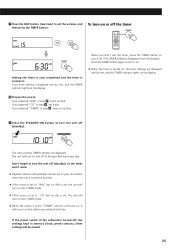
... TIMER button. "TIMER" and "OFF" indiactors appear on the display. < When no button is pressed for 7 seconds, the timer setting mode will be programmed to turn on and off at a specified time. < Adjust the clock before setting the timer. 1 Press and hold the TIMER button for more than 2 seconds and release it when the "hour" value starts blinking. TIMER / Setting the Timer 4 Press the SKIP button (.//) to set the start time (minute), and then press the TIMER button...
... TIMER button. "TIMER" and "OFF" indiactors appear on the display. < When no button is pressed for 7 seconds, the timer setting mode will be programmed to turn on and off at a specified time. < Adjust the clock before setting the timer. 1 Press and hold the TIMER button for more than 2 seconds and release it when the "hour" value starts blinking. TIMER / Setting the Timer 4 Press the SKIP button (.//) to set the start time (minute), and then press the TIMER button...
Owners Manual
Page 25
... disc is turned on the display. When you selected "TUNER" in step 6 , tune in step 6 , insert an iPod. The clock and the TIMER indicator are displayed one by one , and the TIMER indicator lights on , the timer settings are displayed. 7 Press the SKIP button (.//) to set the volume, and To turn the unit off (standby). If you selected "iPod" in a station. 9 Press the STANDBY/ON button to turn on into TUNER mode. < If the source is set to "CD...
... disc is turned on the display. When you selected "TUNER" in step 6 , tune in step 6 , insert an iPod. The clock and the TIMER indicator are displayed one by one , and the TIMER indicator lights on , the timer settings are displayed. 7 Press the SKIP button (.//) to set the volume, and To turn the unit off (standby). If you selected "iPod" in a station. 9 Press the STANDBY/ON button to turn on into TUNER mode. < If the source is set to "CD...
Owners Manual
Page 26
... or use scratched, damaged or warped discs. Maintenance If the surface of the subwoofer turned off . Allow the surface of the CD-X10i and the iPod, and insert the iPod again. Check and make sure the AC source is not a switched outlet and that, if it off , the settings kept in memory (clock, preset stations, timer setting) will stabilize at the front panel. e Adjust the volume. Will not play . CD Player Will not play...
... or use scratched, damaged or warped discs. Maintenance If the surface of the subwoofer turned off . Allow the surface of the CD-X10i and the iPod, and insert the iPod again. Check and make sure the AC source is not a switched outlet and that, if it off , the settings kept in memory (clock, preset stations, timer setting) will stabilize at the front panel. e Adjust the volume. Will not play . CD Player Will not play...
Owners Manual
Page 27
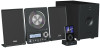
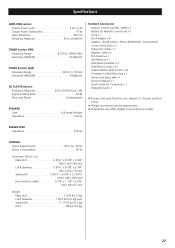
... Remote Control Unit (RC-1090) x 1 Battery for Remote Control Unit x 1 Dock x 1 Dock adapter x 8 (adapter "60GB (color) + Photo 40GB/60GB" premounted) Cover for the Dock x 1 Subwoofer Cable x 1 Speaker Cable x 2 FM Antenna x 1 AM Antenna x 1 Wall Mount Adapter x 3 Wall Mount Screw x 10 Tapered Plastic Wall Anchor x 10 Template for Wall Mounting x 1 Stereo mini plug cable x 1 Owner's Manual x 1 Quick Guide for Connection x 1 Warranty Card x 1 < Design and specifications are approximate. < Illustrations may differ slightly from production models. SUBWOOFER Impedance 8 ohms GENERAL Power...
... Remote Control Unit (RC-1090) x 1 Battery for Remote Control Unit x 1 Dock x 1 Dock adapter x 8 (adapter "60GB (color) + Photo 40GB/60GB" premounted) Cover for the Dock x 1 Subwoofer Cable x 1 Speaker Cable x 2 FM Antenna x 1 AM Antenna x 1 Wall Mount Adapter x 3 Wall Mount Screw x 10 Tapered Plastic Wall Anchor x 10 Template for Wall Mounting x 1 Stereo mini plug cable x 1 Owner's Manual x 1 Quick Guide for Connection x 1 Warranty Card x 1 < Design and specifications are approximate. < Illustrations may differ slightly from production models. SUBWOOFER Impedance 8 ohms GENERAL Power...

