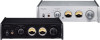
Firmware Update Manual
Page 1
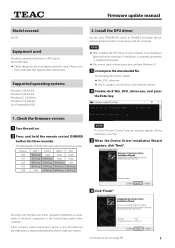
.../or other countries. The blinking INPUT SELECTOR knob indicators show the version. Continued on . 2 Press and hold the remote control DIMMER button (for charging cannot be necessary. Install the DFU driver Set the unit's STANDBY/ON switch to "3. The following operations before connecting it again will be created. Microsoft and Windows are from Windows 10. 1 Uncompress the downloaded file. Supported operating systems Windows 7 (32/64...
.../or other countries. The blinking INPUT SELECTOR knob indicators show the version. Continued on . 2 Press and hold the remote control DIMMER button (for charging cannot be necessary. Install the DFU driver Set the unit's STANDBY/ON switch to "3. The following operations before connecting it again will be created. Microsoft and Windows are from Windows 10. 1 Uncompress the downloaded file. Supported operating systems Windows 7 (32/64...
Firmware Update Manual
Page 2
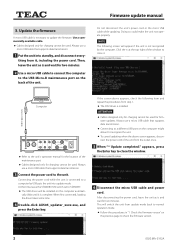
... operation mode. oo Cables designed only for charging cannot be used . Then, leave the unit as is connected to close the window. 6 Disconnect the micro USB cable and power cord. oo The USB driver will be used for two minutes. 2 Use a micro USB cable to connect the computer to STANDBY. Wait until it . oo To cancel updating when the above appears, check the following screen will switch...
... operation mode. oo Cables designed only for charging cannot be used . Then, leave the unit as is connected to close the window. 6 Disconnect the micro USB cable and power cord. oo The USB driver will be used for two minutes. 2 Use a micro USB cable to connect the computer to STANDBY. Wait until it . oo To cancel updating when the above appears, check the following screen will switch...

Owners Manual Deutsch Italiano Nederlands Svenska
Page 58
...una prestazione in cui esso è stato acquistato. In countries/regions other than the USA, Canada and Europe This warranty gives you specific legal rights, and you bought the product. 58 Dit product valt onder de wettelijke garantievoorschriften van het land waar het is subject ... waar u het product heeft gekocht. Questo apparecchio è conforme alle norme sulla garanzia vigenti nel rispettivo Paese in garanzia. Vid fel eller problem kontakta vänligen återförsäljaren, där du köpte produkten. If you have other rights that vary by...
...una prestazione in cui esso è stato acquistato. In countries/regions other than the USA, Canada and Europe This warranty gives you specific legal rights, and you bought the product. 58 Dit product valt onder de wettelijke garantievoorschriften van het land waar het is subject ... waar u het product heeft gekocht. Questo apparecchio è conforme alle norme sulla garanzia vigenti nel rispettivo Paese in garanzia. Vid fel eller problem kontakta vänligen återförsäljaren, där du köpte produkten. If you have other rights that vary by...

Owners Manual Deutsch Italiano Nederlands Svenska
Page 60
Model name: AX-505 Serial number: 1018 . Phone: +1-323-726-0303 Gutenbergstr. 3, 82178 Puchheim, Germany Phone: +49-8142-4208-141 This product has a serial number located on the rear panel. Phone: +1-201-785-2600 10410 Pioneer Blvd., Unit #1 and #4, Santa Fe Springs, CA 90640, U.S.A. Corporation Canada: TEAC AMERICA, INC. Europe: TEAC AUDIO EUROPE 1-47 Ochiai, Tama-shi, Tokyo 206-8530, Japan...
Model name: AX-505 Serial number: 1018 . Phone: +1-323-726-0303 Gutenbergstr. 3, 82178 Puchheim, Germany Phone: +49-8142-4208-141 This product has a serial number located on the rear panel. Phone: +1-201-785-2600 10410 Pioneer Blvd., Unit #1 and #4, Santa Fe Springs, CA 90640, U.S.A. Corporation Canada: TEAC AMERICA, INC. Europe: TEAC AUDIO EUROPE 1-47 Ochiai, Tama-shi, Tokyo 206-8530, Japan...
Owners Manual English Francais Espanol
Page 2
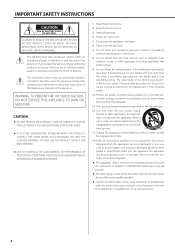
... electrician for replacement of electric shock to the presence of the polarized or groundingtype plug. oo The mains plug is intended to alert the user to persons. IMPORTANT SAFETY INSTRUCTIONS CAUTION: TO REDUCE THE RISK OF ELECTRIC SHOCK, DO NOT REMOVE COVER (OR BACK). REFER SERVICING TO QUALIFIED SERVICE PERSONNEL. < The lightning flash with its POWER or STANDBY/ON switch not...
... electrician for replacement of electric shock to the presence of the polarized or groundingtype plug. oo The mains plug is intended to alert the user to persons. IMPORTANT SAFETY INSTRUCTIONS CAUTION: TO REDUCE THE RISK OF ELECTRIC SHOCK, DO NOT REMOVE COVER (OR BACK). REFER SERVICING TO QUALIFIED SERVICE PERSONNEL. < The lightning flash with its POWER or STANDBY/ON switch not...

Owners Manual English Francais Espanol
Page 3
... for a long time (more than those specified. The nameplate is replaced with liquids, such as vases, on the bottom of battery. oo Do not carry or store batteries with a power supply cord that has a protective grounding connection. oo Never recharge a battery unless it is not used for products that you can easily reach the power cord plug at any objects...
... for a long time (more than those specified. The nameplate is replaced with liquids, such as vases, on the bottom of battery. oo Do not carry or store batteries with a power supply cord that has a protective grounding connection. oo Never recharge a battery unless it is not used for products that you can easily reach the power cord plug at any objects...
Owners Manual English Francais Espanol
Page 4
... generates, uses, and can radiate radio frequency energy and, if not installed and used in accordance with the limits for a Class B digital device, pursuant to Part 15 of the FCC Rules. CAUTION Changes or modifications...service or the shop where you will help . For more than the specified values of hazardous substances in a residential installation. IMPORTANT SAFETY INSTRUCTIONS (continued) Model for USA Declaration of FCC Rules. Operation is no guarantee that may cause harmful interference to operate the equipment. e) Return and collection systems are designed to end users...
... generates, uses, and can radiate radio frequency energy and, if not installed and used in accordance with the limits for a Class B digital device, pursuant to Part 15 of the FCC Rules. CAUTION Changes or modifications...service or the shop where you will help . For more than the specified values of hazardous substances in a residential installation. IMPORTANT SAFETY INSTRUCTIONS (continued) Model for USA Declaration of FCC Rules. Operation is no guarantee that may cause harmful interference to operate the equipment. e) Return and collection systems are designed to end users...
Owners Manual English Francais Espanol
Page 5
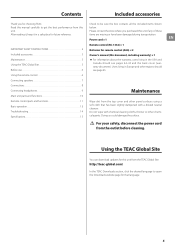
.... Please contact the store where you for this below. EN Power cord × 1 IMPORTANT SAFETY INSTRUCTIONS 2 Included accessories 5 Maintenance 5 Using the TEAC Global Site 5 Before use 6 Remote control (RC-1332) × 1 Batteries for future reference. Using the remote control 6 Connecting speakers 7 Connections 8 Connecting headphones 9 Main unit parts and functions 10 Maintenance Remote control parts and functions 11 Basic operation 12 Troubleshooting 14 Specifications 15 Wipe dirt from this unit from the outlet before cleaning...
.... Please contact the store where you for this below. EN Power cord × 1 IMPORTANT SAFETY INSTRUCTIONS 2 Included accessories 5 Maintenance 5 Using the TEAC Global Site 5 Before use 6 Remote control (RC-1332) × 1 Batteries for future reference. Using the remote control 6 Connecting speakers 7 Connections 8 Connecting headphones 9 Main unit parts and functions 10 Maintenance Remote control parts and functions 11 Basic operation 12 Troubleshooting 14 Specifications 15 Wipe dirt from this unit from the outlet before cleaning...
Owners Manual English Francais Espanol
Page 6
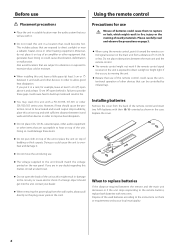
... voltage printed on the plug; Installing batteries Remove the cover from the wall outlet, always pull directly on the rear panel. Replace the cover. Dispose of other devices that you are exposed to the instructions on the unit is exposed to the remote buttons, replace both batteries with their ¥/^ oriented as this might not work if the remote control signal receiver on them to...
... voltage printed on the plug; Installing batteries Remove the cover from the wall outlet, always pull directly on the rear panel. Replace the cover. Dispose of other devices that you are exposed to the instructions on the unit is exposed to the remote buttons, replace both batteries with their ¥/^ oriented as this might not work if the remote control signal receiver on them to...
Owners Manual English Francais Espanol
Page 7
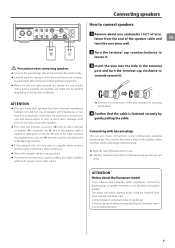
... protection circuit to activate and sound output to stop. ATTENTION oo This unit works with European safety regulations, connecting banana plugs to speaker terminals is fastened securely by gently pulling the cable. ATTENTION Notice about one centimeter (1/2") of the speaker cable and EN twist the core wires well. VVPrecautions when connecting speakers oo Connect the power plugs after all connections have been made. Connect the marked wire to the red...
... protection circuit to activate and sound output to stop. ATTENTION oo This unit works with European safety regulations, connecting banana plugs to speaker terminals is fastened securely by gently pulling the cable. ATTENTION Notice about one centimeter (1/2") of the speaker cable and EN twist the core wires well. VVPrecautions when connecting speakers oo Connect the power plugs after all connections have been made. Connect the marked wire to the red...

Owners Manual English Francais Espanol
Page 8
... a cassette deck, CD player or other device. Use commercially-available audio cables for connections. oo This unit's XLR connectors are 2: HOT. LINE1: RCA cables LINE2: RCA cables LINE3: RCA cables XLR: XLR cables 8 Connect the audio output connectors of the other audio output equipment to input stereo analog audio. R L Audio output (LINE OUT, etc.) Cassette deck, CD player, etc. c Wall outlet A Analog audio input connectors (LINE 1, LINE 2, LINE 3, XLR) Use these to these. Connections A C B Included power cord RCA cables XLR cables R L Audio output (LINE...
... a cassette deck, CD player or other device. Use commercially-available audio cables for connections. oo This unit's XLR connectors are 2: HOT. LINE1: RCA cables LINE2: RCA cables LINE3: RCA cables XLR: XLR cables 8 Connect the audio output connectors of the other audio output equipment to input stereo analog audio. R L Audio output (LINE OUT, etc.) Cassette deck, CD player, etc. c Wall outlet A Analog audio input connectors (LINE 1, LINE 2, LINE 3, XLR) Use these to these. Connections A C B Included power cord RCA cables XLR cables R L Audio output (LINE...
Owners Manual English Francais Espanol
Page 9
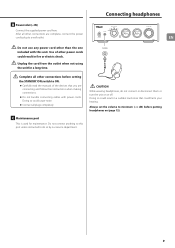
... them or turn the unit on (page 12). 9 After all plugs completely. oo Carefully read the manuals of other than the one included with power cords. oo Connect all other connections before putting headphones on or off. oo Do not bundle connecting cables with this port unless instructed to this unit. C Maintenance port This is used for a long time. Always set the volume to...
... them or turn the unit on (page 12). 9 After all plugs completely. oo Carefully read the manuals of other than the one included with power cords. oo Connect all other connections before putting headphones on or off. oo Do not bundle connecting cables with this port unless instructed to this unit. C Maintenance port This is used for a long time. Always set the volume to...

Owners Manual English Francais Espanol
Page 10
...). Wiring illustration C INPUT SELECTOR knob Use to adjust the volume. F VOLUME knob Use to select the input source. Failure to put the unit into standby mode or turn it at the remote control signal receiver. Main unit parts and functions A B C DE F A STANDBY/ON switch Use to do so could result in sudden loud noises that could damage speakers and harm your hearing. 10 oo This headphone amp circuit uses a four-pole connector with a 3.5mm (1/8") stereo mini plug here...
...). Wiring illustration C INPUT SELECTOR knob Use to adjust the volume. F VOLUME knob Use to select the input source. Failure to put the unit into standby mode or turn it at the remote control signal receiver. Main unit parts and functions A B C DE F A STANDBY/ON switch Use to do so could result in sudden loud noises that could damage speakers and harm your hearing. 10 oo This headphone amp circuit uses a four-pole connector with a 3.5mm (1/8") stereo mini plug here...
Owners Manual English Francais Espanol
Page 11
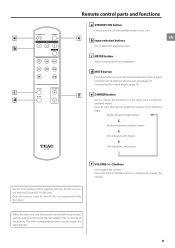
...-1332 remote control supplied with the same functions, this manual explains how to use one of the input source indicators and level meters. b c METER button Press to change the brightness of the buttons. When the main unit and the remote control both AX-505 and PD-501HR units. Remote control parts and functions a STANDBY/ON button Press to put the unit into standby mode or turn it again to restore sound output at the previous level (page...
...-1332 remote control supplied with the same functions, this manual explains how to use one of the input source indicators and level meters. b c METER button Press to change the brightness of the buttons. When the main unit and the remote control both AX-505 and PD-501HR units. Remote control parts and functions a STANDBY/ON button Press to put the unit into standby mode or turn it again to restore sound output at the previous level (page...
Owners Manual English Francais Espanol
Page 12
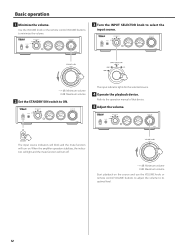
... input indicator lights for the selected source. 4 Operate the playback device. Use the VOLUME knob or the remote control VOLUME buttons to minimize the volume. 3 Turn the INPUT SELECTOR knob to select the input source. −∞ dB: Minimum volume 0 dB: Maximum volume 2 Set the STANDBY/ON switch to the operation manual of that device. 5 Adjust the volume. Basic operation 1 Minimize the volume. The input source indicators will blink and the mute function will turn on the source and use the VOLUME knob or remote control VOLUME buttons to adjust the volume...
... input indicator lights for the selected source. 4 Operate the playback device. Use the VOLUME knob or the remote control VOLUME buttons to minimize the volume. 3 Turn the INPUT SELECTOR knob to select the input source. −∞ dB: Minimum volume 0 dB: Maximum volume 2 Set the STANDBY/ON switch to the operation manual of that device. 5 Adjust the volume. Basic operation 1 Minimize the volume. The input source indicators will blink and the mute function will turn on the source and use the VOLUME knob or remote control VOLUME buttons to adjust the volume...

Owners Manual English Francais Espanol
Page 13
.... Automatic power saving function Changing level meter operation This unit has an automatic power saving function. Automatic power saving function on /off c +20 dB 1 Press the remote control STANDBY/ON button c to on, the unit will be greater than usual. The unit turns on, all input source indicators light for 3 seconds oo When level meter operation is no audio input for at the input source indicators immediately after the input source indicators and level meters blink and...
.... Automatic power saving function Changing level meter operation This unit has an automatic power saving function. Automatic power saving function on /off c +20 dB 1 Press the remote control STANDBY/ON button c to on, the unit will be greater than usual. The unit turns on, all input source indicators light for 3 seconds oo When level meter operation is no audio input for at the input source indicators immediately after the input source indicators and level meters blink and...

Owners Manual English Francais Espanol
Page 14
.... ee Use the INPUT SELECTOR knob to select the input that is the case, turn on the unit from one side of heat. If this is connected to STANDBY, and check the speaker connections. Noise occurs. ee The protection circuit might be operated in error. ee If a connecting cable is inserted completely. Set the STANDBY/ON switch to the source that the headphones plug is near a power cord, fluorescent light or similar...
.... ee Use the INPUT SELECTOR knob to select the input that is the case, turn on the unit from one side of heat. If this is connected to STANDBY, and check the speaker connections. Noise occurs. ee The protection circuit might be operated in error. ee If a connecting cable is inserted completely. Set the STANDBY/ON switch to the source that the headphones plug is near a power cord, fluorescent light or similar...
Owners Manual English Francais Espanol
Page 15
... output Connector 3.5mm (1/8") 4-pole stereo mini jack Maximum output level 360 mW + 360 mW (into 32Ω load, THD 10%, JEITA) Frequency response 5 Hz - 150 kHz (−3 dB) Distortion 0.003% (30mW output into 32Ω load, JEITA) S/N ratio 115 dB Compatible impedance range 16-600 Ω Analog inputs LINE connectors 3 pairs Maximum input level 2.5 Vrms Input impedance 10 kΩ or more XLR connectors 1 pair Maximum input level 3 Vrms Input impedance...
... output Connector 3.5mm (1/8") 4-pole stereo mini jack Maximum output level 360 mW + 360 mW (into 32Ω load, THD 10%, JEITA) Frequency response 5 Hz - 150 kHz (−3 dB) Distortion 0.003% (30mW output into 32Ω load, JEITA) S/N ratio 115 dB Compatible impedance range 16-600 Ω Analog inputs LINE connectors 3 pairs Maximum input level 2.5 Vrms Input impedance 10 kΩ or more XLR connectors 1 pair Maximum input level 3 Vrms Input impedance...
Owners Manual English Francais Espanol
Page 44
...transporteur). How To Obtain Warranty Service Your unit must pay all other than TEAC or an authorized TEAC service station. What Is Not Covered Under This Warranty oo Damage to follow instructions contained in the products owners' manual or otherwise provided with the product...REPAIR OR REPLACEMENT OF THE PRODUCT, AT TEAC'S OPTION. WARRANTY/GARANTIE/GARANTÍA Warranty provisions (United States and Canada only) Length of Warranty The parts and labor warranty will be effective for one (1) year for all labor and material expenses for items covered by an authorized TEAC service station...
...transporteur). How To Obtain Warranty Service Your unit must pay all other than TEAC or an authorized TEAC service station. What Is Not Covered Under This Warranty oo Damage to follow instructions contained in the products owners' manual or otherwise provided with the product...REPAIR OR REPLACEMENT OF THE PRODUCT, AT TEAC'S OPTION. WARRANTY/GARANTIE/GARANTÍA Warranty provisions (United States and Canada only) Length of Warranty The parts and labor warranty will be effective for one (1) year for all labor and material expenses for items covered by an authorized TEAC service station...
Owners Manual English Francais Espanol
Page 48
Europe: TEAC AUDIO EUROPE 1-47 Ochiai, Tama-shi, Tokyo 206-8530, Japan Phone: +81-42-356-9156 18 Park Way, Upper Saddle River, NJ 07458, U.S.A. Model name: AX-505 Serial number: 1018 . M A -26 4 0A Phone: +1-323-726-0303 Gutenbergstr. 3, 82178 Puchheim, Germany Phone: +49-8142-4208-141 This product has a serial number located on the rear panel. Please write it...
Europe: TEAC AUDIO EUROPE 1-47 Ochiai, Tama-shi, Tokyo 206-8530, Japan Phone: +81-42-356-9156 18 Park Way, Upper Saddle River, NJ 07458, U.S.A. Model name: AX-505 Serial number: 1018 . M A -26 4 0A Phone: +1-323-726-0303 Gutenbergstr. 3, 82178 Puchheim, Germany Phone: +49-8142-4208-141 This product has a serial number located on the rear panel. Please write it...


