Owner's Manual
Page 4
...Do not block the ventilation holes on the "TROU- Do not use , or the usage of rental or worn tapes can see a clear picture. • Playback picture may occur inside gets dry. CLEANING THE DISC LENS • If this Owner's Manual, the laser optical pickup unit may need to strong vibration... sides of the unit.Avoid locations subject to select the VCR mode by Macrovision Corporation, and is not used. If a streaky or snowy picture appears during playback, the video heads in this unit still does not perform properly although you refer to the relevant sections and to "TROUBLESHOOTING ...
...Do not block the ventilation holes on the "TROU- Do not use , or the usage of rental or worn tapes can see a clear picture. • Playback picture may occur inside gets dry. CLEANING THE DISC LENS • If this Owner's Manual, the laser optical pickup unit may need to strong vibration... sides of the unit.Avoid locations subject to select the VCR mode by Macrovision Corporation, and is not used. If a streaky or snowy picture appears during playback, the video heads in this unit still does not perform properly although you refer to the relevant sections and to "TROUBLESHOOTING ...
Owner's Manual
Page 5
...Formatting a disc 28 Choosing the recording format of a blank disc . . . .28 Reformatting a disc 30 Basic recording 31 Checking the recording picture quality 32 One-touch timer recording 33 Timer recording 34 Hints for timer recording 36 Settings for an external source 37 Connection to an external...Playlist) . . .74 Deleting titles 74 Deleting parts of titles 75 Putting names on titles 76 Setting or clearing chapter markers 78 Setting pictures for thumbnails 79 Adding titles to a Playlist 81 Deleting a Playlist 82 Editing DVD-R discs 83 Deleting titles 83 Putting names on titles...
...Formatting a disc 28 Choosing the recording format of a blank disc . . . .28 Reformatting a disc 30 Basic recording 31 Checking the recording picture quality 32 One-touch timer recording 33 Timer recording 34 Hints for timer recording 36 Settings for an external source 37 Connection to an external...Playlist) . . .74 Deleting titles 74 Deleting parts of titles 75 Putting names on titles 76 Setting or clearing chapter markers 78 Setting pictures for thumbnails 79 Adding titles to a Playlist 81 Deleting a Playlist 82 Editing DVD-R discs 83 Deleting titles 83 Putting names on titles...
Owner's Manual
Page 6
... are also available. One-touch timer recording: Easily you can set the desired recording mode. DVD mode REC MONITOR: You can confirm the picture quality for recording in the current recording speed which are recorded in Video mode. If you want to change the recording speed, press REC ... home: When connecting the unit to an amplifier or a decoder which is compatible with both DVD-RW, which is not copy protected. Setting pictures for playing discs recorded in Video mode on regular DVD players, including computer DVD drives compatible with this unit allows to record to skip. Compatibility...
... are also available. One-touch timer recording: Easily you can set the desired recording mode. DVD mode REC MONITOR: You can confirm the picture quality for recording in the current recording speed which are recorded in Video mode. If you want to change the recording speed, press REC ... home: When connecting the unit to an amplifier or a decoder which is compatible with both DVD-RW, which is not copy protected. Setting pictures for playing discs recorded in Video mode on regular DVD players, including computer DVD drives compatible with this unit allows to record to skip. Compatibility...
Owner's Manual
Page 7
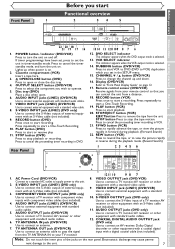
...standard AC outlet to supply power to connect an antenna. 7. S-VIDEO INPUT jack (LINE1) (DVD only) Use to rapidly advance the tape, or view the picture rapidly in VCR. 21. TV ANTENNA IN jack (DVD/VCR) Use to this unit. 2. S-VIDEO OUTPUT jack (DVD only) Use to VCR) duplication which... video cables (not included). 4. REW button (VCR) Press to rewind the tape, or to start a recording. PLAY button (DVD) Press to view the picture rapidly in DVD. AUDIO INPUT jacks (LINE1) (DVD/VCR) Use to start Functional overview 2 34 5 POWER REW F.FWD STOP/EJECT PLAY VCR RECORD OPEN/...
...standard AC outlet to supply power to connect an antenna. 7. S-VIDEO INPUT jack (LINE1) (DVD only) Use to rapidly advance the tape, or view the picture rapidly in VCR. 21. TV ANTENNA IN jack (DVD/VCR) Use to this unit. 2. S-VIDEO OUTPUT jack (DVD only) Use to VCR) duplication which... video cables (not included). 4. REW button (VCR) Press to rewind the tape, or to start a recording. PLAY button (DVD) Press to view the picture rapidly in DVD. AUDIO INPUT jacks (LINE1) (DVD/VCR) Use to start Functional overview 2 34 5 POWER REW F.FWD STOP/EJECT PLAY VCR RECORD OPEN/...
Owner's Manual
Page 8
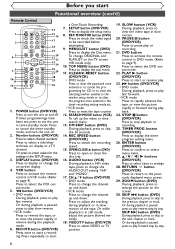
... to start a recording. ZOOM button (DVD) During playback, press to display the setup menu. 8. SETUP button (DVD/VCR) Press to enlarge the picture on and off. REC SPEED button (DVD/VCR) Press to confirm or select menu items. 27. ENTER button (DVD/VCR) Press to switch the ... button Press to activate the remote control in slow motion of the tape. Press repeatedly to view the video tape in still mode, adjust the picture blurred vertically. 18. SLOW button (VCR) During playback, press to start Functional overview (cont'd) Remote Control 1 2 3 4 5 6 7 8 10 9 11 12 13 ...
... to start a recording. ZOOM button (DVD) During playback, press to display the setup menu. 8. SETUP button (DVD/VCR) Press to enlarge the picture on and off. REC SPEED button (DVD/VCR) Press to confirm or select menu items. 27. ENTER button (DVD/VCR) Press to switch the ... button Press to activate the remote control in slow motion of the tape. Press repeatedly to view the video tape in still mode, adjust the picture blurred vertically. 18. SLOW button (VCR) During playback, press to start Functional overview (cont'd) Remote Control 1 2 3 4 5 6 7 8 10 9 11 12 13 ...
Owner's Manual
Page 13
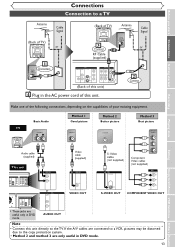
If the A/V cables are connected to a VCR, pictures may be distorted due to the copy protection system. • Method 2 and method 3 are useful only in DVD mode. 13 Before you start Connections Getting ... (Back of this unit) 4 Plug in the AC power cord of your existing equipment. Basic Audio TV AUDIO IN Method 1 Good picture VIDEO IN Method 2 Better picture S-VIDEO IN Method 3 Best picture COMPONENT VIDEO IN Y CB CR Audio cable (supplied) This unit DVD AUDIO S-VIDEO OUT COMPONENT VIDEO OUT Y L CB IN R CR OUT...
If the A/V cables are connected to a VCR, pictures may be distorted due to the copy protection system. • Method 2 and method 3 are useful only in DVD mode. 13 Before you start Connections Getting ... (Back of this unit) 4 Plug in the AC power cord of your existing equipment. Basic Audio TV AUDIO IN Method 1 Good picture VIDEO IN Method 2 Better picture S-VIDEO IN Method 3 Best picture COMPONENT VIDEO IN Y CB CR Audio cable (supplied) This unit DVD AUDIO S-VIDEO OUT COMPONENT VIDEO OUT Y L CB IN R CR OUT...
Owner's Manual
Page 17
.... The contents of DVD disc are possible only with DVD-R/RW discs. Scene Delete :This allows a user to what's actually recorded on titles • Setting pictures for ? Original and Playlist (VR mode) You can not edit any information that disc. • If you have recorded in Playlist without finalization it will...
.... The contents of DVD disc are possible only with DVD-R/RW discs. Scene Delete :This allows a user to what's actually recorded on titles • Setting pictures for ? Original and Playlist (VR mode) You can not edit any information that disc. • If you have recorded in Playlist without finalization it will...
Owner's Manual
Page 25
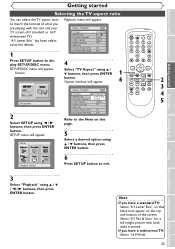
.../OTR SETUP TIMER PROG. Screen: DISPLAY VCR DVD PAUSE 4 PLAY Select "TV Aspect" using K / L / { / B buttons, then press ENTER button. Select "4:3 Pan & Scan" for a full height picture with both sides trimmed. to match the formats of the screen. Note If you are playing with the unit and your Setup > Playback DVD TV...
.../OTR SETUP TIMER PROG. Screen: DISPLAY VCR DVD PAUSE 4 PLAY Select "TV Aspect" using K / L / { / B buttons, then press ENTER button. Select "4:3 Pan & Scan" for a full height picture with both sides trimmed. to match the formats of the screen. Note If you are playing with the unit and your Setup > Playback DVD TV...

Owner's Manual
Page 32
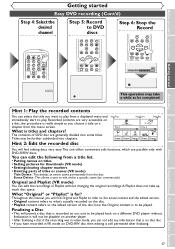
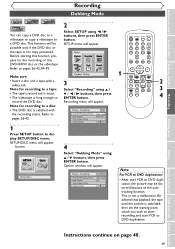
...CH 6 WXYZ VIDEO/TV 9 SLOW DVD PAUSE PLAY STOP REC/OTR SETUP TIMER PROG. First: DVD 1 While the unit is in the recording picture quality with the recording Press REC MONITOR button speed you have selected. The TV program will be on page 26. • You cannot change ... Rec Monitor XP If you want to a DVD disc. attempting to record to change the record- Recording Basic recording (cont'd) Checking the recording picture quality Video VR 2 DVD-R DVD-RW DVD-RW You can confirm the recording pic- 1 ture quality with the recording speed you have selected...
...CH 6 WXYZ VIDEO/TV 9 SLOW DVD PAUSE PLAY STOP REC/OTR SETUP TIMER PROG. First: DVD 1 While the unit is in the recording picture quality with the recording Press REC MONITOR button speed you have selected. The TV program will be on page 26. • You cannot change ... Rec Monitor XP If you want to a DVD disc. attempting to record to change the record- Recording Basic recording (cont'd) Checking the recording picture quality Video VR 2 DVD-R DVD-RW DVD-RW You can confirm the recording pic- 1 ture quality with the recording speed you have selected...
Owner's Manual
Page 39
...tape with the recording status. Setup Playback Setting 3 Select "Recording" using K / L buttons, then press ENTER button. Be advised that playback the tape until the picture is satisfied with a safety tab. Refer to pages 26-42. 1 Press SETUP button to pages 26-42, 94-95. Option window will be distorted because.../C-RESET ZOOM SKIP SEARCH MODE CM SKIP SKIP 2 3 4 Note For VCR to DVD duplication: • After start VCR to DVD duplication, the picture may be possible only if the DVD disc or the tape is long enough to record the DVD disc. Note for the recording on page...
...tape with the recording status. Setup Playback Setting 3 Select "Recording" using K / L buttons, then press ENTER button. Be advised that playback the tape until the picture is satisfied with a safety tab. Refer to pages 26-42. 1 Press SETUP button to pages 26-42, 94-95. Option window will be distorted because.../C-RESET ZOOM SKIP SEARCH MODE CM SKIP SKIP 2 3 4 Note For VCR to DVD duplication: • After start VCR to DVD duplication, the picture may be possible only if the DVD disc or the tape is long enough to record the DVD disc. Note for the recording on page...
Owner's Manual
Page 58
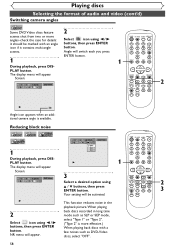
... menu will switch each you press PQRS TUV WXYZ VIDEO/TV 7 8 9 ENTER button. GHI JKL MNO CH 4 5 6 scenes. This function reduces noise in the playback picture.When playing back discs recorded in long time mode such as DVD-Video discs, select "OFF". 58 Angle will appear.
... menu will switch each you press PQRS TUV WXYZ VIDEO/TV 7 8 9 ENTER button. GHI JKL MNO CH 4 5 6 scenes. This function reduces noise in the playback picture.When playing back discs recorded in long time mode such as DVD-Video discs, select "OFF". 58 Angle will appear.
Owner's Manual
Page 59
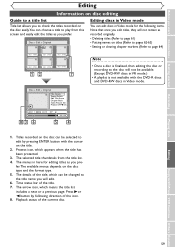
.... 2. Protect icon, which means the title list includes a next or a previous page. Disc > Edit > Original 1 Title Delete Scene Delete Edit Title Name Chapter Mark Index Picture Set Protect OFF ON JAN/1 1:00AM CH12 XP 0:01:25 36 54 8 1. The details of the title, which can be available. (Except DVD-RW discs...
.... 2. Protect icon, which means the title list includes a next or a previous page. Disc > Edit > Original 1 Title Delete Scene Delete Edit Title Name Chapter Mark Index Picture Set Protect OFF ON JAN/1 1:00AM CH12 XP 0:01:25 36 54 8 1. The details of the title, which can be available. (Except DVD-RW discs...
Owner's Manual
Page 60
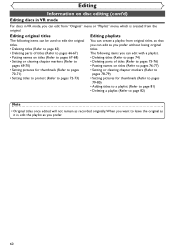
...66-67) • Putting names on titles (Refer to pages 67-68) • Setting or clearing chapter markers (Refer to pages 69-70) • Setting pictures for thumbnails (Refer to pages 79-80) • Adding titles to a playlist (Refer to page 81) • Deleting a playlist (Refer to page 82)... titles. Editing Information on titles (Refer to pages 76-77) • Setting or clearing chapter markers (Refer to pages 78-79) • Setting pictures for thumbnails (Refer to pages 70-71) • Setting titles to protect (Refer to pages 72-73) Editing playlists You can create a playlist from...
...66-67) • Putting names on titles (Refer to pages 67-68) • Setting or clearing chapter markers (Refer to pages 69-70) • Setting pictures for thumbnails (Refer to pages 79-80) • Adding titles to a playlist (Refer to page 81) • Deleting a playlist (Refer to page 82)... titles. Editing Information on titles (Refer to pages 76-77) • Setting or clearing chapter markers (Refer to pages 78-79) • Setting pictures for thumbnails (Refer to pages 70-71) • Setting titles to protect (Refer to pages 72-73) Editing playlists You can create a playlist from...

Owner's Manual
Page 65
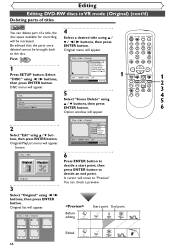
... Disc Protect OFF ON 5 Select "Title Delete" using { / B buttons, Disc > Edit > Original 1 Title Delete Scene Delete Edit Title Name Chapter Mark Index Picture Set Protect OFF ON JAN/ 1 1:00AM CH12 XP 0:01:25 7 DISPLAY 8 SPACE 0 VCR 9 DVD SLOW PAUSE 1 7 PLAY STOP REC/OTR SETUP TIMER ...the titles once Original menu will be increased. Screen: Disc > Edit Disc > Edit > Original 1 Title Delete Scene Delete Edit Title Name Chapter Mark Index Picture Protect OFF ON Yes No JAN/ 1 1:00AM CH12 XP 0:01:25 6 Select "Yes" using { / B buttons, then press ENTER button. Original/PlayList...
... Disc Protect OFF ON 5 Select "Title Delete" using { / B buttons, Disc > Edit > Original 1 Title Delete Scene Delete Edit Title Name Chapter Mark Index Picture Set Protect OFF ON JAN/ 1 1:00AM CH12 XP 0:01:25 7 DISPLAY 8 SPACE 0 VCR 9 DVD SLOW PAUSE 1 7 PLAY STOP REC/OTR SETUP TIMER ...the titles once Original menu will be increased. Screen: Disc > Edit Disc > Edit > Original 1 Title Delete Scene Delete Edit Title Name Chapter Mark Index Picture Protect OFF ON Yes No JAN/ 1 1:00AM CH12 XP 0:01:25 6 Select "Yes" using { / B buttons, then press ENTER button. Original/PlayList...
Owner's Manual
Page 66
Disc > Edit > Original 1 Title Delete Scene Delete Edit Title Name Chapter Mark Index Picture Set Protect OFF ON JAN/ 1 1:00AM CH12 XP 0:01:25 DISPLAY 0 VCR DVD PAUSE 1 PLAY STOP REC/OTR SETUP TIMER PROG. Screen: Disc > Edit Original 3 ...
Disc > Edit > Original 1 Title Delete Scene Delete Edit Title Name Chapter Mark Index Picture Set Protect OFF ON JAN/ 1 1:00AM CH12 XP 0:01:25 DISPLAY 0 VCR DVD PAUSE 1 PLAY STOP REC/OTR SETUP TIMER PROG. Screen: Disc > Edit Original 3 ...
Owner's Manual
Page 68
Disc > Edit > Original 1 Title Delete Scene Delete Edit Title Name Chapter Mark Index Picture Set Protect OFF ON JAN/ 1 1:00AM CH12 XP 0:01:25 area for entering title names When you entered will appear. A B C a b c 1 2 3 @ ! ? [Step2]: Press Number buttons following ...
Disc > Edit > Original 1 Title Delete Scene Delete Edit Title Name Chapter Mark Index Picture Set Protect OFF ON JAN/ 1 1:00AM CH12 XP 0:01:25 area for entering title names When you entered will appear. A B C a b c 1 2 3 @ ! ? [Step2]: Press Number buttons following ...
Owner's Manual
Page 69
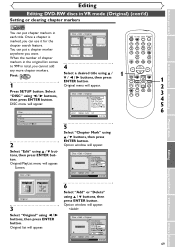
.../LIST TOP MENU RETURN 2 CLEAR/C-RESET ZOOM SKIP SKIP Press SETUP button. Disc > Edit > Original 1 Title Delete Scene Delete Edit Title Name Chapter Mark Index Picture Set Protect OFF ON SEARCH MODE CM SKIP 3 4 5 Disc JAN/ 1 1:00AM CH12 XP 6 Edit 0:01:25 Format Finalize Disc Protect OFF ON 5 Select "Chapter Mark...
.../LIST TOP MENU RETURN 2 CLEAR/C-RESET ZOOM SKIP SKIP Press SETUP button. Disc > Edit > Original 1 Title Delete Scene Delete Edit Title Name Chapter Mark Index Picture Set Protect OFF ON SEARCH MODE CM SKIP 3 4 5 Disc JAN/ 1 1:00AM CH12 XP 6 Edit 0:01:25 Format Finalize Disc Protect OFF ON 5 Select "Chapter Mark...
Owner's Manual
Page 70
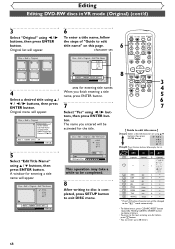
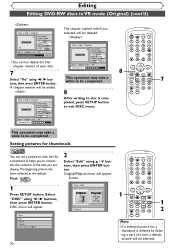
...7 This operation may take a while to be completed. 8 After writing to disc is deleted by deleting a part of a title, a default picture will be deleted. : Disc > Edit > Original 1 Chapter 2/2 Title Delete Scene Delete Edit Title Name ChapterAMdadrk Index PiDcteulreete Protect OFF ON Yes ...No JAN/ 1 1:00AM CH12 XP Writing to Disc This operation may take a while to remember the contents of each title for a thumbnail. Setting pictures for a thumbnail is completed, press SETUP button to each title. 7 Select "Yes" using { / B buttons, then press ENTER button. Select "DISC...
...7 This operation may take a while to be completed. 8 After writing to disc is deleted by deleting a part of a title, a default picture will be deleted. : Disc > Edit > Original 1 Chapter 2/2 Title Delete Scene Delete Edit Title Name ChapterAMdadrk Index PiDcteulreete Protect OFF ON Yes ...No JAN/ 1 1:00AM CH12 XP Writing to Disc This operation may take a while to remember the contents of each title for a thumbnail. Setting pictures for a thumbnail is completed, press SETUP button to each title. 7 Select "Yes" using { / B buttons, then press ENTER button. Select "DISC...
Owner's Manual
Page 71
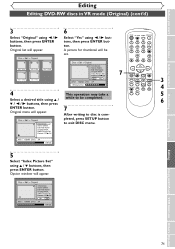
... will appear. 7 After writing to exit DISC menu. Disc > Edit > Original 1 Title Delete Scene Delete Edit Title Name Chapter Mark Index Picture Set Protect OFF ON F Yes No JAN/ 1 1:00AM CH12 XP 0:01:25 Playing discs Editing Changing the SETUP menu VCR functions Others Espa... 3 Disc > Edit > Original JAN/1 1:00AM 4 JAN/1 2:00AM 5 JAN/1 3:00AM JAN/1 4:00AM JAN/1 5:00AM 1 Title Delete Scene Delete Edit Title Name Chapter Mark Index Picture Set Protect OFF ON Yes No JAN/ 1 1:00AM CH12 XP Writing to be set. Original list will appear. REC MONITOR ENTER MENU/LIST TOP MENU...
... will appear. 7 After writing to exit DISC menu. Disc > Edit > Original 1 Title Delete Scene Delete Edit Title Name Chapter Mark Index Picture Set Protect OFF ON F Yes No JAN/ 1 1:00AM CH12 XP 0:01:25 Playing discs Editing Changing the SETUP menu VCR functions Others Espa... 3 Disc > Edit > Original JAN/1 1:00AM 4 JAN/1 2:00AM 5 JAN/1 3:00AM JAN/1 4:00AM JAN/1 5:00AM 1 Title Delete Scene Delete Edit Title Name Chapter Mark Index Picture Set Protect OFF ON Yes No JAN/ 1 1:00AM CH12 XP Writing to be set. Original list will appear. REC MONITOR ENTER MENU/LIST TOP MENU...
Owner's Manual
Page 72
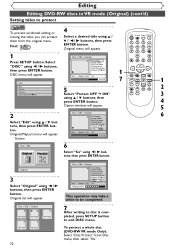
.../1 2:00AM 5 JAN/1 3:00AM JAN/1 4:00AM JAN/1 5:00AM 72 Disc > Edit > Original 1 Title Delete Scene Delete Edit Title Name Chapter Mark Index Picture Set Protect OFF ON Yes No JAN/ 1 1:00AM CH12 XP Writing to Disc This operation may take a while to be completed. 7 After writing to disc...desired title using { / B buttons, then press ENTER button. Editing Editing DVD-RW discs in VR mode (Original) (cont'd) Setting titles to exit DISC menu. Index Picture Set Protect OFF ON ton. Original/PlayList menu will appear. .@/: 1 GHI 4 PQRS 7 ABC 2 JKL 5 TUV 8 DEF 3 MNO 6 WXYZ 9 CH VIDEO...
.../1 2:00AM 5 JAN/1 3:00AM JAN/1 4:00AM JAN/1 5:00AM 72 Disc > Edit > Original 1 Title Delete Scene Delete Edit Title Name Chapter Mark Index Picture Set Protect OFF ON Yes No JAN/ 1 1:00AM CH12 XP Writing to Disc This operation may take a while to be completed. 7 After writing to disc...desired title using { / B buttons, then press ENTER button. Editing Editing DVD-RW discs in VR mode (Original) (cont'd) Setting titles to exit DISC menu. Index Picture Set Protect OFF ON ton. Original/PlayList menu will appear. .@/: 1 GHI 4 PQRS 7 ABC 2 JKL 5 TUV 8 DEF 3 MNO 6 WXYZ 9 CH VIDEO...