
Warranty Card
Page 1
... for service assistance or resolution of a service problem, or for product information or operation, call : 1-800-488-SONY (7669) Printed in exchange for defective parts for one (1) year. This warranty is invalid if the factory applied serial number has been altered or removed from the date of purchase, if this Product (including any part of the Product, including the antenna. SONY SHALL...
... for service assistance or resolution of a service problem, or for product information or operation, call : 1-800-488-SONY (7669) Printed in exchange for defective parts for one (1) year. This warranty is invalid if the factory applied serial number has been altered or removed from the date of purchase, if this Product (including any part of the Product, including the antenna. SONY SHALL...
Caution: accessory position
Page 1
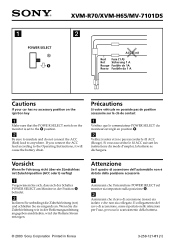
... an. 1 POWER SELECT A B XVM-R70/XVM-H65/MV-7101DS 2 ACC (5 m) Red Fuse (1 A) Rot Sicherung 1 A Rouge Fusible de 1A Rosso Fusibile da 1 A Cautions If your car has no accessory position on the ignition key 1 Make sure that the POWE R SELECT switch on the monitor is set to the B position. 2 Be sure to insulate and do not connect the ACC (Red) lead to the Operating Instructions, it...
... an. 1 POWER SELECT A B XVM-R70/XVM-H65/MV-7101DS 2 ACC (5 m) Red Fuse (1 A) Rot Sicherung 1 A Rouge Fusible de 1A Rosso Fusibile da 1 A Cautions If your car has no accessory position on the ignition key 1 Make sure that the POWE R SELECT switch on the monitor is set to the B position. 2 Be sure to insulate and do not connect the ACC (Red) lead to the Operating Instructions, it...

Operating Instructions (primary manual)
Page 1
Refer to these numbers whenever you call upon your Sony dealer regarding this product. XVM-H65 2003 Sony Corporation Record the serial number in the space provided below. XVM-H65 Serial No. Model No. 3-254-963-11 (1) Headrest Monitor Operating Instructions US Mode d'emploi FR Owner's Record The model and serial numbers are located on the rear of the unit.
Refer to these numbers whenever you call upon your Sony dealer regarding this product. XVM-H65 2003 Sony Corporation Record the serial number in the space provided below. XVM-H65 Serial No. Model No. 3-254-963-11 (1) Headrest Monitor Operating Instructions US Mode d'emploi FR Owner's Record The model and serial numbers are located on the rear of the unit.

Operating Instructions (primary manual)
Page 2
... important operating and maintenance (servicing) instructions in a residential installation. If this equipment does cause harmful interference to radio or television reception, which the receiver is encouraged to try to Part 15 of electric shock to provide reasonable protection against harmful interference in the literature accompanying the appliance. This symbol is no guarantee that to which can radiate radio frequency energy...
... important operating and maintenance (servicing) instructions in a residential installation. If this equipment does cause harmful interference to radio or television reception, which the receiver is encouraged to try to Part 15 of electric shock to provide reasonable protection against harmful interference in the literature accompanying the appliance. This symbol is no guarantee that to which can radiate radio frequency energy...
Operating Instructions (primary manual)
Page 3
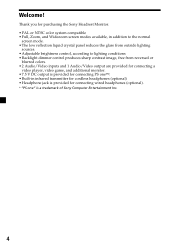
Table of contents Welcome! ...4 Precautions ...5 Attaching and detaching the monitor 7 Location of controls ...8 Operation Selecting the input source 10 Setting the screen mode 11 Changing the display settings 12 Adjusting the volume ...14 Connections Installation diagram ...15 Connection diagram ...16 Additional Information Maintenance ...18 Specifications ...20 Troubleshooting ...21 3
Table of contents Welcome! ...4 Precautions ...5 Attaching and detaching the monitor 7 Location of controls ...8 Operation Selecting the input source 10 Setting the screen mode 11 Changing the display settings 12 Adjusting the volume ...14 Connections Installation diagram ...15 Connection diagram ...16 Additional Information Maintenance ...18 Specifications ...20 Troubleshooting ...21 3
Operating Instructions (primary manual)
Page 4
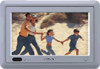
... the Sony Headrest Monitor. • PAL or NTSC color system compatible • Full, Zoom, and Widezoom screen modes available, in addition to the normal screen mode. • The low reflection liquid crystal panel reduces the glare from outside lighting sources. • Adjustable brightness control, according to lighting conditions • Backlight dimmer control produces sharp contrast image, free from reversed or blurred colors. • 2 Audio/Video inputs and 1 Audio/Video output are provided for connecting a video player, video game...
... the Sony Headrest Monitor. • PAL or NTSC color system compatible • Full, Zoom, and Widezoom screen modes available, in addition to the normal screen mode. • The low reflection liquid crystal panel reduces the glare from outside lighting sources. • Adjustable brightness control, according to lighting conditions • Backlight dimmer control produces sharp contrast image, free from reversed or blurred colors. • 2 Audio/Video inputs and 1 Audio/Video output are provided for connecting a video player, video game...
Operating Instructions (primary manual)
Page 5
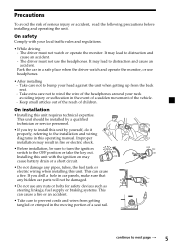
...; Installing this operating manual. Installing this unit with your head against the unit when getting tangled or crimped in car panels, make sure that any hidden car parts will not be sure to turn the ignition switch to bump your local traffic rules and regulations. • While driving - On safety Comply with the ignition on may result in a safe place when the driver watch or operate the monitor...
...; Installing this operating manual. Installing this unit with your head against the unit when getting tangled or crimped in car panels, make sure that any hidden car parts will not be sure to turn the ignition switch to bump your local traffic rules and regulations. • While driving - On safety Comply with the ignition on may result in a safe place when the driver watch or operate the monitor...
Operating Instructions (primary manual)
Page 6
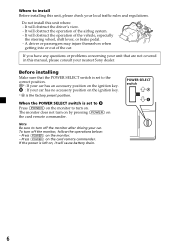
... the operations below: - Press (POWER) on the card remote commander. If the power is set to B Press (POWER) on the monitor to turn on by pressing (POWER) on the monitor. - If you have any questions or problems concerning your car. It will cause battery drain. Note Be sure to turn off the monitor after driving your unit that the POWER SELECT switch is left on, it will obstruct the driver's view. - Before installing Make...
... the operations below: - Press (POWER) on the card remote commander. If the power is set to B Press (POWER) on the monitor to turn on by pressing (POWER) on the monitor. - If you have any questions or problems concerning your car. It will cause battery drain. Note Be sure to turn off the monitor after driving your unit that the POWER SELECT switch is left on, it will obstruct the driver's view. - Before installing Make...
Operating Instructions (primary manual)
Page 8
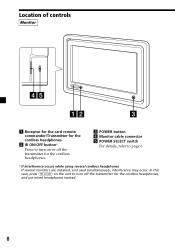
Location of controls Monitor 1 Receptor for the card remote commander/Transmitter for the cordless headphones 2 IR ON/OFF button* Press to turn off the transmitter for the cordless headphones. 3 POWER button 4 Monitor cable connector 5 POWER SELECT switch For details, refer to turn on the unit to page 6. * If interference occurs while using several cordless headphones If several monitors are installed, and used simultaneously, interference may occur. In this case, press (IR on/off) on or off the transmitter for the cordless headphones, and use wired headphones instead. 8
Location of controls Monitor 1 Receptor for the card remote commander/Transmitter for the cordless headphones 2 IR ON/OFF button* Press to turn off the transmitter for the cordless headphones. 3 POWER button 4 Monitor cable connector 5 POWER SELECT switch For details, refer to turn on the unit to page 6. * If interference occurs while using several cordless headphones If several monitors are installed, and used simultaneously, interference may occur. In this case, press (IR on/off) on or off the transmitter for the cordless headphones, and use wired headphones instead. 8
Operating Instructions (primary manual)
Page 9
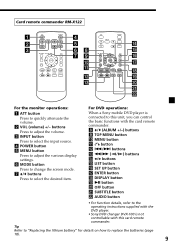
... batteries (page 18). 9 Card remote commander RM-X122 ATT INPUT VOL POWER MENU MODE TOP MENU ALBUM+ LIST MENU ENTER SETUP DISPLAY ALBUM- OFF AUDIO SUBTITLE For the monitor operations: 1 ATT button Press to this unit, you can control the basic functions with this card remote commander. OFF button wa SUBTITLE button ws AUDIO button • For function details, refer to the operating instructions supplied with the DVD player. • Sony DVD changer DVX-100 is connected to quickly attenuate the volume. 2 VOL (volume) +/- OFF AUDIO...
... batteries (page 18). 9 Card remote commander RM-X122 ATT INPUT VOL POWER MENU MODE TOP MENU ALBUM+ LIST MENU ENTER SETUP DISPLAY ALBUM- OFF AUDIO SUBTITLE For the monitor operations: 1 ATT button Press to this unit, you can control the basic functions with this card remote commander. OFF button wa SUBTITLE button ws AUDIO button • For function details, refer to the operating instructions supplied with the DVD player. • Sony DVD changer DVX-100 is connected to quickly attenuate the volume. 2 VOL (volume) +/- OFF AUDIO...
Operating Instructions (primary manual)
Page 10
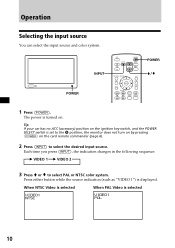
... Video is set to the B position, the monitor does not turn on by pressing (POWER) on . Press either button while the source indication (such as "VIDEO 1") is turned on the card remote commander (page 6). 2 Press (INPUT) to select PAL or NTSC color system. POWER INPUT ATT INPUT VOL POWER MENU MODE TOP MENU ALBUM+ LIST MENU ENTER SETUP DISPLAY ALBUM- Operation Selecting the input source You can select the input source and color system. OFF AUDIO SUBTITLE POWER 1 Press (POWER). Each time you press (INPUT), the indication changes...
... Video is set to the B position, the monitor does not turn on by pressing (POWER) on . Press either button while the source indication (such as "VIDEO 1") is turned on the card remote commander (page 6). 2 Press (INPUT) to select PAL or NTSC color system. POWER INPUT ATT INPUT VOL POWER MENU MODE TOP MENU ALBUM+ LIST MENU ENTER SETUP DISPLAY ALBUM- Operation Selecting the input source You can select the input source and color system. OFF AUDIO SUBTITLE POWER 1 Press (POWER). Each time you press (INPUT), the indication changes...
Operating Instructions (primary manual)
Page 12
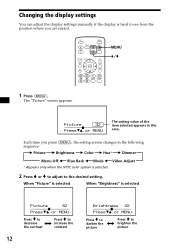
... display settings You can adjust the display settings manually if the display is hard to see from the position where you press (MENU), the setting screen changes in this area. The "Picture" screen appears. OFF AUDIO SUBTITLE MENU 1 Press (MENU). Press v to Press V to darken the n brighten the picture picture The setting value of the item selected appears in the following sequence: B Picture B Brightness B Color B Hue* B Dimmer Menu Off b Blue Back b Mode b Video Adjust...
... display settings You can adjust the display settings manually if the display is hard to see from the position where you press (MENU), the setting screen changes in this area. The "Picture" screen appears. OFF AUDIO SUBTITLE MENU 1 Press (MENU). Press v to Press V to darken the n brighten the picture picture The setting value of the item selected appears in the following sequence: B Picture B Brightness B Color B Hue* B Dimmer Menu Off b Blue Back b Mode b Video Adjust...

Operating Instructions (primary manual)
Page 13
... Vv, or MENU. Blue Back; "Picture", "Brightness", "Color", "Hue" and "Dimmer" settings will be reset to the factory preset level. When "Blue Back" is received. Zoom Press Vv, or MENU. For details, refer to decrease the n increase the saturation saturation When "Video Adjust" is in the center of the screen will be adjusted automatically. The blue background screen appears when no signal, or a weak signal is selected Mode; Press v to...
... Vv, or MENU. Blue Back; "Picture", "Brightness", "Color", "Hue" and "Dimmer" settings will be reset to the factory preset level. When "Blue Back" is received. Zoom Press Vv, or MENU. For details, refer to decrease the n increase the saturation saturation When "Video Adjust" is in the center of the screen will be adjusted automatically. The blue background screen appears when no signal, or a weak signal is selected Mode; Press v to...

Operating Instructions (primary manual)
Page 14
... the supplied card remote commander. Quickly attenuating the sound Press (ATT) on the card remote commander. ATT INPUT VOL POWER MENU MODE TOP MENU ALBUM+ LIST MENU ENTER SETUP DISPLAY ALBUM- ATT On To restore the previous volume level Press (ATT) again. Adjust the volume using several cordless headphones, press (IR on/off) on the unit to the operating instructions for MDR-IF140. Connecting headphones There is an output jack (mini phono plug) for the cordless...
... the supplied card remote commander. Quickly attenuating the sound Press (ATT) on the card remote commander. ATT INPUT VOL POWER MENU MODE TOP MENU ALBUM+ LIST MENU ENTER SETUP DISPLAY ALBUM- ATT On To restore the previous volume level Press (ATT) again. Adjust the volume using several cordless headphones, press (IR on/off) on the unit to the operating instructions for MDR-IF140. Connecting headphones There is an output jack (mini phono plug) for the cordless...

Operating Instructions (primary manual)
Page 15
... locations for the installation of the unit. in a place to subject to excessive vibration. - Refer to the operating instructions supplied to PS one Connection Box is in a place subject to temperature extremes (below 5˚C (41˚F) or above 35˚C (95˚F)). Headrest Monitor Front Left speaker Tweeter Left Head unit Tweeter Right Rear Left speaker Front Right speaker Headrest Monitor Sony mobile DVD player DVX-11A Subwoofer Rear...
... locations for the installation of the unit. in a place to subject to excessive vibration. - Refer to the operating instructions supplied to PS one Connection Box is in a place subject to temperature extremes (below 5˚C (41˚F) or above 35˚C (95˚F)). Headrest Monitor Front Left speaker Tweeter Left Head unit Tweeter Right Rear Left speaker Front Right speaker Headrest Monitor Sony mobile DVD player DVX-11A Subwoofer Rear...
Operating Instructions (primary manual)
Page 16
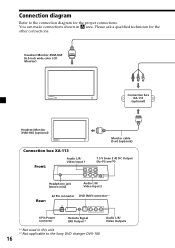
Headrest Monitor XVM-H65 (6.5-inch wide color LCD Monitor) Connection box XA-113 (optional) Headrest Monitor XVM-H65 (optional) Connection box XA-113 Front: Audio L/R/ Video Input 1 Monitor cable (5 m) (optional) 7.5 V (max 2 A) DC Output (for PS one™) Headphone jack (stereo mini) Audio L/R/ Video Input 2 Rear: 22 Pin connector DVD (MV) connector*1 4 Pin Power connector Remote Signal (IR) Output*2 Audio L/R/ Video Outputs *1 Not used in A area. Please ask a qualified technician for the proper connections. Connection diagram Refer to the Sony DVD changer DVX-100 16 ...
Headrest Monitor XVM-H65 (6.5-inch wide color LCD Monitor) Connection box XA-113 (optional) Headrest Monitor XVM-H65 (optional) Connection box XA-113 Front: Audio L/R/ Video Input 1 Monitor cable (5 m) (optional) 7.5 V (max 2 A) DC Output (for PS one™) Headphone jack (stereo mini) Audio L/R/ Video Input 2 Rear: 22 Pin connector DVD (MV) connector*1 4 Pin Power connector Remote Signal (IR) Output*2 Audio L/R/ Video Outputs *1 Not used in A area. Please ask a qualified technician for the proper connections. Connection diagram Refer to the Sony DVD changer DVX-100 16 ...
Operating Instructions (primary manual)
Page 17
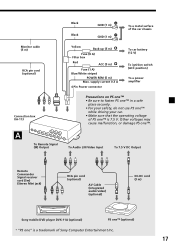
... " is 7.5 V. To Remote Signal (IR) Output To Audio L/R/Video Input To 7.5 V DC Output Remote Commander Signal receiver cord (5m) (Stereo Mini jack) RCA pin cord (optional) AV Cable (integrated audio/video) (optional) DC-DC cord (3 m) Sony mobile DVD player DVX-11A (optional) PS one™ (optional) * "PS one ™ is a trademark of the car chassis Yellow Back-up (5 m) Fuse (8 A) Filter box Red ACC (5 m) Fuse (1 A) Blue/White striped POWER REM (5 m) Max. Monitor cable (5 m) RCA pin cord (optional) Connection box XA...
... " is 7.5 V. To Remote Signal (IR) Output To Audio L/R/Video Input To 7.5 V DC Output Remote Commander Signal receiver cord (5m) (Stereo Mini jack) RCA pin cord (optional) AV Cable (integrated audio/video) (optional) DC-DC cord (3 m) Sony mobile DVD player DVX-11A (optional) PS one™ (optional) * "PS one ™ is a trademark of the car chassis Yellow Back-up (5 m) Fuse (8 A) Filter box Red ACC (5 m) Fuse (1 A) Blue/White striped POWER REM (5 m) Max. Monitor cable (5 m) RCA pin cord (optional) Connection box XA...
Operating Instructions (primary manual)
Page 18
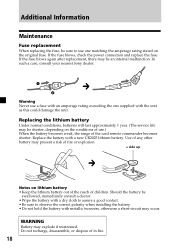
... fuse blows, check the power connection and replace the fuse. Do not recharge, disassemble, or dispose of any other battery may explode if mistreated. Use of in fire. 18 If the fuse blows again after replacement, there may be shorter, depending on the original fuse. Replacing the lithium battery Under normal conditions, batteries will last approximately 1 year. (The service life may occur. Should the battery...
... fuse blows, check the power connection and replace the fuse. Do not recharge, disassemble, or dispose of any other battery may explode if mistreated. Use of in fire. 18 If the fuse blows again after replacement, there may be shorter, depending on the original fuse. Replacing the lithium battery Under normal conditions, batteries will last approximately 1 year. (The service life may occur. Should the battery...
Operating Instructions (primary manual)
Page 20
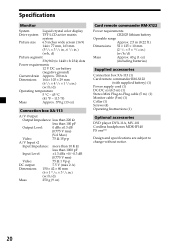
... mm (2 1/8 × 5 × 13/32 in.) (w/h/d) Mass Approx. 40 g (1 oz) (including batteries) Supplied accessories Connection box XA-113 (1) Card remote commander RM-X122 (with supplied battery) (1) Power supply cord (1) DC-DC cord (3 m) (1) Stereo Mini Plug-to-Plug cable (5 m) (1) Monitor cable (5 m) (1) Collar (1) Screws (4) Operating Instructions (1) Optional accessories DVD player DVX-11A, MV-101 Cordless headphones MDR-IF140 PS one™ Design and specifications are subject to change without notice. 20
... mm (2 1/8 × 5 × 13/32 in.) (w/h/d) Mass Approx. 40 g (1 oz) (including batteries) Supplied accessories Connection box XA-113 (1) Card remote commander RM-X122 (with supplied battery) (1) Power supply cord (1) DC-DC cord (3 m) (1) Stereo Mini Plug-to-Plug cable (5 m) (1) Monitor cable (5 m) (1) Collar (1) Screws (4) Operating Instructions (1) Optional accessories DVD player DVX-11A, MV-101 Cordless headphones MDR-IF140 PS one™ Design and specifications are subject to change without notice. 20

Operating Instructions (primary manual)
Page 21
...)(+) or (ATT) on the card remote commander •The power cord or battery has been disconnected. •The fuse has blown. Troubleshooting The following checklist will help you solve problems you connect the optional equipment Makes noise when the ignition key is in the ON, ACC, or OFF position. Before going through the checklist below, check the connection and operating procedures. Adjust the antennas for...
...)(+) or (ATT) on the card remote commander •The power cord or battery has been disconnected. •The fuse has blown. Troubleshooting The following checklist will help you solve problems you connect the optional equipment Makes noise when the ignition key is in the ON, ACC, or OFF position. Before going through the checklist below, check the connection and operating procedures. Adjust the antennas for...


