
Warranty Card
Page 1
...parts for product information or operation, call : 1-800-488-SONY (7669) Printed in the form of a bill of one (1) year from your convenience, Sony Electronics Inc. 4-557-152-02 ® LIMITED WARRANTY Car Audio Sony Electronics Inc. ("Sony") warrants this Product is invalid if the factory applied serial number has been altered or removed...does not cover customer instruction, installation, set up adjustments or signal reception problems. This warranty does not cover cosmetic damage or damage due to acts of God, accident, misuse, abuse, negligence, commercial use, or modification of ...
...parts for product information or operation, call : 1-800-488-SONY (7669) Printed in the form of a bill of one (1) year from your convenience, Sony Electronics Inc. 4-557-152-02 ® LIMITED WARRANTY Car Audio Sony Electronics Inc. ("Sony") warrants this Product is invalid if the factory applied serial number has been altered or removed...does not cover customer instruction, installation, set up adjustments or signal reception problems. This warranty does not cover cosmetic damage or damage due to acts of God, accident, misuse, abuse, negligence, commercial use, or modification of ...
Operating Instructions
Page 1
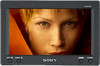
Model No. Record the serial number in the space provided below. Refer to these numbers whenever you call upon your Sony dealer regarding this product. XVM-B62 Serial No. XVM-B62 2006 Sony Corporation 2-666-477-11 (1) Mobile Monitor Operating Instructions US Mode d'emploi FR Owner's Record The model and serial numbers are located on the bottom of the unit.
Model No. Record the serial number in the space provided below. Refer to these numbers whenever you call upon your Sony dealer regarding this product. XVM-B62 Serial No. XVM-B62 2006 Sony Corporation 2-666-477-11 (1) Mobile Monitor Operating Instructions US Mode d'emploi FR Owner's Record The model and serial numbers are located on the bottom of the unit.
Operating Instructions
Page 2
..., the display does not turn off and this product may be sure to press (POWER) to lighting conditions • Backlight dimmer control produces sharp contrast image, free from outside lighting sources. • Adjustable brightness control, according to turn off the unit. Disposal of this causes battery drain. Thank you for purchasing the Sony Mobile Monitor. • PAL or NTSC color system compatible • Wide, Zoom, and Full screen modes available...
..., the display does not turn off and this product may be sure to press (POWER) to lighting conditions • Backlight dimmer control produces sharp contrast image, free from outside lighting sources. • Adjustable brightness control, according to turn off the unit. Disposal of this causes battery drain. Thank you for purchasing the Sony Mobile Monitor. • PAL or NTSC color system compatible • Wide, Zoom, and Full screen modes available...
Operating Instructions
Page 3
Table of contents Warning 2 Welcome 2 Precautions 4 Location of controls 6 Operation Changing the menu settings 7 Connections Installation diagram 8 Connection diagram 9 Additional Information Attaching and detaching the monitor 10 Maintenance 11 Specifications 12 Troubleshooting 12 3
Table of contents Warning 2 Welcome 2 Precautions 4 Location of controls 6 Operation Changing the menu settings 7 Connections Installation diagram 8 Connection diagram 9 Additional Information Attaching and detaching the monitor 10 Maintenance 11 Specifications 12 Troubleshooting 12 3
Operating Instructions
Page 4
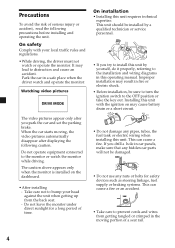
... caution. Installing this unit with your head against the unit when getting up from getting tangled or crimped in this unit requires technical expertise. It may lead to prevent cords and wires from the back seat. - Watching video pictures DRIVE MODE On installation • Installing this operating manual. Improper installation may cause battery drain or a short circuit. Do not leave the monitor under direct sunlight for safety devices such...
... caution. Installing this unit with your head against the unit when getting up from getting tangled or crimped in this unit requires technical expertise. It may lead to prevent cords and wires from the back seat. - Watching video pictures DRIVE MODE On installation • Installing this operating manual. Improper installation may cause battery drain or a short circuit. Do not leave the monitor under direct sunlight for safety devices such...
Operating Instructions
Page 5
It will obstruct the driver's view. - Do not install this unit, please check your nearest Sony dealer. 5 Where to install Before installing this unit where: - It will obstruct the operation of the vehicle, especially the steering wheel, shift lever, or brake pedal. - A driver or passengers may injure themselves when getting into or out of the airbag system. - If you have any questions or problems concerning your unit that are not covered in this manual, please consult your local traffic rules and regulations. It will obstruct the operation of the car.
It will obstruct the driver's view. - Do not install this unit, please check your nearest Sony dealer. 5 Where to install Before installing this unit where: - It will obstruct the operation of the vehicle, especially the steering wheel, shift lever, or brake pedal. - A driver or passengers may injure themselves when getting into or out of the airbag system. - If you have any questions or problems concerning your unit that are not covered in this manual, please consult your local traffic rules and regulations. It will obstruct the operation of the car.
Operating Instructions
Page 6
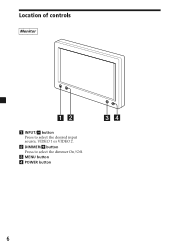
Location of controls Monitor 12 1 INPUT/ button Press to select the desired input source, VIDEO 1 or VIDEO 2. 2 DIMMER/ button Press to select the dimmer On/Off. 3 MENU button 4 POWER button 34 6
Location of controls Monitor 12 1 INPUT/ button Press to select the desired input source, VIDEO 1 or VIDEO 2. 2 DIMMER/ button Press to select the dimmer On/Off. 3 MENU button 4 POWER button 34 6
Operating Instructions
Page 7
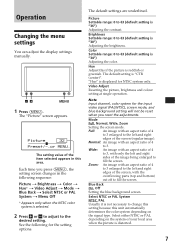
Operation Changing the menu settings You can adjust the display settings manually. Picture 32 Press+/-,or MENU. See the following sequence: Picture t Brightness t Color t Hue* t Video Adjust t Mode t Blue Back t Select NTSC or PAL System t Menu Off * Appears only when the NTSC color system is reddish or greenish. Color Settable range: 0 to 63 (default setting is "CTR (center)". The default setting is "34") Adjusting the color. Note Input channel, color system for the setting options. Mode Full, Normal...
Operation Changing the menu settings You can adjust the display settings manually. Picture 32 Press+/-,or MENU. See the following sequence: Picture t Brightness t Color t Hue* t Video Adjust t Mode t Blue Back t Select NTSC or PAL System t Menu Off * Appears only when the NTSC color system is reddish or greenish. Color Settable range: 0 to 63 (default setting is "CTR (center)". The default setting is "34") Adjusting the color. Note Input channel, color system for the setting options. Mode Full, Normal...

Operating Instructions
Page 8
Connections Installation diagram Refer to prevent them moving while your nearest Sony dealer. 8 Front Left speaker Tweeter Left Head unit Mobile Monitor Tweeter Right Front Right speaker Rear Left speaker Subwoofer Rear Right speaker Be sure to securely fasten all equipment to the car chassis, etc., to the installation diagram and ask a qualified technician for the installation of the unit. Notes • All equipment other than one Mobile Monitor is optional...
Connections Installation diagram Refer to prevent them moving while your nearest Sony dealer. 8 Front Left speaker Tweeter Left Head unit Mobile Monitor Tweeter Right Front Right speaker Rear Left speaker Subwoofer Rear Right speaker Be sure to securely fasten all equipment to the car chassis, etc., to the installation diagram and ask a qualified technician for the installation of the unit. Notes • All equipment other than one Mobile Monitor is optional...
Operating Instructions
Page 9
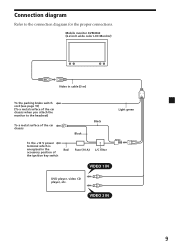
VIDEO 2 IN 9 Connection diagram Refer to the headrest) To a metal surface of the car chassis Black Black To the +12 V power terminal which is energized in the Red accessory position of the car chassis when you attach the monitor to the connection diagram for the proper connections. Mobile monitor XVM-B62 (6.2-inch wide color LCD Monitor) Video in cable (3 m) To the parking brake switch cord (see page 10) (To a metal surface of the ignition key switch Fuse (10 A) L/C filter VIDEO 1 IN Light green DVD player, video CD player, etc.
VIDEO 2 IN 9 Connection diagram Refer to the headrest) To a metal surface of the car chassis Black Black To the +12 V power terminal which is energized in the Red accessory position of the car chassis when you attach the monitor to the connection diagram for the proper connections. Mobile monitor XVM-B62 (6.2-inch wide color LCD Monitor) Video in cable (3 m) To the parking brake switch cord (see page 10) (To a metal surface of the ignition key switch Fuse (10 A) L/C filter VIDEO 1 IN Light green DVD player, video CD player, etc.
Operating Instructions
Page 10
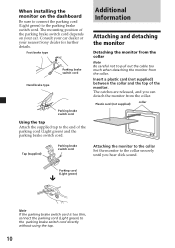
... brake switch cord directly without using the tap. 10 Parking cord (Light green) x Note If the parking brake switch cord is too thin, connect the parking cord (Light green) to the parking brake switch cord. When installing the monitor on your nearest Sony dealer for further details. The mounting position of the parking cord (Light green) and the parking brake switch cord. The catches are released, and you hear click sound. Foot...
... brake switch cord directly without using the tap. 10 Parking cord (Light green) x Note If the parking brake switch cord is too thin, connect the parking cord (Light green) to the parking brake switch cord. When installing the monitor on your nearest Sony dealer for further details. The mounting position of the parking cord (Light green) and the parking brake switch cord. The catches are released, and you hear click sound. Foot...
Operating Instructions
Page 11
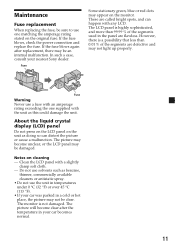
... car was parked in temperatures under 0 °C (32 °F) or over 45 °C (113 °F). • If your nearest Sony dealer. Clean the LCD panel with any LCD. Maintenance Fuse replacement When replacing the fuse, be clear. If the fuse blows, check the power connection and replace the fuse. The picture will become unclear, or the LCD panel may not be sure to use...
... car was parked in temperatures under 0 °C (32 °F) or over 45 °C (113 °F). • If your nearest Sony dealer. Clean the LCD panel with any LCD. Maintenance Fuse replacement When replacing the fuse, be clear. If the fuse blows, check the power connection and replace the fuse. The picture will become unclear, or the LCD panel may not be sure to use...

Operating Instructions
Page 12
...;F) Mass Approx. 450 g (1 lb) Supplied accessories Collar (1) Power supply cord (1) Video in cable (3 m) (1) Tap (1) Operating Instructions (1) Optional accessories Sony Video CD Players Sony Multi Disc Player MEX-R1 Design and specifications are subject to change without notice. When a wireless equipment such as a transceiver is used near the monitor, a noise may encounter with your unit. Connect the cord securely. 12 Troubleshooting The following checklist will help you solve problems you connect the optional equipment.
...;F) Mass Approx. 450 g (1 lb) Supplied accessories Collar (1) Power supply cord (1) Video in cable (3 m) (1) Tap (1) Operating Instructions (1) Optional accessories Sony Video CD Players Sony Multi Disc Player MEX-R1 Design and specifications are subject to change without notice. When a wireless equipment such as a transceiver is used near the monitor, a noise may encounter with your unit. Connect the cord securely. 12 Troubleshooting The following checklist will help you solve problems you connect the optional equipment.

Operating Instructions
Page 28
Sony Corporation Printed in Korea
Sony Corporation Printed in Korea


