Remote Guide
Page 3
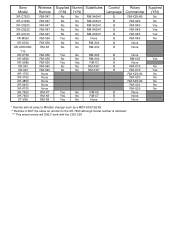
Sony Model XR-C7200 XR-C7220 XR-C8200 XR-C8220 XR-C9100 XR-M550 XR-U500 XR-U550/660/ 770 XR-U700 XR-U800 XR-U880 XR-340 XR-430 XR-1750 XR-3750 XR-4800 XR-6450 XR-6700 XR-7500 XR-7600 XT-V8A Wireless Remote RM-X47 RM-X47 RM-X47 RM-X47 RM-X47 RM-X94 RM-X36 RM-X3 Supplied Illumin (Y/N) (Y/N) No ...X2S/4S No RM-X2S No RM-X2S/4S No RM-X2S No RM-X2S No B None B None C None * Remote will not select a Minidisc changer such as a MDX-60/61/62/65. ** Remote is NOT the same as remote for the XR-7600 although model number is identical! *** This wired remote will ONLY work with the CDX-C90
Sony Model XR-C7200 XR-C7220 XR-C8200 XR-C8220 XR-C9100 XR-M550 XR-U500 XR-U550/660/ 770 XR-U700 XR-U800 XR-U880 XR-340 XR-430 XR-1750 XR-3750 XR-4800 XR-6450 XR-6700 XR-7500 XR-7600 XT-V8A Wireless Remote RM-X47 RM-X47 RM-X47 RM-X47 RM-X47 RM-X94 RM-X36 RM-X3 Supplied Illumin (Y/N) (Y/N) No ...X2S/4S No RM-X2S No RM-X2S/4S No RM-X2S No RM-X2S No B None B None C None * Remote will not select a Minidisc changer such as a MDX-60/61/62/65. ** Remote is NOT the same as remote for the XR-7600 although model number is identical! *** This wired remote will ONLY work with the CDX-C90
Warranty Card
Page 1
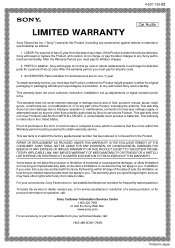
...To obtain warranty service, you must pay the labor charges to service the Product. 4-557-153-02 ® LIMITED WARRANTY Car Audio Sony Electronics Inc. ("Sony") warrants this Product is determined to be presented to you. REPAIR OR REPLACEMENT AS PROVIDED UNDER...warranty service. ACCESSORIES: Parts and labor for all accessories are for product information or operation, call : 1-800-488-SONY (7669) Printed in material or workmanship as fuses or batteries). This warranty does not cover customer instruction, installation, set up adjustments or signal reception problems. ...
...To obtain warranty service, you must pay the labor charges to service the Product. 4-557-153-02 ® LIMITED WARRANTY Car Audio Sony Electronics Inc. ("Sony") warrants this Product is determined to be presented to you. REPAIR OR REPLACEMENT AS PROVIDED UNDER...warranty service. ACCESSORIES: Parts and labor for all accessories are for product information or operation, call : 1-800-488-SONY (7669) Printed in material or workmanship as fuses or batteries). This warranty does not cover customer instruction, installation, set up adjustments or signal reception problems. ...
Primary User Manual
Page 1
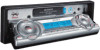
... supplied installation/connections manual. Para obtener información sobre la instalación y las conexiones, consulte el manual de instalación/conexiones suministrado. Refer to these numbers in the space provided below. XR-M550 © 2000 Sony Corporation Model No. 3-047-781-11 (1) FM/AM Cassette Car Stereo Operating Instructions US Mode d'emploi FR Manual de instrucciones ES Owner's Record The model and serial numbers are located on the bottom of the unit...
... supplied installation/connections manual. Para obtener información sobre la instalación y las conexiones, consulte el manual de instalación/conexiones suministrado. Refer to these numbers in the space provided below. XR-M550 © 2000 Sony Corporation Model No. 3-047-781-11 (1) FM/AM Cassette Car Stereo Operating Instructions US Mode d'emploi FR Manual de instrucciones ES Owner's Record The model and serial numbers are located on the bottom of the unit...
Primary User Manual
Page 2
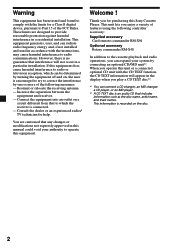
... device, pursuant to Part 15 of the following controller accessory: Supplied accessory Card remote commander RM-X94 Optional accessory Rotary commander RM-X4S In addition to the cassette playback and radio operations, you for help. Welcome ! However, there is connected. - You are designed to provide reasonable protection against harmful interference in the display when you operate this equipment. This equipment generates, uses, and...
... device, pursuant to Part 15 of the following controller accessory: Supplied accessory Card remote commander RM-X94 Optional accessory Rotary commander RM-X4S In addition to the cassette playback and radio operations, you for help. Welcome ! However, there is connected. - You are designed to provide reasonable protection against harmful interference in the display when you operate this equipment. This equipment generates, uses, and...
Primary User Manual
Page 3
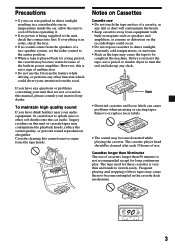
... the fuse. • If no power is being supplied to turn the reel and take up any dirt or dust will contaminate the heads. • Keep cassettes away from the speakers of the built-in the cassette deck mechanism. 3 Remove or replace loose labels. • The sound may contaminate the playback heads, reduce the sound quality, or prevent sound reproduction altogether. The cassette player head should be...
... the fuse. • If no power is being supplied to turn the reel and take up any dirt or dust will contaminate the heads. • Keep cassettes away from the speakers of the built-in the cassette deck mechanism. 3 Remove or replace loose labels. • The sound may contaminate the playback heads, reduce the sound quality, or prevent sound reproduction altogether. The cassette player head should be...
Primary User Manual
Page 4
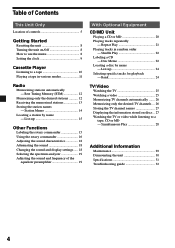
... Changing the sound and display settings ..... 18 Selecting the spectrum analyzer 19 Adjusting the sound and frequency of controls 5 Getting Started Resetting the unit 8 Turning the unit on discs .. 27 Watching the TV or video while listening to a tape 10 Playing a tape in random order - Best Tuning Memory (BTM 12 Memorizing only the desired stations 12 Receiving the memorized stations 13 Storing the station names - Table of Contents This Unit Only Location of the equalizer...
... Changing the sound and display settings ..... 18 Selecting the spectrum analyzer 19 Adjusting the sound and frequency of controls 5 Getting Started Resetting the unit 8 Turning the unit on discs .. 27 Watching the TV or video while listening to a tape 10 Playing a tape in random order - Best Tuning Memory (BTM 12 Memorizing only the desired stations 12 Receiving the memorized stations 13 Storing the station names - Table of Contents This Unit Only Location of the equalizer...

Primary User Manual
Page 5
Location of controls Card remote commander RM-X94 OFF D-BASS OPEN/CLOSE MENU SEEK DISC SOURCE LIST SEEK SOUND DISC ENTER DSPL ATT MODE VOL Refer to activate the unit first. 5 M/m (DISC/PRST +/-) buttons 8, 9, 11, 13, 14, 15, 19, 20, 21, 22, 23, 24, 25, 26 During radio reception: Preset stations select 13 During CD/MD playback: Disc change 21 During TV reception: Band select 26 qa ENTER button 9, 11, 12, 13, 14, 19...
Location of controls Card remote commander RM-X94 OFF D-BASS OPEN/CLOSE MENU SEEK DISC SOURCE LIST SEEK SOUND DISC ENTER DSPL ATT MODE VOL Refer to activate the unit first. 5 M/m (DISC/PRST +/-) buttons 8, 9, 11, 13, 14, 15, 19, 20, 21, 22, 23, 24, 25, 26 During radio reception: Preset stations select 13 During CD/MD playback: Disc change 21 During TV reception: Band select 26 qa ENTER button 9, 11, 12, 13, 14, 19...

Primary User Manual
Page 7
Reset button (located on the front side of the unit control the same functions as those on the unit for the card remote commander 5 Volume adjust buttons 6 DSPL (display mode change) button 7 Sub display window 8 MENU button 9 Z (eject) button 10 qs LIST button qd OFF button* 8 qf MODE button qg SOURCE button qh Number buttons During tape playback: (1) REP 11 During radio reception Preset number select 12, 13 During CD/MD playback: (1) REP 21 (2) SHUF 22 During TV reception: Preset number select 26 qj PRST/DISC +/- (cursor up...
Reset button (located on the front side of the unit control the same functions as those on the unit for the card remote commander 5 Volume adjust buttons 6 DSPL (display mode change) button 7 Sub display window 8 MENU button 9 Z (eject) button 10 qs LIST button qd OFF button* 8 qf MODE button qg SOURCE button qh Number buttons During tape playback: (1) REP 11 During radio reception Preset number select 12, 13 During CD/MD playback: (1) REP 21 (2) SHUF 22 During TV reception: Preset number select 26 qj PRST/DISC +/- (cursor up...
Primary User Manual
Page 9
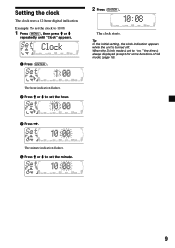
The minute indication flashes. 4 Press M or m to set the minute. 9 The hour indication flashes. 2 Press M or m to set the hour. 3 Press ,. When the D.Info mode is set the clock to "on," the time is turned off. Setting the clock The clock uses a 12-hour digital indication. Tip In the initial setting, the clock indication appears while the unit is always displayed (except for some functions of SA mode) (page 18). Example: To set to 10:08 1 Press (MENU), then press M or m repeatedly until "Clock" appears. 1 Press (ENTER). 2 Press (ENTER). The clock starts.
The minute indication flashes. 4 Press M or m to set the minute. 9 The hour indication flashes. 2 Press M or m to set the hour. 3 Press ,. When the D.Info mode is set the clock to "on," the time is turned off. Setting the clock The clock uses a 12-hour digital indication. Tip In the initial setting, the clock indication appears while the unit is always displayed (except for some functions of SA mode) (page 18). Example: To set to 10:08 1 Press (MENU), then press M or m repeatedly until "Clock" appears. 1 Press (ENTER). 2 Press (ENTER). The clock starts.

Primary User Manual
Page 10
... you want to close the front panel. Cassette Player Listening to start playback during fast-forwarding or rewinding, press (MODE) (o). DISC . : SEEK > : SEEK To locate SOURCE To locate preceding succeeding tracks DISC tracks Note The AMS function may not work when: - Tip The Motion Display mode can skip up is noise between tracks are long sections of the card remote commander and insert a cassette. Locating a specific track -
... you want to close the front panel. Cassette Player Listening to start playback during fast-forwarding or rewinding, press (MODE) (o). DISC . : SEEK > : SEEK To locate SOURCE To locate preceding succeeding tracks DISC tracks Note The AMS function may not work when: - Tip The Motion Display mode can skip up is noise between tracks are long sections of the card remote commander and insert a cassette. Locating a specific track -
Primary User Manual
Page 12
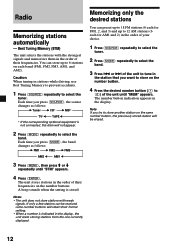
... (MENU), then press M or m repeatedly until "MEM" appears. The number button indication appears in stations while driving, use Best Tuning Memory to prevent accidents. 1 Press (SOURCE) repeatedly to 6 stations on the number buttons. or > of the unit to select the band. 3 Press . You can preset up to 18 FM stations (6 each for AM1 and 2) in the order of your choice. 1 Press (SOURCE) repeatedly to select the tuner. 2 Press (MODE) repeatedly...
... (MENU), then press M or m repeatedly until "MEM" appears. The number button indication appears in stations while driving, use Best Tuning Memory to prevent accidents. 1 Press (SOURCE) repeatedly to 6 stations on the number buttons. or > of the unit to select the band. 3 Press . You can preset up to 18 FM stations (6 each for AM1 and 2) in the order of your choice. 1 Press (SOURCE) repeatedly to select the tuner. 2 Press (MODE) repeatedly...
Primary User Manual
Page 13
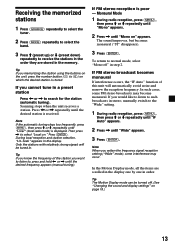
... the frequency of this unit will be turned off " in step 2. Receiving the memorized stations 1 Press (SOURCE) repeatedly to select the tuner. 2 Press (MODE) repeatedly to select the band. 3 Press M (preset up) or m (preset down) repeatedly to normal mode, select "Mono off . (See "Changing the sound and display settings" on " appears. Tip If you memorizing the station using the buttons on the unit, press the number button ((1) to select "Local on which the desired station is...
... the frequency of this unit will be turned off " in step 2. Receiving the memorized stations 1 Press (SOURCE) repeatedly to select the tuner. 2 Press (MODE) repeatedly to select the band. 3 Press M (preset up) or m (preset down) repeatedly to normal mode, select "Mono off . (See "Changing the sound and display settings" on " appears. Tip If you memorizing the station using the buttons on the unit, press the number button ((1) to select "Local on which the desired station is...

Primary User Manual
Page 16
... the number buttons. •Change the disc. 16 By pushing in and rotating the control (the PRESET/DISC control) Push in and rotate the control to fast-wind the tape. To start playback. •Tune in the following ways; • Tuner: FM1 t FM2 t FM3 t AM1 t AM2 • CD unit*: CD1 t CD2 t ... • MD unit*: MD1 t MD2 t ... • Tape: playback direction • TV/Video*: TV1 t TV2 t AUX...
... the number buttons. •Change the disc. 16 By pushing in and rotating the control (the PRESET/DISC control) Push in and rotate the control to fast-wind the tape. To start playback. •Tune in the following ways; • Tuner: FM1 t FM2 t FM3 t AM1 t AM2 • CD unit*: CD1 t CD2 t ... • MD unit*: MD1 t MD2 t ... • Tape: playback direction • TV/Video*: TV1 t TV2 t AUX...
Primary User Manual
Page 17
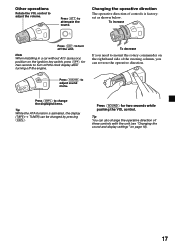
... unit (see "Changing the sound and display settings" on the right hand side of controls is activated, the display (TAPE y TUNER) can also change the displayed items. Tip While the ATA function is factoryset as shown below. To increase OFF Press (OFF) to attenuate the sound. Tip You can be changed by pressing (DSPL). Other operations Rotate the VOL control to adjust sound menu. Press (ATT) to turn off the clock display after turning...
... unit (see "Changing the sound and display settings" on the right hand side of controls is activated, the display (TAPE y TUNER) can also change the displayed items. Tip While the ATA function is factoryset as shown below. To increase OFF Press (OFF) to attenuate the sound. Tip You can be changed by pressing (DSPL). Other operations Rotate the VOL control to adjust sound menu. Press (ATT) to turn off the clock display after turning...

Primary User Manual
Page 18
... interface cable of a car telephone is connected to use the rotary commander as follows: BAS (bass) t TRE (treble) t BAL (left-right) t FAD (front-rear) t SUB (Sub woofer) 2 Adjust the selected item by pressing (SOUND) repeatedly. Select "norm" to the ATT lead, the unit decreases the volume automatically when a telephone call comes in the display are not recognizable because of the unit's installed position. •M.Dspl (Motion Display) - Select "off frequency of the subwoofer output...
... interface cable of a car telephone is connected to use the rotary commander as follows: BAS (bass) t TRE (treble) t BAL (left-right) t FAD (front-rear) t SUB (Sub woofer) 2 Adjust the selected item by pressing (SOUND) repeatedly. Select "norm" to the ATT lead, the unit decreases the volume automatically when a telephone call comes in the display are not recognizable because of the unit's installed position. •M.Dspl (Motion Display) - Select "off frequency of the subwoofer output...
Primary User Manual
Page 19
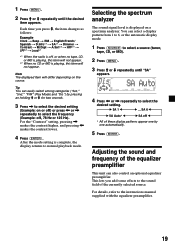
... currently selected source. This lets you press m, the item changes as follows: Example Clock t Beep t RM t English/French/ Spanish t D.Info*1 t SA*1 t Dimmer t Contrast t M.Dspl t A.Scrl*2 t HPF*1 t LPF*1 t Loud*1 *1 When the radio is playing, this item will differ depending on a spectrum analyzer. Tip You can also control an optional equalizer preamplifier. For details, refer to normal playback mode. After the mode setting is displayed...
... currently selected source. This lets you press m, the item changes as follows: Example Clock t Beep t RM t English/French/ Spanish t D.Info*1 t SA*1 t Dimmer t Contrast t M.Dspl t A.Scrl*2 t HPF*1 t LPF*1 t Loud*1 *1 When the radio is playing, this item will differ depending on a spectrum analyzer. Tip You can also control an optional equalizer preamplifier. For details, refer to normal playback mode. After the mode setting is displayed...

Primary User Manual
Page 20
... the Auto Scroll function is on ." 4 Press (ENTER). Auto Scroll does not work. 20 CD/MD playback starts. To cancel Auto Scroll, select "A.Scrl off . (See "Changing the sound and display settings" on or off. 1 During playback, press (MENU). 2 Press M or m repeatedly until the desired unit appears. Changing the display item Each time you set the function on page 18.) Automatically scrolling a disc name - Tip The Motion Display mode can control...
... the Auto Scroll function is on ." 4 Press (ENTER). Auto Scroll does not work. 20 CD/MD playback starts. To cancel Auto Scroll, select "A.Scrl off . (See "Changing the sound and display settings" on or off. 1 During playback, press (MENU). 2 Press M or m repeatedly until the desired unit appears. Changing the display item Each time you set the function on page 18.) Automatically scrolling a disc name - Tip The Motion Display mode can control...

Primary User Manual
Page 22
... random order. 1 During playback, press (MENU). 2 Press M or m repeatedly until "Shuf" appears. 3 Press , repeatedly until the desired setting appears in random order - Disc Memo (For a CD unit with the custom file function) You can select: •Shuf 1 - You can locate the disc by name (page 24) and select the specific tracks for a disc. The next character flashes. If you press m repeatedly, the...
... random order. 1 During playback, press (MENU). 2 Press M or m repeatedly until "Shuf" appears. 3 Press , repeatedly until the desired setting appears in random order - Disc Memo (For a CD unit with the custom file function) You can select: •Shuf 1 - You can locate the disc by name (page 24) and select the specific tracks for a disc. The next character flashes. If you press m repeatedly, the...
Primary User Manual
Page 31
... Hz AM Tuning range Antenna terminal Intermediate frequency Sensitivity 530 - 1,710 kHz External antenna connector 10.7 MHz/450 kHz 30 µV Power amplifier section Outputs Speaker outputs Speaker impedance 4 - 8 ohms Maximum power output 50 W × 4 (at 4 ohms) General Outputs Inputs Tone controls Power requirements Dimensions Mounting dimensions Mass Supplied accessories Optional accessories Optional equipment Audio output (3) Power antenna relay control lead Power amplifier control lead Telephone ATT control lead Illumination control lead Bass ±9 dB at 100 Hz Treble ±...
... Hz AM Tuning range Antenna terminal Intermediate frequency Sensitivity 530 - 1,710 kHz External antenna connector 10.7 MHz/450 kHz 30 µV Power amplifier section Outputs Speaker outputs Speaker impedance 4 - 8 ohms Maximum power output 50 W × 4 (at 4 ohms) General Outputs Inputs Tone controls Power requirements Dimensions Mounting dimensions Mass Supplied accessories Optional accessories Optional equipment Audio output (3) Power antenna relay control lead Power amplifier control lead Telephone ATT control lead Illumination control lead Bass ±9 dB at 100 Hz Treble ±...
Primary User Manual
Page 32
...." t Use manual tuning. •The local seek mode is hampered by noises. You are using a mobile phone. Connect a power antenna control lead (blue) or accessory power supply lead (red) to adjust the volume. • The power cord or battery has been disconnected. • The reset button was pressed. General Problem No sound. The contents of the VOL buttons to the power supply lead of a car's antenna booster. (When your unit. The stations cannot be received. The "ST" indication flashes. Before...
...." t Use manual tuning. •The local seek mode is hampered by noises. You are using a mobile phone. Connect a power antenna control lead (blue) or accessory power supply lead (red) to adjust the volume. • The power cord or battery has been disconnected. • The reset button was pressed. General Problem No sound. The contents of the VOL buttons to the power supply lead of a car's antenna booster. (When your unit. The stations cannot be received. The "ST" indication flashes. Before...


