
Remote Guide
Page 3
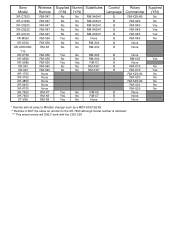
Sony Model XR-C7200 XR-C7220 XR-C8200 XR-C8220 XR-C9100 XR-M550 XR-U500 XR-U550/660/ 770 XR-U700 XR-U800 XR-U880 XR-340 XR-430 XR-1750 XR-3750 XR-4800 XR-6450 XR-6700 XR-7500 XR-7600 XT-V8A Wireless Remote RM-X47 RM-X47 RM-X47...X40/41 RM-X40/41 RM-X40/41 RM-X40/41 RM-X40/41 None RM-X40 RM-X30 Control Language B B B B B B B B Rotary Commander RM-X2S/4S RM-X4S RM-X4S RM... None C None * Remote will not select a Minidisc changer such as a MDX-60/61/62/65. ** Remote is NOT the same as remote for the XR-7600 although model number is identical! *** This wired remote will ONLY work with the CDX-C90
Sony Model XR-C7200 XR-C7220 XR-C8200 XR-C8220 XR-C9100 XR-M550 XR-U500 XR-U550/660/ 770 XR-U700 XR-U800 XR-U880 XR-340 XR-430 XR-1750 XR-3750 XR-4800 XR-6450 XR-6700 XR-7500 XR-7600 XT-V8A Wireless Remote RM-X47 RM-X47 RM-X47...X40/41 RM-X40/41 RM-X40/41 RM-X40/41 RM-X40/41 None RM-X40 RM-X30 Control Language B B B B B B B B Rotary Commander RM-X2S/4S RM-X4S RM-X4S RM... None C None * Remote will not select a Minidisc changer such as a MDX-60/61/62/65. ** Remote is NOT the same as remote for the XR-7600 although model number is identical! *** This wired remote will ONLY work with the CDX-C90
Users Guide
Page 1
Refer to these numbers whenever you call upon your Sony dealer regarding this product. For installation and connections, see the supplied installation/connections manual. Model No. XR-C5120/4890 Serial No. XR-C5120 XR-4890 © 1999 by Sony Corporation Record the serial number in the space provided below. 3-865-814-11(1) FM/AM Cassette Car Stereo Operating Instructions US Owner's Record The model and serial numbers are located on the bottom of the unit.
Refer to these numbers whenever you call upon your Sony dealer regarding this product. For installation and connections, see the supplied installation/connections manual. Model No. XR-C5120/4890 Serial No. XR-C5120 XR-4890 © 1999 by Sony Corporation Record the serial number in the space provided below. 3-865-814-11(1) FM/AM Cassette Car Stereo Operating Instructions US Owner's Record The model and serial numbers are located on the bottom of the unit.
Users Guide
Page 2
... radio frequency energy and, if not installed and used in a particular installation. Reorient or relocate the receiving antenna. - Connect the equipment into an outlet on , the user is no guarantee that any changes or modifications not expressly approved in a residential installation. This unit lets you can connect a CD changer, an MD changer, a CD player, or an MD player (XR-C5120 only). 2 Warning This equipment has been tested...
... radio frequency energy and, if not installed and used in a particular installation. Reorient or relocate the receiving antenna. - Connect the equipment into an outlet on , the user is no guarantee that any changes or modifications not expressly approved in a residential installation. This unit lets you can connect a CD changer, an MD changer, a CD player, or an MD player (XR-C5120 only). 2 Warning This equipment has been tested...
Users Guide
Page 3
... bass sound - Repeat Play 15 Playing tracks in various modes 8 Radio Memorizing stations automatically - Shuffle Play 15 Additional Information Precautions 15 Maintenance 16 Dismounting the unit 17 Specifications 18 Troubleshooting guide 19 3 Table of Contents This Unit Only Location of controls 4 Getting Started Resetting the unit 5 Detaching the front panel 5 Setting the clock 6 Cassette Player Listening to a tape 7 Playing a tape in random order - D-bass 13 With Optional Equipment CD/MD Unit (XR-C5120 only) Playing...
... bass sound - Repeat Play 15 Playing tracks in various modes 8 Radio Memorizing stations automatically - Shuffle Play 15 Additional Information Precautions 15 Maintenance 16 Dismounting the unit 17 Specifications 18 Troubleshooting guide 19 3 Table of Contents This Unit Only Location of controls 4 Getting Started Resetting the unit 5 Detaching the front panel 5 Setting the clock 6 Cassette Player Listening to a tape 7 Playing a tape in random order - D-bass 13 With Optional Equipment CD/MD Unit (XR-C5120 only) Playing...
Users Guide
Page 4
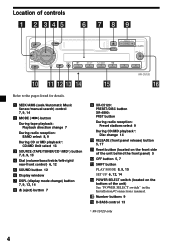
...3 SOURCE (TAPE/TUNER/CD*/MD*) button 7, 8, 9, 13 4 Dial (volume/bass/treble/left-right/ rear-front control) 6, 12 5 SOUND button 12 6 Display window 7 DSPL (display mode change) button 7, 9, 13, 14 8 6 (eject) button 7 9 XR-C5120: PRESET/DISC button XR-4890: PRST button During radio reception: Preset stations select 9 During CD/MD playback*: Disc change 14 0 RELEASE (front panel release) button 5, 17 !¡ Reset button (located on the front side of the unit behind the front panel) 5 !™ OFF button 5, 7 !£ SHIFT button PLAY MODE 8, 9, 15 SET UP 6, 12, 14 !¢ POWER SELECT switch...
...3 SOURCE (TAPE/TUNER/CD*/MD*) button 7, 8, 9, 13 4 Dial (volume/bass/treble/left-right/ rear-front control) 6, 12 5 SOUND button 12 6 Display window 7 DSPL (display mode change) button 7, 9, 13, 14 8 6 (eject) button 7 9 XR-C5120: PRESET/DISC button XR-4890: PRST button During radio reception: Preset stations select 9 During CD/MD playback*: Disc change 14 0 RELEASE (front panel release) button 5, 17 !¡ Reset button (located on the front side of the unit behind the front panel) 5 !™ OFF button 5, 7 !£ SHIFT button PLAY MODE 8, 9, 15 SET UP 6, 12, 14 !¢ POWER SELECT switch...

Users Guide
Page 5
... display window of the unit is still turned on, the power will turn the ignition key switch to the OFF position without removing the front panel, the caution alarm will erase the clock setting and some memorized functions. Caution alarm If you , use the supplied front panel case. 5 Detaching the front panel You can detach the front panel of this unit to protect...
... display window of the unit is still turned on, the power will turn the ignition key switch to the OFF position without removing the front panel, the caution alarm will erase the clock setting and some memorized functions. Caution alarm If you , use the supplied front panel case. 5 Detaching the front panel You can detach the front panel of this unit to protect...

Users Guide
Page 6
... go forward 6 The minute indication flashes. 4 Set the minute. to go backward to 10:08 1 Press (SHIFT), then press (2) (SET UP) repeatedly until "CLOCK" appears. 1 Press (4) (n). The clock starts. 3 Press (SHIFT). to go backward to normal playback mode. Note If the POWER SELECT switch on the bottom of the unit is complete, the display returns to go forward 2 Press...
... go forward 6 The minute indication flashes. 4 Set the minute. to go backward to 10:08 1 Press (SHIFT), then press (2) (SET UP) repeatedly until "CLOCK" appears. 1 Press (4) (n). The clock starts. 3 Press (SHIFT). to go backward to normal playback mode. Note If the POWER SELECT switch on the bottom of the unit is complete, the display returns to go forward 2 Press...

Users Guide
Page 7
.... Changing the display item Each time you select the desired item, the display will automatically change the tape's playback direction, press (MODE) (*). To Stop playback Eject the cassette Press (OFF) 6 Fast-winding the tape During playback, push the SEEK/AMS control up to a tape Insert a cassette. You can be turned off. (See "Changing the sound and display settings" on page 12). 7 there is activated. Cassette Player Listening to...
.... Changing the display item Each time you select the desired item, the display will automatically change the tape's playback direction, press (MODE) (*). To Stop playback Eject the cassette Press (OFF) 6 Fast-winding the tape During playback, push the SEEK/AMS control up to a tape Insert a cassette. You can be turned off. (See "Changing the sound and display settings" on page 12). 7 there is activated. Cassette Player Listening to...
Users Guide
Page 8
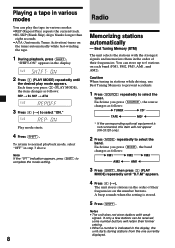
... currently displayed. A beep sounds when the setting is indicated in stations while driving, use Best Tuning Memory to prevent accidents. 1 Press (SOURCE) repeatedly to select "ON." To return to select the band. Notes • The unit does not store stations with the strongest signals and memorizes them in step 3 above. If only a few stations can be received, some number buttons will not appear (XR-C5120 only). 2 Press (MODE) repeatedly...
... currently displayed. A beep sounds when the setting is indicated in stations while driving, use Best Tuning Memory to prevent accidents. 1 Press (SOURCE) repeatedly to select "ON." To return to select the band. Notes • The unit does not store stations with the strongest signals and memorizes them in step 3 above. If only a few stations can be received, some number buttons will not appear (XR-C5120 only). 2 Press (MODE) repeatedly...

Users Guide
Page 9
... same number button, the previously stored station will be turned off. (See "Changing the sound and display settings" on which the desired station is poor - Memorizing only the desired stations You can be erased. Receiving the memorized stations 1 Press (SOURCE) repeatedly to select the tuner. 2 Press (MODE) repeatedly to select the band. 3 Press the number button ((1) to normal mode, select "MONOOFF" in step 2 above items are stored in the display. To return to...
... same number button, the previously stored station will be turned off. (See "Changing the sound and display settings" on which the desired station is poor - Memorizing only the desired stations You can be erased. Receiving the memorized stations 1 Press (SOURCE) repeatedly to select the tuner. 2 Press (MODE) repeatedly to select the band. 3 Press the number button ((1) to normal mode, select "MONOOFF" in step 2 above items are stored in the display. To return to...
Users Guide
Page 10
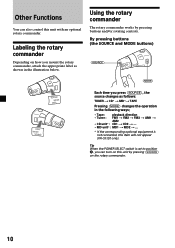
Other Functions You can turn on this unit by pressing buttons and/or rotating controls. Tip When the POWER SELECT switch is not connected, this unit with an optional rotary commander. By pressing buttons (the SOURCE and MODE buttons) (SOURCE) (MODE) SOUND MODE DSPL DSPL MODE SOUND Each time you press (SOURCE), the source changes as shown in the following ways; • Tape : playback direction • Tuner : FM1 n FM2 n FM3 n AM1 n AM2 • CD unit...
Other Functions You can turn on this unit by pressing buttons and/or rotating controls. Tip When the POWER SELECT switch is not connected, this unit with an optional rotary commander. By pressing buttons (the SOURCE and MODE buttons) (SOURCE) (MODE) SOUND MODE DSPL DSPL MODE SOUND Each time you press (SOURCE), the source changes as shown in the following ways; • Tape : playback direction • Tuner : FM1 n FM2 n FM3 n AM1 n AM2 • CD unit...
Users Guide
Page 11
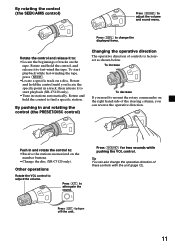
... the tape, press (MODE). •Locate a specific track on the tape. Rotate and hold the control, and release it to fast-wind the tape. Press (ATT) to adjust the volume and sound menu. Push in and rotating the control (the PRESET/DISC control) Changing the operative direction The operative direction of the steering column, you locate the specific point in stations automatically. By rotating the control (the SEEK/AMS control) Press (SOUND) to...
... the tape, press (MODE). •Locate a specific track on the tape. Rotate and hold the control, and release it to fast-wind the tape. Press (ATT) to adjust the volume and sound menu. Push in and rotating the control (the PRESET/DISC control) Changing the operative direction The operative direction of the steering column, you locate the specific point in stations automatically. By rotating the control (the SEEK/AMS control) Press (SOUND) to...
Users Guide
Page 12
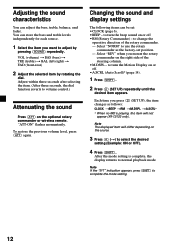
.... - "ATT-ON" flashes momentarily. to select the desired setting (Example: ON or OFF). 4 Press (SHIFT). Note The displayed item will not appear (XR-C5120 only). Adjusting the sound characteristics You can store the bass and treble levels independently for each source. 1 Select the item you want to volume control.) Attenuating the sound Press (ATT) on the optional rotary commander or wireless remote. VOL (volume) n BAS (bass) n TRE (treble) n BAL (left...
.... - "ATT-ON" flashes momentarily. to select the desired setting (Example: ON or OFF). 4 Press (SHIFT). Note The displayed item will not appear (XR-C5120 only). Adjusting the sound characteristics You can store the bass and treble levels independently for each source. 1 Select the item you want to volume control.) Attenuating the sound Press (ATT) on the optional rotary commander or wireless remote. VOL (volume) n BAS (bass) n TRE (treble) n BAL (left...
Users Guide
Page 13
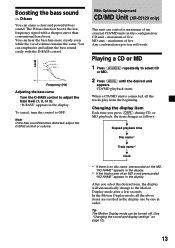
... Motion Display mode, all the tracks play from the beginning. To cancel, turn the control to select CD or MD. 2 Press (MODE) until the desired unit appears. CD/MD playback starts. The D-bass function boosts the low frequency signal with the D-BASS control. maximum of five Any combination up to ten will automatically change to adjust the bass level (1, 2, or 3). You can be turned off. (See "Changing the sound and display settings" on...
... Motion Display mode, all the tracks play from the beginning. To cancel, turn the control to select CD or MD. 2 Press (MODE) until the desired unit appears. CD/MD playback starts. The D-bass function boosts the low frequency signal with the D-BASS control. maximum of five Any combination up to ten will automatically change to adjust the bass level (1, 2, or 3). You can be turned off. (See "Changing the sound and display settings" on...
Users Guide
Page 14
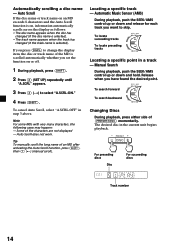
... until "A.SCRL" appears. 3 Press (4) (n) to change the display item, the disc or track name of an MD after activating the Auto Scroll function, press (SHIFT), then (1) (N) (manual scroll). Locating a specific track - Automatic Music Sensor (AMS) During playback, push the SEEK/AMS control up or down and release for each track you press (DSPL) to select "A.SCRL-ON." 4 Press (SHIFT). Automatically scrolling...
... until "A.SCRL" appears. 3 Press (4) (n) to change the display item, the disc or track name of an MD after activating the Auto Scroll function, press (SHIFT), then (1) (N) (manual scroll). Locating a specific track - Automatic Music Sensor (AMS) During playback, push the SEEK/AMS control up or down and release for each track you press (DSPL) to select "A.SCRL-ON." 4 Press (SHIFT). Automatically scrolling...
Users Guide
Page 15
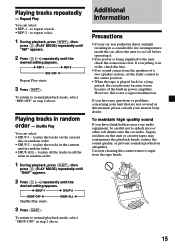
... Play You can select: • SHUF-1 - If you have any questions or problems concerning your audio equipment, be careful not to play all the tracks in all the units in power amplifier. Cassette cleaning kits cannot remove sugar from the speakers of malfunction. to the center position. • When the tape is not a sign of a two-speaker system, set the fader control to play...
... Play You can select: • SHUF-1 - If you have any questions or problems concerning your audio equipment, be careful not to play all the tracks in all the units in power amplifier. Cassette cleaning kits cannot remove sugar from the speakers of malfunction. to the center position. • When the tape is not a sign of a two-speaker system, set the fader control to play...

Users Guide
Page 16
... touch the tape surface of a cassette, as any slack. If the fuse blows, check the power connection and replace the fuse. Warning Never use one supplied with built-in magnets such as speakers and amplifiers, as this could occur. • Do not expose cassettes to become distorted while playing the cassette. The cassette player head should be sure to use a fuse with an...
... touch the tape surface of a cassette, as any slack. If the fuse blows, check the power connection and replace the fuse. Warning Never use one supplied with built-in magnets such as speakers and amplifiers, as this could occur. • Do not expose cassettes to become distorted while playing the cassette. The cassette player head should be sure to use a fuse with an...
Users Guide
Page 18
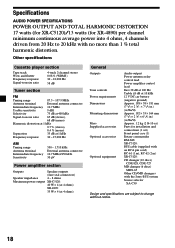
... (7 1/4 × 2 1/8 × 6 1/2 in.) (w/h/d) Approx. 1.2 kg (2 lb 10 oz) Parts for XR-4890) per channel minimum continuous average power into 4 ohms, 4 channels driven from 20 Hz to change without notice. 18 Specifications AUDIO POWER SPECIFICATIONS POWER OUTPUT AND TOTAL HARMONIC DISTORTION 17 watts (for XR-C5120)/13 watts (for installation and connections (1 set) Front panel case (1) Rotary commander RM-X4S XR-C5120: BUS cable (supplied with an RCA pin cord) RC-61 (1 m), RC...
... (7 1/4 × 2 1/8 × 6 1/2 in.) (w/h/d) Approx. 1.2 kg (2 lb 10 oz) Parts for XR-4890) per channel minimum continuous average power into 4 ohms, 4 channels driven from 20 Hz to change without notice. 18 Specifications AUDIO POWER SPECIFICATIONS POWER OUTPUT AND TOTAL HARMONIC DISTORTION 17 watts (for XR-C5120)/13 watts (for installation and connections (1 set) Front panel case (1) Rotary commander RM-X4S XR-C5120: BUS cable (supplied with an RCA pin cord) RC-61 (1 m), RC...
Users Guide
Page 19
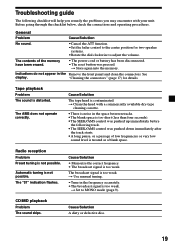
... with your unit. n Set to adjust the volume. CD/MD playback Problem The sound skips. The contents of the memory have been erased. • The power cord or battery has been disconnected. • The reset button was pushed down immediately after the track starts. • A long pause, or a passage of low frequencies or very low sound level is contaminated. Radio reception Problem Preset tuning is not...
... with your unit. n Set to adjust the volume. CD/MD playback Problem The sound skips. The contents of the memory have been erased. • The power cord or battery has been disconnected. • The reset button was pushed down immediately after the track starts. • A long pause, or a passage of low frequencies or very low sound level is contaminated. Radio reception Problem Preset tuning is not...
Users Guide
Page 20
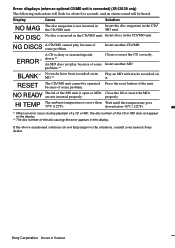
... an MD.*2 Play an MD with tracks recorded on it. Display Cause Solution NO MAG The disc magazine is connected) (XR-C5120 only) The following indications will flash for about five seconds, and an alarm sound will be operated Press the reset button of some problem. Insert discs in the display. If the above-mentioned solutions do not help improve the situation...
... an MD.*2 Play an MD with tracks recorded on it. Display Cause Solution NO MAG The disc magazine is connected) (XR-C5120 only) The following indications will flash for about five seconds, and an alarm sound will be operated Press the reset button of some problem. Insert discs in the display. If the above-mentioned solutions do not help improve the situation...


