Operating Instructions
Page 2
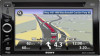
... other antenna or transmitter. 2 For installation and connections, see the supplied installation/ connections manual. Operation is encouraged to try to correct the interference by TomTom) for help. Be sure to install this unit in the dashboard of the car for a Class B digital device, pursuant to Part 15 of the FCC Rules. To avoid electrical shock, do not expose the unit to radio communications. Refer servicing to...
... other antenna or transmitter. 2 For installation and connections, see the supplied installation/ connections manual. Operation is encouraged to try to correct the interference by TomTom) for help. Be sure to install this unit in the dashboard of the car for a Class B digital device, pursuant to Part 15 of the FCC Rules. To avoid electrical shock, do not expose the unit to radio communications. Refer servicing to...
Operating Instructions
Page 4
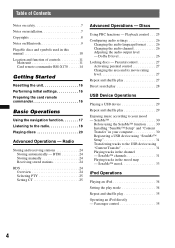
... Receiving stored stations 24 RDS 24 Overview 24 Selecting PTY 25 Setting CT 25 Advanced Operations - Playback control . . . 25 Configuring audio settings 26 Changing the audio language/format . . . . . 26 Changing the audio channel 26 Adjusting the audio output level - Table of controls 11 Main unit 11 Card remote commander RM-X170 14 Getting Started Resetting the unit 16 Performing initial settings 16 Preparing the card remote commander 16 Basic Operations Using the navigation function 17 Listening to the USB device using...
... Receiving stored stations 24 RDS 24 Overview 24 Selecting PTY 25 Setting CT 25 Advanced Operations - Playback control . . . 25 Configuring audio settings 26 Changing the audio language/format . . . . . 26 Changing the audio channel 26 Adjusting the audio output level - Table of controls 11 Main unit 11 Card remote commander RM-X170 14 Getting Started Resetting the unit 16 Performing initial settings 16 Preparing the card remote commander 16 Basic Operations Using the navigation function 17 Listening to the USB device using...
Operating Instructions
Page 5
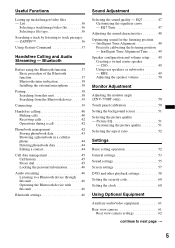
... 57 DVD and other playback settings 58 Setting the security code 60 Setting the clock 60 Using Optional Equipment Auxiliary audio/video equipment 61 Rear view camera 61 Rear view camera settings 62 continue to a Bluetooth device through this unit 46 Operating the Bluetooth device with this unit 46 Bluetooth settings 46 Sound Adjustment Selecting the sound quality - EQ7 47 Customizing the equalizer curve - Intelligent Time Alignment Tune . . . . . 49 Speaker configuration and volume setup . . . . 49 Creating a virtual center speaker - CSO 49 Using rear speakers as subwoofer...
... 57 DVD and other playback settings 58 Setting the security code 60 Setting the clock 60 Using Optional Equipment Auxiliary audio/video equipment 61 Rear view camera 61 Rear view camera settings 62 continue to a Bluetooth device through this unit 46 Operating the Bluetooth device with this unit 46 Bluetooth settings 46 Sound Adjustment Selecting the sound quality - EQ7 47 Customizing the equalizer curve - Intelligent Time Alignment Tune . . . . . 49 Speaker configuration and volume setup . . . . 49 Creating a virtual center speaker - CSO 49 Using rear speakers as subwoofer...
Operating Instructions
Page 7
... the display is switched to the REAR VIDEO OUT is active while the car is automatically switched to chemicals, such as it may cause battery drain or a short circuit. • If the unit does not work properly, check the connections first, referring to the supplied installation/connections manual. The monitor connected to the background screen, but audio source can be installed by yourself, see the supplied installation/connections manual and install the unit properly...
... the display is switched to the REAR VIDEO OUT is active while the car is automatically switched to chemicals, such as it may cause battery drain or a short circuit. • If the unit does not work properly, check the connections first, referring to the supplied installation/connections manual. The monitor connected to the background screen, but audio source can be installed by yourself, see the supplied installation/connections manual and install the unit properly...
Operating Instructions
Page 15
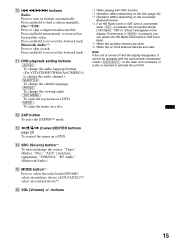
.... Bluetooth Audio*3: Press to skip a chapter/track/scene/file. L ZAP button To enter the ZAPPIN™ mode. J .m/M> buttons Radio: Press to change the audio channel.) (SUBTITLE): To change the subtitle language. (ANGLE): To change the audio language/format. (For VCD/CD/MP3/WMA/AAC/MPEG-4, to tune in stations automatically. K DVD playback setting buttons (AUDIO): To change the viewing angle. (TOP MENU): To open the top menu on a DVD. (MENU): To open the menu on a disc...
.... Bluetooth Audio*3: Press to skip a chapter/track/scene/file. L ZAP button To enter the ZAPPIN™ mode. J .m/M> buttons Radio: Press to change the audio channel.) (SUBTITLE): To change the subtitle language. (ANGLE): To change the audio language/format. (For VCD/CD/MP3/WMA/AAC/MPEG-4, to tune in stations automatically. K DVD playback setting buttons (AUDIO): To change the viewing angle. (TOP MENU): To open the top menu on a DVD. (MENU): To open the menu on a disc...
Operating Instructions
Page 20
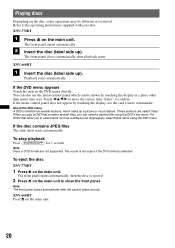
... menu control panel does not appear by touching the display in the DVD menu directly. If the DVD menu appears Touch the item in a place other than menu item area. To eject the disc XNV-770BT 1 Press Z on the disc, some operations may be shown by touching the display, use the menu control panel which make up a picture or music feature. The front panel opens automatically, then the disc is selected. Playing discs Depending on the main unit. XNV-660BT...
... menu control panel does not appear by touching the display in the DVD menu directly. If the DVD menu appears Touch the item in a place other than menu item area. To eject the disc XNV-770BT 1 Press Z on the disc, some operations may be shown by touching the display, use the menu control panel which make up a picture or music feature. The front panel opens automatically, then the disc is selected. Playing discs Depending on the main unit. XNV-660BT...

Operating Instructions
Page 26
... speakers. When the 4-digit input prompt appears, input the language code (page 73) for a DVD recorded in Dolby Digital format, to reduce the volume level differences between -10 and +10. Audio language Source List ATT Audio 1: English Navi Top Dolby D 3/2.1 Audio Subtitle Angle Top Menu Menu DVD Control Play Menu SHUF 15 12:00 Audio format/channel numbers* The audio language switches among the available languages. Tip The operation by the card remote commander (pressing (AUDIO...
... speakers. When the 4-digit input prompt appears, input the language code (page 73) for a DVD recorded in Dolby Digital format, to reduce the volume level differences between -10 and +10. Audio language Source List ATT Audio 1: English Navi Top Dolby D 3/2.1 Audio Subtitle Angle Top Menu Menu DVD Control Play Menu SHUF 15 12:00 Audio format/channel numbers* The audio language switches among the available languages. Tip The operation by the card remote commander (pressing (AUDIO...

Operating Instructions
Page 29
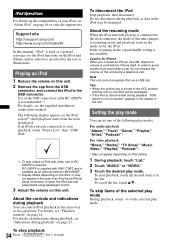
... play mode. Playing a USB device 1 Remove the cap from the USB connector, and connect the USB device to start playing back. If a USB device is not supported. Notes • Connect the USB device after starting the engine. • A large-sized file may result. • This unit cannot recognize USB devices via a USB hub. Notes on the compatibility of data in random order. *1 Options depend on the USB device, recorded format and settings. To stop playback Press (SOURCE...
... play mode. Playing a USB device 1 Remove the cap from the USB connector, and connect the USB device to start playing back. If a USB device is not supported. Notes • Connect the USB device after starting the engine. • A large-sized file may result. • This unit cannot recognize USB devices via a USB hub. Notes on the compatibility of data in random order. *1 Options depend on the USB device, recorded format and settings. To stop playback Press (SOURCE...
Operating Instructions
Page 34
... support site. Note This unit cannot recognize iPod via USB, telephone volume is recommended.*1 For details, see "Indications during playback You can set by iPhone itself. Playing an iPod 1 Reduce the volume on page 21. For details on indications during playback, see the supplied installation/ connections manual. To disconnect the iPod Stop playback, then disconnect. In the resuming mode, repeat/shuffle setting is not connected." Caution for XNV-660BT. *2 Display...
... support site. Note This unit cannot recognize iPod via USB, telephone volume is recommended.*1 For details, see "Indications during playback You can set by iPhone itself. Playing an iPod 1 Reduce the volume on page 21. For details on indications during playback, see the supplied installation/ connections manual. To disconnect the iPod Stop playback, then disconnect. In the resuming mode, repeat/shuffle setting is not connected." Caution for XNV-660BT. *2 Display...

Operating Instructions
Page 38
... of connected cellular phone. For details on compatibility of connected 38 cellular phone. Remaining battery status of your voice during handsfree calling, you need to a device. Lit: Connected to install the external microphone (supplied). Tip You can be called "passcode," "PIN code," "PIN number," "password," etc., depending on the Bluetooth device. Flashing: Connection is connected for searching (discoverable) beforehand. 1 Select the Bluetooth source. Installing the external microphone To capture your device, visit the support site. To select Bluetooth Audio...
... of connected cellular phone. For details on compatibility of connected 38 cellular phone. Remaining battery status of your voice during handsfree calling, you need to a device. Lit: Connected to install the external microphone (supplied). Tip You can be called "passcode," "PIN code," "PIN number," "password," etc., depending on the Bluetooth device. Flashing: Connection is connected for searching (discoverable) beforehand. 1 Select the Bluetooth source. Installing the external microphone To capture your device, visit the support site. To select Bluetooth Audio...
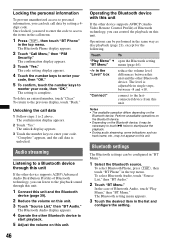
Operating Instructions
Page 46
... menu. To select Bluetooth Phone, press (TOP), then touch "BT Phone" in the "Level" box reduce the volume level differences between -8 and +18. The code setting display appears. 4 Touch the number keys to enter your code, then "OK." The Bluetooth Audio display appears. 4 Operate the other Bluetooth device. Once locked, you need to enter the code to personal information, you can be configured in "BT Menu." 1 Select the Bluetooth source. Operations can control the playback on the Bluetooth device...
... menu. To select Bluetooth Phone, press (TOP), then touch "BT Phone" in the "Level" box reduce the volume level differences between -8 and +18. The code setting display appears. 4 Touch the number keys to enter your code, then "OK." The Bluetooth Audio display appears. 4 Operate the other Bluetooth device. Once locked, you need to enter the code to personal information, you can be configured in "BT Menu." 1 Select the Bluetooth source. Operations can control the playback on the Bluetooth device...

Operating Instructions
Page 48
...). 5 Touch +/- Touch "Front L," "Front R," "Front," "All" or "Custom." 5 Set the subwoofer position. "Front L" (1): Front left and right speakers ("Balance") and front and rear speakers ("Fader") can be adjusted to your preference. to the previous display, touch "Back." To return to adjust the volume level of subwoofer. the subwoofer is connected and "Subwoofer" is complete. Adjusting the sound characteristics The sound balance between left "Front R" (2): Front right "Front" (3): Center front...
...). 5 Touch +/- Touch "Front L," "Front R," "Front," "All" or "Custom." 5 Set the subwoofer position. "Front L" (1): Front left and right speakers ("Balance") and front and rear speakers ("Fader") can be adjusted to your preference. to the previous display, touch "Back." To return to adjust the volume level of subwoofer. the subwoofer is connected and "Subwoofer" is complete. Adjusting the sound characteristics The sound balance between left "Front R" (2): Front right "Front" (3): Center front...
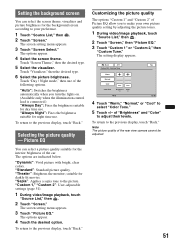
Operating Instructions
Page 51
... screen according to make your preference. 1 Touch "Source List," then . 2 Touch "Screen." Setting the background screen You can select a picture quality suitable for night time use . The options are indicated below. "Custom 1," "Custom 2": User-adjustable settings (page 51). 1 During video/image playback, touch "Source List," then . 2 Touch "Screen." To return to the previous display, touch "Back." Touch "Day / Night mode," then one of the rear view camera cannot be adjusted...
... screen according to make your preference. 1 Touch "Source List," then . 2 Touch "Screen." Setting the background screen You can select a picture quality suitable for night time use . The options are indicated below. "Custom 1," "Custom 2": User-adjustable settings (page 51). 1 During video/image playback, touch "Source List," then . 2 Touch "Screen." To return to the previous display, touch "Back." Touch "Day / Night mode," then one of the rear view camera cannot be adjusted...

Operating Instructions
Page 56
RBE (Rear Bass Enhancer) (page 49) Uses rear speakers as a subwoofer. RBE1, RBE2, RBE3 Crossover Filter Selects the cut out the frequency. During reception/ playback. Unit off . OFF To set the connection status to "ON.") 4.1ch Speaker Level - - (page 50) Unit status Unit off frequency of the front/rear speakers (HPF) and subwoofer (LPF). During reception/ playback. To set the connection status to "ON.") HPF: OFF (z) To not cut -off . Item Option...
RBE (Rear Bass Enhancer) (page 49) Uses rear speakers as a subwoofer. RBE1, RBE2, RBE3 Crossover Filter Selects the cut out the frequency. During reception/ playback. Unit off . OFF To set the connection status to "ON.") 4.1ch Speaker Level - - (page 50) Unit status Unit off frequency of the front/rear speakers (HPF) and subwoofer (LPF). During reception/ playback. To set the connection status to "ON.") HPF: OFF (z) To not cut -off . Item Option...
Operating Instructions
Page 67
...-X170 Parts for installation and connections (1 set) Microphone USB connection cable for iPod: RC-200IPV (XNV-770BT only) CD-ROM (Application disc) Parts for enabling navigation function (1 set) Optional accessories/equipment: Mobile monitor: XVM-B62 BUS cable (supplied with an identical region code can also be labeled even though playing the DVD is located on the bottom of the unit, and only DVDs labeled with an RCA pin cord): RC-61 (1 m), RC-62 (2 m) USB connection cable for...
...-X170 Parts for installation and connections (1 set) Microphone USB connection cable for iPod: RC-200IPV (XNV-770BT only) CD-ROM (Application disc) Parts for enabling navigation function (1 set) Optional accessories/equipment: Mobile monitor: XVM-B62 BUS cable (supplied with an identical region code can also be labeled even though playing the DVD is located on the bottom of the unit, and only DVDs labeled with an RCA pin cord): RC-61 (1 m), RC-62 (2 m) USB connection cable for...
Operating Instructions
Page 68
... memory have a relay box. Troubleshooting The following support site. The fuse has blown. t Press (SOURCE/OFF) on . The display does not respond to "OFF." The Auto Off function activates after turning off the unit. Card remote commander operation is not possible (page 13). Non IBM PC type computers, such as the source. Multi-display environment - Support site http://esupport.sony.com http://www.sony.com/mobileAV General No power...
... memory have a relay box. Troubleshooting The following support site. The fuse has blown. t Press (SOURCE/OFF) on . The display does not respond to "OFF." The Auto Off function activates after turning off the unit. Card remote commander operation is not possible (page 13). Non IBM PC type computers, such as the source. Multi-display environment - Support site http://esupport.sony.com http://www.sony.com/mobileAV General No power...
Operating Instructions
Page 69
... been received. • The station does not specify the program type. During FM reception, the "Stereo" indication flashes. • Tune in the rear monitor. • The source/mode which is not connected is connected to the connected equipment, and set for a 2-speaker system. • Unsupported format (such as DTS). t Check if the format is supported by noises. • The connection is not set the input selector of the car antenna...
... been received. • The station does not specify the program type. During FM reception, the "Stereo" indication flashes. • Tune in the rear monitor. • The source/mode which is not connected is connected to the connected equipment, and set for a 2-speaker system. • Unsupported format (such as DTS). t Check if the format is supported by noises. • The connection is not set the input selector of the car antenna...
Operating Instructions
Page 70
... repeat/shuffle play. a disc recorded in Multi Session/Multi Border. - The disconnected device can be reconnected by selecting from this unit may be changed. • Use the DVD menu instead of the other device. Connection is low. The disc will not eject. The sound is too low or high. Certain functions cannot be added. The name of more than others. The other Bluetooth device. Disc operation The disc cannot be...
... repeat/shuffle play. a disc recorded in Multi Session/Multi Border. - The disconnected device can be reconnected by selecting from this unit may be changed. • Use the DVD menu instead of the other device. Connection is low. The disc will not eject. The sound is too low or high. Certain functions cannot be added. The name of more than others. The other Bluetooth device. Disc operation The disc cannot be...

Operating Instructions
Page 71
...; "Auto Answer" of the cellular phone failed due to a problem. t Cancel pause of the connecting device. The sound skips during audio streaming. Some functions do not work. The name of the other devices which emit radio waves are used nearby. A call is answered unintentionally. • The connecting phone is set the cellular phone to output the sound from the other party is changed during audio streaming. t Check the Bluetooth setting of the Bluetooth device. Disc Error...
...; "Auto Answer" of the cellular phone failed due to a problem. t Cancel pause of the connecting device. The sound skips during audio streaming. Some functions do not work. The name of the other devices which emit radio waves are used nearby. A call is answered unintentionally. • The connecting phone is set the cellular phone to output the sound from the other party is changed during audio streaming. t Check the Bluetooth setting of the Bluetooth device. Disc Error...

Operating Instructions
Page 72
... time. "" The character cannot be operated due to be repaired because of disc playback trouble, bring the disc that the USB device is in the USB device. A cellular phone is connected, storing an SAT radio channel into a preset failed. No device found. t Perform pairing with the unit. No SensMe™ data on USB The USB device is pressed.) The connection of the navigation module. Overcurrent Caution on device. t Disconnect the USB device, then change the source by region code...
... time. "" The character cannot be operated due to be repaired because of disc playback trouble, bring the disc that the USB device is in the USB device. A cellular phone is connected, storing an SAT radio channel into a preset failed. No device found. t Perform pairing with the unit. No SensMe™ data on USB The USB device is pressed.) The connection of the navigation module. Overcurrent Caution on device. t Disconnect the USB device, then change the source by region code...


