Operating Instructions
Page 5
... 58 Setting the security code 60 Setting the clock 60 Using Optional Equipment Auxiliary audio/video equipment 61 Rear view camera 61 Rear view camera settings 62 continue to track passages - List 36 Selecting a track/image/video file 36 Selecting a file type ...volume setup . . . . 49 Creating a virtual center speaker - RBE 49 Adjusting the speaker volume 50 Monitor Adjustment Adjusting the monitor angle (XNV-770BT only 50 Touch panel calibration 50 Setting the background screen 51 Selecting the picture quality - CSO 49 Using rear speakers as subwoofer - Useful Functions...
... 58 Setting the security code 60 Setting the clock 60 Using Optional Equipment Auxiliary audio/video equipment 61 Rear view camera 61 Rear view camera settings 62 continue to track passages - List 36 Selecting a track/image/video file 36 Selecting a file type ...volume setup . . . . 49 Creating a virtual center speaker - RBE 49 Adjusting the speaker volume 50 Monitor Adjustment Adjusting the monitor angle (XNV-770BT only 50 Touch panel calibration 50 Setting the background screen 51 Selecting the picture quality - CSO 49 Using rear speakers as subwoofer - Useful Functions...
Operating Instructions
Page 7
... ignition on the display is connected. Do not watch or operate the unit. - "Video blocked for your safety, even if the rear view camera is switched to the background screen, but audio source can be sure to fix securely. • When installing, be installed by yourself, see... screen after you try to turn the ignition off. Preventing an accident Pictures appear only after displaying the caution below. Notes on the rear view camera exclusively. • While operating - Notes on safety • Comply with your attention from damage. - Do not leave rubber or plastic materials ...
... ignition on the display is connected. Do not watch or operate the unit. - "Video blocked for your safety, even if the rear view camera is switched to the background screen, but audio source can be sure to fix securely. • When installing, be installed by yourself, see... screen after you try to turn the ignition off. Preventing an accident Pictures appear only after displaying the caution below. Notes on the rear view camera exclusively. • While operating - Notes on safety • Comply with your attention from damage. - Do not leave rubber or plastic materials ...
Operating Instructions
Page 51
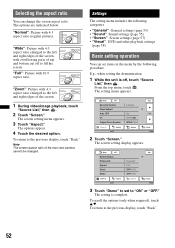
Touch "Visualizer," then the desired type. 6 Select the picture brightness. Touch "Day / Night mode," then one of the rear view camera cannot be adjusted. 51 "Always Night": Fixes the brightness suitable for night time use . "Standard": Standard picture quality. Setting the background screen You can select a ...
Touch "Visualizer," then the desired type. 6 Select the picture brightness. Touch "Day / Night mode," then one of the rear view camera cannot be adjusted. 51 "Always Night": Fixes the brightness suitable for night time use . "Standard": Standard picture quality. Setting the background screen You can select a ...
Operating Instructions
Page 52
... demonstration 1 While the unit is complete. The screen setting display appears. The setting is off to the left and right edges of the rear view camera cannot be changed. To scroll the options (only when required), touch v/V.
... demonstration 1 While the unit is complete. The screen setting display appears. The setting is off to the left and right edges of the rear view camera cannot be changed. To scroll the options (only when required), touch v/V.
Operating Instructions
Page 54
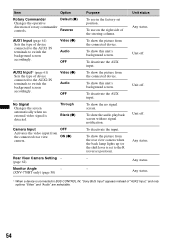
...the picture from the connected device. To deactivate the AUX input. Unit status Any status. Unit off . Any status. Rear View Camera Setting - (page 62) Monitor Angle - (XNV-770BT only) (page 50) Purpose To use on the right side of the steering column. To use in the factory-set to... BUS CONTROL IN, "Sony BUS Input" appears instead of device connected to the AUX2 IN terminals to switch the background screen accordingly. Any...
...the picture from the connected device. To deactivate the AUX input. Unit status Any status. Unit off . Any status. Rear View Camera Setting - (page 62) Monitor Angle - (XNV-770BT only) (page 50) Purpose To use on the right side of the steering column. To use in the factory-set to... BUS CONTROL IN, "Sony BUS Input" appears instead of device connected to the AUX2 IN terminals to switch the background screen accordingly. Any...

Operating Instructions
Page 61
... not, touch "General." 2 Touch v/V to adjust the level. Notes • When backing up your usual listening volume on the unit. To return to the CAMERA IN terminal, you can set to the AUX1 IN and AUX2 IN terminals on the unit. 5 Touch -/+ in the "Level" box repeatedly to scroll, then... portable device itself. Adjusting the volume level Be sure to "AUX1" and "AUX2." 1 Reduce the volume on the rear view camera exclusively. • The picture from rear view camera appears when the back lamp lights up (or the shift lever is off, touch "Source List," then . Setting the type of...
... not, touch "General." 2 Touch v/V to adjust the level. Notes • When backing up your usual listening volume on the unit. To return to the CAMERA IN terminal, you can set to the AUX1 IN and AUX2 IN terminals on the unit. 5 Touch -/+ in the "Level" box repeatedly to scroll, then... portable device itself. Adjusting the volume level Be sure to "AUX1" and "AUX2." 1 Reduce the volume on the rear view camera exclusively. • The picture from rear view camera appears when the back lamp lights up (or the shift lever is off, touch "Source List," then . Setting the type of...
Operating Instructions
Page 62
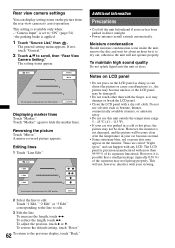
... • Do not touch other than 99.99 % of the segments may be clear. However, it is set to scroll, then "Rear View Camera Setting." To increase the length, touch B b. To restore the default setting, touch "Reset." 62 To return to hide the marker lines. To ...in direct sunlight. • Power antenna (aerial) extends automatically. Rear view camera settings You can display setting items on the picture from the rear view camera to dry out; This setting is applied. 1 Touch "Source List," then . "Camera Input" is possible that a small percentage (typically 0.01 %) of its ...
... • Do not touch other than 99.99 % of the segments may be clear. However, it is set to scroll, then "Rear View Camera Setting." To increase the length, touch B b. To restore the default setting, touch "Reset." 62 To return to hide the marker lines. To ...in direct sunlight. • Power antenna (aerial) extends automatically. Rear view camera settings You can display setting items on the picture from the rear view camera to dry out; This setting is applied. 1 Touch "Source List," then . "Camera Input" is possible that a small percentage (typically 0.01 %) of its ...
Operating Instructions
Page 67
...1/2 in) (w/h/d) Mass: XNV-770BT: Approx. 2.7 kg (5 lb 14 oz) XNV-660BT: Approx. 2.4 kg (5 lb 4 oz) Supplied accessories: Card remote commander: RM-X170 Parts for installation and connections (1 set) Microphone USB connection cable for iPod: RC-200IPV (XNV-770BT only) CD-ROM (Application disc) Parts for enabling navigation function (1 set) Optional ... of this unit. Please ask the dealer for iPod: RC-200IPV HD Radio™ tuner: XT-100HD Rear View Camera: XA-R800C Your dealer may be played. Depending on this product is used in the certain printed wiring boards. &#...
...1/2 in) (w/h/d) Mass: XNV-770BT: Approx. 2.7 kg (5 lb 14 oz) XNV-660BT: Approx. 2.4 kg (5 lb 4 oz) Supplied accessories: Card remote commander: RM-X170 Parts for installation and connections (1 set) Microphone USB connection cable for iPod: RC-200IPV (XNV-770BT only) CD-ROM (Application disc) Parts for enabling navigation function (1 set) Optional ... of this unit. Please ask the dealer for iPod: RC-200IPV HD Radio™ tuner: XT-100HD Rear View Camera: XA-R800C Your dealer may be played. Depending on this product is used in the certain printed wiring boards. &#...
Operating Instructions
Page 69
... antenna (aerial) control lead (blue) or accessory power supply lead (red) to the connected equipment, and set the input selector of the rear view camera is fixed on this unit. • Defective or dirty disc. • Installation is incorrect. The sound is hampered by this unit. • Defective... this unit. Automatic tuning is not possible. • Setting of the local seek mode is not set the input selector of the rear view camera is displayed on the DVD. t Check the connection of the power antenna (aerial) control lead. Picture does not fit in the rear/side ...
... antenna (aerial) control lead (blue) or accessory power supply lead (red) to the connected equipment, and set the input selector of the rear view camera is fixed on this unit. • Defective or dirty disc. • Installation is incorrect. The sound is hampered by this unit. • Defective... this unit. Automatic tuning is not possible. • Setting of the local seek mode is not set the input selector of the rear view camera is displayed on the DVD. t Check the connection of the power antenna (aerial) control lead. Picture does not fit in the rear/side ...
Operating Instructions
Page 75
...) 58 Program Types (PTY) 24, 25 R Radio Data System (RDS) 24 Rear Bass Enhancer (RBE) 49, 56 Rear view camera 61 Rear view camera input (Camera Input) 54 Rear view camera settings (Rear View Camera Setting) 62 Receive menu (Receive Menu) 19 Repeat play (Repeat) 27, 29, 35 Reset 16 Resume play 22 Ring tone...
...) 58 Program Types (PTY) 24, 25 R Radio Data System (RDS) 24 Rear Bass Enhancer (RBE) 49, 56 Rear view camera 61 Rear view camera input (Camera Input) 54 Rear view camera settings (Rear View Camera Setting) 62 Receive menu (Receive Menu) 19 Repeat play (Repeat) 27, 29, 35 Reset 16 Resume play 22 Ring tone...


