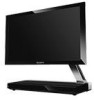

Operating Instructions
Page 4
.... To reduce the risk of image retention, turn off the menus of connected equipment (see "Important Safety Instructions" on the cord. Un-repairable damage can radiate radio frequency energy and, if not installed and used in wide screen mode (16:9 aspect ratio). s Use the AC power cord specified by pressing the DISPLAY button, and turn off the On Screen Display (OSD) by Sony and suitable for a Class B digital device, pursuant to the presence...
.... To reduce the risk of image retention, turn off the menus of connected equipment (see "Important Safety Instructions" on the cord. Un-repairable damage can radiate radio frequency energy and, if not installed and used in wide screen mode (16:9 aspect ratio). s Use the AC power cord specified by pressing the DISPLAY button, and turn off the On Screen Display (OSD) by Sony and suitable for a Class B digital device, pursuant to the presence...
Operating Instructions
Page 5
... Buttons and Indicators on the Base 24 Overview of the TV Home Menu (XMB 25 Enjoying Photos and Music from Damage 30 Image Retention 30 Screen Saver 30 Customizing the TV Settings Adjusting the Settings Menu 31 TV Settings Descriptions 32 Product Support 32 Clock/Timers Settings 32 Picture Settings 32 Sound Settings 34 Screen Settings 34 Video Options Settings 35 Audio Options Settings 36 Channel Settings 37 CC Closed Captions (CC) Settings 38 Parental Lock Settings 38 HDMI Settings 41 General Settings 41 Initial Setup 42 Other Information Troubleshooting...
... Buttons and Indicators on the Base 24 Overview of the TV Home Menu (XMB 25 Enjoying Photos and Music from Damage 30 Image Retention 30 Screen Saver 30 Customizing the TV Settings Adjusting the Settings Menu 31 TV Settings Descriptions 32 Product Support 32 Clock/Timers Settings 32 Picture Settings 32 Sound Settings 34 Screen Settings 34 Video Options Settings 35 Audio Options Settings 36 Channel Settings 37 CC Closed Captions (CC) Settings 38 Parental Lock Settings 38 HDMI Settings 41 General Settings 41 Initial Setup 42 Other Information Troubleshooting...
Operating Instructions
Page 6
... connecting cables, be bared and cut, causing a short-circuit, and resulting in a fire or an electric shock. Lightning storms For added protection for replacement of time. 14) Refer all instructions. 5) Do not use the supplied AC power cord on the cables. A polarized plug has two blades with a wet hand. If you plug/unplug the AC power cord from the wall outlet first. If the provided plug...
... connecting cables, be bared and cut, causing a short-circuit, and resulting in a fire or an electric shock. Lightning storms For added protection for replacement of time. 14) Refer all instructions. 5) Do not use the supplied AC power cord on the cables. A polarized plug has two blades with a wet hand. If you plug/unplug the AC power cord from the wall outlet first. If the provided plug...
Operating Instructions
Page 7
... Electrical Code Antenna discharge unit (NEC Section 810-20) Grounding conductors (NEC Section 810-21) Ground clamps Power service grounding electrode system (NEC Art 250 Part H) BATTERIES CAUTION: Danger of overhead power lines or other electric light or power circuits, or where it . Small accessories Keep small accessories out of the TV set Unplug the AC power cord when cleaning this TV. Replace only...
... Electrical Code Antenna discharge unit (NEC Section 810-20) Grounding conductors (NEC Section 810-21) Ground clamps Power service grounding electrode system (NEC Art 250 Part H) BATTERIES CAUTION: Danger of overhead power lines or other electric light or power circuits, or where it . Small accessories Keep small accessories out of the TV set Unplug the AC power cord when cleaning this TV. Replace only...
Operating Instructions
Page 12
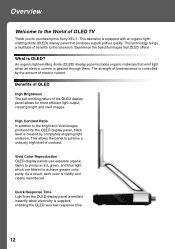
... greater color purity. Vivid Color Reproduction OLED display panels use separate organic layers to produce red, green, and blue light, which are filtered to achieve a uniquely high level of contrast. This television is supplied, enabling the OLED very fast response time. 12 This technology brings a multitude of benefits to this Sony XEL-1. The strength of luminescence is controlled by completely stopping light emission. Quick Response Time Light from the OLED display panel...
... greater color purity. Vivid Color Reproduction OLED display panels use separate organic layers to produce red, green, and blue light, which are filtered to achieve a uniquely high level of contrast. This television is supplied, enabling the OLED very fast response time. 12 This technology brings a multitude of benefits to this Sony XEL-1. The strength of luminescence is controlled by completely stopping light emission. Quick Response Time Light from the OLED display panel...

Operating Instructions
Page 14
... plug adapter (not supplied). ~ • While headphones are connected, the TV speakers are muted. 14 This USB port is PCM/Dolby Digital compatible. HDMI supports enhanced, or high-definition video, plus digital audio. 2 DMex/ SERVICE ~ • You can view 480i, 480p, 720p, 1080i and 1080p formats with an HDMI connection. ACCESS LED located above the Memory Stick slot blinks while Memory Stick is accessed. 5 VHF/UHF/CABLE RF input that connects to your Cable or VHF/UHF antenna. 6 Headphone jack/ DIGITAL AUDIO OUT (OPTICAL) Connects...
... plug adapter (not supplied). ~ • While headphones are connected, the TV speakers are muted. 14 This USB port is PCM/Dolby Digital compatible. HDMI supports enhanced, or high-definition video, plus digital audio. 2 DMex/ SERVICE ~ • You can view 480i, 480p, 720p, 1080i and 1080p formats with an HDMI connection. ACCESS LED located above the Memory Stick slot blinks while Memory Stick is accessed. 5 VHF/UHF/CABLE RF input that connects to your Cable or VHF/UHF antenna. 6 Headphone jack/ DIGITAL AUDIO OUT (OPTICAL) Connects...

Operating Instructions
Page 15
... antenna/cable input using a 75-ohm coaxial cable to your TV via the HDMI input on the back of your area) along with HDMI Connection Rear of input signal you connect this equipment to receive optimum picture quality. Shown with standard-definition analog programming. ~ • This TV is capable of receiving unscrambled digital programming for the type of TV 1 IN 2 IN DMex/SERVICE DC IN 16V STD/DUO VHF/ UHF/ CABLE HDMI cable HD cable box/ HD satellite box...
... antenna/cable input using a 75-ohm coaxial cable to your TV via the HDMI input on the back of your area) along with HDMI Connection Rear of input signal you connect this equipment to receive optimum picture quality. Shown with standard-definition analog programming. ~ • This TV is capable of receiving unscrambled digital programming for the type of TV 1 IN 2 IN DMex/SERVICE DC IN 16V STD/DUO VHF/ UHF/ CABLE HDMI cable HD cable box/ HD satellite box...

Operating Instructions
Page 18
... connected an antenna or cable directly to the previous screen. In this case, press V/v/B/b, or VOL +/- to return to continue. You may be used for the first time. You will scan for digital channels. Follow the help text provided on . • The Auto Program may want to create a list of available analog and digital channels if you accidentally turn on the TV for all the on-screen settings. Initial Setup The Initial Setup screen...
... connected an antenna or cable directly to the previous screen. In this case, press V/v/B/b, or VOL +/- to return to continue. You may be used for the first time. You will scan for digital channels. Follow the help text provided on . • The Auto Program may want to create a list of available analog and digital channels if you accidentally turn on the TV for all the on-screen settings. Initial Setup The Initial Setup screen...

Operating Instructions
Page 20
... programmed to use with 0-9 and ENT to select a channel; the channel changes after two seconds. Slide the battery holder out. Button Description 1 DISPLAY 2 CC 3 DMex 4 SOUND 5 0-9 ENT 6 Press once to display the information pertaining to access features in your dealer or www.sony.com/bravia for more information. If you want to turn off the Closed Captions (CC). Use them as a reference when operating the remote control. • This remote control...
... programmed to use with 0-9 and ENT to select a channel; the channel changes after two seconds. Slide the battery holder out. Button Description 1 DISPLAY 2 CC 3 DMex 4 SOUND 5 0-9 ENT 6 Press once to display the information pertaining to access features in your dealer or www.sony.com/bravia for more information. If you want to turn off the Closed Captions (CC). Use them as a reference when operating the remote control. • This remote control...

Operating Instructions
Page 24
...). 3 TIMER LED When the timer is set, this LED will act as B/b to access the TV Home Menu items such as their function may cause a malfunction. 24 It may be affected. • Do not block the ventilation openings or speakers by placing any objects in red, the TV requires service. If the LED flashes in front of the POWER button is lit, External Inputs can be adjusted. If the HOME button is...
...). 3 TIMER LED When the timer is set, this LED will act as B/b to access the TV Home Menu items such as their function may cause a malfunction. 24 It may be affected. • Do not block the ventilation openings or speakers by placing any objects in red, the TV requires service. If the LED flashes in front of the POWER button is lit, External Inputs can be adjusted. If the HOME button is...

Operating Instructions
Page 30
... no operation is performed (such as switching the channels or adjusting the volume control) for more than 5 minutes, the screen saver starts automatically. It protects the screen from Damage Prolonged display of the material used for its high-precision image, permanent image retention may darken the screen • still or motionless images displayed by slightly shifting the picture position on the display automatically after a set -top box, video recorder, disc player...
... no operation is performed (such as switching the channels or adjusting the volume control) for more than 5 minutes, the screen saver starts automatically. It protects the screen from Damage Prolonged display of the material used for its high-precision image, permanent image retention may darken the screen • still or motionless images displayed by slightly shifting the picture position on the display automatically after a set -top box, video recorder, disc player...
Operating Instructions
Page 32
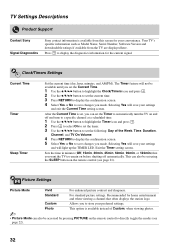
... . Selecting Yes will not be accessed by pressing PICTURE on the remote control to directly toggle the modes (see page 21). Recommended for your preferred settings. TV Settings Descriptions Product Support Contact Sony Signal Diagnostics Sony contact information is available from the TV are displayed here. Clock/Timers Settings Current Time Timer Sleep Timer Set the current time (day, hour, minutes, and AM/PM). This can also be available until you set the Current Time. 1 Use the V/v/B/b button...
... . Selecting Yes will not be accessed by pressing PICTURE on the remote control to directly toggle the modes (see page 21). Recommended for your preferred settings. TV Settings Descriptions Product Support Contact Sony Signal Diagnostics Sony contact information is available from the TV are displayed here. Clock/Timers Settings Current Time Timer Sleep Timer Set the current time (day, hour, minutes, and AM/PM). This can also be available until you set the Current Time. 1 Use the V/v/B/b button...

Operating Instructions
Page 33
... white colors a bluish tint. Useful for all the advanced settings to the default values. Black Corrector Enhances black areas of color reproduction from the OPTIONS menu. Clear White Emphasizes white and light colors. Color Space Selects the range of the picture for the following conditions: Vivid Advanced Settings n/a Standard yes Custom yes Photo* yes Reset Resets all inputs can also be accessed by pressing OPTIONS on the remote control, then selecting Picture...
... white colors a bluish tint. Useful for all the advanced settings to the default values. Black Corrector Enhances black areas of color reproduction from the OPTIONS menu. Clear White Emphasizes white and light colors. Color Space Selects the range of the picture for the following conditions: Vivid Advanced Settings n/a Standard yes Custom yes Photo* yes Reset Resets all inputs can also be accessed by pressing OPTIONS on the remote control, then selecting Picture...

Operating Instructions
Page 34
...). • See WIDE button description and "Changing the Wide Screen Mode" chart on the headphone/DIGITAL AUDIO OUT (OPTICAL) connection. Select High or Low for the amount of boost you are connected. Steady Sound On Stabilizes the volume across all programs and commercials. Screen Settings Wide Mode Wide Zoom Fills the screen with a greater sense of the current input (TV or HDMI input) relative to other inputs. ~ • Only Reset and Volume Offset options are...
...). • See WIDE button description and "Changing the Wide Screen Mode" chart on the headphone/DIGITAL AUDIO OUT (OPTICAL) connection. Select High or Low for the amount of boost you are connected. Steady Sound On Stabilizes the volume across all programs and commercials. Screen Settings Wide Mode Wide Zoom Fills the screen with a greater sense of the current input (TV or HDMI input) relative to other inputs. ~ • Only Reset and Volume Offset options are...
Operating Instructions
Page 38
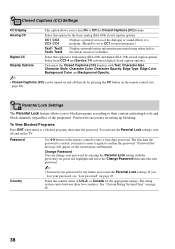
... sound effects of U.S.A. See "Custom Rating System Chart" on page 45. Analog CC Select this option for the appropriate ratings. Display Options Customize the Closed Captions (CC) displays with the previously set to turn off directly by entering the Parental Lock setting with Text, Character Size, Character Style, Character Color, Character Opacity, Edge Type, Edge Color, Background Color and Background Opacity. ~ • Closed Captions (CC) can be set password, highlight and select the Change Password...
... sound effects of U.S.A. See "Custom Rating System Chart" on page 45. Analog CC Select this option for the appropriate ratings. Display Options Customize the Closed Captions (CC) displays with the previously set to turn off directly by entering the Parental Lock setting with Text, Character Size, Character Style, Character Color, Character Opacity, Edge Type, Edge Color, Background Color and Background Opacity. ~ • Closed Captions (CC) can be set password, highlight and select the Change Password...
Operating Instructions
Page 43
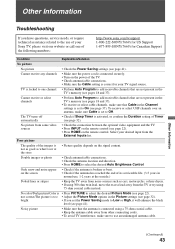
... optional video equipment and the TV. • Press INPUT on the power of Timer (see page 22). • Press HOME on the signal content. Double images or ghosts • Check antenna/cable connections. • Check the antenna location and direction. • Press HOME to select the desired Picture Mode (see page 41). The TV turns off automatically • Check if Sleep Timer is • Press PICTURE to select the desired Auto Brightness Control. Poor picture The...
... optional video equipment and the TV. • Press INPUT on the power of Timer (see page 22). • Press HOME on the signal content. Double images or ghosts • Check antenna/cable connections. • Check the antenna location and direction. • Press HOME to select the desired Picture Mode (see page 41). The TV turns off automatically • Check if Sleep Timer is • Press PICTURE to select the desired Auto Brightness Control. Poor picture The...

Operating Instructions
Page 44
... antenna cable. When HD content channels switch to SD definition content (commercials), the picture may cause your TV's screen to display less loss of the source content used by certain other connecting cords. • To avoid TV interference, make sure to the method the provider broadcasts their contents. "Black box" on the image dimensions, file size and number of the connected equipment is 1,000 files. To turn off this is automatically replaced with a black...
... antenna cable. When HD content channels switch to SD definition content (commercials), the picture may cause your TV's screen to display less loss of the source content used by certain other connecting cords. • To avoid TV interference, make sure to the method the provider broadcasts their contents. "Black box" on the image dimensions, file size and number of the connected equipment is 1,000 files. To turn off this is automatically replaced with a black...

Operating Instructions
Page 45
... factory • Turn on the TV. Some digital cable channels are not being displayed • Certain cable companies have limitations on the broadcast of the TV. • Fluorescent lamps can interfere with your remote control operation; How to reset the TV to reduce the ghosting. Press HOME or OPTIONS to return to protect the screen, the brightness of an image is performed (such as switching the channels or adjusting the volume control...
... factory • Turn on the TV. Some digital cable channels are not being displayed • Certain cable companies have limitations on the broadcast of the TV. • Fluorescent lamps can interfere with your remote control operation; How to reset the TV to reduce the ghosting. Press HOME or OPTIONS to return to protect the screen, the brightness of an image is performed (such as switching the channels or adjusting the volume control...
Operating Instructions
Page 46
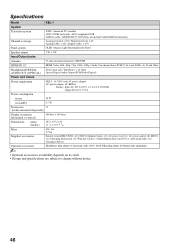
...CableCARD functionality) Channel coverage Analog terrestrial: 2-69 / Digital terrestrial: 2-69 Analog Cable: 1-125 / Digital Cable: 1-135 Panel system OLED (Organic Light-Emitting Diode) Panel Speaker output 1 W + 1 W Input/Output jacks Antenna 75-ohm external terminal for VHF/UHF HDMI IN 1/2 HDMI: Video: 480i, 480p, 720p, 1080i, 1080p / Audio: Two channel linear PCM 32, 44.1 and 48 kHz, 16, 20 and 24bits Headphones/DIGITAL AUDIO OUT (OPTICAL) Stereo mini jack / Impedance: 16 ohms Optical Digital Audio Output (PCM/Dolby Digital) Power and others Power requirement XEL-1: 16 V DC...
...CableCARD functionality) Channel coverage Analog terrestrial: 2-69 / Digital terrestrial: 2-69 Analog Cable: 1-125 / Digital Cable: 1-135 Panel system OLED (Organic Light-Emitting Diode) Panel Speaker output 1 W + 1 W Input/Output jacks Antenna 75-ohm external terminal for VHF/UHF HDMI IN 1/2 HDMI: Video: 480i, 480p, 720p, 1080i, 1080p / Audio: Two channel linear PCM 32, 44.1 and 48 kHz, 16, 20 and 24bits Headphones/DIGITAL AUDIO OUT (OPTICAL) Stereo mini jack / Impedance: 16 ohms Optical Digital Audio Output (PCM/Dolby Digital) Power and others Power requirement XEL-1: 16 V DC...
Operating Instructions
Page 47
... HDMI Settings 41 Initial Setup 42 Parental Lock 38 Picture 32 Product Support 32 Screen 34 Sound 34 Video Options 35 Sharpness 33 Show/Hide Channels 37 Signal Diagnostics 32 SLEEP button 21 Sleep Timer 32 Sound Booster 34 SOUND button 20 Sound Mode 34 Steady Sound 34 Surround 34 T Timer 32 TIMER LED 24 Timers Settings 32 Treble 34 Troubleshooting 43-45 TV Auto Power On 41 TV Rating 40 U U.S.A. Index 0-9 buttons 20 4:3 Default 35 A Add Digital Channels 37 Advanced Settings 33 Analog CC 38 Auto Brightness Control 41 Auto Program...
... HDMI Settings 41 Initial Setup 42 Parental Lock 38 Picture 32 Product Support 32 Screen 34 Sound 34 Video Options 35 Sharpness 33 Show/Hide Channels 37 Signal Diagnostics 32 SLEEP button 21 Sleep Timer 32 Sound Booster 34 SOUND button 20 Sound Mode 34 Steady Sound 34 Surround 34 T Timer 32 TIMER LED 24 Timers Settings 32 Treble 34 Troubleshooting 43-45 TV Auto Power On 41 TV Rating 40 U U.S.A. Index 0-9 buttons 20 4:3 Default 35 A Add Digital Channels 37 Advanced Settings 33 Analog CC 38 Auto Brightness Control 41 Auto Program...


