Operating Instructions
Page 2
.../DVD player is turned off . CAUTION The use of california, USA only Perchlorate Material - Increase the separation between the equipment and receiver. - This equipment has been tested and found to set the Auto Off function (page 41). To set the speaker connection status, see page 45. These limits are cautioned that to time out or a mistake, the settings can radiate radio frequency energy and, if not installed...
.../DVD player is turned off . CAUTION The use of california, USA only Perchlorate Material - Increase the separation between the equipment and receiver. - This equipment has been tested and found to set the Auto Off function (page 41). To set the speaker connection status, see page 45. These limits are cautioned that to time out or a mistake, the settings can radiate radio frequency energy and, if not installed...
Operating Instructions
Page 3
... installation/connections manual and install the unit properly. - If you park the car and set the parking brake. Do not use the setup feature or any car parts such as pipes, tubes, fuel tank or wiring by a qualified technician or service personnel. - Keep small articles out of the reach of the car. Preventing an accident Pictures and karaoke function are available only after displaying the caution below. Do not watch or operate the unit...
... installation/connections manual and install the unit properly. - If you park the car and set the parking brake. Do not use the setup feature or any car parts such as pipes, tubes, fuel tank or wiring by a qualified technician or service personnel. - Keep small articles out of the reach of the car. Preventing an accident Pictures and karaoke function are available only after displaying the caution below. Do not watch or operate the unit...
Operating Instructions
Page 4
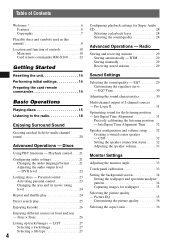
... Selecting the sound quality 28 Advanced Operations - Pro Logic II 31 Optimizing sound for wallpaper 35 Selecting the picture quality - CSO 32 Setting the speaker connection status . . . . . 32 Adjusting the speaker volume 33 Monitor Settings Adjusting the monitor angle 33 Touch panel calibration 33 Setting the background screen 34 Setting the wallpaper and spectrum analyzer pattern 34 Capturing images for the listening position - DVD level 22 Locking discs - Picture EQ 35 Customizing the picture quality 36...
... Selecting the sound quality 28 Advanced Operations - Pro Logic II 31 Optimizing sound for wallpaper 35 Selecting the picture quality - CSO 32 Setting the speaker connection status . . . . . 32 Adjusting the speaker volume 33 Monitor Settings Adjusting the monitor angle 33 Touch panel calibration 33 Setting the background screen 34 Setting the wallpaper and spectrum analyzer pattern 34 Capturing images for the listening position - DVD level 22 Locking discs - Picture EQ 35 Customizing the picture quality 36...
Operating Instructions
Page 5
... Screen settings - Screen 45 Disc playback settings - Disc 46 Setting the security code 47 Setting the clock 47 Using Optional Equipment Auxiliary audio/video equipment 48 Back camera/navigation device 48 Displaying the picture 48 Back camera settings 49 CD changer 49 Rotary commander RM-X4S 50 Additional Information Precautions 51 Notes on LCD panel 51 Notes on discs 51 Playback order of DVD setup 37 Language settings for display or soundtrack 38 Audio/visual settings 38 Parental control settings 39 Play mode settings...
... Screen settings - Screen 45 Disc playback settings - Disc 46 Setting the security code 47 Setting the clock 47 Using Optional Equipment Auxiliary audio/video equipment 48 Back camera/navigation device 48 Displaying the picture 48 Back camera settings 49 CD changer 49 Rotary commander RM-X4S 50 Additional Information Precautions 51 Notes on LCD panel 51 Notes on discs 51 Playback order of DVD setup 37 Language settings for display or soundtrack 38 Audio/visual settings 38 Parental control settings 39 Play mode settings...
Operating Instructions
Page 6
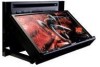
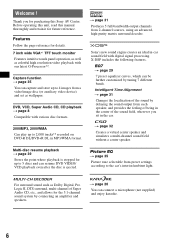
... 31 Changes the localization of the sound by delaying the sound output from 2-channel sources, using an advanced, high-purity matrix surround decoder. t page 26 You can be further customized by connecting an amplifier and speakers. t page 35 Picture tone selectable from preset settings according to 4 images from a video/image disc (or auxiliary video device) and set as wallpaper. Features Follow the page reference for details. 7 inch wide VGA*1 TFT touch monitor...
... 31 Changes the localization of the sound by delaying the sound output from 2-channel sources, using an advanced, high-purity matrix surround decoder. t page 26 You can be further customized by connecting an amplifier and speakers. t page 35 Picture tone selectable from preset settings according to 4 images from a video/image disc (or auxiliary video device) and set as wallpaper. Features Follow the page reference for details. 7 inch wide VGA*1 TFT touch monitor...
Operating Instructions
Page 7
...,000). *2 Dedicated processor which renders the graphic user interface on the screen translucently. *3 Depending on the satellite radio tuner module. If the back camera input is selected, its picture automatically appears when the back lamp lights up to 3 optional devices, such as a portable media player, game, etc. Please see the supplied installation/ connections manual. NAVI/CAMERA IN allows connection of up . *1 Abbreviation for home and other...
...,000). *2 Dedicated processor which renders the graphic user interface on the screen translucently. *3 Depending on the satellite radio tuner module. If the back camera input is selected, its picture automatically appears when the back lamp lights up to 3 optional devices, such as a portable media player, game, etc. Please see the supplied installation/ connections manual. NAVI/CAMERA IN allows connection of up . *1 Abbreviation for home and other...
Operating Instructions
Page 10
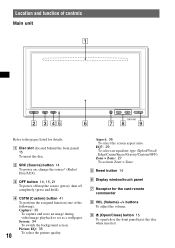
.../eject the disc when inserted. C OFF button 14, 15, 21 To power off completely (press and hold). D CSTM (Custom) button 41 To perform the assigned function (one of controls Main unit 1 SRC OFF CSTM 2 3 45 6 XAV-W1 78 9 Refer to set as a wallpaper. Screen: 34 To switch the background screen. Capture: 35 To capture and store an image during video/image playback to the pages listed for the card remote...
.../eject the disc when inserted. C OFF button 14, 15, 21 To power off completely (press and hold). D CSTM (Custom) button 41 To perform the assigned function (one of controls Main unit 1 SRC OFF CSTM 2 3 45 6 XAV-W1 78 9 Refer to set as a wallpaper. Screen: 34 To switch the background screen. Capture: 35 To capture and store an image during video/image playback to the pages listed for the card remote...
Operating Instructions
Page 13
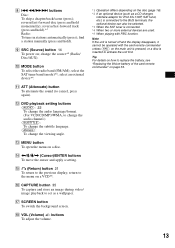
... attenuate the sound (to change the audio channel.) (SUBTITLE): To change the subtitle language. (ANGLE): To change the viewing angle. I SRC (Source) button 14 To power on a disc. M MENU button To open the menu on ; L DVD playback setting buttons (AUDIO): 22 To change the source*2 (Radio/ Disc/AUX). H .m/M> buttons Disc: To skip a chapter/track/scene (press); reverse/fast-forward disc (press and hold ). J MODE button To select the radio band (FM/AM); N select the SAT tuner band (mode)*3; select an external device*4. reverse/fast-forward...
... attenuate the sound (to change the audio channel.) (SUBTITLE): To change the subtitle language. (ANGLE): To change the viewing angle. I SRC (Source) button 14 To power on a disc. M MENU button To open the menu on ; L DVD playback setting buttons (AUDIO): 22 To change the source*2 (Radio/ Disc/AUX). H .m/M> buttons Disc: To skip a chapter/track/scene (press); reverse/fast-forward disc (press and hold ). J MODE button To select the radio band (FM/AM); N select the SAT tuner band (mode)*3; select an external device*4. reverse/fast-forward...
Operating Instructions
Page 16
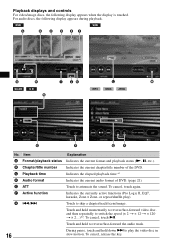
... video/image discs, the following display appears during playback. A B C D EF G H I JK L M N O P QR No. C Playback time Indicates the elapsed playback time.*1 D Audio format Indicates the current audio format of the DVD. Touch and hold down > to switch the speed (× 2 t × 12 t × 120 t × 2...)*2. F Active function Indicates the currently active functions (Pro Logic II, EQ7, karaoke, Zone × Zone, or repeat/shuffle play the video disc in 16 slow motion. G ./> Touch to reverse...
... video/image discs, the following display appears during playback. A B C D EF G H I JK L M N O P QR No. C Playback time Indicates the elapsed playback time.*1 D Audio format Indicates the current audio format of the DVD. Touch and hold down > to switch the speed (× 2 t × 12 t × 120 t × 2...)*2. F Active function Indicates the currently active functions (Pro Logic II, EQ7, karaoke, Zone × Zone, or repeat/shuffle play the video disc in 16 slow motion. G ./> Touch to reverse...
Operating Instructions
Page 22
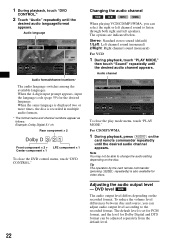
When the same language is displayed two or more times, the disc is also available for video discs. Stereo: Standard stereo sound (default) 1/Left: Left channel sound (monaural) 2/Right: Right channel sound (monaural) For VCD 1 During playback, touch "PLAY MODE," then touch "Sound" repeatedly until the desired audio language/format appears. Adjusting the audio output level - 1 During playback, touch "DVD CONTROL." 2 Touch "Audio" repeatedly until the desired audio channel appears. Example: Dolby Digital 5.1 ch Rear component × 2 Dolby D 3 / 2 . 1 Front component...
When the same language is displayed two or more times, the disc is also available for video discs. Stereo: Standard stereo sound (default) 1/Left: Left channel sound (monaural) 2/Right: Right channel sound (monaural) For VCD 1 During playback, touch "PLAY MODE," then touch "Sound" repeatedly until the desired audio language/format appears. Adjusting the audio output level - 1 During playback, touch "DVD CONTROL." 2 Touch "Audio" repeatedly until the desired audio channel appears. Example: Dolby Digital 5.1 ch Rear component × 2 Dolby D 3 / 2 . 1 Front component...
Operating Instructions
Page 29
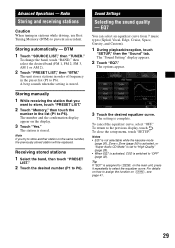
... the setup menu, touch "SETUP." The unit stores stations in order of frequency in the list (P1 to the previous display, touch . EQ7 You can select an equalizer curve from 7 music types (Xplod, Vocal, Edge, Cruise, Space, Gravity, and Custom). 1 During playback/reception, touch "SETUP," then the "Sound" tab. The "Sound Setting" display appears. 2 Touch "EQ7." The number and the confirmation display appear on the same number, the previously stored station will be replaced. To...
... the setup menu, touch "SETUP." The unit stores stations in order of frequency in the list (P1 to the previous display, touch . EQ7 You can select an equalizer curve from 7 music types (Xplod, Vocal, Edge, Cruise, Space, Gravity, and Custom). 1 During playback/reception, touch "SETUP," then the "Sound" tab. The "Sound Setting" display appears. 2 Touch "EQ7." The number and the confirmation display appear on the same number, the previously stored station will be replaced. To...
Operating Instructions
Page 33
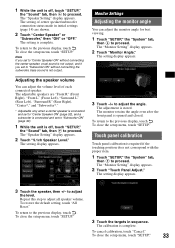
... previous display, touch . Adjusting the speaker volume You can adjust the monitor angle for best viewing. 1 Touch "SETUP," the "System" tab, then to proceed. Note If you set to "Center Speaker ON" without connecting the center speaker, vocal sound is not output, and if you set to "Subwoofer ON" (page 32). 1 While the unit is off , touch "SETUP," the "Sound" tab, then to proceed. The "Monitor Setting" display appears. 2 Touch "Monitor Angle." To return to the previous display, touch . The...
... previous display, touch . Adjusting the speaker volume You can adjust the monitor angle for best viewing. 1 Touch "SETUP," the "System" tab, then to proceed. Note If you set to "Center Speaker ON" without connecting the center speaker, vocal sound is not output, and if you set to "Subwoofer ON" (page 32). 1 While the unit is off , touch "SETUP," the "Sound" tab, then to proceed. The "Monitor Setting" display appears. 2 Touch "Monitor Angle." To return to the previous display, touch . The...
Operating Instructions
Page 43
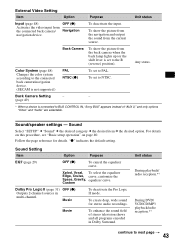
... camera/navigation device. (SECAM is connected to BUS CONTROL IN, "Sony BUS" appears instead of stereo television shows and all programs encoded in multi-channel. External Video Setting Item Option Purpose Unit status Input (page 48) OFF (z) Activates the video input from the back camera when the back lamp lights up (or the shift lever is set to the R (reverse) position). Music To deactivate the Pro Logic II mode. To set to next page t Sound/speaker settings...
... camera/navigation device. (SECAM is connected to BUS CONTROL IN, "Sony BUS" appears instead of stereo television shows and all programs encoded in multi-channel. External Video Setting Item Option Purpose Unit status Input (page 48) OFF (z) Activates the video input from the back camera when the back lamp lights up (or the shift lever is set to the R (reverse) position). Music To deactivate the Pro Logic II mode. To set to next page t Sound/speaker settings...
Operating Instructions
Page 47
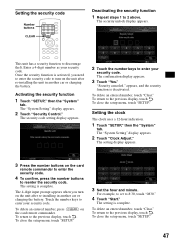
...-installing the unit in another car or charging the battery. To close the setup menu, touch "SETUP." Setting the security code Number buttons CLEAR Deactivating the security function 1 Repeat steps 1 to enter your security code. For example, to set to the previous display, touch . The setting is activated, you turn on the card remote commander to enter the security code. 4 To confirm, press the number buttons to the previous display, touch . Setting the clock The clock uses a 12-hour indication. 1 Touch "SETUP...
...-installing the unit in another car or charging the battery. To close the setup menu, touch "SETUP." Setting the security code Number buttons CLEAR Deactivating the security function 1 Repeat steps 1 to enter your security code. For example, to set to the previous display, touch . The setting is activated, you turn on the card remote commander to enter the security code. 4 To confirm, press the number buttons to the previous display, touch . Setting the clock The clock uses a 12-hour indication. 1 Touch "SETUP...
Operating Instructions
Page 48
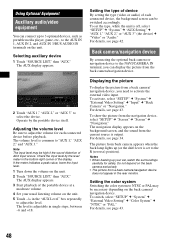
... the unit. 2 Touch "SOURCE LIST," then "AUX." Operate by the level meter in the rear monitor. The AUX display appears. 3 Start playback of AUX input occurs. To set to the R (reverse) position). For details, see page 43. 48 The navigation display appears on the back camera/ navigation device. Setting the color system Switching the color system to NTSC or PAL may be necessary depending on the background screen, and the sound from the navigation device, select "SETUP" c "Screen" c "Screen" c "Navigation." The level is adjustable...
... the unit. 2 Touch "SOURCE LIST," then "AUX." Operate by the level meter in the rear monitor. The AUX display appears. 3 Start playback of AUX input occurs. To set to the R (reverse) position). For details, see page 43. 48 The navigation display appears on the back camera/ navigation device. Setting the color system Switching the color system to NTSC or PAL may be necessary depending on the background screen, and the sound from the navigation device, select "SETUP" c "Screen" c "Screen" c "Navigation." The level is adjustable...

Operating Instructions
Page 53
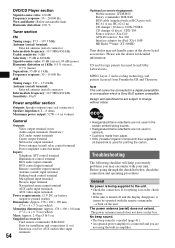
... JPEG Playback of the card remote commander becomes shorter. Specifications Fuse (10A) AUDIO POWER SPECIFICATIONS POWER OUTPUT AND TOTAL HARMONIC DISTORTION 23.2 watts per channel minimum continuous average power into 4 Ohms) Monitor section Display type: Wide LCD color monitor Dimensions: 7.0 in fire. lossless compression - In such a case, consult your nearest Sony dealer. WARNING Battery may be an internal malfunction. It compresses audio CD data to approximately 1/22* of...
... JPEG Playback of the card remote commander becomes shorter. Specifications Fuse (10A) AUDIO POWER SPECIFICATIONS POWER OUTPUT AND TOTAL HARMONIC DISTORTION 23.2 watts per channel minimum continuous average power into 4 Ohms) Monitor section Display type: Wide LCD color monitor Dimensions: 7.0 in fire. lossless compression - In such a case, consult your nearest Sony dealer. WARNING Battery may be an internal malfunction. It compresses audio CD data to approximately 1/22* of...
Operating Instructions
Page 54
... output terminals (front/rear) Z×Z audio output terminals Center output terminal Subwoofer output terminal Power antenna (aerial) relay control terminal Power amplifier control terminal Inputs: Telephone ATT control terminal Illumination control terminal BUS audio input terminals BUS control input terminal Remote controller input terminal Antenna (aerial) input terminal Parking break control terminal Microphone input terminal Reverse input terminal Navigation/camera input terminal AUX audio input terminals AUX video input terminals Power requirements: 12 V DC car battery (negative ground...
... output terminals (front/rear) Z×Z audio output terminals Center output terminal Subwoofer output terminal Power antenna (aerial) relay control terminal Power amplifier control terminal Inputs: Telephone ATT control terminal Illumination control terminal BUS audio input terminals BUS control input terminal Remote controller input terminal Antenna (aerial) input terminal Parking break control terminal Microphone input terminal Reverse input terminal Navigation/camera input terminal AUX audio input terminals AUX video input terminals Power requirements: 12 V DC car battery (negative ground...
Operating Instructions
Page 55
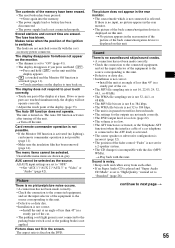
... stations and correct time are shown in a sturdy part of the back camera/navigation device is displayed on the unit until the display appears. • is touched and the Monitor Off function is activated (page 11). The display does not respond to the parking brake switch cord, or the parking brake is not applied. The unit is turned on . t Turn off the unit. The aspect ratio is fixed on this unit. • Defective or dirty disc. • Installation is...
... stations and correct time are shown in a sturdy part of the back camera/navigation device is displayed on the unit until the display appears. • is touched and the Monitor Off function is activated (page 11). The display does not respond to the parking brake switch cord, or the parking brake is not applied. The unit is turned on . t Turn off the unit. The aspect ratio is fixed on this unit. • Defective or dirty disc. • Installation is...
Operating Instructions
Page 56
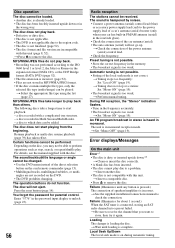
...; Connect a power antenna (aerial) control lead (blue) or accessory power supply lead (red) to the power supply lead of the car antenna (aerial). • The auto antenna (aerial) will not eject. Local Seek Up/Down The local seek mode is not correct. Resume playback or multi-disc resume playback (page 39) has taken effect. Error displays/Messages On the main unit Error*1 • The disc is not compatible with this unit. The following discs...
...; Connect a power antenna (aerial) control lead (blue) or accessory power supply lead (red) to the power supply lead of the car antenna (aerial). • The auto antenna (aerial) will not eject. Local Seek Up/Down The local seek mode is not correct. Resume playback or multi-disc resume playback (page 39) has taken effect. Error displays/Messages On the main unit Error*1 • The disc is not compatible with this unit. The following discs...
Operating Instructions
Page 57
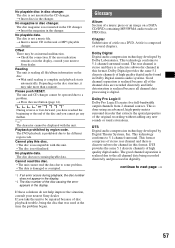
... subwoofer channel in this format. This format comprises of a title on the disc. No playable data. t Insert a music CD in the CD changer. Reading The unit is not inserted in this disc. • The unit cannot read this unit or MP3 playable changer. The DVD playback is damaged or corrupted. *1 If an error occurs during playback, the disc number does not appear in the display. *2 The disc number...
... subwoofer channel in this format. This format comprises of a title on the disc. No playable data. t Insert a music CD in the CD changer. Reading The unit is not inserted in this disc. • The unit cannot read this unit or MP3 playable changer. The DVD playback is damaged or corrupted. *1 If an error occurs during playback, the disc number does not appear in the display. *2 The disc number...


