
Installation/Connections
Page 2
...all other leads have been connected. • Run all ground wires to a common ground point. • Be sure to insulate any doubt about the safe installation of fire. If you are rated high enough, connect the unit directly to use only a fuse of each component's fuse. • When no car circuits... are in your nearest Sony dealer. Cautions • Do not get the wires under a screw, or caught in trucks or other system's power supply cord to this unit, please ...
...all other leads have been connected. • Run all ground wires to a common ground point. • Be sure to insulate any doubt about the safe installation of fire. If you are rated high enough, connect the unit directly to use only a fuse of each component's fuse. • When no car circuits... are in your nearest Sony dealer. Cautions • Do not get the wires under a screw, or caught in trucks or other system's power supply cord to this unit, please ...

Installation/Connections
Page 3
Table of Contents Precautions ...2 Parts List ...4 Connection Example 5 Connecting Information 6 Connecting the cords ...6 Using the tap ...6 1 Car Systems Connections 7 Connecting without optional TV tuner unit 9 Connecting with optional TV tuner unit 10 2 Installing the Main Unit 11 Before installation ...11 Installation procedure ...12 3 After Installation and Connections 14 3
Table of Contents Precautions ...2 Parts List ...4 Connection Example 5 Connecting Information 6 Connecting the cords ...6 Using the tap ...6 1 Car Systems Connections 7 Connecting without optional TV tuner unit 9 Connecting with optional TV tuner unit 10 2 Installing the Main Unit 11 Before installation ...11 Installation procedure ...12 3 After Installation and Connections 14 3

Installation/Connections
Page 8
... speakers with built-in amplifiers) to the speaker terminals may damage the unit. • To avoid a malfunction, do not use the built-in speaker wires installed in your car if the unit shares a common negative E lead for the right and left speaker. • Do not connect the ground lead of this...
... speakers with built-in amplifiers) to the speaker terminals may damage the unit. • To avoid a malfunction, do not use the built-in speaker wires installed in your car if the unit shares a common negative E lead for the right and left speaker. • Do not connect the ground lead of this...

Installation/Connections
Page 11
...T/N T/N • To allow for proper opening and closing of the monitor loading mechanism or other car audio equipment (single DIN slot size) in a stacked configuration, install the main unit on top. 11 Make sure that the monitor when opened position is exceeded, the monitor may deform the chassis, resulting in failure... strong impact or force may not open up will not block access to the hazard switch or other important controls. • Do not install the unit (monitor) in the opened up or retract properly. Shift lever At least 170 mm from horizontal. If this unit together with...
...T/N T/N • To allow for proper opening and closing of the monitor loading mechanism or other car audio equipment (single DIN slot size) in a stacked configuration, install the main unit on top. 11 Make sure that the monitor when opened position is exceeded, the monitor may deform the chassis, resulting in failure... strong impact or force may not open up will not block access to the hazard switch or other important controls. • Do not install the unit (monitor) in the opened up or retract properly. Shift lever At least 170 mm from horizontal. If this unit together with...

Installation/Connections
Page 12
If the monitor is opened while installing and given too much force, it may cause a malfunction. 1 182 mm 53 mm 0 2 Claws 3 qa Dashboard 0 12 Installation procedure Mounting example When installing this unit, be sure to close the monitor of the unit.
If the monitor is opened while installing and given too much force, it may cause a malfunction. 1 182 mm 53 mm 0 2 Claws 3 qa Dashboard 0 12 Installation procedure Mounting example When installing this unit, be sure to close the monitor of the unit.

Installation/Connections
Page 13
... occur if the screws are used directly on the unit without the brackets of the factory-installed car stereo. 13 For Toyota cars, the supplied screws 6 should be used. 6 XAV-A1 XAV-C1 Bracket of factory-installed car stereo Notes • Do not press the front panel buttons of the unit during...the side of the main unit, and use the supplied screws to use the supplied pan-head screws 6 to fasten the brackets. 6 XAV-A1 XAV-C1 Bracket of factory-installed car stereo Screws of factoryinstalled car stereo bracket * Be sure to fasten the brackets. If any objects on top of the unit. •...
... occur if the screws are used directly on the unit without the brackets of the factory-installed car stereo. 13 For Toyota cars, the supplied screws 6 should be used. 6 XAV-A1 XAV-C1 Bracket of factory-installed car stereo Notes • Do not press the front panel buttons of the unit during...the side of the main unit, and use the supplied screws to use the supplied pan-head screws 6 to fasten the brackets. 6 XAV-A1 XAV-C1 Bracket of factory-installed car stereo Screws of factoryinstalled car stereo bracket * Be sure to fasten the brackets. If any objects on top of the unit. •...

Installation/Connections
Page 14
Note To avoid the possibility of damage, you press the Reset button, the system becomes operative. 14 3 After Installation and Connections 1 Start the car's engine. 2 Verify that the brake lights, other lights, horn, turn indicators, and all other electrical parts operate normally. Reset button When you should not use a needle or push the button too strongly. 3 Use a mechanical-pencil or similar to push the Reset button on the unit.
Note To avoid the possibility of damage, you press the Reset button, the system becomes operative. 14 3 After Installation and Connections 1 Start the car's engine. 2 Verify that the brake lights, other lights, horn, turn indicators, and all other electrical parts operate normally. Reset button When you should not use a needle or push the button too strongly. 3 Use a mechanical-pencil or similar to push the Reset button on the unit.

Instructions Manual
Page 1
Model No. For installation and connections, see the supplied Installation/Connections manual. En ce qui concerne l'installation et les connexions, consulter le manuel d'Installation/Connexions fourni. Sony Corporation Printed in the space provided below. Serial No. XAV-A1 XAV-C1 © 2005 Sony Corporation Refer to these numbers whenever you call upon your Sony dealer regarding this product. Para obtener informaci...
Model No. For installation and connections, see the supplied Installation/Connections manual. En ce qui concerne l'installation et les connexions, consulter le manuel d'Installation/Connexions fourni. Sony Corporation Printed in the space provided below. Serial No. XAV-A1 XAV-C1 © 2005 Sony Corporation Refer to these numbers whenever you call upon your Sony dealer regarding this product. Para obtener informaci...

Instructions Manual
Page 2
...to operate this CD/DVD player is connected. - WARNING This equipment has been tested and found to comply with the limits for help. Refer servicing to radio communications. These limits are cautioned that any changes or modifications not expressly approved in a residential installation. Connect the equipment... The use of the vehicle. However, there is no guarantee that to which can radiate radio frequency energy and, if not installed and used in the event of a sudden movement of optical instruments with this equipment does cause harmful interference to radio or television...
...to operate this CD/DVD player is connected. - WARNING This equipment has been tested and found to comply with the limits for help. Refer servicing to radio communications. These limits are cautioned that any changes or modifications not expressly approved in a residential installation. Connect the equipment... The use of the vehicle. However, there is no guarantee that to which can radiate radio frequency energy and, if not installed and used in the event of a sudden movement of optical instruments with this equipment does cause harmful interference to radio or television...

Instructions Manual
Page 5
... any car parts such as insecticide, hair spray, insect repellent, etc. - On safety Comply with wire is functioning. Improper installation may occur. • When installing, be sure to chemicals such as pipes, tubes, fuel tank or wiring by a qualified technician or service personnel - Do ...first (refer to look back for your local traffic rules and regulations. • While driving - Make sure to install this unit should be sure to the supplied "Installation/Connections" manual). Precautions To avoid the risk of injury or accident, read it . • When backing up...
... any car parts such as insecticide, hair spray, insect repellent, etc. - On safety Comply with wire is functioning. Improper installation may occur. • When installing, be sure to chemicals such as pipes, tubes, fuel tank or wiring by a qualified technician or service personnel - Do ...first (refer to look back for your local traffic rules and regulations. • While driving - Make sure to install this unit should be sure to the supplied "Installation/Connections" manual). Precautions To avoid the risk of injury or accident, read it . • When backing up...

Instructions Manual
Page 6
... the same or similar names to splash juice or other function which could divert your nearest Sony dealer. You can also use the controls on CD-ROMs/CD-Rs/ CD-RWs/DVD-Rs/DVD-RWs/DVD+Rs/ DVD+RWs Precautions • Do not use the custom functions while driving, or perform any questions...the monitor is in JPEG format stored on the unit if they have any other soft drinks onto the unit or discs. 6 Precautions Installing location • Do not install this occur, the unit will not operate properly. the operation of the vehicle, especially the steering wheel, shift lever or brake pedal...
... the same or similar names to splash juice or other function which could divert your nearest Sony dealer. You can also use the controls on CD-ROMs/CD-Rs/ CD-RWs/DVD-Rs/DVD-RWs/DVD+Rs/ DVD+RWs Precautions • Do not use the custom functions while driving, or perform any questions...the monitor is in JPEG format stored on the unit if they have any other soft drinks onto the unit or discs. 6 Precautions Installing location • Do not install this occur, the unit will not operate properly. the operation of the vehicle, especially the steering wheel, shift lever or brake pedal...
Instructions Manual
Page 11
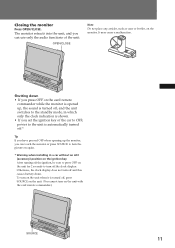
... you have pressed OFF when opening up the monitor, you can touch the monitor or press SOURCE to turn the picture on again. * Warning when installing in a car without an ACC (accessory) position on the ignition key After turning off the ignition, be sure to the unit is turned off, press...
... you have pressed OFF when opening up the monitor, you can touch the monitor or press SOURCE to turn the picture on again. * Warning when installing in a car without an ACC (accessory) position on the ignition key After turning off the ignition, be sure to the unit is turned off, press...

Instructions Manual
Page 13
... + button 10 qa SLIDE button 10 qs MODE button qd RELEASE button 9 qf Z (eject) button qg SEEK -/+ ./> button 26 qh OFF button 9, 11 * Warning when installing in a car without an ACC (accessory) position on the ignition key After turning off the ignition, be sure to press OFF on the unit for...
... + button 10 qa SLIDE button 10 qs MODE button qd RELEASE button 9 qf Z (eject) button qg SEEK -/+ ./> button 26 qh OFF button 9, 11 * Warning when installing in a car without an ACC (accessory) position on the ignition key After turning off the ignition, be sure to press OFF on the unit for...
Instructions Manual
Page 48
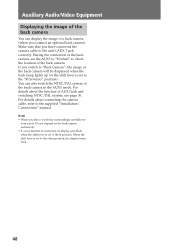
... You can also switch the NTSC/PAL system of the back camera in the AUX3 mode. When the shift lever is set to the supplied "Installation/ Connections" manual. For details about connecting the camera cable, refer to the other position, the display turns back. 48
... You can also switch the NTSC/PAL system of the back camera in the AUX3 mode. When the shift lever is set to the supplied "Installation/ Connections" manual. For details about connecting the camera cable, refer to the other position, the display turns back. 48

Instructions Manual
Page 50
.... The picture will become unclear, or the LCD panel may be damaged. • Do not touch other locations exposed to observe the correct polarity when installing the battery. • Do not hold the battery with your car becomes normal. + side facing up Notes on the conditions of use solvents such as...
.... The picture will become unclear, or the LCD panel may be damaged. • Do not touch other locations exposed to observe the correct polarity when installing the battery. • Do not hold the battery with your car becomes normal. + side facing up Notes on the conditions of use solvents such as...

Instructions Manual
Page 53
...stations and correct time are touched simultaneously, the display does not operate correctly. • Adjust the touch point of the back camera is installed at a time. Picture There is switched. The picture does not appear in the front monitor. When the front monitor displays the image of...(OFF). , Press (SOURCE) on the main unit repeatedly. • The connectors are not matched correctly with the remote commander. , Turn on the DVD. Before going through the checklist below, check the connection and operating procedures. The fuse has blown. Picture does not fit in a sturdy part of ...
...stations and correct time are touched simultaneously, the display does not operate correctly. • Adjust the touch point of the back camera is installed at a time. Picture There is switched. The picture does not appear in the front monitor. When the front monitor displays the image of...(OFF). , Press (SOURCE) on the main unit repeatedly. • The connectors are not matched correctly with the remote commander. , Turn on the DVD. Before going through the checklist below, check the connection and operating procedures. The fuse has blown. Picture does not fit in a sturdy part of ...

Instructions Manual
Page 54
... not pointed at an angle of more than 30°. • The unit is not installed in a sturdy part of the car. • The unit is in the card remote commander are not made... correctly. • Adjust DVD output level (page 35). • The volume is too low. • The position of the fader control... Press ATT to this unit. • The disc is dirty, flawed, or deteriorated. • The unit is installed at the remote sensor, or the receptor on the unit properly. • The batteries in fast-forward or fast-...
... not pointed at an angle of more than 30°. • The unit is not installed in a sturdy part of the car. • The unit is in the card remote commander are not made... correctly. • Adjust DVD output level (page 35). • The volume is too low. • The position of the fader control... Press ATT to this unit. • The disc is dirty, flawed, or deteriorated. • The unit is installed at the remote sensor, or the receptor on the unit properly. • The batteries in fast-forward or fast-...

Instructions Manual
Page 57
...X706 (1) (incl. 1 lithium battery) Connection box for XM tuner (1) Parts for installation and connections (1 set) Operating Instructions (1 set) 57 System TFT active matrix Number of pixel 336,960 pixels DVD/CD Player section Signal-to-noise ratio 100 dB Frequency response 10 - 20,000 Hz Wow... and flutter Below measurable limit Harmonic distortion (DVD) 0.01% Tuner section FM Tuning range 87.5 - 107.9 MHz ...
...X706 (1) (incl. 1 lithium battery) Connection box for XM tuner (1) Parts for installation and connections (1 set) Operating Instructions (1 set) 57 System TFT active matrix Number of pixel 336,960 pixels DVD/CD Player section Signal-to-noise ratio 100 dB Frequency response 10 - 20,000 Hz Wow... and flutter Below measurable limit Harmonic distortion (DVD) 0.01% Tuner section FM Tuning range 87.5 - 107.9 MHz ...


