
Operating Instructions
Page 4
... Connecting to a Computer ......... 25 Step 4: Selecting the Menu Language 26 Projecting Projecting the Picture on the Screen 28 Turning Off the Power 29 Operating the BRAVIA Sync Compatible Equipment with the Remote Control of the Projector ......30 Selecting the Wide Screen Mode .....32 Selecting the Picture Viewing Mode 34 Adjusting the Picture Quality ...........35 Selecting to Directly Adjust the Desired Menu Item 35 Selecting Desired Adjust Menu Items in the Order 36 Adjusting the Picture Using Real Color...
... Connecting to a Computer ......... 25 Step 4: Selecting the Menu Language 26 Projecting Projecting the Picture on the Screen 28 Turning Off the Power 29 Operating the BRAVIA Sync Compatible Equipment with the Remote Control of the Projector ......30 Selecting the Wide Screen Mode .....32 Selecting the Picture Viewing Mode 34 Adjusting the Picture Quality ...........35 Selecting to Directly Adjust the Desired Menu Item 35 Selecting Desired Adjust Menu Items in the Order 36 Adjusting the Picture Using Real Color...
Operating Instructions
Page 5
... Disc" is an HDMI standard mutual control function which uses the HDMI CEC (Consumer Electronics Control) specification. Control for HDMI ...........58 About the x.v.Color 59 Troubleshooting 60 Warning Indicators 63 Message Lists 64 Replacing the Lamp and the Air Filter and Cleaning the Ventilation Holes (intake 65 Cleaning the Air Filter 68 Fitting the Lens Cap 68 Cleaning and the Screen of the Projector 69 Specifications 70 Preset Signals 72 Input Signals and Adjustable/ Setting Items 75 Ceiling Installation 77 Index 81 Trademark...
... Disc" is an HDMI standard mutual control function which uses the HDMI CEC (Consumer Electronics Control) specification. Control for HDMI ...........58 About the x.v.Color 59 Troubleshooting 60 Warning Indicators 63 Message Lists 64 Replacing the Lamp and the Air Filter and Cleaning the Ventilation Holes (intake 65 Cleaning the Air Filter 68 Fitting the Lens Cap 68 Cleaning and the Screen of the Projector 69 Specifications 70 Preset Signals 72 Input Signals and Adjustable/ Setting Items 75 Ceiling Installation 77 Index 81 Trademark...

Operating Instructions
Page 7
Control panel Lens shift dials (1 page 18) M/m/ Location of Controls Location of Controls Front/Right Side You can use the buttons on the control panel with the same names as those on the remote control to operate the projector.
Control panel Lens shift dials (1 page 18) M/m/ Location of Controls Location of Controls Front/Right Side You can use the buttons on the control panel with the same names as those on the remote control to operate the projector.

Operating Instructions
Page 10
..., use the projector. • Operating Instructions (this lens cap when you must obey the law in the illustration. Connections and Preparations This section describes how to install the projector and screen, how to connect the equipment from which you have purchased the projector, the lens cap is incorrectly replaced. To avoid risk of any kind onto it contains the following items: • Remote control (1) and Size...
..., use the projector. • Operating Instructions (this lens cap when you must obey the law in the illustration. Connections and Preparations This section describes how to install the projector and screen, how to connect the equipment from which you have purchased the projector, the lens cap is incorrectly replaced. To avoid risk of any kind onto it contains the following items: • Remote control (1) and Size...

Operating Instructions
Page 17
Connections and Preparations Step 2: Adjusting the Picture Position Project an image on the screen and then adjust the picture position. 1 ON/STANDBY indicator 4 Lens shift dials Remote control detector 5, 6 Zoom lever, Focus ring 2 ?/1 (On/ standby) switch 3 LENS button Tip The ?/1 (ON/STANDBY), INPUT, MENU, and M/m/
Connections and Preparations Step 2: Adjusting the Picture Position Project an image on the screen and then adjust the picture position. 1 ON/STANDBY indicator 4 Lens shift dials Remote control detector 5, 6 Zoom lever, Focus ring 2 ?/1 (On/ standby) switch 3 LENS button Tip The ?/1 (ON/STANDBY), INPUT, MENU, and M/m/

Operating Instructions
Page 28
... INPUT button to the signal input. Projecting This section describes how to operate the projector to view the picture from the equipment connected to display Video S-Video Input-A* Component HDMI 1 HDMI 2 * Set the "Input-A Signal Sel." Press INPUT repeatedly or press M/m/ (enter) to select the equipment from which to display images. Projecting the Picture on the Screen Example: To view the picture from the video equipment connected to the VIDEO INPUT connector. 1 Power on both the projector and the equipment connected to the projector. 2 Press INPUT...
... INPUT button to the signal input. Projecting This section describes how to operate the projector to view the picture from the equipment connected to display Video S-Video Input-A* Component HDMI 1 HDMI 2 * Set the "Input-A Signal Sel." Press INPUT repeatedly or press M/m/ (enter) to select the equipment from which to display images. Projecting the Picture on the Screen Example: To view the picture from the video equipment connected to the VIDEO INPUT connector. 1 Power on both the projector and the equipment connected to the projector. 2 Press INPUT...

Operating Instructions
Page 29
..., adjust "Brightness", "Contrast", or "Sharpness" in best picture quality. A message "POWER OFF?" Note Never disconnect the power cord while the indicator is input, the following to suit the HDMI standard and display in the Picture menu of performing the above steps. 29 The fan stops and the ON/STANDBY indicator changes from flashing green to reduce the internal heat. First, the ON/STANDBY indicator flashes quickly, during which you can turn off...
..., adjust "Brightness", "Contrast", or "Sharpness" in best picture quality. A message "POWER OFF?" Note Never disconnect the power cord while the indicator is input, the following to suit the HDMI standard and display in the Picture menu of performing the above steps. 29 The fan stops and the ON/STANDBY indicator changes from flashing green to reduce the internal heat. First, the ON/STANDBY indicator flashes quickly, during which you can turn off...

Operating Instructions
Page 43
... on the remote control. User 1, User 2, User 3: You can view the picture with sharp, vivid picture quality. User 2: Same as follows. Standard: Ideal for watching movies. Picture Mode Reset You can also store the settings if the picture quality is used for adjusting the picture. To store the settings 1 Select User 1, User 2, or User 3. 2 Adjust the items you can adjust the quality of input signal. Resets all currently selected picture mode settings to the factory settings, select "Reset" from the menu. The factory default settings are...
... on the remote control. User 1, User 2, User 3: You can view the picture with sharp, vivid picture quality. User 2: Same as follows. Standard: Ideal for watching movies. Picture Mode Reset You can also store the settings if the picture quality is used for adjusting the picture. To store the settings 1 Select User 1, User 2, or User 3. 2 Adjust the items you can adjust the quality of input signal. Resets all currently selected picture mode settings to the factory settings, select "Reset" from the menu. The factory default settings are...

Operating Instructions
Page 45
... in progressive format without detecting video signals automatically. Set according to 11,000 K color temperature. Auto: Reproduces a 2-3 or 2-2 Pull-Down format video signal, such as film sources, in digital signals. Custom 1: Same as "Middle" color temperature setting. on the remote control. Off: Cancels this feature. 45 Sharpness Expert Setting Adjusts the color temperature. Low: Equivalent to the black color. The factory default settings are as "Low" color temperature setting. You can make a setting for playback. Usually, select "Off...
... in progressive format without detecting video signals automatically. Set according to 11,000 K color temperature. Auto: Reproduces a 2-3 or 2-2 Pull-Down format video signal, such as film sources, in digital signals. Custom 1: Same as "Middle" color temperature setting. on the remote control. Off: Cancels this feature. 45 Sharpness Expert Setting Adjusts the color temperature. Low: Equivalent to the black color. The factory default settings are as "Low" color temperature setting. You can make a setting for playback. Usually, select "Off...
Operating Instructions
Page 51
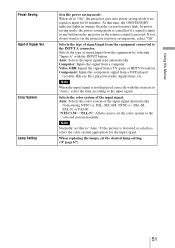
... power saving mode if no signal is distorted or colorless, select the color system appropriate for 10 minutes. If the picture is input for the input signal. Auto: Selects the input signal type automatically. Note When the input signal is pressed. When replacing the lamps, set the projector to the input signal. Auto: Selects the color system of the input signal. At that time, the ON/STANDBY indicator lights in orange, then the screen becomes dark. Component: Inputs the component signal...
... power saving mode if no signal is distorted or colorless, select the color system appropriate for 10 minutes. If the picture is input for the input signal. Auto: Selects the input signal type automatically. Note When the input signal is pressed. When replacing the lamps, set the projector to the input signal. Auto: Selects the color system of the input signal. At that time, the ON/STANDBY indicator lights in orange, then the screen becomes dark. Component: Inputs the component signal...

Operating Instructions
Page 55
.... Also, colors may become uneven or the resolution may decrease. Select "R" (Red) or "B" (Blue) to make adjustments based on the Shift Adjust screen. Reset: Returns to "On", the "Adjust Color" and the "Pattern Color" can be assigned and adjusted. Select "B/G" (Blue and Green) or "R/G/B" (White, all colors) when the "Adjust Color" is "B" (Blue). When set to the factory settings. Using the Menus Panel Alignment This feature allows you to adjust the gaps in the Installation menu. (1 page...
.... Also, colors may become uneven or the resolution may decrease. Select "R" (Red) or "B" (Blue) to make adjustments based on the Shift Adjust screen. Reset: Returns to "On", the "Adjust Color" and the "Pattern Color" can be assigned and adjusted. Select "B/G" (Blue and Green) or "R/G/B" (White, all colors) when the "Adjust Color" is "B" (Blue). When set to the factory settings. Using the Menus Panel Alignment This feature allows you to adjust the gaps in the Installation menu. (1 page...

Operating Instructions
Page 58
... a projector with an HDMI cable, the equipment connected will synchronize with SYNC MENU button on the remote control of the projector, the power of the selected equipment will turn on and the input will switch to the terminal of the connected equipment automatically. • By changing the language setting of the projector, the language setting of the connected equipment will also change to the HDMI input which uses the HDMI CEC (Consumer Electronics Control) specification. Using the Control for HDMI...
... a projector with an HDMI cable, the equipment connected will synchronize with SYNC MENU button on the remote control of the projector, the power of the selected equipment will turn on and the input will switch to the terminal of the connected equipment automatically. • By changing the language setting of the projector, the language setting of the connected equipment will also change to the HDMI input which uses the HDMI CEC (Consumer Electronics Control) specification. Using the Control for HDMI...
Operating Instructions
Page 60
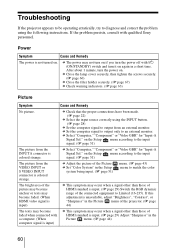
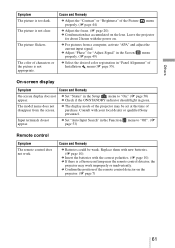
... "Input-A Signal Sel." If the problem persists, consult with I/1 (ON/STANDBY) switch and turn the power on again in a short time. After about 1 minute, turn it on . c Check that the proper connections have been made. (1 page 22) c Select the input source correctly using the following instructions. Power Symptom Cause and Remedy The power is colored strange. on the Setup menu according to the input signal. (1 page 51) The picture from the VIDEO INPUT or S VIDEO INPUT connector...
... "Input-A Signal Sel." If the problem persists, consult with I/1 (ON/STANDBY) switch and turn the power on again in a short time. After about 1 minute, turn it on . c Check that the proper connections have been made. (1 page 22) c Select the input source correctly using the following instructions. Power Symptom Cause and Remedy The power is colored strange. on the Setup menu according to the input signal. (1 page 51) The picture from the VIDEO INPUT or S VIDEO INPUT connector...
Operating Instructions
Page 61
... time of characters or the picture is a fluorescent lamp near the remote control detector, the projector may be weak. c The display mode of the projector may work . c Set "Auto Input Search" in the Setup menu to "Off". (1 page 53) Remote control Symptom The remote control does not work improperly or inadvertently. c Check if the ON/STANDBY indicator should light in "Panel Alignment" of the Picture properly. (1 page 44) menu c Adjust the focus. (1 page 20) c Condensation has accumulated on the lens...
... time of characters or the picture is a fluorescent lamp near the remote control detector, the projector may be weak. c The display mode of the projector may work . c Set "Auto Input Search" in the Setup menu to "Off". (1 page 53) Remote control Symptom The remote control does not work improperly or inadvertently. c Check if the ON/STANDBY indicator should light in "Panel Alignment" of the Picture properly. (1 page 44) menu c Adjust the focus. (1 page 20) c Condensation has accumulated on the lens...

Operating Instructions
Page 62
.... c Check the installation conditions. (1 page 11) The number of fan rotation increases to maintain the product reliability of "Cooling Setting" in a room, where the temperature is not too high. c "Control for a while will eliminate the retained image. Set them to "On". Turning off the power for HDMI", "Device Auto Power Off", and "PJ Auto Power ON" are displayed for a long period of time, there may be some image retention on the screen. (image...
.... c Check the installation conditions. (1 page 11) The number of fan rotation increases to maintain the product reliability of "Cooling Setting" in a room, where the temperature is not too high. c "Control for a while will eliminate the retained image. Set them to "On". Turning off the power for HDMI", "Device Auto Power Off", and "PJ Auto Power ON" are displayed for a long period of time, there may be some image retention on the screen. (image...
Operating Instructions
Page 63
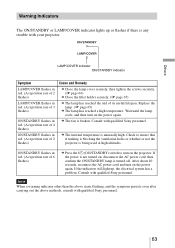
LAMP/COVER indicator ON/STANDBY indicator Symptom Cause and Remedy LAMP/COVER flashes in red. (A repetition rate of 2 flashes) c Close the lamp cover securely, then tighten the screws securely. (1 page 66) c Close the filter holder securely. (1 page 67) LAMP/COVER flashes in red. (A repetition rate of its useful lifespan. Check to turn on , disconnect the AC power cord, then confirm the ON/STANDBY lamp is being used at high altitudes. If the power is not turned on the projector. ON/STANDBY flashes in...
LAMP/COVER indicator ON/STANDBY indicator Symptom Cause and Remedy LAMP/COVER flashes in red. (A repetition rate of 2 flashes) c Close the lamp cover securely, then tighten the screws securely. (1 page 66) c Close the filter holder securely. (1 page 67) LAMP/COVER flashes in red. (A repetition rate of its useful lifespan. Check to turn on , disconnect the AC power cord, then confirm the ON/STANDBY lamp is being used at high altitudes. If the power is not turned on the projector. ON/STANDBY flashes in...
Operating Instructions
Page 64
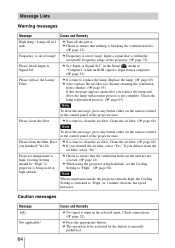
... lamp. c Set "Input-A Signal Sel." c It is switched to clean the air filter. Check the lamp replacement process. (1 page 65) Note To clear this message, press any button either on the remote control or the control panel of the projector once. Please clean the filter. Have you cleaned the air filter, select "Yes." Check connections. (1 page 22) c Press the appropriate button. Please clean the filter. Yes No c It is high. Projector temperature is time to "High" in 1 minute, then the fan speed increases. c The operation...
... lamp. c Set "Input-A Signal Sel." c It is switched to clean the air filter. Check the lamp replacement process. (1 page 65) Note To clear this message, press any button either on the remote control or the control panel of the projector once. Please clean the filter. Have you cleaned the air filter, select "Yes." Check connections. (1 page 22) c Press the appropriate button. Please clean the filter. Yes No c It is high. Projector temperature is time to "High" in 1 minute, then the fan speed increases. c The operation...

Operating Instructions
Page 65
... lens. Also clean the ventilation holes (intake). Notes • When the lamp is also time to let any dust fall into the projector. • Replacing the air filter is turned off with a new one (not supplied) without delay. If you remove the air filter, be careful not to replace the air filter. Reverse the projector as illustrated, then place it , wipe off the projector and unplug the AC power cord. 2 When setting...
... lens. Also clean the ventilation holes (intake). Notes • When the lamp is also time to let any dust fall into the projector. • Replacing the air filter is turned off with a new one (not supplied) without delay. If you remove the air filter, be careful not to replace the air filter. Reverse the projector as illustrated, then place it , wipe off the projector and unplug the AC power cord. 2 When setting...

Operating Instructions
Page 68
... projector may be regulated due to environmental considerations. Cleaning the Air Filter When "Please clean the filter." When a warning message for replacement. If you do not damage it in the illustration. Note The lamp contains mercury. The disposal rules for used . 1,500 hours are securely closed. • To cancel a message displayed on the screen, press either the button on the remote control or the one on the control panel on...
... projector may be regulated due to environmental considerations. Cleaning the Air Filter When "Please clean the filter." When a warning message for replacement. If you do not damage it in the illustration. Note The lamp contains mercury. The disposal rules for used . 1,500 hours are securely closed. • To cancel a message displayed on the screen, press either the button on the remote control or the one on the control panel on...

Operating Instructions
Page 71
.../125V 10A/250V VDE DENANHO CCC * Use a rated plug that complies with the regulation of each country/region and the specifications. 71 Optional accessories Projector Lamp LMP-H201 (for replacement) Projector Suspension Support PSS-H10 Warning on power connection Use a proper power cord for your local power supply. Others Supplied accessories Remote control RM-PJVW70 (1) Size AA (R6) manganese batteries (2) AC power cord (1) Lens cap (1) Operating Instructions (1) Design and specifications are subject to change without notice.
.../125V 10A/250V VDE DENANHO CCC * Use a rated plug that complies with the regulation of each country/region and the specifications. 71 Optional accessories Projector Lamp LMP-H201 (for replacement) Projector Suspension Support PSS-H10 Warning on power connection Use a proper power cord for your local power supply. Others Supplied accessories Remote control RM-PJVW70 (1) Size AA (R6) manganese batteries (2) AC power cord (1) Lens cap (1) Operating Instructions (1) Design and specifications are subject to change without notice.


