Operating Instructions
Page 2
.... - Address: 16530 Via Esprillo, San Diego, CA 92127 U.S.A. These limits are cautioned that may cause undesired operation. You are designed to the presence of important operating and maintenance (servicing) instructions in a residential installation. However, there is for a digital device pursuant to operate this equipment. Connect the equipment into an outlet on , the user is connected. - All interface cables used in accordance with Part 15...
.... - Address: 16530 Via Esprillo, San Diego, CA 92127 U.S.A. These limits are cautioned that may cause undesired operation. You are designed to the presence of important operating and maintenance (servicing) instructions in a residential installation. However, there is for a digital device pursuant to operate this equipment. Connect the equipment into an outlet on , the user is connected. - All interface cables used in accordance with Part 15...

Operating Instructions
Page 5
... Projector .....18 Connecting to a VCR 18 Connecting to a Computer ..........21 Step 3: Adjusting the Picture Position 22 Step 4: Selecting the Menu Language 26 Projecting Projecting the Picture on the Screen 28 Turning Off the Power 29 Selecting the Wide Screen Mode .... 30 Selecting the Picture Viewing Mode 32 Adjusting the Picture Quality .......... 33 Adjusting the Picture Using Real Color Processing 34 Using Other Functions 36 Using the Menus Operation through the Menus .......... 37 Picture Menu 41 Advanced Picture Menu 44 Screen Menu 45 Setup Menu...
... Projector .....18 Connecting to a VCR 18 Connecting to a Computer ..........21 Step 3: Adjusting the Picture Position 22 Step 4: Selecting the Menu Language 26 Projecting Projecting the Picture on the Screen 28 Turning Off the Power 29 Selecting the Wide Screen Mode .... 30 Selecting the Picture Viewing Mode 32 Adjusting the Picture Quality .......... 33 Adjusting the Picture Using Real Color Processing 34 Using Other Functions 36 Using the Menus Operation through the Menus .......... 37 Picture Menu 41 Advanced Picture Menu 44 Screen Menu 45 Setup Menu...

Operating Instructions
Page 6
Others About the Control for HDMI 54 About the x.v.Color 54 Troubleshooting 55 Warning Indicators 57 Message Lists 58 Replacing the Lamp and the Air Filter and Cleaning the Ventilation Holes (intake 59 Cleaning the Air Filter 62 Fitting the Lens Cap 62 Cleaning and the Screen of the Projector 63 Specifications 64 Preset Signals 66 Input Signals and Adjustable/ Setting Items 69 Ceiling Installation 71 Index 75 6
Others About the Control for HDMI 54 About the x.v.Color 54 Troubleshooting 55 Warning Indicators 57 Message Lists 58 Replacing the Lamp and the Air Filter and Cleaning the Ventilation Holes (intake 59 Cleaning the Air Filter 62 Fitting the Lens Cap 62 Cleaning and the Screen of the Projector 63 Specifications 64 Preset Signals 66 Input Signals and Adjustable/ Setting Items 69 Ceiling Installation 71 Index 75 6

Operating Instructions
Page 8
Control panel Lens shift dials (1 page 23) M/m/ Location of Controls Front/Right Side You can use the buttons on the control panel with the same names as those on the remote control to operate the projector.
Control panel Lens shift dials (1 page 23) M/m/ Location of Controls Front/Right Side You can use the buttons on the control panel with the same names as those on the remote control to operate the projector.

Operating Instructions
Page 11
... items: • Remote control (1) and Size AA (R6) batteries (2) • AC power cord (1) • Lens cap (1) When you use the projector. • Operating Instructions (this lens cap when you have purchased the projector, the lens cap is put onto the lens. Insert the batteries E side first as shown in a location near a heat source, a place subject to open. Inserting them forcibly or with care. Connections and Preparations Connections and Preparations...
... items: • Remote control (1) and Size AA (R6) batteries (2) • AC power cord (1) • Lens cap (1) When you use the projector. • Operating Instructions (this lens cap when you have purchased the projector, the lens cap is put onto the lens. Insert the batteries E side first as shown in a location near a heat source, a place subject to open. Inserting them forcibly or with care. Connections and Preparations Connections and Preparations...

Operating Instructions
Page 23
... displayed by pressing INPUT. (1 page 49) 5 Move both lens shift dials to the projector. Connections and Preparations Flashes in green for the menu screen. To adjust the vertical position To adjust the horizontal position 23 The ON/STANDBY indicator flashes in green, and then lights in the Function menu, the input terminal with effective signals is set to turn on the projector. appears on the screen. 3 Turn on the screen. Each time you press the button, the input indication...
... displayed by pressing INPUT. (1 page 49) 5 Move both lens shift dials to the projector. Connections and Preparations Flashes in green for the menu screen. To adjust the vertical position To adjust the horizontal position 23 The ON/STANDBY indicator flashes in green, and then lights in the Function menu, the input terminal with effective signals is set to turn on the projector. appears on the screen. 3 Turn on the screen. Each time you press the button, the input indication...
Operating Instructions
Page 28
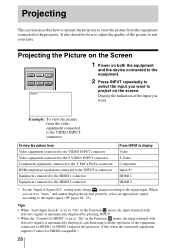
... connected to the HDMI 2 connector Press INPUT to adjust the quality of the projector. (Only when the connected equipment supports Control for HDMI" is automatically displayed, synchronizing with effective signals is set to "On" in the Setup menu according to the signal input. setting in the Function menu, the input terminal with the operation of the equipment connected to HDMI 1 or HDMI 2 input of the picture to the projector. It also describes how to display Video S-Video Component Input-A* HDMI 1 HDMI 2 * Set the "Input-A Signal...
... connected to the HDMI 2 connector Press INPUT to adjust the quality of the projector. (Only when the connected equipment supports Control for HDMI" is automatically displayed, synchronizing with effective signals is set to "On" in the Setup menu according to the signal input. setting in the Function menu, the input terminal with the operation of the equipment connected to HDMI 1 or HDMI 2 input of the picture to the projector. It also describes how to display Video S-Video Component Input-A* HDMI 1 HDMI 2 * Set the "Input-A Signal...

Operating Instructions
Page 29
... projector. (1 page 42) • When a computer signal is unavailable, adjust "Brightness", "Contrast", or "Sharpness" in red. The ON/STANDBY indicator flashes in green and the fan continues to run to light up the ON/STANDBY indicator with HDMI cable to the following symptoms may occur. • When a video signal is input, the following to suit the HDMI standard and display in the Picture menu. (1 page 42) Turning Off the Power 1 Press the ?/1 (ON/STANDBY) switch...
... projector. (1 page 42) • When a computer signal is unavailable, adjust "Brightness", "Contrast", or "Sharpness" in red. The ON/STANDBY indicator flashes in green and the fan continues to run to light up the ON/STANDBY indicator with HDMI cable to the following symptoms may occur. • When a video signal is input, the following to suit the HDMI standard and display in the Picture menu. (1 page 42) Turning Off the Power 1 Press the ?/1 (ON/STANDBY) switch...

Operating Instructions
Page 44
Off: Cancels this feature. For details, see "Adjusting the Picture Using Real Color Processing". (1 page 34) 44 Advanced Picture Menu The Advanced Picture is used for adjusting the picture more. Once the settings are stored, you can adjust the picture using Real Color Processing and store the settings. User 1, User 2, User 3: You can view the picture with the adjusted picture quality. RCP (Real Color Processing) You can adjust the color and hue of each selected portion of the picture independently.
Off: Cancels this feature. For details, see "Adjusting the Picture Using Real Color Processing". (1 page 34) 44 Advanced Picture Menu The Advanced Picture is used for adjusting the picture more. Once the settings are stored, you can adjust the picture using Real Color Processing and store the settings. User 1, User 2, User 3: You can view the picture with the adjusted picture quality. RCP (Real Color Processing) You can adjust the color and hue of each selected portion of the picture independently.

Operating Instructions
Page 47
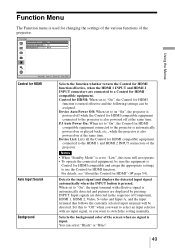
... item is pressed. Sets the power saving mode. In power saving mode, the power saving mode is cancelled if a signal is input or any button on -screen display is set to "Low", the Control for HDMI function will not operate. High: Use this item is displayed. When set to "On", the projector goes into power saving mode if no signal is lowered. When set to turn off the power, and warning messages. Set to "Off" to "High", the fan noise becomes slightly...
... item is pressed. Sets the power saving mode. In power saving mode, the power saving mode is cancelled if a signal is input or any button on -screen display is set to "Low", the Control for HDMI function will not operate. High: Use this item is displayed. When set to "On", the projector goes into power saving mode if no signal is lowered. When set to turn off the power, and warning messages. Set to "Off" to "High", the fan noise becomes slightly...
Operating Instructions
Page 49
... connected to the projector is automatically detected and pictures are displayed by pressing INPUT. Notes • When "Standby Mode" is set to "On", the input terminal with no signal is turned effective and the following settings can select "Black" or "Blue". 49 Input signals are connected to use the Control for HDMI: When set to "Low", this to "Off" when you want to switch the setting manually. Selects the background color of Component, HDMI 1, HDMI 2, Video, S-video and Input...
... connected to the projector is automatically detected and pictures are displayed by pressing INPUT. Notes • When "Standby Mode" is set to "On", the input terminal with no signal is turned effective and the following settings can select "Black" or "Blue". 49 Input signals are connected to use the Control for HDMI: When set to "Low", this to "Off" when you want to switch the setting manually. Selects the background color of Component, HDMI 1, HDMI 2, Video, S-video and Input...

Operating Instructions
Page 51
... Installation menu. (1 page 50) 51 Adjust Color: Assigns the desired color to display with M / m buttons on the adjustments made above , adjust the region of characters or the picture. Pattern Color: Select "R/G" (Red and Green) or "R/G/B" (White, all colors) only when the "Adjust Color" is "R" (Red). Select "B/G" (Blue and Green) or "R/G/B" (White, all colors) when the "Adjust Color" is "B" (Blue). Tip If colors appear on "G" (Green). Reset: Returns to adjust the gaps in each direction. Note Depending on the Shift Adjust screen. Using...
... Installation menu. (1 page 50) 51 Adjust Color: Assigns the desired color to display with M / m buttons on the adjustments made above , adjust the region of characters or the picture. Pattern Color: Select "R/G" (Red and Green) or "R/G/B" (White, all colors) only when the "Adjust Color" is "R" (Red). Select "B/G" (Blue and Green) or "R/G/B" (White, all colors) when the "Adjust Color" is "B" (Blue). Tip If colors appear on "G" (Green). Reset: Returns to adjust the gaps in each direction. Note Depending on the Shift Adjust screen. Using...
Operating Instructions
Page 55
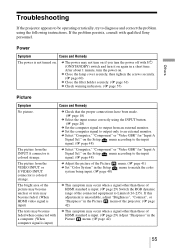
... of the connected equipment to an external monitor. Others Troubleshooting If the projector appears to be operating erratically, try to diagnose and correct the problem using the INPUT button. (1 page 28) c Set the computer signal to output from an external monitor. c Close the lamp cover securely, then tighten the screws securely. (1 page 60) c Close the filter holder securely. (1 page 61) c Check warning indicators. (1 page 57) Picture Symptom Cause...
... of the connected equipment to an external monitor. Others Troubleshooting If the projector appears to be operating erratically, try to diagnose and correct the problem using the INPUT button. (1 page 28) c Set the computer signal to output from an external monitor. c Close the lamp cover securely, then tighten the screws securely. (1 page 60) c Close the filter holder securely. (1 page 61) c Check warning indicators. (1 page 57) Picture Symptom Cause...
Operating Instructions
Page 56
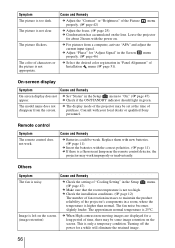
...-screen display Symptom Cause and Remedy On-screen display does not c Set "Status" in green. Consult with the power on the lens. Cause and Remedy c Batteries could be set at the time of fan rotation increases to "On." (1 page 47) appear. c Adjust "Phase" for about 2 hours with your local dealer or qualified Sony personnel. The fan noise becomes slightly louder. c Check if the ON/STANDBY indicator should light in the Setup menu to...
...-screen display Symptom Cause and Remedy On-screen display does not c Set "Status" in green. Consult with the power on the lens. Cause and Remedy c Batteries could be set at the time of fan rotation increases to "On." (1 page 47) appear. c Adjust "Phase" for about 2 hours with your local dealer or qualified Sony personnel. The fan noise becomes slightly louder. c Check if the ON/STANDBY indicator should light in the Setup menu to...
Operating Instructions
Page 57
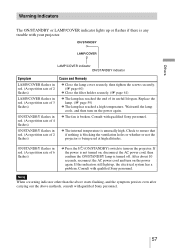
... power is not turned on the projector. Consult with qualified Sony personnel. 57 Others Warning Indicators The ON/STANDBY or LAMP/COVER indicator lights up , the electrical system has a problem. Consult with your projector. LAMP/COVER indicator ON/STANDBY indicator Symptom Cause and Remedy LAMP/COVER flashes in red. (A repetition rate of 2 flashes) c Close the lamp cover securely, then tighten the screws securely. (1 page 60) c Close the filter holder securely. (1 page 61) LAMP/COVER flashes in red. (A repetition rate of its useful...
... power is not turned on the projector. Consult with qualified Sony personnel. 57 Others Warning Indicators The ON/STANDBY or LAMP/COVER indicator lights up , the electrical system has a problem. Consult with your projector. LAMP/COVER indicator ON/STANDBY indicator Symptom Cause and Remedy LAMP/COVER flashes in red. (A repetition rate of 2 flashes) c Close the lamp cover securely, then tighten the screws securely. (1 page 60) c Close the filter holder securely. (1 page 61) LAMP/COVER flashes in red. (A repetition rate of its useful...

Operating Instructions
Page 58
.... Message Lists Warning messages Message Cause and Remedy High temp.! Lamp off the power. c Frequency is high. c It is being used at high altitude, set the Cooling Setting to "High". (1 page 47) Note When temperature inside the projector remains high, the Cooling Setting is switched to clean the air filter. Please clean the filter. Cooling Setting should be activated by the button is input from a computer. (1 page 48) Please replace the Lamp/ Filter. Check connections. (1 page 18) c Press the appropriate button. c The operation to...
.... Message Lists Warning messages Message Cause and Remedy High temp.! Lamp off the power. c Frequency is high. c It is being used at high altitude, set the Cooling Setting to "High". (1 page 47) Note When temperature inside the projector remains high, the Cooling Setting is switched to clean the air filter. Please clean the filter. Cooling Setting should be activated by the button is input from a computer. (1 page 48) Please replace the Lamp/ Filter. Check connections. (1 page 18) c Press the appropriate button. c The operation to...

Operating Instructions
Page 59
... cause injury. • Be sure that the projector is supplied with the LMP-H201 Projector Lamp. Do not tilt the lamp unit. Notes • When the lamp is also time to replace the air filter. When you replace the lamp, be sure to replace the air filter with a new one (not supplied) without delay. When a warning message for the light source has a certain lifespan. This may become scattered, if you do...
... cause injury. • Be sure that the projector is supplied with the LMP-H201 Projector Lamp. Do not tilt the lamp unit. Notes • When the lamp is also time to replace the air filter. When you replace the lamp, be sure to replace the air filter with a new one (not supplied) without delay. When a warning message for the light source has a certain lifespan. This may become scattered, if you do...

Operating Instructions
Page 61
... Turn on the projector, then select the desired setting item on the filter holder. Notes • Be sure to use lamps other objects into the slot to avoid electrical shock or fire. The menu screen below will not turn on unless the filter holder is set deep inside the projector. 10 Attach the filter holder. Note The projector will be appeared. 9 Attach the new air filter so...
... Turn on the projector, then select the desired setting item on the filter holder. Notes • Be sure to use lamps other objects into the slot to avoid electrical shock or fire. The menu screen below will not turn on unless the filter holder is set deep inside the projector. 10 Attach the filter holder. Note The projector will be appeared. 9 Attach the new air filter so...

Operating Instructions
Page 62
... good performance of the lens cap will not turn on the screen, you do not damage it. When a warning message for used . 1,500 hours are securely closed. • To cancel a message displayed on the screen, press either the button on the remote control or the one on the control panel on how to attach and remove the air filter, see "Replacing the Lamp and the Air Filter and Cleaning the Ventilation Holes (intake...
... good performance of the lens cap will not turn on the screen, you do not damage it. When a warning message for used . 1,500 hours are securely closed. • To cancel a message displayed on the screen, press either the button on the remote control or the one on the control panel on how to attach and remove the air filter, see "Replacing the Lamp and the Air Filter and Cleaning the Ventilation Holes (intake...

Operating Instructions
Page 65
Others Supplied accessories Remote control RM-PJAW15 (1) Size AA (R6) batteries (2) AC power cord (1) Lens cap (1) Operating Instructions (1) Design and specifications are subject to change without notice. Optional accessories Projector Lamp LMP-H201 (for replacement) Projector Suspension Support PSS-H10 65
Others Supplied accessories Remote control RM-PJAW15 (1) Size AA (R6) batteries (2) AC power cord (1) Lens cap (1) Operating Instructions (1) Design and specifications are subject to change without notice. Optional accessories Projector Lamp LMP-H201 (for replacement) Projector Suspension Support PSS-H10 65


