Specification Sheet (VPLEW246 Specification Sheet)
Page 1
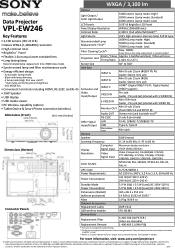
... BrightEra LCD Panel Panel Display Resolution WXGA (1280x800 dots) Contrast Ratio 2,300:1 (Full white/full black)*1 Light Source Ultra high-pressure mercury lamp 210 W type Recommended Lamp Replacement Time*2 3000H (Lamp mode: High) 5000H (Lamp mode: Standard) 7000H (Lamp mode: Low) Filter Cleaning Cycle*2 Max. 7000H Same time as an audio switcher function. For more information, visit: www.sony.com/projectors © 2013 Sony Corporation. Auto power saving mode - Reproduction in whole or in standby. Features and specifications are trademarks of their respective owners...
... BrightEra LCD Panel Panel Display Resolution WXGA (1280x800 dots) Contrast Ratio 2,300:1 (Full white/full black)*1 Light Source Ultra high-pressure mercury lamp 210 W type Recommended Lamp Replacement Time*2 3000H (Lamp mode: High) 5000H (Lamp mode: Standard) 7000H (Lamp mode: Low) Filter Cleaning Cycle*2 Max. 7000H Same time as an audio switcher function. For more information, visit: www.sony.com/projectors © 2013 Sony Corporation. Auto power saving mode - Reproduction in whole or in standby. Features and specifications are trademarks of their respective owners...

User Manual (Data Projector)
Page 2
... Location and Function of Controls .... 4 Main Unit 4 Connector Panel 5 Remote Commander and Control Panel Keys 6 Preparation Connecting the Projector 9 Connecting a Computer 9 Connecting a Video equipment ... 10 Connecting a microphone .......... 12 Connecting a USB memory device 12 Connecting a USB wireless LAN module 13 Connecting an External Monitor and Audio Equipment 13 Projecting/Adjusting an Image Projecting an Image 14 Adjusting the Projected image ... 15 Turning Off the Power 18 Adjustments and Settings Using a Menu Using a MENU 19 The Picture Menu 20 The Screen Menu...
... Location and Function of Controls .... 4 Main Unit 4 Connector Panel 5 Remote Commander and Control Panel Keys 6 Preparation Connecting the Projector 9 Connecting a Computer 9 Connecting a Video equipment ... 10 Connecting a microphone .......... 12 Connecting a USB memory device 12 Connecting a USB wireless LAN module 13 Connecting an External Monitor and Audio Equipment 13 Projecting/Adjusting an Image Projecting an Image 14 Adjusting the Projected image ... 15 Turning Off the Power 18 Adjustments and Settings Using a Menu Using a MENU 19 The Picture Menu 20 The Screen Menu...

User Manual (Data Projector)
Page 7
... temporarily. key (VPL-EW276/ EW246/EW226/EX276/EX246/ EX226 only) Adjusts the volume output. Lamp Mode: Low With No Input: Standby With Static Signal: Lamp Dimming Standby Mode: Low User: Sets each mode to the optimum energy-saving value. Picture muting helps reduce power consumption. Press again to restore the previous image. Notes *1: Use this key when "Type A USB", "Type B USB" or "Network" is selected as you want to 4 times. But it...
... temporarily. key (VPL-EW276/ EW246/EW226/EX276/EX246/ EX226 only) Adjusts the volume output. Lamp Mode: Low With No Input: Standby With Static Signal: Lamp Dimming Standby Mode: Low User: Sets each mode to the optimum energy-saving value. Picture muting helps reduce power consumption. Press again to restore the previous image. Notes *1: Use this key when "Type A USB", "Type B USB" or "Network" is selected as you want to 4 times. But it...

User Manual (Data Projector)
Page 14
... Network, see "USB Media Viewer" (page 39). Press the INPUT key on the projector to turn on the unit. 4 Turn on the distance between the projector and screen. To project an image using USB Connection, see "Projection Distance" (page 58). 35 Projector 4 2 Video equipment 1 Wall outlet 6 1 Plug the AC power cord into the wall outlet. 2 Connect all equipment to the projector (page 9). 3 Press the ?/1 key to display the menu for switching input signal on projection distances and projected image sizes, see "Projecting an Image using USB Connection...
... Network, see "USB Media Viewer" (page 39). Press the INPUT key on the projector to turn on the unit. 4 Turn on the distance between the projector and screen. To project an image using USB Connection, see "Projection Distance" (page 58). 35 Projector 4 2 Video equipment 1 Wall outlet 6 1 Plug the AC power cord into the wall outlet. 2 Connect all equipment to the projector (page 9). 3 Press the ?/1 key to display the menu for switching input signal on projection distances and projected image sizes, see "Projecting an Image using USB Connection...
User Manual (Data Projector)
Page 17
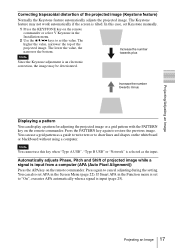
... set APA in the Installation menu. 2 Use the V/v/B/b keys to "On", executes APA automatically when a signal is input from a computer (APA (Auto Pixel Alignment)) Press the APA key on the remote commander or select V Keystone in the Screen Menu (page 22). You can also set the value. Press again to restore the previous image. Projecting an Image 17 Automatically adjusts Phase, Pitch and Shift of projected image while a signal is input...
... set APA in the Installation menu. 2 Use the V/v/B/b keys to "On", executes APA automatically when a signal is input from a computer (APA (Auto Pixel Alignment)) Press the APA key on the remote commander or select V Keystone in the Screen Menu (page 22). You can also set the value. Press again to restore the previous image. Projecting an Image 17 Automatically adjusts Phase, Pitch and Shift of projected image while a signal is input...
User Manual (Data Projector)
Page 25
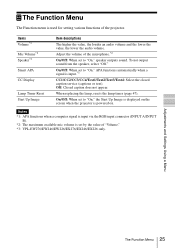
... Image is displayed on the screen when the projector is input.*1 CC1/CC2/CC3/CC4/Text1/Text2/Text3/Text4: Select the closed caption service (captions or text). On/Off: When set to "On," speaker outputs sound. When replacing the lamp, resets the lamp timer (page 47). Notes *1: APA functions when a computer signal is input via the RGB input connector (INPUT A/INPUT B). *2: The maximum available mic volume is used for setting...
... Image is displayed on the screen when the projector is input.*1 CC1/CC2/CC3/CC4/Text1/Text2/Text3/Text4: Select the closed caption service (captions or text). On/Off: When set to "On," speaker outputs sound. When replacing the lamp, resets the lamp timer (page 47). Notes *1: APA functions when a computer signal is input via the RGB input connector (INPUT A/INPUT B). *2: The maximum available mic volume is used for setting...

User Manual (Data Projector)
Page 26
... projector. c "Control Key Lock" is set to authorized users by using the menu or the remote commander. On/Off: When set to "Off" and enables operation of all the control panel keys of the projector to "On," locks all keys on . Note *1: You will be used. On: All on the projector after three consecutive times, the projector cannot be asked to input the password again. You are required to verify the projector's serial number...
... projector. c "Control Key Lock" is set to authorized users by using the menu or the remote commander. On/Off: When set to "Off" and enables operation of all the control panel keys of the projector to "On," locks all keys on . Note *1: You will be used. On: All on the projector after three consecutive times, the projector cannot be asked to input the password again. You are required to verify the projector's serial number...

User Manual (Data Projector)
Page 27
... Connection*8 Access Point Setup On/Off: Set the wireless output of the USB wireless LAN module (not supplied) to "High," the image becomes brighter, and power consumption becomes higher. Auto/Manual *11: Set the access point automatically or manually. Auto Power Saving With No Input With Static Signal Standby Mode*2 Lamp Cutoff: The lamp turns off automatically and power consumption is input for more than 10 minutes, the power turns off automatically, and the unit enters standby mode. Dark images are projected...
... Connection*8 Access Point Setup On/Off: Set the wireless output of the USB wireless LAN module (not supplied) to "High," the image becomes brighter, and power consumption becomes higher. Auto/Manual *11: Set the access point automatically or manually. Auto Power Saving With No Input With Static Signal Standby Mode*2 Lamp Cutoff: The lamp turns off automatically and power consumption is input for more than 10 minutes, the power turns off automatically, and the unit enters standby mode. Dark images are projected...
User Manual (Data Projector)
Page 28
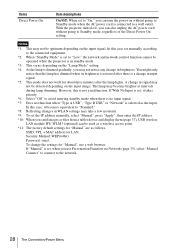
... entering standby mode when there is no input signal. *7: Does not function when "Type A USB", "Type B USB" or "Network" is a change in brightness. SSID: VPL + MAC address for "Manual" are as the input. However, this case set manually according to the connected equipment. *2: When "Standby Mode" is set to "Low," the network and network control function cannot be used as a wireless access point. *11: The factory default settings for LAN Security Method: WEP(64bit) Password: sony1 To change in signal may...
... entering standby mode when there is no input signal. *7: Does not function when "Type A USB", "Type B USB" or "Network" is a change in brightness. SSID: VPL + MAC address for "Manual" are as the input. However, this case set manually according to the connected equipment. *2: When "Standby Mode" is set to "Low," the network and network control function cannot be used as a wireless access point. *11: The factory default settings for LAN Security Method: WEP(64bit) Password: sony1 To change in signal may...
User Manual (Data Projector)
Page 31
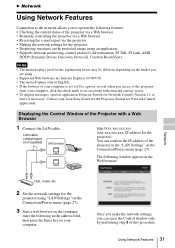
... Sony dealer for the Projector Station for the projector using an application. • Supports network monitoring, control protocol (Advertisement, PJ Talk, PJ Link, AMX DDDP [Dynamic Device Discovery Protocol], Crestron RoomView). Contact your computer. LAN cable (straight type) (not supplied) LAN Connector http://xxx.xxx.xxx.xxx (xxx.xxx.xxx.xxx: IP address for the projector. • Displaying messages on the projected image using "LAN Settings" on the Connection/Power menu (page 27). 3 Start...
... Sony dealer for the Projector Station for the projector using an application. • Supports network monitoring, control protocol (Advertisement, PJ Talk, PJ Link, AMX DDDP [Dynamic Device Discovery Protocol], Crestron RoomView). Contact your computer. LAN cable (straight type) (not supplied) LAN Connector http://xxx.xxx.xxx.xxx (xxx.xxx.xxx.xxx: IP address for the projector. • Displaying messages on the projected image using "LAN Settings" on the Connection/Power menu (page 27). 3 Start...

User Manual (Data Projector)
Page 37
... the users' status. *1: To use the application, one of the screen. Stop projecting an image (screen turns black). Select a projection method then start projecting an image. Project in a tablet device wirelessly by using a specific application.*1 For downloading*2 or detailed method of the screen. Display the number of the screen. Not projecting an image. Presentation Function via Network Using Presentation Function via USB wireless LAN module IFU-WLM3 (optional)that is required. • Connected to network where wireless connection can project JPEG images, PDF...
... the users' status. *1: To use the application, one of the screen. Stop projecting an image (screen turns black). Select a projection method then start projecting an image. Project in a tablet device wirelessly by using a specific application.*1 For downloading*2 or detailed method of the screen. Display the number of the screen. Not projecting an image. Presentation Function via Network Using Presentation Function via USB wireless LAN module IFU-WLM3 (optional)that is required. • Connected to network where wireless connection can project JPEG images, PDF...

User Manual (Data Projector)
Page 38
...: Home Premium/Professional (Recommended)/Ultimate/Enterprise CPU Pentium4 2.8GHz or faster Starting USB Display 1 Connecting the projector and your computer changes when the application is recognized as the input source (page 14). After a short time, the projector is started. • Depending of the computer's setting, the application may not be projected properly. Using the Controller USB Display 38 Projecting an Image using USB Connection You can simply disconnect the USB cable without using the Safely Remove Hardware...
...: Home Premium/Professional (Recommended)/Ultimate/Enterprise CPU Pentium4 2.8GHz or faster Starting USB Display 1 Connecting the projector and your computer changes when the application is recognized as the input source (page 14). After a short time, the projector is started. • Depending of the computer's setting, the application may not be projected properly. Using the Controller USB Display 38 Projecting an Image using USB Connection You can simply disconnect the USB cable without using the Safely Remove Hardware...

User Manual (Data Projector)
Page 43
... . Address the problem in accordance with qualified Sony personnel. ON/STANDBY indicator Status Lights in red Flashes in green Lights in green Lights in orange Flashes in red Flashes twice Flashes six times Other number of flashes Meaning/Remedies The projector is in red Symptoms are indicated by number of the projector. Consult with a new one (page 47). LAMP/COVER indicator Status Meaning/Remedies Flashes in Standby mode. • The projector is ready to cool then turn on the power again. In this case, replace the lamp with qualified Sony...
... . Address the problem in accordance with qualified Sony personnel. ON/STANDBY indicator Status Lights in red Flashes in green Lights in green Lights in orange Flashes in red Flashes twice Flashes six times Other number of flashes Meaning/Remedies The projector is in red Symptoms are indicated by number of the projector. Consult with a new one (page 47). LAMP/COVER indicator Status Meaning/Remedies Flashes in Standby mode. • The projector is ready to cool then turn on the power again. In this case, replace the lamp with qualified Sony...

User Manual (Data Projector)
Page 44
... 27 44 Messages List Set "Input-A Signal Sel." Please clean the filter. When any of the messages listed below appears on the projected image, address the problem in accordance with a new one for signals supported by the projector. Messages Meaning/Remedy High temp.! "Control Key Lock" is set correctly. Lamp Dimming Reduces lamp output when "With Static Signal" is out of the connected equipment to Restart projector will be "On" if Projector is set correctly. Lamp off the projector directly...
... 27 44 Messages List Set "Input-A Signal Sel." Please clean the filter. When any of the messages listed below appears on the projected image, address the problem in accordance with a new one for signals supported by the projector. Messages Meaning/Remedy High temp.! "Control Key Lock" is set correctly. Lamp Dimming Reduces lamp output when "With Static Signal" is out of the connected equipment to Restart projector will be "On" if Projector is set correctly. Lamp off the projector directly...

User Manual (Data Projector)
Page 45
... The power is not turned Check if the AC power cord is running. Check the computer signal is installed on the projector using a Keystone feature. Check if the USB memory device connected to an external 14 monitor only. On-screen display does The on . In this case, select "Manual" to external 9 equipment firmly. When the "V Keystone" is set for Network Presentation" does not start. Troubleshooting 45 Others If the lamp or lamp cover is displayed smaller...
... The power is not turned Check if the AC power cord is running. Check the computer signal is installed on the projector using a Keystone feature. Check if the USB memory device connected to an external 14 monitor only. On-screen display does The on . In this case, select "Manual" to external 9 equipment firmly. When the "V Keystone" is set for Network Presentation" does not start. Troubleshooting 45 Others If the lamp or lamp cover is displayed smaller...

User Manual (Data Projector)
Page 46
... sound. (VPL- The fan is appropriate. in the location where the temperature is set to "Auto," the luminance of 4, 4 the projector rises and the fan noise becomes larger. 46 Troubleshooting Check if the value is noisy. power consumption. If the ventilation holes are installed correctly. - Check "Lamp Timer," and replace the lamp with the power on the lens. When the "Lamp Mode" is high. Check that the connecting cables between the projector and 9 EW276/EW246/ external video or audio...
... sound. (VPL- The fan is appropriate. in the location where the temperature is set to "Auto," the luminance of 4, 4 the projector rises and the fan noise becomes larger. 46 Troubleshooting Check if the value is noisy. power consumption. If the ventilation holes are installed correctly. - Check "Lamp Timer," and replace the lamp with the power on the lens. When the "Lamp Mode" is high. Check that the connecting cables between the projector and 9 EW276/EW246/ external video or audio...

User Manual (Data Projector)
Page 47
... the projector is turned off. If you replace the lamp, wait for at least an hour after turning off the projector, and disconnect the AC power cord from a wall outlet. 2 When the lamp has cooled sufficiently, open the lamp cover by loosening 1 screw. If you touch a part of the lamp other than the designated location, you may cause electrical shock or fire. Replacing the Lamp Replace the lamp with a new one if a message displayed...
... the projector is turned off. If you replace the lamp, wait for at least an hour after turning off the projector, and disconnect the AC power cord from a wall outlet. 2 When the lamp has cooled sufficiently, open the lamp cover by loosening 1 screw. If you touch a part of the lamp other than the designated location, you may cause electrical shock or fire. Replacing the Lamp Replace the lamp with a new one if a message displayed...

User Manual (Data Projector)
Page 48
... The power will not turn on the projector. 7 Reset the lamp timer for notification of the next replacement time. Tighten the 2 screws. 5 Close the lamp cover and tighten the 1 screw. 6 Connect the AC power cord to reset the lamp timer (page 25). When a message appears, select "Yes" to a wall outlet and turn on the Function menu then press the ENTER key. Select "Lamp Timer Reset" on if the lamp is securely in place. 4 Insert the new lamp...
... The power will not turn on the projector. 7 Reset the lamp timer for notification of the next replacement time. Tighten the 2 screws. 5 Close the lamp cover and tighten the 1 screw. 6 Connect the AC power cord to reset the lamp timer (page 25). When a message appears, select "Yes" to a wall outlet and turn on the Function menu then press the ENTER key. Select "Lamp Timer Reset" on if the lamp is securely in place. 4 Insert the new lamp...
User Manual (Data Projector)
Page 54
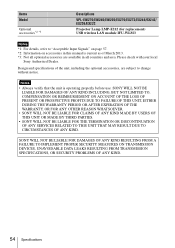
...*2 *3 Descriptions VPL-EW276/EW246/EW226/EX276/EX272/EX246/EX242/ EX226/EX222 Projector Lamp LMP-E212 (for replacement) USB wireless LAN module IFU-WLM3 Notes *1: For details, refer to change without notice. SONY WILL NOT BE LIABLE FOR DAMAGES OF ANY KIND RESULTING FROM A FAILURE TO IMPLEMENT PROPER SECURITY MEASURES ON TRANSMISSION DEVICES, UNAVOIDABLE DATA LEAKS RESULTING FROM TRANSMISSION SPECIFICATIONS, OR SECURITY PROBLEMS OF...
...*2 *3 Descriptions VPL-EW276/EW246/EW226/EX276/EX272/EX246/EX242/ EX226/EX222 Projector Lamp LMP-E212 (for replacement) USB wireless LAN module IFU-WLM3 Notes *1: For details, refer to change without notice. SONY WILL NOT BE LIABLE FOR DAMAGES OF ANY KIND RESULTING FROM A FAILURE TO IMPLEMENT PROPER SECURITY MEASURES ON TRANSMISSION DEVICES, UNAVOIDABLE DATA LEAKS RESULTING FROM TRANSMISSION SPECIFICATIONS, OR SECURITY PROBLEMS OF...

User Manual (Data Projector)
Page 78
... IN 6 Acceptable input signal 57 Adjust Signal 22 Air filter 49 Air filter cover/Ventilation holes (intake 4 APA 6 Aspect 6, 21, 23 B BLANK 7 Brightness 20 C CC Display 25 Color 20 Color Temp 20 Connecting a computer 9 Connecting a Video equipment 10 Connecting an external monitor and audio equipment 13 Connector panel 4, 5 Contrast 20 Control Key Lock 26 Control Panel Keys 6 Correcting trapezoidal distortion of the projected image (Keystone feature 6, 17 D Digital Zoom 7 E ECO MODE (Energy-saving mode) ......... 7 F fH 30 Focus 15 Focus ring 4 Freeze 7 Front...
... IN 6 Acceptable input signal 57 Adjust Signal 22 Air filter 49 Air filter cover/Ventilation holes (intake 4 APA 6 Aspect 6, 21, 23 B BLANK 7 Brightness 20 C CC Display 25 Color 20 Color Temp 20 Connecting a computer 9 Connecting a Video equipment 10 Connecting an external monitor and audio equipment 13 Connector panel 4, 5 Contrast 20 Control Key Lock 26 Control Panel Keys 6 Correcting trapezoidal distortion of the projected image (Keystone feature 6, 17 D Digital Zoom 7 E ECO MODE (Energy-saving mode) ......... 7 F fH 30 Focus 15 Focus ring 4 Freeze 7 Front...


