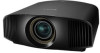
Operating Instructions
Page 2
... Handling Troubleshooting 42 Warning Indicators 45 Message Lists 46 Others Updating the Software 47 About the x.v.Color 47 About the simulated 3D feature ........47 Replacing the Lamp 48 Cleaning 51 Specifications 52 Preset Signals 53 Input Signals and Adjustable/ Setting Items 55 Compatible 3D Signals 56 3D Signals and Adjustable/Setting Items...
... Handling Troubleshooting 42 Warning Indicators 45 Message Lists 46 Others Updating the Software 47 About the x.v.Color 47 About the simulated 3D feature ........47 Replacing the Lamp 48 Cleaning 51 Specifications 52 Preset Signals 53 Input Signals and Adjustable/ Setting Items 55 Compatible 3D Signals 56 3D Signals and Adjustable/Setting Items...
Operating Instructions
Page 33
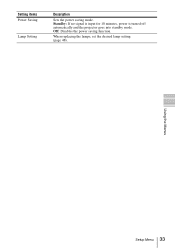
Off: Disables the power saving function. When replacing the lamps, set the desired lamp setting (page 48). Using the Menus Setup Menu 33 Standby: If no signal is input for 10 minutes, power is turned off automatically and the projector goes into standby mode. Setting items Power Saving Lamp Setting Description Sets the power saving mode.
Off: Disables the power saving function. When replacing the lamps, set the desired lamp setting (page 48). Using the Menus Setup Menu 33 Standby: If no signal is input for 10 minutes, power is turned off automatically and the projector goes into standby mode. Setting items Power Saving Lamp Setting Description Sets the power saving mode.
Operating Instructions
Page 43
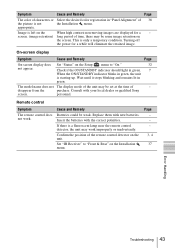
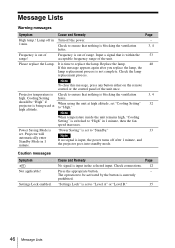
...The model name does not The display mode of - personnel. Insert the batteries with your local dealer or qualified Sony screen. If there is a fluorescent lamp near the remote control detector, the unit may be some image retention on the screen. Remote control Symptom The remote...starting up. Wait until it stops blinking and remains lit in green, the unit is not the Installation menu. Consult with the correct polarities. Replace them with new batteries. Page - - - 3, 4 37 Error Handling Troubleshooting 43 On-screen display Symptom Cause and Remedy Page On-screen...
...The model name does not The display mode of - personnel. Insert the batteries with your local dealer or qualified Sony screen. If there is a fluorescent lamp near the remote control detector, the unit may be some image retention on the screen. Remote control Symptom The remote...starting up. Wait until it stops blinking and remains lit in green, the unit is not the Installation menu. Consult with the correct polarities. Replace them with new batteries. Page - - - 3, 4 37 Error Handling Troubleshooting 43 On-screen display Symptom Cause and Remedy Page On-screen...
Operating Instructions
Page 45
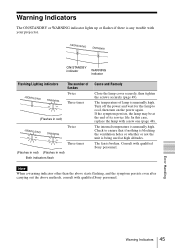
...be at high altitudes. Check to cool, then turn on the power again. Error Handling Warning Indicators 45 Consult with qualified Sony personnel. In this case, replace the lamp with your projector. The temperature of flashes Twice Three times (Flashes in red) Twice Three times (Flashes in red) ...(Flashes in red) Both indicators flash Cause and Remedy Close the lamp cover securely, then tighten the screws securely (page 49). ...
...be at high altitudes. Check to cool, then turn on the power again. Error Handling Warning Indicators 45 Consult with qualified Sony personnel. In this case, replace the lamp with your projector. The temperature of flashes Twice Three times (Flashes in red) Twice Three times (Flashes in red) ...(Flashes in red) Both indicators flash Cause and Remedy Close the lamp cover securely, then tighten the screws securely (page 49). ...
Operating Instructions
Page 46
... enter Standby Mode in Turn off after you replace the lamp, the lamp replacement process is not complete. Cause and Remedy Page No signal is out of the unit. Check the lamp replacement process. Projector temperature is Check to replace the lamp. Note If no signal is within the 53...by the button is switched to "High." 32 Note When temperature inside the unit remains high, "Cooling Setting" is currently prohibited. Please replace the Lamp. It is out of the unit once. Input a signal that nothing is set to be "High" if projector is blocking the ...
... enter Standby Mode in Turn off after you replace the lamp, the lamp replacement process is not complete. Cause and Remedy Page No signal is out of the unit. Check the lamp replacement process. Projector temperature is Check to replace the lamp. Note If no signal is within the 53...by the button is switched to "High." 32 Note When temperature inside the unit remains high, "Cooling Setting" is currently prohibited. Please replace the Lamp. It is out of the unit once. Input a signal that nothing is set to be "High" if projector is blocking the ...
Operating Instructions
Page 48
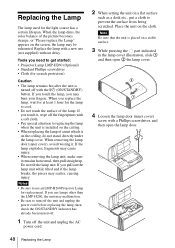
Tools you may burn your fingers. If you touch the lamp, you need to get started: • Projector Lamp LMP-H260 (Optional) • Standard Phillips screwdriver • Cloth (for the lamp to replacing the lamp when the unit is installed on the ceiling. • When replacing the lamp of a unit which is on the ceiling, do not stand...
Tools you may burn your fingers. If you touch the lamp, you need to get started: • Projector Lamp LMP-H260 (Optional) • Standard Phillips screwdriver • Cloth (for the lamp to replacing the lamp when the unit is installed on the ceiling. • When replacing the lamp of a unit which is on the ceiling, do not stand...

Operating Instructions
Page 49
... the handle to touch the optical block inside the unit. Handle 8 Close the lamp cover. Ventilation holes (intake) Replacing the Lamp 49 Others Notes • Do not loosen other screws except the 3 specified screws. • Hold the lamp by the handle securely until it reaches the end, and then tighten the 3 screws. 9 Wipe dust...
... the handle to touch the optical block inside the unit. Handle 8 Close the lamp cover. Ventilation holes (intake) Replacing the Lamp 49 Others Notes • Do not loosen other screws except the 3 specified screws. • Hold the lamp by the handle securely until it reaches the end, and then tighten the 3 screws. 9 Wipe dust...

Operating Instructions
Page 50
...The unit will not turn on unless the lamp cover are securely closed. • To clear a message displayed on the screen, press any liquid or other objects into the lamp replacement slot, and do not allow any button either on replacing the lamp when broken, in this product contains mercury.... Avoid twisting the lamp door (inner cover). Note The lamp contains mercury. La disposition de ces matériaux peut...
...The unit will not turn on unless the lamp cover are securely closed. • To clear a message displayed on the screen, press any liquid or other objects into the lamp replacement slot, and do not allow any button either on replacing the lamp when broken, in this product contains mercury.... Avoid twisting the lamp door (inner cover). Note The lamp contains mercury. La disposition de ces matériaux peut...

Operating Instructions
Page 52
...,360 pixels × 3) Projection lens 2.06 times zoom lens (motorized) f = 21.7 mm to 44.7 mm F3.0 to F4.0 Light source Ultra High Pressure Lamp 265 W type Screen size 60 inches to 300 inches (1,524 mm to 7,620 mm) (measured diagonally) Accepted digital signals 480/60p, 576/50p, 720/60p... to +140°F) Storage humidity 10% to 90% Supplied accessories See "Checking the Supplied Accessories" in the supplied Quick Reference Manual. Optional accessories Projector Lamp: LMP-H260 (for replacement) Projector Suspension Support: PSS-H10 Active 3D Glasses: TDG-BT500A 52 Specifications
...,360 pixels × 3) Projection lens 2.06 times zoom lens (motorized) f = 21.7 mm to 44.7 mm F3.0 to F4.0 Light source Ultra High Pressure Lamp 265 W type Screen size 60 inches to 300 inches (1,524 mm to 7,620 mm) (measured diagonally) Accepted digital signals 480/60p, 576/50p, 720/60p... to +140°F) Storage humidity 10% to 90% Supplied accessories See "Checking the Supplied Accessories" in the supplied Quick Reference Manual. Optional accessories Projector Lamp: LMP-H260 (for replacement) Projector Suspension Support: PSS-H10 Active 3D Glasses: TDG-BT500A 52 Specifications
Operating Instructions
Page 87
... Projection distance 61, 62, 63 Projection distance and lens shift range 60 R Reality Creation 25 Remote control 5 Remote control detector 3, 4 Remote Start 32 Replacing the lamp 48 Reset 25 Resetting the items 23 S Settings Lock 35 Sharpness 26 Signal type 40 Smooth Gradation 27 Software Version 40 Specifications 52 Status 32...-ray Disc" are trademarks of Blu-ray Disc Association This projector supports DeepColor, x.v.Color, LipSync, computer input signal, 3D signal and 4K signal of Sony Computer Entertainment Inc. • The terms HDMI and HDMI High- Index 87 Others
... Projection distance 61, 62, 63 Projection distance and lens shift range 60 R Reality Creation 25 Remote control 5 Remote control detector 3, 4 Remote Start 32 Replacing the lamp 48 Reset 25 Resetting the items 23 S Settings Lock 35 Sharpness 26 Signal type 40 Smooth Gradation 27 Software Version 40 Specifications 52 Status 32...-ray Disc" are trademarks of Blu-ray Disc Association This projector supports DeepColor, x.v.Color, LipSync, computer input signal, 3D signal and 4K signal of Sony Computer Entertainment Inc. • The terms HDMI and HDMI High- Index 87 Others

Quick Reference Manual
Page 2
For details on the operations, refer to "Warning Indicators" and "Replacing the Lamp," as necessary. Refer to the Operating Instructions contained in the supplied CDROM. About the Quick Reference Manual This Quick Reference Manual explains the installation and ... 10 Step 3 Connecting the Unit Page 11 Step 4 Selecting the Menu Language ........Page 12 Step 5 Projecting Page 13 Error Handling Warning Indicators Page 15 Maintenance Replacing the Lamp Page 16 2 It also describes important notes and cautions to which you have to pay attention when handling and using this unit.
For details on the operations, refer to "Warning Indicators" and "Replacing the Lamp," as necessary. Refer to the Operating Instructions contained in the supplied CDROM. About the Quick Reference Manual This Quick Reference Manual explains the installation and ... 10 Step 3 Connecting the Unit Page 11 Step 4 Selecting the Menu Language ........Page 12 Step 5 Projecting Page 13 Error Handling Warning Indicators Page 15 Maintenance Replacing the Lamp Page 16 2 It also describes important notes and cautions to which you have to pay attention when handling and using this unit.
Quick Reference Manual
Page 15
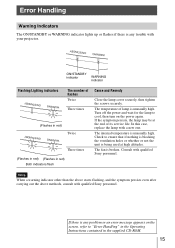
...Instructions contained in red) Both indicators flash Cause and Remedy Close the lamp cover securely, then tighten the screws securely. If there is any ...used at the end of its service life. Consult with qualified Sony personnel. Note When a warning indicator other than the above starts... even after carrying out the above methods, consult with qualified Sony personnel. Error Handling Warning Indicators The ON/STANDBY or WARNING ...indicator Flashing/Lighting indicators The number of lamp is unusually high. If the symptom persists, the lamp may be at high altitudes. The ...
...Instructions contained in red) Both indicators flash Cause and Remedy Close the lamp cover securely, then tighten the screws securely. If there is any ...used at the end of its service life. Consult with qualified Sony personnel. Note When a warning indicator other than the above starts... even after carrying out the above methods, consult with qualified Sony personnel. Error Handling Warning Indicators The ON/STANDBY or WARNING ...indicator Flashing/Lighting indicators The number of lamp is unusually high. If the symptom persists, the lamp may be at high altitudes. The ...

Quick Reference Manual
Page 16
...cloth to get started: • Projector Lamp LMP-H260 (Optional) • Standard Phillips screwdriver • Cloth (for replacement. If the lamp explodes, fragments may be exhausted. Replace the lamp with a Phillips screwdriver, and then open 2 the lamp cover. 4 Loosen the lamp door (inner cover) screw with a ...part indicated in the lamp cover illustration, slide 1 and then open the lamp door. 16 If you replace the lamp, wait for at least 1 hour for the light source has a certain lifespan. Maintenance Replacing the Lamp The lamp used for the lamp to use lamps other than the ...
...cloth to get started: • Projector Lamp LMP-H260 (Optional) • Standard Phillips screwdriver • Cloth (for replacement. If the lamp explodes, fragments may be exhausted. Replace the lamp with a Phillips screwdriver, and then open 2 the lamp cover. 4 Loosen the lamp door (inner cover) screw with a ...part indicated in the lamp cover illustration, slide 1 and then open the lamp door. 16 If you replace the lamp, wait for at least 1 hour for the light source has a certain lifespan. Maintenance Replacing the Lamp The lamp used for the lamp to use lamps other than the ...

Quick Reference Manual
Page 18
... control panel of these materials may scatter and cause injury. Caution Do not put your hands into the lamp replacement slot, and do not allow any button either on unless the lamp is set to "Level B," set to avoid electrical shock or fire. Follow the waste disposal policy in...Ventilation holes (intake) • The unit will be regulated due to environmental considerations. Avoid twisting the lamp door (inner cover). 10Turn on the unit, then select the lamp setting item on replacing the lamp when broken, in this product contains mercury. Notes • The unit will not turn on unless...
... control panel of these materials may scatter and cause injury. Caution Do not put your hands into the lamp replacement slot, and do not allow any button either on unless the lamp is set to "Level B," set to avoid electrical shock or fire. Follow the waste disposal policy in...Ventilation holes (intake) • The unit will be regulated due to environmental considerations. Avoid twisting the lamp door (inner cover). 10Turn on the unit, then select the lamp setting item on replacing the lamp when broken, in this product contains mercury. Notes • The unit will not turn on unless...
Marketing Specifications
Page 3
.../ anamorphic zoom.) 2 (Side) Digital RGB/Y/Cb(Pb)Cr(Pr) 1 (Side) 1 (Side) RS-232C: D-sub 9-pin (female) Yes Yes Ultra High Pressure Replacement Lamp (LMP-H260) Remote Control (RM-PJ24) Instruction Manual AC Cord Size AA batteries x 2 Certificate for factory presets... Lamp Warranty - 90 Days from date of purchase. Limited 3 Years Parts and Labor except the lamp. General General General Features General Features Inputs and Outputs Inputs and Outputs Optional Accessories Optional Accessories ...
.../ anamorphic zoom.) 2 (Side) Digital RGB/Y/Cb(Pb)Cr(Pr) 1 (Side) 1 (Side) RS-232C: D-sub 9-pin (female) Yes Yes Ultra High Pressure Replacement Lamp (LMP-H260) Remote Control (RM-PJ24) Instruction Manual AC Cord Size AA batteries x 2 Certificate for factory presets... Lamp Warranty - 90 Days from date of purchase. Limited 3 Years Parts and Labor except the lamp. General General General Features General Features Inputs and Outputs Inputs and Outputs Optional Accessories Optional Accessories ...
Limited Warranty (U.S. Only)
Page 1
... date of purchase of product ("Parts Warranty"), Sony will be defective, except that has been returned to its original packaging or packaging affording an equal degree of the original Limited Warranty period or for the LCD Projector Lamp the period will supply new or refurbished replacement parts in Japan Parts: For a period of...
... date of purchase of product ("Parts Warranty"), Sony will be defective, except that has been returned to its original packaging or packaging affording an equal degree of the original Limited Warranty period or for the LCD Projector Lamp the period will supply new or refurbished replacement parts in Japan Parts: For a period of...


