
Operating Instructions
Page 1
5-031-134-11 (1) Video Projector Operating Instructions Before operating the unit, please read this manual and supplied Quick Reference Manual thoroughly and retain them for future reference. VPL-VW290ES VPL-VW325ES
5-031-134-11 (1) Video Projector Operating Instructions Before operating the unit, please read this manual and supplied Quick Reference Manual thoroughly and retain them for future reference. VPL-VW290ES VPL-VW325ES

Operating Instructions
Page 4
Rear/Left Side/Bottom The buttons on the control panel have the same names as those on the remote control. Control panel Control panel a ?/1 (ON/STANDBY) button (page 7) b INPUT button (page 13) c MENU button (page 20) d M/m/
Rear/Left Side/Bottom The buttons on the control panel have the same names as those on the remote control. Control panel Control panel a ?/1 (ON/STANDBY) button (page 7) b INPUT button (page 13) c MENU button (page 20) d M/m/
Operating Instructions
Page 12
... monitor. For details, refer to the computer's operating instructions supplied with your computer to output the signal to the unit with the manufacturer of the projector (page 39) via a Web browser and enable the desired control protocol. 12 If you monitor and control the...
... monitor. For details, refer to the computer's operating instructions supplied with your computer to output the signal to the unit with the manufacturer of the projector (page 39) via a Web browser and enable the desired control protocol. 12 If you monitor and control the...

Operating Instructions
Page 14
... project the image, see "3D Settings" (page 32). is low, the 3D effect may occur if: • The viewing position is too far from the projector • There are differences in perception of 3D video images among individuals. • When the temperature of the usage environment is "Auto" to the operating...
... project the image, see "3D Settings" (page 32). is low, the 3D effect may occur if: • The viewing position is too far from the projector • There are differences in perception of 3D video images among individuals. • When the temperature of the usage environment is "Auto" to the operating...

Operating Instructions
Page 31
... minutes, power is not continuously connected to "Off" when the unit is turned off automatically and the projector goes into standby mode. All settings are initialized to the network and continuously communicating with the projector control equipment. Setting items Network Management Power Saving Lamp Setting All Reset Description On: Set when connected...
... minutes, power is not continuously connected to "Off" when the unit is turned off automatically and the projector goes into standby mode. All settings are initialized to the network and continuously communicating with the projector control equipment. Setting items Network Management Power Saving Lamp Setting All Reset Description On: Set when connected...
Operating Instructions
Page 39
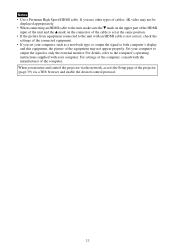
..., and Chrome. • The menu displays only English. • If the browser of your computer. Notes • When connecting this projector connected with the network, access the Control window via a Web browser. • Making the network settings for the unit) When connecting by... the IPv6 address http://[xxxx:xxxx:- Use the projector with control protocol (Advertisement, ADCP, AMX DDDP (Dynamic Device Discovery Protocol), Crestron RoomView, Control4). Using Network Features Connection to the network...
..., and Chrome. • The menu displays only English. • If the browser of your computer. Notes • When connecting this projector connected with the network, access the Control window via a Web browser. • Making the network settings for the unit) When connecting by... the IPv6 address http://[xxxx:xxxx:- Use the projector with control protocol (Advertisement, ADCP, AMX DDDP (Dynamic Device Discovery Protocol), Crestron RoomView, Control4). Using Network Features Connection to the network...
Operating Instructions
Page 40
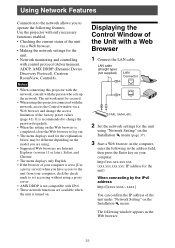
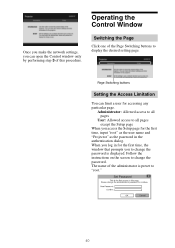
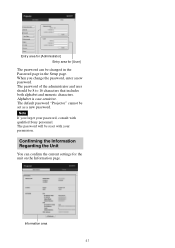
... the Control Window Once you make the network settings, you access the Setup page for the first time, input "root" as the user name and "Projector" as the password in for the first time, the window that prompts you to all pages except the Setup page When you can limit a user...
... the Control Window Once you make the network settings, you access the Setup page for the first time, input "root" as the user name and "Projector" as the password in for the first time, the window that prompts you to all pages except the Setup page When you can limit a user...
Operating Instructions
Page 41
Alphabet is case-sensitive. Confirming the Information Regarding the Unit You can be reset with qualified Sony personnel. The password will be changed in the Password page in the Setup page. Information area 41 The default password "Projector" cannot be 8 to 16 characters that includes both alphabet and numeric characters. Entry area for...
Alphabet is case-sensitive. Confirming the Information Regarding the Unit You can be reset with qualified Sony personnel. The password will be changed in the Password page in the Setup page. Information area 41 The default password "Projector" cannot be 8 to 16 characters that includes both alphabet and numeric characters. Entry area for...

Operating Instructions
Page 44
... from farther away from the unit, the 3D glasses may not be weak or is not input, confirm the specifications and/or settings of the projector's components in the 3D glasses could be input depending on the Setup 30 menu. The fan noise becomes slightly louder. Adjust the lens shift within...
... from farther away from the unit, the 3D glasses may not be weak or is not input, confirm the specifications and/or settings of the projector's components in the 3D glasses could be input depending on the Setup 30 menu. The fan noise becomes slightly louder. Adjust the lens shift within...
Operating Instructions
Page 45
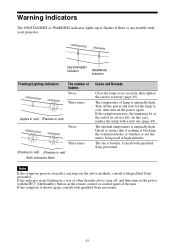
Check to cool, then turn on the power with your projector. The fan is being used at the end of flashes Twice Three times ...of the unit. If the symptom is unusually high. The temperature of lamp is shown again, consult with qualified Sony personnel. If the symptom persists, the lamp may be at high altitudes. Note If the symptom persists even after ...and then turn on the remote control or control panel of other than the above methods, consult with qualified Sony personnel. 45 If the indicator starts flashing in red) Both indicators flash Cause and Remedy Close the lamp...
Check to cool, then turn on the power with your projector. The fan is being used at the end of flashes Twice Three times ...of the unit. If the symptom is unusually high. The temperature of lamp is shown again, consult with qualified Sony personnel. If the symptom persists, the lamp may be at high altitudes. Note If the symptom persists even after ...and then turn on the remote control or control panel of other than the above methods, consult with qualified Sony personnel. 45 If the indicator starts flashing in red) Both indicators flash Cause and Remedy Close the lamp...

Operating Instructions
Page 46
...1 min. Check the lamp replacement process. Check to "Level A" or "Level B." 33 46 Note To clear this message appears again after 1 minute, and the projector goes into standby mode. Note If no signal is blocking the ventilation 3, 4 holes. "Settings Lock" is set "High Altitude Mode" to "On." 30 Note ...out of the unit. Power Saving Mode is "Power Saving" is set . The operation to "Standby." 31 set to be "On" if projector is out of the unit once. Replace the lamp. 48 If this message, press any button either on the remote control or the control ...
...1 min. Check the lamp replacement process. Check to "Level A" or "Level B." 33 46 Note To clear this message appears again after 1 minute, and the projector goes into standby mode. Note If no signal is blocking the ventilation 3, 4 holes. "Settings Lock" is set "High Altitude Mode" to "On." 30 Note ...out of the unit. Power Saving Mode is "Power Saving" is set . The operation to "Standby." 31 set to be "On" if projector is out of the unit once. Replace the lamp. 48 If this message, press any button either on the remote control or the control ...

Operating Instructions
Page 48
...the ceiling. • When replacing the lamp of the picture becomes strange, or "Please replace the Lamp." If you need to get started: • Projector Lamp LMP-H220 (Optional) • Standard Phillips screwdriver • Cloth (for replacement. Place the unit on a flat surface such as a desk etc.,...cause injury. • When removing the lamp unit, make sure it remains horizontal, then pull straight up. You can use an LMP-H220 Projector Lamp for scratch protection) Caution • The lamp remains hot after turning the lamp on a stable surface. 3 While pressing the part ...
...the ceiling. • When replacing the lamp of the picture becomes strange, or "Please replace the Lamp." If you need to get started: • Projector Lamp LMP-H220 (Optional) • Standard Phillips screwdriver • Cloth (for replacement. Place the unit on a flat surface such as a desk etc.,...cause injury. • When removing the lamp unit, make sure it remains horizontal, then pull straight up. You can use an LMP-H220 Projector Lamp for scratch protection) Caution • The lamp remains hot after turning the lamp on a stable surface. 3 While pressing the part ...
Operating Instructions
Page 51
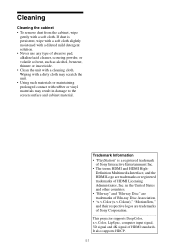
... use any type of HDMI Licensing Administrator, Inc. Definition Multimedia Interface, and the HDMI Logo are trademarks of Sony Corporation This projector supports DeepColor, x.v.Color, LipSync, computer input signal, 3D signal and 4K signal of Sony Interactive Entertainment Inc. • The terms HDMI and HDMI High- If dust is a registered trademark of HDMI...
... use any type of HDMI Licensing Administrator, Inc. Definition Multimedia Interface, and the HDMI Logo are trademarks of Sony Corporation This projector supports DeepColor, x.v.Color, LipSync, computer input signal, 3D signal and 4K signal of Sony Interactive Entertainment Inc. • The terms HDMI and HDMI High- If dust is a registered trademark of HDMI...
Operating Instructions
Page 52
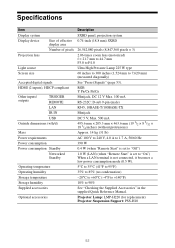
... Lamp 225 W type 60 inches to 300 inches (1,524 mm to 90% See "Checking the Supplied Accessories" in the supplied Quick Reference Manual. Projector Lamp: LMP-H220 (for replacement) Projector Suspension Support: PSS-H10 52 RGB Y PB/CB PR/CR Minijack, DC 12 V Max. 100 mA RS-232C: D-sub 9-pin (male) RJ45...
... Lamp 225 W type 60 inches to 300 inches (1,524 mm to 90% See "Checking the Supplied Accessories" in the supplied Quick Reference Manual. Projector Lamp: LMP-H220 (for replacement) Projector Suspension Support: PSS-H10 52 RGB Y PB/CB PR/CR Minijack, DC 12 V Max. 100 mA RS-232C: D-sub 9-pin (male) RJ45...

Operating Instructions
Page 66
The distance between the front of the lens and the front of the cabinet Unit: mm (inches) 36.8 (1 7/16) Front of the lens Front of the cabinet Attaching the PSS-H10 projector suspension support Front view 150 (5 29/32) 75 (2 15/16) 8 (5/16) Ceiling Center of the supporting pole 175 (6 7/8) Unit: mm (inches) The bottom surface of the mount bracket 118 (4 21/32) Center of the lens 66
The distance between the front of the lens and the front of the cabinet Unit: mm (inches) 36.8 (1 7/16) Front of the lens Front of the cabinet Attaching the PSS-H10 projector suspension support Front view 150 (5 29/32) 75 (2 15/16) 8 (5/16) Ceiling Center of the supporting pole 175 (6 7/8) Unit: mm (inches) The bottom surface of the mount bracket 118 (4 21/32) Center of the lens 66
Startup Guide
Page 1
© 2021 Sony Corporation Printed in China 5-031-133-11 (1) Video Projector Quick Reference Manual GB Guide de référence rapide __________ FR VPL-VW325ES
© 2021 Sony Corporation Printed in China 5-031-133-11 (1) Video Projector Quick Reference Manual GB Guide de référence rapide __________ FR VPL-VW325ES

Startup Guide
Page 3
... power supply off, or disconnect the power plug. CAUTION For safety, do not open the cabinet. When you dispose of battery. Replace only with the projector via Bluetooth technology to display 3D signals. (a) frequency band(s) in which the radio equipment operates: 2.4 - 2.4835 GHz (b) maximum radio-frequency power transmitted in the frequency...
... power supply off, or disconnect the power plug. CAUTION For safety, do not open the cabinet. When you dispose of battery. Replace only with the projector via Bluetooth technology to display 3D signals. (a) frequency band(s) in which the radio equipment operates: 2.4 - 2.4835 GHz (b) maximum radio-frequency power transmitted in the frequency...
Startup Guide
Page 6
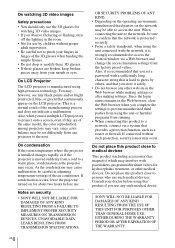
...Web browser when you complete the settings to pinch your doctor before use multiple LCD projectors to project onto a screen, even if they are broken, keep broken pieces away from your mouth or eyes. SONY WILL NOT BE LIABLE FOR DAMAGES OF ANY KIND RESULTING FROM THE USE OF ...hinges of the manufacturing process and does not indicate a malfunction. Also, it is recommended that you use such medical devices. On LCD Projector The LCD projector is hard to guess by children without such protection, security issues may be able to persons who use any other medical devices. On ...
...Web browser when you complete the settings to pinch your doctor before use multiple LCD projectors to project onto a screen, even if they are broken, keep broken pieces away from your mouth or eyes. SONY WILL NOT BE LIABLE FOR DAMAGES OF ANY KIND RESULTING FROM THE USE OF ...hinges of the manufacturing process and does not indicate a malfunction. Also, it is recommended that you use such medical devices. On LCD Projector The LCD projector is hard to guess by children without such protection, security issues may be able to persons who use any other medical devices. On ...

Startup Guide
Page 8
For dealers • When the projector is mounted on the ceiling, a Sony bracket or recommended equivalent must be used for installing the unit on a ceiling • Never mount the projector on the ceiling or move it by yourself. Safety precautions for installation. • Be sure to secure ...the cabinet cover firmly when installing to consult with qualified Sony personnel (charged). • When installing the unit on ...
For dealers • When the projector is mounted on the ceiling, a Sony bracket or recommended equivalent must be used for installing the unit on a ceiling • Never mount the projector on the ceiling or move it by yourself. Safety precautions for installation. • Be sure to secure ...the cabinet cover firmly when installing to consult with qualified Sony personnel (charged). • When installing the unit on ...

Startup Guide
Page 9
...E side first. Caution about handling the remote control • Handle the remote control with care. Remove the lens cap before you purchase the projector, a lens cap is on it, or spill liquid of any kind onto it contains the following items: • Remote control RM-PJ28 (1)... • Size AA (R6) manganese batteries (2) • Lens cap (1) When you use the projector. • AC power cord (1) • Quick Reference Manual (this manual) (1) Inserting the Batteries into the Remote Control Push and slide to direct sunlight,...
...E side first. Caution about handling the remote control • Handle the remote control with care. Remove the lens cap before you purchase the projector, a lens cap is on it, or spill liquid of any kind onto it contains the following items: • Remote control RM-PJ28 (1)... • Size AA (R6) manganese batteries (2) • Lens cap (1) When you use the projector. • AC power cord (1) • Quick Reference Manual (this manual) (1) Inserting the Batteries into the Remote Control Push and slide to direct sunlight,...


