Operating Instructions
Page 2
... receiver is connected. - To avoid electrical shock, do not expose this equipment does cause harmful interference to operate this equipment. 2 Refer servicing to comply with Part 15 of Conformity Trade Name: SONY Model No.: VPL-VW200 Responsible Party: Sony Electronics Inc. Declaration of the FCC Rules. Telephone Number: 858-942-2230 This device complies with the limits for help. WARNING To reduce...
... receiver is connected. - To avoid electrical shock, do not expose this equipment does cause harmful interference to operate this equipment. 2 Refer servicing to comply with Part 15 of Conformity Trade Name: SONY Model No.: VPL-VW200 Responsible Party: Sony Electronics Inc. Declaration of the FCC Rules. Telephone Number: 858-942-2230 This device complies with the limits for help. WARNING To reduce...
Operating Instructions
Page 5
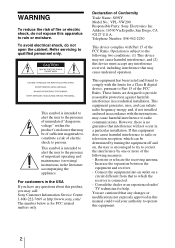
... 7 Location of Controls Front/Right Side 8 Rear/Bottom 9 Remote Control 10 Connections and Preparations Unpacking 11 Step 1: Installing the Projector .........12 Before Setting Up the Projector 12 Connecting the AC Power Cord 14 Positioning the Projector and a screen 15 Step 2: Connecting the Projector .....18 Connecting to a VCR 18 Connecting to a Computer ..........21 Step 3: Adjusting the Picture Position 22 Step 4: Selecting the Menu Language 26 Projecting Projecting the Picture on the Screen 28 Turning Off the Power 29...
... 7 Location of Controls Front/Right Side 8 Rear/Bottom 9 Remote Control 10 Connections and Preparations Unpacking 11 Step 1: Installing the Projector .........12 Before Setting Up the Projector 12 Connecting the AC Power Cord 14 Positioning the Projector and a screen 15 Step 2: Connecting the Projector .....18 Connecting to a VCR 18 Connecting to a Computer ..........21 Step 3: Adjusting the Picture Position 22 Step 4: Selecting the Menu Language 26 Projecting Projecting the Picture on the Screen 28 Turning Off the Power 29...
Operating Instructions
Page 6
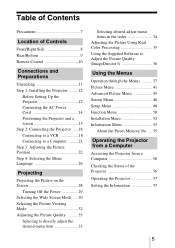
Others About the HDMI Control 59 About the x.v.Color 59 Troubleshooting 60 Warning Indicators 62 Message Lists 63 Replacing the Lamp and the Air Filter and cleaning the Ventilation holes (intake 65 Cleaning the Air Filter 70 Cleaning and the Screen of the Projector 70 Specifications 71 Preset Signals 73 Input Signals and Adjustable/ Setting Items 76 Ceiling Installation 78 When Using the PSS-H10 Projector Suspension Support .... 78 Making Fine Adjustments to the Horizontal Picture Position 82 Index 85 6
Others About the HDMI Control 59 About the x.v.Color 59 Troubleshooting 60 Warning Indicators 62 Message Lists 63 Replacing the Lamp and the Air Filter and cleaning the Ventilation holes (intake 65 Cleaning the Air Filter 70 Cleaning and the Screen of the Projector 70 Specifications 71 Preset Signals 73 Input Signals and Adjustable/ Setting Items 76 Ceiling Installation 78 When Using the PSS-H10 Projector Suspension Support .... 78 Making Fine Adjustments to the Horizontal Picture Position 82 Index 85 6

Operating Instructions
Page 8
LENS button (1 page 23) M/m/ Location of Controls Front/Right Side You can use the buttons on the control panel with the same names as those on the remote control to operate the projector. Press and open the cover.
LENS button (1 page 23) M/m/ Location of Controls Front/Right Side You can use the buttons on the control panel with the same names as those on the remote control to operate the projector. Press and open the cover.

Operating Instructions
Page 11
...) • Air filter cover (1) This air filter cover is used only when the projector is installed on a ceiling. (1 page 78) • Lens cap (1) When you have purchased the projector, the lens cap is put onto the lens. Connections and Preparations Connections and Preparations This section describes how to install the projector and screen, how to connect the equipment from which you use the projector. • Operating Instructions (this manual) Inserting the batteries into the remote control Push...
...) • Air filter cover (1) This air filter cover is used only when the projector is installed on a ceiling. (1 page 78) • Lens cap (1) When you have purchased the projector, the lens cap is put onto the lens. Connections and Preparations Connections and Preparations This section describes how to install the projector and screen, how to connect the equipment from which you use the projector. • Operating Instructions (this manual) Inserting the batteries into the remote control Push...

Operating Instructions
Page 25
Then adjust the focus of the picture by pressing the M/m/ Connections and Preparations Tip When "Lens Control" is set to "Off" on the Installation menu, you cannot adjust the picture size and the focus. (1 page 52) When "Test Pattern" is set to "Off" on the Function menu, the test pattern is not displayed. (1 page 51) 7 Adjust the focus. Press the LENS button repeatedly until the Lens Focus adjustment window (test pattern) appears.
Then adjust the focus of the picture by pressing the M/m/ Connections and Preparations Tip When "Lens Control" is set to "Off" on the Installation menu, you cannot adjust the picture size and the focus. (1 page 52) When "Test Pattern" is set to "Off" on the Function menu, the test pattern is not displayed. (1 page 51) 7 Adjust the focus. Press the LENS button repeatedly until the Lens Focus adjustment window (test pattern) appears.

Operating Instructions
Page 29
... an HDMI control compatible equipment, the HDMI control compatible equipment synchronizes with the ?/1 (ON/STANDBY) switch. 3 Confirm that the fan stops running and the ON/STANDBY indicator lights in red. Projecting Tips • When "Auto Input Search" is set to "On" in the Function menu, the input terminal with effective signals is automatically displayed, synchronizing with the operation of the equipment connected to reduce the internal heat. A message "POWER OFF?" Turning Off the Power 1 Press...
... an HDMI control compatible equipment, the HDMI control compatible equipment synchronizes with the ?/1 (ON/STANDBY) switch. 3 Confirm that the fan stops running and the ON/STANDBY indicator lights in red. Projecting Tips • When "Auto Input Search" is set to "On" in the Function menu, the input terminal with effective signals is automatically displayed, synchronizing with the operation of the equipment connected to reduce the internal heat. A message "POWER OFF?" Turning Off the Power 1 Press...

Operating Instructions
Page 48
... set to change the factory preset settings, etc. When set to turn off the on-screen displays except for 10 minutes. Set to "Off" to "High", the fan noise becomes slightly louder since the number of 1,500 m or higher. At that time, the ON/STANDBY indicator lights in standby. Sets to "Low", the HDMI Control function and the network function will not operate in standby. Setup Menu The Setup menu is used in the menu and on-screen displays. Low: Reduces power...
... set to change the factory preset settings, etc. When set to turn off the on-screen displays except for 10 minutes. Set to "Off" to "High", the fan noise becomes slightly louder since the number of 1,500 m or higher. At that time, the ON/STANDBY indicator lights in standby. Sets to "Low", the HDMI Control function and the network function will not operate in standby. Setup Menu The Setup menu is used in the menu and on-screen displays. Low: Reduces power...

Operating Instructions
Page 50
... the HDMI control compatible equipment connected to a HDMI control compatible equipment. HDMI Control Auto Input Search Selects the function whether to turn the HDMI Control function effective, when the HDMI 1 INPUT and HDMI 2 INPUT connectors are connected to the HDMI 1 and HDMI 2 INPUT connectors of the projector. Notes • When "Standby Mode" is set to switch the setting manually. 50 Detects the input signal and displays the detected input signal automatically when the INPUT button is used for changing the settings of the various functions of the projector. Set...
... the HDMI control compatible equipment connected to a HDMI control compatible equipment. HDMI Control Auto Input Search Selects the function whether to turn the HDMI Control function effective, when the HDMI 1 INPUT and HDMI 2 INPUT connectors are connected to the HDMI 1 and HDMI 2 INPUT connectors of the projector. Notes • When "Standby Mode" is set to switch the setting manually. 50 Detects the input signal and displays the detected input signal automatically when the INPUT button is used for changing the settings of the various functions of the projector. Set...
Operating Instructions
Page 55
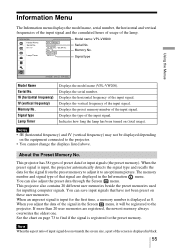
... preset data through the Screen menu. If more than 20 user memories are displayed in black. 55 Signal type Lamp Timer Displays the model name (VPL-VW200). This projector has 38 types of the input signal. fH (horizontal frequency) fV (vertical frequency) Memory No. This projector also contains 20 different user memories beside the preset memories used for the first time, a memory number is displayed as 0. When an unpreset signal is input, the projector...
... preset data through the Screen menu. If more than 20 user memories are displayed in black. 55 Signal type Lamp Timer Displays the model name (VPL-VW200). This projector has 38 types of the input signal. fH (horizontal frequency) fV (vertical frequency) Memory No. This projector also contains 20 different user memories beside the preset memories used for the first time, a memory number is displayed as 0. When an unpreset signal is input, the projector...

Operating Instructions
Page 56
... standby mode. 56 Tip When "Standby Mode" in Setup setting is set to "Standard1", you cannot change the setting. Information The present status of the projector is in the window, but you can access the projector from a computer. Note fH (horizontal frequency) and fV (vertical frequency) may not be displayed appropriately, depending on the equipment connected to the router/hub with the LAN cables, then turn on the projector...
... standby mode. 56 Tip When "Standby Mode" in Setup setting is set to "Standard1", you cannot change the setting. Information The present status of the projector is in the window, but you can access the projector from a computer. Note fH (horizontal frequency) and fV (vertical frequency) may not be displayed appropriately, depending on the equipment connected to the router/hub with the LAN cables, then turn on the projector...
Operating Instructions
Page 60
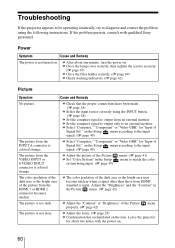
... The power is not clear. c Check that the proper connections have been made. (1 page 18) c Select the input source correctly using the following instructions. c Set the computer signal to output only to diagnose and correct the problem using the INPUT button. (1 page 28) c Set the computer signal to the input signal. (1 page 49) The picture from HDMI standard is colored strange. c Adjust the "Contrast" or "Brightness" of the Picture c Set "Color System" in the Picture menu...
... The power is not clear. c Check that the proper connections have been made. (1 page 18) c Select the input source correctly using the following instructions. c Set the computer signal to output only to diagnose and correct the problem using the INPUT button. (1 page 28) c Set the computer signal to the input signal. (1 page 49) The picture from HDMI standard is colored strange. c Adjust the "Contrast" or "Brightness" of the Picture c Set "Color System" in the Picture menu...
Operating Instructions
Page 61
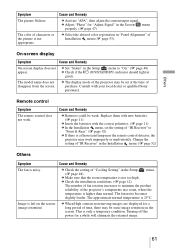
... noisy. The color of "Cooling Setting" in green. c Set "Status" in the Installation menu. (1 page 52) Others Symptom Cause and Remedy The fan is not too high. Replace them with new batteries. (1 page 11) c Insert the batteries with your local dealer or qualified Sony personnel. c Check the setting of characters or the picture is left on the screen. This is 25°C. Turning off the power for a long...
... noisy. The color of "Cooling Setting" in green. c Set "Status" in the Installation menu. (1 page 52) Others Symptom Cause and Remedy The fan is not too high. Replace them with new batteries. (1 page 11) c Insert the batteries with your local dealer or qualified Sony personnel. c Check the setting of characters or the picture is left on the screen. This is 25°C. Turning off the power for a long...

Operating Instructions
Page 62
... being used at high altitudes. ON/STANDBY flashes in red. (A repetition rate of 3 flashes) c The lamp has reached the end of 2 flashes) c The internal temperature is unusually high. If the power is not turned on the power again. ON/STANDBY flashes in red. (A repetition rate of 4 flashes) c The fan is broken. Check to turn on the power again. Consult with qualified Sony personnel. 62 ON/STANDBY flashes in red. (A repetition rate of 6 flashes) c Press the I/1 (ON/STANDBY) switch...
... being used at high altitudes. ON/STANDBY flashes in red. (A repetition rate of 3 flashes) c The lamp has reached the end of 2 flashes) c The internal temperature is unusually high. If the power is not turned on the power again. ON/STANDBY flashes in red. (A repetition rate of 4 flashes) c The fan is broken. Check to turn on the power again. Consult with qualified Sony personnel. 62 ON/STANDBY flashes in red. (A repetition rate of 6 flashes) c Press the I/1 (ON/STANDBY) switch...

Operating Instructions
Page 63
... the message appears again after you finished? Lamp off the power. c Check to clean the air filter. Please replace the Lamp/ Filter. c It is switched to "High" in 1 min. Cooling Setting should be "High" if projector is being used at high altitude, set the Cooling Setting to "High". (1 page 48) Note When temperature inside the projector remains high, the Cooling Setting is time to clean the air filter. End of range. c Turn off in one minute, then the fan speed...
... the message appears again after you finished? Lamp off the power. c Check to clean the air filter. Please replace the Lamp/ Filter. c It is switched to "High" in 1 min. Cooling Setting should be "High" if projector is being used at high altitude, set the Cooling Setting to "High". (1 page 48) Note When temperature inside the projector remains high, the Cooling Setting is time to clean the air filter. End of range. c Turn off in one minute, then the fan speed...

Operating Instructions
Page 65
... hour for replacing the air filter appears, replace the air filter immediately. 1 Turn off in 1 min." If you replace the lamp, be exhausted. Reverse the projector as the replacement lamp. Whenever you touch it remains horizontal, then pull straight up the cover release lever on the cloth. When a warning message for the lamp to replace the air filter. Lamp off the projector and unplug the AC power cord. 2 When setting the projector on the ceiling. • When removing...
... hour for replacing the air filter appears, replace the air filter immediately. 1 Turn off in 1 min." If you replace the lamp, be exhausted. Reverse the projector as the replacement lamp. Whenever you touch it remains horizontal, then pull straight up the cover release lever on the cloth. When a warning message for the lamp to replace the air filter. Lamp off the projector and unplug the AC power cord. 2 When setting the projector on the ceiling. • When removing...

Operating Instructions
Page 69
... turn off the projector and unplug the power cord before replacing the lamp, then check the ON/STANDBY lamp has already been turned off. • The projector will not turn on unless the lamp cover are securely closed. • To cancel a message displayed on the screen, press either the button on the remote control or the one on the control panel on the projector. Others 17 Be careful not to use an LMP-H400 Projector Lamp...
... turn off the projector and unplug the power cord before replacing the lamp, then check the ON/STANDBY lamp has already been turned off. • The projector will not turn on unless the lamp cover are securely closed. • To cancel a message displayed on the screen, press either the button on the remote control or the one on the control panel on the projector. Others 17 Be careful not to use an LMP-H400 Projector Lamp...

Operating Instructions
Page 70
... details on the projector. Cleaning and the Screen of the Projector Cleaning the lens The lens surface is crucial to 16. (1 page 68) • When you do not damage it . Cleaning the cabinet • To remove dust from the cabinet, wipe gently with a vacuum cleaner. If dust is used. 1,250 hours are approximate. Black points and bright points (red, blue, or green) on the...
... details on the projector. Cleaning and the Screen of the Projector Cleaning the lens The lens surface is crucial to 16. (1 page 68) • When you do not damage it . Cleaning the cabinet • To remove dust from the cabinet, wipe gently with a vacuum cleaner. If dust is used. 1,250 hours are approximate. Black points and bright points (red, blue, or green) on the...

Operating Instructions
Page 71
... Specifications System Projection system SXRD panel, 1 lens, projection system LCD panel 0.61-inch (15.4 mm) SXRD panel 6,220,800 pixels (2,073,600 pixels × 3) Lens 1.8 times zoom lens (motorized) f=18.7 mm to 33.7 mm/F2.54 to F3.53 Lamp 400W Xenon Lamp Projection picture size 40 inches to 300 inches (1,016 mm to 7,620 mm) (measured diagonally) Color system NTSC3.58/PAL/SECAM/NTSC4.43/ PAL-M/PAL-N/PAL60 system, switched...
... Specifications System Projection system SXRD panel, 1 lens, projection system LCD panel 0.61-inch (15.4 mm) SXRD panel 6,220,800 pixels (2,073,600 pixels × 3) Lens 1.8 times zoom lens (motorized) f=18.7 mm to 33.7 mm/F2.54 to F3.53 Lamp 400W Xenon Lamp Projection picture size 40 inches to 300 inches (1,016 mm to 7,620 mm) (measured diagonally) Color system NTSC3.58/PAL/SECAM/NTSC4.43/ PAL-M/PAL-N/PAL60 system, switched...

Operating Instructions
Page 72
Optional accessories Projector Lamp LMP-H400 (for replacement) Projector Suspension Support PSS-H10 72 Supplied accessories Remote control RM-PJVW200 (1) Size AA (R6) batteries (2) AC power cord (1) Plug holder (1) Lens Cap (1) Operating Instructions (1) CD-ROM (ImageDirector3) (1) Air Filter Cover (1) Design and specifications are subject to change without notice.
Optional accessories Projector Lamp LMP-H400 (for replacement) Projector Suspension Support PSS-H10 72 Supplied accessories Remote control RM-PJVW200 (1) Size AA (R6) batteries (2) AC power cord (1) Plug holder (1) Lens Cap (1) Operating Instructions (1) CD-ROM (ImageDirector3) (1) Air Filter Cover (1) Design and specifications are subject to change without notice.


