

Operating Instructions
Page 1
4-589-872-01 (1) Video Projector Operating Instructions Before operating the unit, please read this manual and supplied Quick Reference Manual thoroughly and retain them for future reference. VPL-HW45
4-589-872-01 (1) Video Projector Operating Instructions Before operating the unit, please read this manual and supplied Quick Reference Manual thoroughly and retain them for future reference. VPL-HW45

Operating Instructions
Page 4
for remote control. a Ventilation holes (intake) (page 43) b Lamp cover (page 42) c Front feet (adjustable) (page 10) d Filter holder (page 43) e Projector suspension support attaching hole (page 58) 4 o REMOTE connector Connects to control the unit. Rear/Bottom p IR IN connector Inputs signals to a computer, etc.
for remote control. a Ventilation holes (intake) (page 43) b Lamp cover (page 42) c Front feet (adjustable) (page 10) d Filter holder (page 43) e Projector suspension support attaching hole (page 58) 4 o REMOTE connector Connects to control the unit. Rear/Bottom p IR IN connector Inputs signals to a computer, etc.

Operating Instructions
Page 7
Lights in green. Press the PATTERN button on the unit. The ON/STANDBY indicator lights in green. 3 Display a test signal for a while (tens of seconds) and then lights in red and the unit goes into standby mode. Flashes in green for performing adjustments. Tip The ?/1 (ON/STANDBY), INPUT, MENU, and M/m/ Remote control detector The ON/STANDBY indicator flashes in green, and then lights in red. 2 Press the ?/1 (ON/STANDBY) button to turn on the remote control to display the test signal. Adjusting the Picture Position Project an image on the screen and then adjust the picture...
Lights in green. Press the PATTERN button on the unit. The ON/STANDBY indicator lights in green. 3 Display a test signal for a while (tens of seconds) and then lights in red and the unit goes into standby mode. Flashes in green for performing adjustments. Tip The ?/1 (ON/STANDBY), INPUT, MENU, and M/m/ Remote control detector The ON/STANDBY indicator flashes in green, and then lights in red. 2 Press the ?/1 (ON/STANDBY) button to turn on the remote control to display the test signal. Adjusting the Picture Position Project an image on the screen and then adjust the picture...
Operating Instructions
Page 14
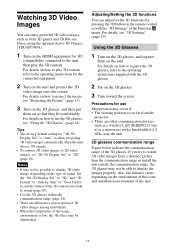
... Display Sel." Tips • The factory default setting for use the 3D glasses, see "Using the 3D Glasses" (page 14). is too far from the projector • There are differences in perception of 3D video images among individuals. • When the temperature of the Function menu. If you want to watch...
... Display Sel." Tips • The factory default setting for use the 3D glasses, see "Using the 3D Glasses" (page 14). is too far from the projector • There are differences in perception of 3D video images among individuals. • When the temperature of the Function menu. If you want to watch...

Operating Instructions
Page 28
... displayed. You can change the factory preset settings, etc. Standby: If no signal is input for certain menus, message when turning off automatically and the projector goes into standby mode. Sets the unit to turn off the on-screen displays except for 10 minutes, power is set the desired lamp setting...
... displayed. You can change the factory preset settings, etc. Standby: If no signal is input for certain menus, message when turning off automatically and the projector goes into standby mode. Sets the unit to turn off the on-screen displays except for 10 minutes, power is set the desired lamp setting...

Operating Instructions
Page 37
... room temperature is 25°C (77°F). The approximate normal temperature is not too high. - Fan speed increases to maintain the product reliability of the projector's components in a room, where the temperature is noisy. The lens shift cannot be adjusted. Check the installation requirements of movement. 9, 55 37 The fan noise...
... room temperature is 25°C (77°F). The approximate normal temperature is not too high. - Fan speed increases to maintain the product reliability of the projector's components in a room, where the temperature is noisy. The lens shift cannot be adjusted. Check the installation requirements of movement. 9, 55 37 The fan noise...

Operating Instructions
Page 38
Close the filter holder securely (page 43). In this case, replace the lamp with qualified Sony personnel. The fan is being used at the end of flashes Twice Three times Twice Three times Cause and Remedy Close the lamp cover securely, ... 41). Note When a warning indicator other than the above starts flashing, and the symptom persists even after carrying out the above methods, consult with your projector. Warning Indicators The ON/STANDBY or WARNING indicator lights up or flashes if there is any trouble with qualified...
Close the filter holder securely (page 43). In this case, replace the lamp with qualified Sony personnel. The fan is being used at the end of flashes Twice Three times Twice Three times Cause and Remedy Close the lamp cover securely, ... 41). Note When a warning indicator other than the above starts flashing, and the symptom persists even after carrying out the above methods, consult with your projector. Warning Indicators The ON/STANDBY or WARNING indicator lights up or flashes if there is any trouble with qualified...

Operating Instructions
Page 39
... Check to "Level A" or "Level B." 30 39 Clean the air filter. 44 Note To clear this message appears again after 1 minute, and the projector goes into standby mode. Settings Lock enabled. Frequency is out of the unit once. It is input, the power turns off the power. - 1 min.... filter. Message Lists Warning messages Symptom Cause and Remedy Page High temp.! Please replace the Lamp/ It is time to be "On" if projector is being used at high altitude, set "High Altitude Mode" to "On." 28 Note When temperature inside the unit remains high, "High ...
... Check to "Level A" or "Level B." 30 39 Clean the air filter. 44 Note To clear this message appears again after 1 minute, and the projector goes into standby mode. Settings Lock enabled. Frequency is out of the unit once. It is input, the power turns off the power. - 1 min.... filter. Message Lists Warning messages Symptom Cause and Remedy Page High temp.! Please replace the Lamp/ It is time to be "On" if projector is being used at high altitude, set "High Altitude Mode" to "On." 28 Note When temperature inside the unit remains high, "High ...

Operating Instructions
Page 41
... source has a certain lifespan. Replace the lamp with the ?/1 (ON/STANDBY) button. Also clean the ventilation holes (intake). Tip The lifespan of the projector or to prevent malfunction to cool. • Do not touch the surface of the lamp may be careful not to let any dust fall into...color balance of the picture becomes strange, or "Please replace the Lamp/Filter." The air filter is turned off the fingerprints with the LMP-H210 Projector Lamp. Caution • The lamp remains hot after turning the lamp on the screen, the lamp may become 41 When a warning message for the...
... source has a certain lifespan. Replace the lamp with the ?/1 (ON/STANDBY) button. Also clean the ventilation holes (intake). Tip The lifespan of the projector or to prevent malfunction to cool. • Do not touch the surface of the lamp may be careful not to let any dust fall into...color balance of the picture becomes strange, or "Please replace the Lamp/Filter." The air filter is turned off the fingerprints with the LMP-H210 Projector Lamp. Caution • The lamp remains hot after turning the lamp on the screen, the lamp may become 41 When a warning message for the...

Operating Instructions
Page 42
Note Be careful not to touch the optical block inside the unit. 6 Close the lamp cover, then tighten the screws. 5 Hold the handle of the new lamp and push it in securely until it reaches the end, and then tighten the 3 screws. 42 This may cause injury. • Be sure that the projector is placed on a stable surface. 3 Loosen the screw on the lamp cover with a Philips screwdriver, and then open the lamp cover. 4 Loosen the 3 screws on the lamp with the Phillips screwdriver. Hold up the handle, then pull the lamp straight out. scattered, if you do not reverse the projector.
Note Be careful not to touch the optical block inside the unit. 6 Close the lamp cover, then tighten the screws. 5 Hold the handle of the new lamp and push it in securely until it reaches the end, and then tighten the 3 screws. 42 This may cause injury. • Be sure that the projector is placed on a stable surface. 3 Loosen the screw on the lamp cover with a Philips screwdriver, and then open the lamp cover. 4 Loosen the 3 screws on the lamp with the Phillips screwdriver. Hold up the handle, then pull the lamp straight out. scattered, if you do not reverse the projector.

Operating Instructions
Page 43
... into each claws (10 positions) on unless the filter holder is set to "Level B," set deep inside the projector. 10 Attach the filter holder. Tip If "Settings Lock" is securely closed. Note The projector will be appeared. 9 Attach the new air filter so that is securely installed in place. 43 7 Remove the...
... into each claws (10 positions) on unless the filter holder is set to "Level B," set deep inside the projector. 10 Attach the filter holder. Tip If "Settings Lock" is securely closed. Note The projector will be appeared. 9 Attach the new air filter so that is securely installed in place. 43 7 Remove the...

Operating Instructions
Page 44
...)" Steps 7 to applicable local, state/province and federal laws. This value varies depending on how to attach and remove the air filter, see www.sony.com/ mercury Cleaning the Air Filter When "Please clean the filter." When a warning message for used lamp For the customers in your area. and Canada... every 1,500 hours. Notes • When you clean the air filter, make sure you should be careful not to let any dust fall into the projector. • Cleaning the air filter is used. 1,500 hours are securely closed. • To clear a message displayed on the screen, press any button ...
...)" Steps 7 to applicable local, state/province and federal laws. This value varies depending on how to attach and remove the air filter, see www.sony.com/ mercury Cleaning the Air Filter When "Please clean the filter." When a warning message for used lamp For the customers in your area. and Canada... every 1,500 hours. Notes • When you clean the air filter, make sure you should be careful not to let any dust fall into the projector. • Cleaning the air filter is used. 1,500 hours are securely closed. • To clear a message displayed on the screen, press any button ...

Operating Instructions
Page 45
... abrasive detergent, or chemical cleaning cloth, as alcohol, benzene, thinner or insecticide. • Clean the unit with water. • Never use any type of the projector, take care with respect to the following: • Wipe the lens gently with a soft cloth such as a cleaning cloth or glass cleaning cloth. • Stubborn...
... abrasive detergent, or chemical cleaning cloth, as alcohol, benzene, thinner or insecticide. • Clean the unit with water. • Never use any type of the projector, take care with respect to the following: • Wipe the lens gently with a soft cloth such as a cleaning cloth or glass cleaning cloth. • Stubborn...
Operating Instructions
Page 46
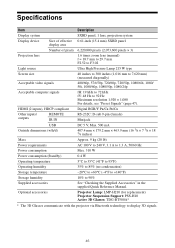
...;C to +60°C (-4°F to +140°F) Storage humidity 10% to 92 Hz Maximum resolution 1,920 × 1,080 For details, see "Preset Signals" (page 47). Projector Lamp: LMP-H210 (for replacement) Projector Suspension Support: PSS-H10 Active 3D Glasses: TDG-BT500A* * The 3D Glasses communicate with the...
...;C to +60°C (-4°F to +140°F) Storage humidity 10% to 92 Hz Maximum resolution 1,920 × 1,080 For details, see "Preset Signals" (page 47). Projector Lamp: LMP-H210 (for replacement) Projector Suspension Support: PSS-H10 Active 3D Glasses: TDG-BT500A* * The 3D Glasses communicate with the...

Operating Instructions
Page 58
Attaching the PSS-H10 projector suspension support Front view Unit: mm (inches) 150 (6) 75 (3) Ceiling Center of the supporting pole 175 (7) The bottom surface of the mount bracket 93.5 (3 3/4) Side view Center of the lens 182.8 (7 1/4) 130 (5 1/8) Unit: mm (inches) Center of the lens Front of the cabinet 227.8 (9) 236.1 (9 3/8) 463.9 (18 3/8) 58
Attaching the PSS-H10 projector suspension support Front view Unit: mm (inches) 150 (6) 75 (3) Ceiling Center of the supporting pole 175 (7) The bottom surface of the mount bracket 93.5 (3 3/4) Side view Center of the lens 182.8 (7 1/4) 130 (5 1/8) Unit: mm (inches) Center of the lens Front of the cabinet 227.8 (9) 236.1 (9 3/8) 463.9 (18 3/8) 58

Operating Instructions
Page 77
... Licensing LLC in the United States and other countries. • "Blu-ray" and "Blu-ray Disc" are trademarks of Blu-ray Disc Association This projector supports DeepColor, x.v.Color, LipSync, 3D signal and computer input signal of Sony Computer Entertainment Inc. • The terms HDMI and HDMI High- It also supports HDCP. 77
... Licensing LLC in the United States and other countries. • "Blu-ray" and "Blu-ray Disc" are trademarks of Blu-ray Disc Association This projector supports DeepColor, x.v.Color, LipSync, 3D signal and computer input signal of Sony Computer Entertainment Inc. • The terms HDMI and HDMI High- It also supports HDCP. 77
Marketing Specifications
Page 1
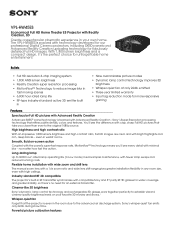
...responsive gaming Features Spectacular Full HD pictures with Advanced Reality Creation Advanced SXRD® panel technology is packed with compatible Sony and 3rd party RF 3D glasses for wider coverage and greater stability, so there's no matter how fast the action.... Forget that refines subtle details, colors and textures. The VPL-HW45ES is teamed with Reality Creation, 3D Create a spectacular cinematic experience in any room size, even with bright highlights and rich, deep blacks - VPL-HW45ES Economical Full HD Home Theater ES Projector with Advanced Reality Creation -
...responsive gaming Features Spectacular Full HD pictures with Advanced Reality Creation Advanced SXRD® panel technology is packed with compatible Sony and 3rd party RF 3D glasses for wider coverage and greater stability, so there's no matter how fast the action.... Forget that refines subtle details, colors and textures. The VPL-HW45ES is teamed with Reality Creation, 3D Create a spectacular cinematic experience in any room size, even with bright highlights and rich, deep blacks - VPL-HW45ES Economical Full HD Home Theater ES Projector with Advanced Reality Creation -

Marketing Specifications
Page 2
... Manual Zoom; Quickly calibrate your local authorities or see www.sony.com/mercury for additional information. Front-facing fan With the fan exhaust positioned at the front of the projector, you 're enjoying with the latest features and firmware updates via the projector's USB port. This helps maximize throw distance, for air intake...
... Manual Zoom; Quickly calibrate your local authorities or see www.sony.com/mercury for additional information. Front-facing fan With the fan exhaust positioned at the front of the projector, you 're enjoying with the latest features and firmware updates via the projector's USB port. This helps maximize throw distance, for air intake...
Limited Warranty
Page 1
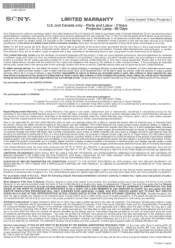
... differently, the arbitration will not be able to enjoy the benefits of software or data. 4 687-282 01 SONY® LIMITED WARRANTY Lamp-based Video Projector U.S. Parts and Labor : 3 Years Projector Lamp : 90 Days Sony Electronics Inc. YOU UNDERSTAND AND ACKNOWLEDGE THAT BY AGREEING TO ARBITRATION, YOU ARE GIVING UP THE RIGHT TO LITIGATE...
... differently, the arbitration will not be able to enjoy the benefits of software or data. 4 687-282 01 SONY® LIMITED WARRANTY Lamp-based Video Projector U.S. Parts and Labor : 3 Years Projector Lamp : 90 Days Sony Electronics Inc. YOU UNDERSTAND AND ACKNOWLEDGE THAT BY AGREEING TO ARBITRATION, YOU ARE GIVING UP THE RIGHT TO LITIGATE...


