Limited Warranty (US Only)
Page 1
... apply to its option, repair or replace with a refurbished product. For specific instructions on how long an implied warranty lasts, so the above limitations or exclusions may have other reason, including but while the Parts Warranty below . 2-515-710-01 ® VPL Front Projector LIMITED WARRANTY Sony Electronics Inc. ("Sony") warrants this product (including any accessories...
... apply to its option, repair or replace with a refurbished product. For specific instructions on how long an implied warranty lasts, so the above limitations or exclusions may have other reason, including but while the Parts Warranty below . 2-515-710-01 ® VPL Front Projector LIMITED WARRANTY Sony Electronics Inc. ("Sony") warrants this product (including any accessories...

Home Entertainment Brochure
Page 1
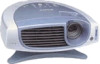
...HS1 Signal Interface Unit for replacement • PK-HS1FL Projector Air Filter >THE ENTIRE HOME ENTERTAINMENT REVOLUTION COMES DOWN TO THIS Sony Electronics Inc. 1 Sony Drive Park Ridge, NY 07656 © 2001 Sony...PAL-M, PAL-N (automatic/manual selection) Video: 600 TV lines; Sony, Cineza, the Cineza Logo, Handycam, Memory Stick, PlayStation, Remote Commander and Side Shot ...Projector lamp for easy hook-up of Sony. HS1 SPECIFICATIONS OPTICAL Projection system: LCD panels: Projection lens: Lamp: Screen coverage: 3 LCD panels, 1 lens, projection system 0.7-inch p-Si TFT SVGA (800 x 600) LCD...
...HS1 Signal Interface Unit for replacement • PK-HS1FL Projector Air Filter >THE ENTIRE HOME ENTERTAINMENT REVOLUTION COMES DOWN TO THIS Sony Electronics Inc. 1 Sony Drive Park Ridge, NY 07656 © 2001 Sony...PAL-M, PAL-N (automatic/manual selection) Video: 600 TV lines; Sony, Cineza, the Cineza Logo, Handycam, Memory Stick, PlayStation, Remote Commander and Side Shot ...Projector lamp for easy hook-up of Sony. HS1 SPECIFICATIONS OPTICAL Projection system: LCD panels: Projection lens: Lamp: Screen coverage: 3 LCD panels, 1 lens, projection system 0.7-inch p-Si TFT SVGA (800 x 600) LCD...
Operating Instructions
Page 3
... 33 Others Troubleshooting 34 Replacing the Lamp 38 Replacing the Air Filter 39 Specifications 40 Location of Controls 44 Front 44 Rear 45 Remote control 46 Index 47 3GB Table of Contents Precautions 4 Connections and Preparations Unpacking 5 Step 1: Installing the Projector 5 Before Setting Up the Projector 6 Installing the Projector and a Screen 7 Step 2: Connecting the Projector 8 Connecting with video...
... 33 Others Troubleshooting 34 Replacing the Lamp 38 Replacing the Air Filter 39 Specifications 40 Location of Controls 44 Front 44 Rear 45 Remote control 46 Index 47 3GB Table of Contents Precautions 4 Connections and Preparations Unpacking 5 Step 1: Installing the Projector 5 Before Setting Up the Projector 6 Installing the Projector and a Screen 7 Step 2: Connecting the Projector 8 Connecting with video...

Operating Instructions
Page 22
"Memory Stick" is specially designed for replacement when the access lamp is removable, "Memory Stick" can also be displayed with the metal parts of the connecting section. • Do not attach any other material than the ... formatting "Memory Stick"s on a personal computer Pay attention to the following points when formatting "Memory Stick"s on the "Memory Stick" is not guaranteed on this projector Image data recorded with the MagicGate copyright protection technology and general "Memory Stick"s. Operation of the images, etc. Using a "Memory Stick" 22 GB About a "Memory...
"Memory Stick" is specially designed for replacement when the access lamp is removable, "Memory Stick" can also be displayed with the metal parts of the connecting section. • Do not attach any other material than the ... formatting "Memory Stick"s on a personal computer Pay attention to the following points when formatting "Memory Stick"s on the "Memory Stick" is not guaranteed on this projector Image data recorded with the MagicGate copyright protection technology and general "Memory Stick"s. Operation of the images, etc. Using a "Memory Stick" 22 GB About a "Memory...
Operating Instructions
Page 34
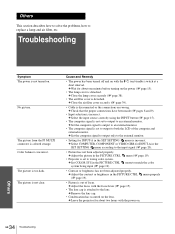
...the computer and external monitor. c Select COMPUTER, COMPONENT or VIDEO GBR for INPUT-A in the PICTURE CTRL • Projector is not turned on the lens. c Adjust the picture in the SET SETTING menu according to wrong color system....lamp cover is attached to the external monitor. • Setting for about one minute before turning on . c Select the input source correctly using the INPUT button (1 page 15). • The computer signal is set to output to both the LCD... connector is incorrect. Color balance is colored strange. menu to replace a lamp and air filter, etc.
...the computer and external monitor. c Select COMPUTER, COMPONENT or VIDEO GBR for INPUT-A in the PICTURE CTRL • Projector is not turned on the lens. c Adjust the picture in the SET SETTING menu according to wrong color system....lamp cover is attached to the external monitor. • Setting for about one minute before turning on . c Select the input source correctly using the INPUT button (1 page 15). • The computer signal is set to output to both the LCD... connector is incorrect. Color balance is colored strange. menu to replace a lamp and air filter, etc.
Operating Instructions
Page 36
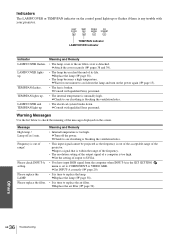
...the computer when INPUT-A in 1 min. Meaning and Remedy • The lamp cover or the air filter cover is too high. c Replace the lamp (1 page 38). • The lamp becomes a high temperature. Meaning and Remedy • Internal temperature is detached. ... qualified Sony personnel. c Input a signal that is any trouble with your projector. c Replace the air filter (1 page 39). Please replace the LAMP. LAMP/ COVER TEMP/ FAN POWER SAVING ON/ STANDBY TEMP/FAN Indicator LAMP/COVER Indicator Indicator LAMP/COVER flashes. c Consult with qualified Sony personnel....
...the computer when INPUT-A in 1 min. Meaning and Remedy • The lamp cover or the air filter cover is too high. c Replace the lamp (1 page 38). • The lamp becomes a high temperature. Meaning and Remedy • Internal temperature is detached. ... qualified Sony personnel. c Input a signal that is any trouble with your projector. c Replace the air filter (1 page 39). Please replace the LAMP. LAMP/ COVER TEMP/ FAN POWER SAVING ON/ STANDBY TEMP/FAN Indicator LAMP/COVER Indicator Indicator LAMP/COVER flashes. c Consult with qualified Sony personnel....
Operating Instructions
Page 38
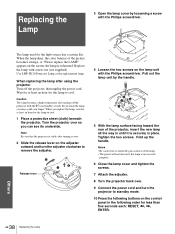
Use LMP-H120 Projector Lamp as the replacement lamp. Note Be sure that the projector is stable after turning it is securely in place. appears on the control panel in the following buttons on the screen, the lamp is not secured properly. 6 Close the lamp cover and tighten the screws. 7 Attach the adjuster. 8 Turn the projector back over. 9 Connect...
Use LMP-H120 Projector Lamp as the replacement lamp. Note Be sure that the projector is stable after turning it is securely in place. appears on the control panel in the following buttons on the screen, the lamp is not secured properly. 6 Close the lamp cover and tighten the screws. 7 Attach the adjuster. 8 Turn the projector back over. 9 Connect...
Operating Instructions
Page 39
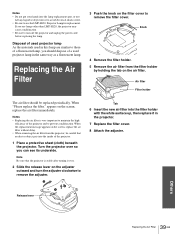
... on the air filter. Knob 4 Remove the filter holder. 5 Remove the air filter from the projector, be replaced periodically. Notes • Replacing the air filter is stable after turning it over so you use the LMP-H120 Projector Lamp for replacement. Note Be sure that no dust or object gets into the filter holder with the...
... on the air filter. Knob 4 Remove the filter holder. 5 Remove the air filter from the projector, be replaced periodically. Notes • Replacing the air filter is stable after turning it over so you use the LMP-H120 Projector Lamp for replacement. Note Be sure that no dust or object gets into the filter holder with the...

Operating Instructions
Page 40
Specifications System Projection system 3 LCD panels, 1 lens, projection system LCD panel 0.7-inch TFT LCD panel, 1,440,000 pixels (480,000 pixels × 3) Lens 1.3 times zoom lens (manual) Lamp 120 W UHP type Projection picture size Range: 40 to 150 inches (measured diagonally) Color system ... control RM-PJHS1 (1) Size AA (R6) batteries (2) Signal interface cable SIC-HS10 (5 m) (1) AC power cord (1) Air filter (for replacement) (1) Lens cap (1) Operating Instructions (1) Design and specifications are subject to change without notice. Others 40 GB Specifications
Specifications System Projection system 3 LCD panels, 1 lens, projection system LCD panel 0.7-inch TFT LCD panel, 1,440,000 pixels (480,000 pixels × 3) Lens 1.3 times zoom lens (manual) Lamp 120 W UHP type Projection picture size Range: 40 to 150 inches (measured diagonally) Color system ... control RM-PJHS1 (1) Size AA (R6) batteries (2) Signal interface cable SIC-HS10 (5 m) (1) AC power cord (1) Air filter (for replacement) (1) Lens cap (1) Operating Instructions (1) Design and specifications are subject to change without notice. Others 40 GB Specifications
Operating Instructions
Page 41
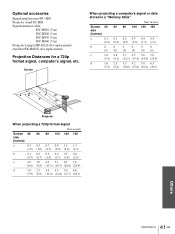
Optional accesories Signal interface unit IFU-HS1 Projector stand SU-HS1 Signal interface cable SIC-HS10 (5 m) SIC-HS20 (5 m) SIC-HS30 (5 m) SIC-HS40 (5 m) Projector Lamp LMP-H120 (for replacement) Air filter PK-HS1FL (for replacement) Projection Distances for a 720p format signal, computer's signal, etc. Screen When projecting a computer's signal or data stored in a "Memory Stick" Unit: m (feet) Screen 40...
Optional accesories Signal interface unit IFU-HS1 Projector stand SU-HS1 Signal interface cable SIC-HS10 (5 m) SIC-HS20 (5 m) SIC-HS30 (5 m) SIC-HS40 (5 m) Projector Lamp LMP-H120 (for replacement) Air filter PK-HS1FL (for replacement) Projection Distances for a 720p format signal, computer's signal, etc. Screen When projecting a computer's signal or data stored in a "Memory Stick" Unit: m (feet) Screen 40...

Operating Instructions
Page 47
... SETTING menu 18, 19 INPUT-A 20 INSTALL SETTING menu ...... 18, 20 Installing the Projector and a Screen 7 K KEYSTONE DIR 20 KEYSTONE MEM 20 L Lamp replacement 38 LAMP TIMER 20 LANGUAGE 20 Location of controls front 44 rear 45 remote control 46 M "Memory Stick" delete a still picture 32 full...18, 19 POWER SAVING 20 Preset memory 21, 43 Projection 14 R Remote control inserting the batteries 5 location of controls 46 Remote control detector front 9 rear 9 RGB ENHANCER 19 S SCAN CONV 19 Screen size 7 Selecting the menu language .......... 12 SET SETTING menu 18, 20 SHARP ...
... SETTING menu 18, 19 INPUT-A 20 INSTALL SETTING menu ...... 18, 20 Installing the Projector and a Screen 7 K KEYSTONE DIR 20 KEYSTONE MEM 20 L Lamp replacement 38 LAMP TIMER 20 LANGUAGE 20 Location of controls front 44 rear 45 remote control 46 M "Memory Stick" delete a still picture 32 full...18, 19 POWER SAVING 20 Preset memory 21, 43 Projection 14 R Remote control inserting the batteries 5 location of controls 46 Remote control detector front 9 rear 9 RGB ENHANCER 19 S SCAN CONV 19 Screen size 7 Selecting the menu language .......... 12 SET SETTING menu 18, 20 SHARP ...


