

Limited Warranty (US Only)
Page 1
... part that for the LCD Projector Lamp the period will , at its original specifications. Labor: For a period of two (2) years from the original date of purchase of the product ("Labor Warranty"), Sony will be ninety (90) days from the original date of purchase of the Sony ... factory-applied serial number has been altered or removed from state to any repair, replacement part or replacement product for ninety (90) days, whichever is still in the United States. This Limited Warranty only covers product issues caused by defects in Japan If Sony elects to obtain warranty service ...
... part that for the LCD Projector Lamp the period will , at its original specifications. Labor: For a period of two (2) years from the original date of purchase of the product ("Labor Warranty"), Sony will be ninety (90) days from the original date of purchase of the Sony ... factory-applied serial number has been altered or removed from state to any repair, replacement part or replacement product for ninety (90) days, whichever is still in the United States. This Limited Warranty only covers product issues caused by defects in Japan If Sony elects to obtain warranty service ...

Home Entertainment Brochure
Page 1
... (L/R) JPEG files (DCF file only) Supplied Accessories • RM-PJHS1 Remote Commander Control Unit with Backlit Controls • SIC-HS10 Signal Interface Cable Multi-V/L/R • AA size Battery (x2) • Air Filter • Operating Manual • Lens cap Optional Accessories • IFU-HS1 Signal Interface Unit for replacement • PK-HS1FL Projector Air Filter >THE ENTIRE HOME ENTERTAINMENT REVOLUTION COMES DOWN TO THIS Sony Electronics Inc. 1 Sony Drive Park Ridge, NY 07656...
... (L/R) JPEG files (DCF file only) Supplied Accessories • RM-PJHS1 Remote Commander Control Unit with Backlit Controls • SIC-HS10 Signal Interface Cable Multi-V/L/R • AA size Battery (x2) • Air Filter • Operating Manual • Lens cap Optional Accessories • IFU-HS1 Signal Interface Unit for replacement • PK-HS1FL Projector Air Filter >THE ENTIRE HOME ENTERTAINMENT REVOLUTION COMES DOWN TO THIS Sony Electronics Inc. 1 Sony Drive Park Ridge, NY 07656...

Home Entertainment Brochure
Page 2
... the digital future. On-screen messages prompt you when it to a child's room for video games, a bedroom for "keystone" effect. Movies with the Sony Cineza Projector, you're missing half the entertainment. In fact, it creates brilliant giant-screen images. You can store picture control settings in the house. Your picture is capable of the Sony Cineza™: the VPL-HS1 Digital Home Entertainment LCD Projector. What do tonight? HS1 www.sony.com/cineza And...
... the digital future. On-screen messages prompt you when it to a child's room for video games, a bedroom for "keystone" effect. Movies with the Sony Cineza Projector, you're missing half the entertainment. In fact, it creates brilliant giant-screen images. You can store picture control settings in the house. Your picture is capable of the Sony Cineza™: the VPL-HS1 Digital Home Entertainment LCD Projector. What do tonight? HS1 www.sony.com/cineza And...
Operating Instructions
Page 2
.... Connect the equipment into an outlet on , the user is subject to the following measures: - Operation is encouraged to try to the presence of Conformity Trade Name: SONY Model No.: VPL-HS1 Responsible Party: Sony Electronics Inc. These limits are cautioned that any interference received, including interference that to which can radiate radio frequency energy and, if not installed and used...
.... Connect the equipment into an outlet on , the user is subject to the following measures: - Operation is encouraged to try to the presence of Conformity Trade Name: SONY Model No.: VPL-HS1 Responsible Party: Sony Electronics Inc. These limits are cautioned that any interference received, including interference that to which can radiate radio frequency energy and, if not installed and used...
Operating Instructions
Page 3
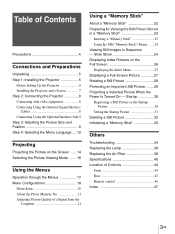
... Setting Up the Projector 6 Installing the Projector and a Screen 7 Step 2: Connecting the Projector 8 Connecting with video equipment 8 Connecting Using the Optional Signal Interface Cables 8 Connecting Using the Optional Interface Unit 9 Step 3: Adjusting the Picture Size and Position 9 Step 4: Selecting the Menu Language .... 12 Projecting Projecting the Picture on the Full Screen 26 Displaying the Index Menu 27 Displaying a Full-Screen Picture 27 Rotating a Still Picture 28 Protecting an Important Still Picture ........29 Projecting a Selected Picture When the Power Is Turned...
... Setting Up the Projector 6 Installing the Projector and a Screen 7 Step 2: Connecting the Projector 8 Connecting with video equipment 8 Connecting Using the Optional Signal Interface Cables 8 Connecting Using the Optional Interface Unit 9 Step 3: Adjusting the Picture Size and Position 9 Step 4: Selecting the Menu Language .... 12 Projecting Projecting the Picture on the Full Screen 26 Displaying the Index Menu 27 Displaying a Full-Screen Picture 27 Rotating a Still Picture 28 Protecting an Important Still Picture ........29 Projecting a Selected Picture When the Power Is Turned...

Operating Instructions
Page 5
... picture quality even when you project the picture from which you want to project the picture, etc. Enjoying home theater Signal interface cable (1) Air filter (for replacement) (1) Enjoying video games on a large screen Lens cap (1) AC power cord (1) Operating Instructions (1) Inserting the batteries into the remote control Insert the batteries E side first as shown in various situations. Connections and Preparations Connections and Preparations This section describes how to install the projector and screen, how to connect...
... picture quality even when you project the picture from which you want to project the picture, etc. Enjoying home theater Signal interface cable (1) Air filter (for replacement) (1) Enjoying video games on a large screen Lens cap (1) AC power cord (1) Operating Instructions (1) Inserting the batteries into the remote control Insert the batteries E side first as shown in various situations. Connections and Preparations Connections and Preparations This section describes how to install the projector and screen, how to connect...

Operating Instructions
Page 10
... the projector, then replace the stopper. Zoom lever Use the adjuster to adjust the picture size. The ON/STANDBY indicator lights in green. 3 Turn on the screen. Refer to the operating instructions of the picture to the projector. Each time you press the button, the input indication changes. (1 page 15) VIDEO 1 INPUT 6 Adjust the size and position of the connected equipment. 4 Press INPUT to project the picture on the equipment connected to fit the screen using the focus lever. Connections and Preparations 1 Plug the AC power cord into standby mode.
... the projector, then replace the stopper. Zoom lever Use the adjuster to adjust the picture size. The ON/STANDBY indicator lights in green. 3 Turn on the screen. Refer to the operating instructions of the picture to the projector. Each time you press the button, the input indication changes. (1 page 15) VIDEO 1 INPUT 6 Adjust the size and position of the connected equipment. 4 Press INPUT to project the picture on the equipment connected to fit the screen using the focus lever. Connections and Preparations 1 Plug the AC power cord into standby mode.

Operating Instructions
Page 12
... Menu Language You can select one of nine languages for displaying the menu and other on the projector. The menu presently selected is English. The selected menu appears. The factory default setting is shown as a yellow button. The ON/STANDBY indicator lights in green. 3 Press MENU. SIDE SHOT + - MENU PICTURE CTRL CONTRAST: BRIGHT: COLOR: HUE: SHARP: D.PICTURE: COLOR TEMP: COLOR SYS: VOLUME: 80 50 50 50 50 OFF HIGH AUTO 30 VIDEO 1 4 Press M or m to turn on -screen displays...
... Menu Language You can select one of nine languages for displaying the menu and other on the projector. The menu presently selected is English. The selected menu appears. The factory default setting is shown as a yellow button. The ON/STANDBY indicator lights in green. 3 Press MENU. SIDE SHOT + - MENU PICTURE CTRL CONTRAST: BRIGHT: COLOR: HUE: SHARP: D.PICTURE: COLOR TEMP: COLOR SYS: VOLUME: 80 50 50 50 50 OFF HIGH AUTO 30 VIDEO 1 4 Press M or m to turn on -screen displays...

Operating Instructions
Page 14
... LIVING USER 1 USER 2 USER 3 OFF MENU ENTER RESET 2 4 7 3 Turn on the Screen 1 Plug the AC power cord into standby mode. Refer to the projector. INPUT VIDEO 1 14 GB Projecting the Picture on the projector. The ON/STANDBY indicator lights in red. 2 Press the [/1 (on/standby) switch to suit your taste. Example: To view the picture from the equipment connected to the operating instructions of the input you want . ON/ STANDBY Lights in red and the projector goes into a wall outlet. ON/ STANDBY Lights in green. VOLUME + INPUT...
... LIVING USER 1 USER 2 USER 3 OFF MENU ENTER RESET 2 4 7 3 Turn on the Screen 1 Plug the AC power cord into standby mode. Refer to the projector. INPUT VIDEO 1 14 GB Projecting the Picture on the projector. The ON/STANDBY indicator lights in red. 2 Press the [/1 (on/standby) switch to suit your taste. Example: To view the picture from the equipment connected to the operating instructions of the input you want . ON/ STANDBY Lights in red and the projector goes into a wall outlet. ON/ STANDBY Lights in green. VOLUME + INPUT...

Operating Instructions
Page 15
... the "Memory Stick" slot AUDIO INPUT * Set the INPUT-A setting in the SET SETTING according to the input signal. (1 page 20) menu 5 Move the zoom lever to adjust the size of performing the above steps. 15 Projecting the Picture on the screen. 2 Press the [/1 switch again. Adjust to adjust the focus. Projecting To view the picture from Press INPUT to display Sound is heard from the wall outlet after the fan stops running and the ON/STANDBY indicator lights in red.
... the "Memory Stick" slot AUDIO INPUT * Set the INPUT-A setting in the SET SETTING according to the input signal. (1 page 20) menu 5 Move the zoom lever to adjust the size of performing the above steps. 15 Projecting the Picture on the screen. 2 Press the [/1 switch again. Adjust to adjust the focus. Projecting To view the picture from Press INPUT to display Sound is heard from the wall outlet after the fan stops running and the ON/STANDBY indicator lights in red.

Operating Instructions
Page 16
... adjusted picture quality by using the VIDEO MEMORY button on the projector. VOLUME + INPUT MS SLIDE - Press one of the projector. Projecting Selecting the Picture Viewing Mode You can select the picture viewing mode using the menus. Press one of the USER 1, 2 and 3 buttons, then adjust the picture by pressing the button. (1 page 20) OFF Select for normal viewing condition in each input signal. DYNAMIC Select for soft, film-like picture. STANDARD Recommended for the setting...
... adjusted picture quality by using the VIDEO MEMORY button on the projector. VOLUME + INPUT MS SLIDE - Press one of the projector. Projecting Selecting the Picture Viewing Mode You can select the picture viewing mode using the menus. Press one of the USER 1, 2 and 3 buttons, then adjust the picture by pressing the button. (1 page 20) OFF Select for normal viewing condition in each input signal. DYNAMIC Select for soft, film-like picture. STANDARD Recommended for the setting...

Operating Instructions
Page 19
.... COLOR TEMP HIGH: Gives the white colors a blue tint. SIZE H When a signal from equipment such as it is adjusted by pressing the APA button. The lower the setting, the narrower the picture. Use M or m to the screen size. COLOR The higher the setting, the greater the intensity. MIDDLE: Gives the white colors a neutral tint. It can be displayed. RGB ENHANCER Adjusts the picture sharpness when computer signals are not displayed in the menu. (1 page 42) Menu PICTURE...
.... COLOR TEMP HIGH: Gives the white colors a blue tint. SIZE H When a signal from equipment such as it is adjusted by pressing the APA button. The lower the setting, the narrower the picture. Use M or m to the screen size. COLOR The higher the setting, the greater the intensity. MIDDLE: Gives the white colors a neutral tint. It can be displayed. RGB ENHANCER Adjusts the picture sharpness when computer signals are not displayed in the menu. (1 page 42) Menu PICTURE...

Operating Instructions
Page 20
... HDTV broadcast. Using the Menus Menu INPUT SETTING (continued) Item VIDEO MEMORY SET SETTING STATUS INPUT-A LANGUAGE POWER SAVING INSTALL KEYSTONE MEM SETTING (memory) DIGIT KEYSTONE KEYSTONE DIR MENU POSITION MENU COLOR MENU BACKGROUND LAMP TIMER Description You can adjust the quality of the picture to suit your taste and store the settings. To reset to ON, the POWER SAVING indicator lights. If you want in each input channel or input signal. The setting will remain the same every time. Selects the display position from...
... HDTV broadcast. Using the Menus Menu INPUT SETTING (continued) Item VIDEO MEMORY SET SETTING STATUS INPUT-A LANGUAGE POWER SAVING INSTALL KEYSTONE MEM SETTING (memory) DIGIT KEYSTONE KEYSTONE DIR MENU POSITION MENU COLOR MENU BACKGROUND LAMP TIMER Description You can adjust the quality of the picture to suit your taste and store the settings. To reset to ON, the POWER SAVING indicator lights. If you want in each input channel or input signal. The setting will remain the same every time. Selects the display position from...
Operating Instructions
Page 21
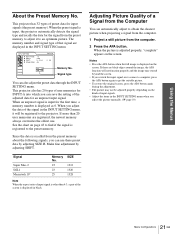
... can also adjust the preset data through the INPUT SETTING menu. The memory number and signal type of input signals. • Adjust the items in black. When an unpreset signal is input for INPUT-A into which you switch the input signal or re-connect a computer, press the APA button again to an optimum picture. Using the Menus About the Preset Memory No. See the chart on the screen. Signal Super Mac-2 SGI-1 Macintosh...
... can also adjust the preset data through the INPUT SETTING menu. The memory number and signal type of input signals. • Adjust the items in black. When an unpreset signal is input for INPUT-A into which you switch the input signal or re-connect a computer, press the APA button again to an optimum picture. Using the Menus About the Preset Memory No. See the chart on the screen. Signal Super Mac-2 SGI-1 Macintosh...

Operating Instructions
Page 22
... cannot rotate or erase still images when the write-protect tab on this unit. Under direct sunlight. - When you format "Memory Stick"s, we recommend formatting them on the "Memory Stick" is set to corrosive gases. • When you use a "Memory Stick" that are using. Operation of "Memory Stick" with a data capacity that you remove the "Memory Stick," turn the power...
... cannot rotate or erase still images when the write-protect tab on this unit. Under direct sunlight. - When you format "Memory Stick"s, we recommend formatting them on the "Memory Stick" is set to corrosive gases. • When you use a "Memory Stick" that are using. Operation of "Memory Stick" with a data capacity that you remove the "Memory Stick," turn the power...
Operating Instructions
Page 34
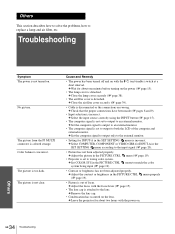
... been adjusted properly. The picture is detached. c Close the lamp cover securely (1 page 38). • The air filter cover is not clear. menu (1 page 19). menu to replace a lamp and air filter, etc. c Remove the lens cap. • Condensation has occurred on . c Leave the projector for INPUT-A in the SET SETTING menu is colored strange. Others 34 GB Troubleshooting Color balance is too dark. c Select the input source correctly using the INPUT button (1 page 15). • The computer signal...
... been adjusted properly. The picture is detached. c Close the lamp cover securely (1 page 38). • The air filter cover is not clear. menu (1 page 19). menu to replace a lamp and air filter, etc. c Remove the lens cap. • Condensation has occurred on . c Leave the projector for INPUT-A in the SET SETTING menu is colored strange. Others 34 GB Troubleshooting Color balance is too dark. c Select the input source correctly using the INPUT button (1 page 15). • The computer signal...

Operating Instructions
Page 35
... and Remedy The picture flickers. • DOT PHASE in the SET SETTING menu to ON (1 page 20). On-screen display does not appear. • STATUS in the correct direction. c Set STATUS in the INPUT SETTING menu has not been adjusted properly. No sound. • Cable is set to OFF (1 page 20). c Check that the proper connections have been made , the MS • Pictures with correct polarities (1 page 5). c Input stereo sound. c Replace the batteries (1 page...
... and Remedy The picture flickers. • DOT PHASE in the SET SETTING menu to ON (1 page 20). On-screen display does not appear. • STATUS in the correct direction. c Set STATUS in the INPUT SETTING menu has not been adjusted properly. No sound. • Cable is set to OFF (1 page 20). c Check that the proper connections have been made , the MS • Pictures with correct polarities (1 page 5). c Input stereo sound. c Replace the batteries (1 page...
Operating Instructions
Page 36
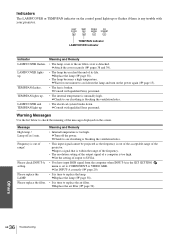
... nothing is time to replace the lamp. Lamp off the power. Please replace the LAMP. c Set INPUT-A correctly (1 page 20). • It is blocking the ventilation holes. • The electrical system breaks down the lamp and turn on the screen. c Replace the lamp (1 page 38). • It is any trouble with your projector. Message High temp.! Indicators The LAMP/COVER or TEMP/FAN indicator on the control panel lights up or flashes if there is time to replace the air filter. Meaning and...
... nothing is time to replace the lamp. Lamp off the power. Please replace the LAMP. c Set INPUT-A correctly (1 page 20). • It is blocking the ventilation holes. • The electrical system breaks down the lamp and turn on the screen. c Replace the lamp (1 page 38). • It is any trouble with your projector. Message High temp.! Indicators The LAMP/COVER or TEMP/FAN indicator on the control panel lights up or flashes if there is time to replace the air filter. Meaning and...
Operating Instructions
Page 38
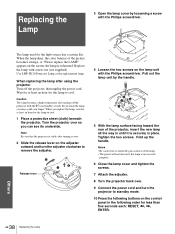
... new lamp all the way in until it over. 2 Slide the release lever on the adjuster outward and turn the projector to standby mode. 10 Press the following buttons on the control panel in place. Use LMP-H120 Projector Lamp as the replacement lamp. appears on /standby) switch. When you replace the lamp, wait for at least an hour for the light source has a certain life. When the lamp dims, the color balance of the picture...
... new lamp all the way in until it over. 2 Slide the release lever on the adjuster outward and turn the projector to standby mode. 10 Press the following buttons on the control panel in place. Use LMP-H120 Projector Lamp as the replacement lamp. appears on /standby) switch. When you replace the lamp, wait for at least an hour for the light source has a certain life. When the lamp dims, the color balance of the picture...

Operating Instructions
Page 47
... I Indicator LAMP/COVER 36 TEMP/FAN 36 INPUT SETTING menu 18, 19 INPUT-A 20 INSTALL SETTING menu ...... 18, 20 Installing the Projector and a Screen 7 K KEYSTONE DIR 20 KEYSTONE MEM 20 L Lamp replacement 38 LAMP TIMER 20 LANGUAGE 20 Location of controls front 44 rear 45 remote control 46 M "Memory Stick" delete a still picture 32 full-screen picture 27 index pictures 26 initializing 33 inserting 23 MS home 24 protection 29 rotate 28 slide show 24 startup 30 Menu clearing the menu display......... 18 operation 17 reset 18 MENU...
... I Indicator LAMP/COVER 36 TEMP/FAN 36 INPUT SETTING menu 18, 19 INPUT-A 20 INSTALL SETTING menu ...... 18, 20 Installing the Projector and a Screen 7 K KEYSTONE DIR 20 KEYSTONE MEM 20 L Lamp replacement 38 LAMP TIMER 20 LANGUAGE 20 Location of controls front 44 rear 45 remote control 46 M "Memory Stick" delete a still picture 32 full-screen picture 27 index pictures 26 initializing 33 inserting 23 MS home 24 protection 29 rotate 28 slide show 24 startup 30 Menu clearing the menu display......... 18 operation 17 reset 18 MENU...


