
Operating Instructions
Page 2
Table of Contents Overview Location and Function of Controls .... 3 Main Unit 3 Connector Panel 4 Remote Commander and Control Panel 5 Preparation Connecting the Projector 8 Connecting a Computer 8 Connecting a Video Equipment ... 9 Connecting an External Monitor and Audio Equipment 11 ... Menu 20 The Connection/Power Menu .......... 21 The Installation Menu 22 The Information Menu 23 Network Using Network Features 24 Displaying the Control Window of the Projector with a Web Browser 24 Confirming the Information regarding the Projector 25 Operating the Projector from a Computer 25 ...
Table of Contents Overview Location and Function of Controls .... 3 Main Unit 3 Connector Panel 4 Remote Commander and Control Panel 5 Preparation Connecting the Projector 8 Connecting a Computer 8 Connecting a Video Equipment ... 9 Connecting an External Monitor and Audio Equipment 11 ... Menu 20 The Connection/Power Menu .......... 21 The Installation Menu 22 The Information Menu 23 Network Using Network Features 24 Displaying the Control Window of the Projector with a Web Browser 24 Confirming the Information regarding the Projector 25 Operating the Projector from a Computer 25 ...
Operating Instructions
Page 3
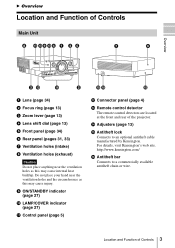
... details, visit Kensington's web site. Location and Function of Controls Main Unit 8 qa qd9q;4 1 4 5 7 6 Overview 3 qs qf 2 qg qh qd a Lens (page 34) b Focus ring (page 13) c Zoom lever (page 13) d Lens shift ... bar Connects to an optional antitheft cable manufactured by Kensington. i ON/STANDBY indicator (page 27) j LAMP/COVER indicator (page 27) k Control panel (page 5) l Connector panel (page 4) m Remote control detector The remote control detectors are located at the front and rear of the projector. Do not place your hand near the ventilation holes as this...
... details, visit Kensington's web site. Location and Function of Controls Main Unit 8 qa qd9q;4 1 4 5 7 6 Overview 3 qs qf 2 qg qh qd a Lens (page 34) b Focus ring (page 13) c Zoom lever (page 13) d Lens shift ... bar Connects to an optional antitheft cable manufactured by Kensington. i ON/STANDBY indicator (page 27) j LAMP/COVER indicator (page 27) k Control panel (page 5) l Connector panel (page 4) m Remote control detector The remote control detectors are located at the front and rear of the projector. Do not place your hand near the ventilation holes as this...

Operating Instructions
Page 4
... B and INPUT C are shared. Connect external audio equipment to install batteries in the Remote Commander, as the power is output as a wired Remote Commander. The audio inputs of the projector are for output to the CONTROL S output connector on the supplied Remote Commander with a connecting cable (stereo mini plug (not supplied)) when using it...
... B and INPUT C are shared. Connect external audio equipment to install batteries in the Remote Commander, as the power is output as a wired Remote Commander. The audio inputs of the projector are for output to the CONTROL S output connector on the supplied Remote Commander with a connecting cable (stereo mini plug (not supplied)) when using it...
Operating Instructions
Page 5
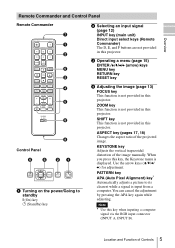
...press this projector. Overview Remote Commander and Control Panel Remote Commander STANDBY ON INPUT A B C D E F VIDEO S VIDEO MENU ECO MODE ENTER RETURN RESET FOCUS ZOOM SHIFT ASPECT KEYSTONE PATTERN D ZOOM MUTING VOLUME + PIC + - APA TWIN FREEZE ID MODE 1 2 3 7 1 2 6 3 4 5 8 Control Panel 63 9 21... computer. Use the arrow keys (V/v/B/ b) for adjustment. ASPECT key (pages 17, 18) Changes the aspect ratio of Controls 5 Note * Use this projector. Location and Function of the projected image. You can cancel the adjustment by pressing the ...
...press this projector. Overview Remote Commander and Control Panel Remote Commander STANDBY ON INPUT A B C D E F VIDEO S VIDEO MENU ECO MODE ENTER RETURN RESET FOCUS ZOOM SHIFT ASPECT KEYSTONE PATTERN D ZOOM MUTING VOLUME + PIC + - APA TWIN FREEZE ID MODE 1 2 3 7 1 2 6 3 4 5 8 Control Panel 63 9 21... computer. Use the arrow keys (V/v/B/ b) for adjustment. ASPECT key (pages 17, 18) Changes the aspect ratio of Controls 5 Note * Use this projector. Location and Function of the projected image. You can cancel the adjustment by pressing the ...
Operating Instructions
Page 6
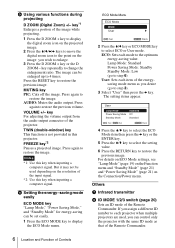
... 3). 3 Select "User" then press the b key. Press again to restore the image. key For adjusting the volume output from the audio output connector of the Remote Commander. Press again to restore the image. ECO Mode Menu ECO Mode ECO User Sel Back 2 Press the V/v key or ECO MODE key to restore... , you can control only the projector with the same ID mode as you desire (go to enlarge. 3 Press the D ZOOM + key or the D ZOOM - Press again to display the ECO Mode menu. If you wish to step 6) User: Sets each item of the energysaving mode menu as that of the Remote Commander...
... 3). 3 Select "User" then press the b key. Press again to restore the image. key For adjusting the volume output from the audio output connector of the Remote Commander. Press again to restore the image. ECO Mode Menu ECO Mode ECO User Sel Back 2 Press the V/v key or ECO MODE key to restore... , you can control only the projector with the same ID mode as you desire (go to enlarge. 3 Press the D ZOOM + key or the D ZOOM - Press again to display the ECO Mode menu. If you wish to step 6) User: Sets each item of the energysaving mode menu as that of the Remote Commander...
Operating Instructions
Page 7
... need to receive signals from the projector. About Remote Commander operation • Direct the Remote Commander toward the remote control detector. • The shorter the distance between the Remote Commander and the remote control detector on the projector with a connecting cable (stereo mini plug (not supplied)) when using the Remote Commander as the power is any obstruction between...
... need to receive signals from the projector. About Remote Commander operation • Direct the Remote Commander toward the remote control detector. • The shorter the distance between the Remote Commander and the remote control detector on the projector with a connecting cable (stereo mini plug (not supplied)) when using the Remote Commander as the power is any obstruction between...

Operating Instructions
Page 20
... key for approximately 10 seconds during Standby mode. Enter the password when you can cancel the security lock. However, you can control the projector with the Remote Commander independently of the projector. When it is set to "On." • Press and hold the MENU key for approximately ..." of the projector to go Standby mode then turn on . On/Off: This function enables restriction of the Remote Commander on the projector. If you call qualified Sony personnel because you have forgotten the password, you will not be asked to verify the projector's serial number and ...
... key for approximately 10 seconds during Standby mode. Enter the password when you can cancel the security lock. However, you can control the projector with the Remote Commander independently of the projector. When it is set to "On." • Press and hold the MENU key for approximately ..." of the projector to go Standby mode then turn on . On/Off: This function enables restriction of the Remote Commander on the projector. If you call qualified Sony personnel because you have forgotten the password, you will not be asked to verify the projector's serial number and ...
Operating Instructions
Page 24
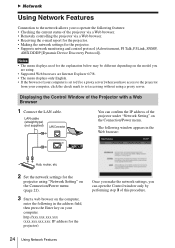
... the following in the Web browser: Hub, router, etc 2 Set the network settings for the projector. • Supports network monitoring and control protocol (Advertisement, PJ Talk, PJ Link, SNMP, AMX DDDP [Dynamic Device Discovery Protocol]). The following features: • Checking the current...24 Using Network Features LAN cable (straight type) (not supplied) LAN Connector You can open the Control window only by performing step 3 of the projector via a Web browser. • Remotely controlling the projector via a Web browser. • Receiving the e-mail report for the projector. •...
... the following in the Web browser: Hub, router, etc 2 Set the network settings for the projector. • Supports network monitoring and control protocol (Advertisement, PJ Talk, PJ Link, SNMP, AMX DDDP [Dynamic Device Discovery Protocol]). The following features: • Checking the current...24 Using Network Features LAN cable (straight type) (not supplied) LAN Connector You can open the Control window only by performing step 3 of the projector via a Web browser. • Remotely controlling the projector via a Web browser. • Receiving the e-mail report for the projector. •...
Operating Instructions
Page 25
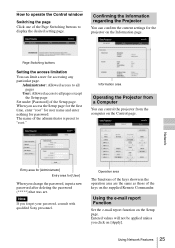
...on [Apply]. Using Network Features 25 Using the e-mail report Function Set the e-mail report function on the Control page. When you forget your password, consult with qualified Sony personnel. The name of the Setup page. Note If you access the Setup page for the first time, ... limitation You can confirm the current settings for password. How to operate the Control window Switching the page Click one of the keys on the supplied Remote Commander. Information area Operating the Projector from a Computer You can control the projector from the computer on the Setup page.
...on [Apply]. Using Network Features 25 Using the e-mail report Function Set the e-mail report function on the Control page. When you forget your password, consult with qualified Sony personnel. The name of the Setup page. Note If you access the Setup page for the first time, ... limitation You can confirm the current settings for password. How to operate the Control window Switching the page Click one of the keys on the supplied Remote Commander. Information area Operating the Projector from a Computer You can control the projector from the computer on the Setup page.
Operating Instructions
Page 28
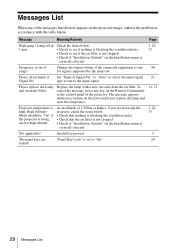
... "Input-A Signal Sel." Message Meaning/Remedy Page High temp.! Please replace the Lamp and clean the Filter. Messages List When any key on the Remote Commander or the control panel of the projector. Lamp off in accordance with a new one 40 for signals supported by the projector. At an altitude of 1,500...
... "Input-A Signal Sel." Message Meaning/Remedy Page High temp.! Please replace the Lamp and clean the Filter. Messages List When any key on the Remote Commander or the control panel of the projector. Lamp off in accordance with a new one 40 for signals supported by the projector. At an altitude of 1,500...
Operating Instructions
Page 48
... 6 Pin assignment 39 Pitch 17 Power Saving Mode 21 Primary DNS 21 Projecting an image 12 Projection distance and lens shift range 42 R Rear panel 3 Remote commander 5 Remote control detector 3 Removing/attaching the projection lens 34 Replacing the lamp 31 Reset 16 RS-232C connector 4 S Screen menu 17 Secondary DNS 21 Security Lock...
... 6 Pin assignment 39 Pitch 17 Power Saving Mode 21 Primary DNS 21 Projecting an image 12 Projection distance and lens shift range 42 R Rear panel 3 Remote commander 5 Remote control detector 3 Removing/attaching the projection lens 34 Replacing the lamp 31 Reset 16 RS-232C connector 4 S Screen menu 17 Secondary DNS 21 Security Lock...


