

Operating Instructions
Page 2
...Overview Location and Function of Controls .... 3 Main Unit 3 Connector Panel 4 Remote Commander and Control Panel 5 Preparation Connecting the Projector 8 Connecting a Computer 8 Connecting a Video Equipment ... 9 Connecting an External Monitor and Audio Equipment 11 Projecting/Adjusting an Image.../Power Menu .......... 21 The Installation Menu 22 The Information Menu 23 Network Using Network Features 24 Displaying the Control Window of the Projector with a Web Browser 24 Confirming the Information regarding the Projector 25 Operating the Projector from a Computer 25 Using the...
...Overview Location and Function of Controls .... 3 Main Unit 3 Connector Panel 4 Remote Commander and Control Panel 5 Preparation Connecting the Projector 8 Connecting a Computer 8 Connecting a Video Equipment ... 9 Connecting an External Monitor and Audio Equipment 11 Projecting/Adjusting an Image.../Power Menu .......... 21 The Installation Menu 22 The Information Menu 23 Network Using Network Features 24 Displaying the Control Window of the Projector with a Web Browser 24 Confirming the Information regarding the Projector 25 Operating the Projector from a Computer 25 Using the...

Operating Instructions
Page 4
... output connector (MONITOR) Audio: Audio output connector (AUDIO) Note This connector outputs the projected image or audio. The audio inputs of the projector are shared. The image is output as the power is supplied from the YPBPR input connector (INPUT A). You do not need to external equipment.... j AC IN (∼) socket Connects the supplied AC power cord. 4 Location and Function of INPUT B and INPUT C are for output to install batteries in the Remote Commander, as a computer signal input from the RGB input connector (INPUT A, INPUT B) or a video signal input from this connector...
... output connector (MONITOR) Audio: Audio output connector (AUDIO) Note This connector outputs the projected image or audio. The audio inputs of the projector are shared. The image is output as the power is supplied from the YPBPR input connector (INPUT A). You do not need to external equipment.... j AC IN (∼) socket Connects the supplied AC power cord. 4 Location and Function of INPUT B and INPUT C are for output to install batteries in the Remote Commander, as a computer signal input from the RGB input connector (INPUT A, INPUT B) or a video signal input from this connector...
Operating Instructions
Page 7
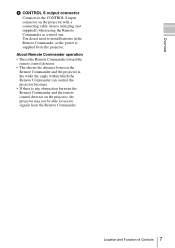
...toward the remote control detector. • The shorter the distance between the Remote Commander and the remote control detector on the projector with a connecting cable (stereo mini plug (not supplied)) when using the Remote Commander as the power is any obstruction between... Commander can control the projector becomes. • If there is supplied from the Remote Commander. Location and Function of Controls 7 Overview i CONTROL S output connector Connects to the CONTROL S input connector on the projector, the projector may not be able to install batteries in the Remote Commander...
...toward the remote control detector. • The shorter the distance between the Remote Commander and the remote control detector on the projector with a connecting cable (stereo mini plug (not supplied)) when using the Remote Commander as the power is any obstruction between... Commander can control the projector becomes. • If there is supplied from the Remote Commander. Location and Function of Controls 7 Overview i CONTROL S output connector Connects to the CONTROL S input connector on the projector, the projector may not be able to install batteries in the Remote Commander...

Operating Instructions
Page 12
... and Lens Shift Range" (page 42). 5 Input Video 4 S-Videoo Input-A Input-B Input-C Sel Skip 6 Computer 2 3 Video equipment INPUT 5 Projector 1 Wall outlet 1 Plug the AC power cord into a wall outlet. 2 Connect all equipment to display the input select window. Press the INPUT key...unit or the ? How to switch the computer to output to the projector varies, depending on the projector to the projector (page 8). 3 Turn on the connected equipment. 5 Select the input source. Install the projector so that the projected image fits the screen size. B Projecting/Adjusting an...
... and Lens Shift Range" (page 42). 5 Input Video 4 S-Videoo Input-A Input-B Input-C Sel Skip 6 Computer 2 3 Video equipment INPUT 5 Projector 1 Wall outlet 1 Plug the AC power cord into a wall outlet. 2 Connect all equipment to display the input select window. Press the INPUT key...unit or the ? How to switch the computer to output to the projector varies, depending on the projector to the projector (page 8). 3 Turn on the connected equipment. 5 Select the input source. Install the projector so that the projected image fits the screen size. B Projecting/Adjusting an...
Operating Instructions
Page 13
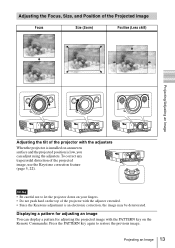
Projecting an Image 13 Press the PATTERN key again to let the projector down on your fingers. • Do not push hard on the top of the projector with the PATTERN key on an uneven surface and the projected position is low, you can display a pattern for adjusting ...adjust using the adjusters. Notes • Be careful not to restore the previous image. To correct any trapezoidal distortion of the projector with the adjusters When the projector is installed on the Remote Commander. Adjusting the Focus, Size, and Position of the Projected image Focus Size (Zoom) Position (Lens shift...
Projecting an Image 13 Press the PATTERN key again to let the projector down on your fingers. • Do not push hard on the top of the projector with the PATTERN key on an uneven surface and the projected position is low, you can display a pattern for adjusting ...adjust using the adjusters. Notes • Be careful not to restore the previous image. To correct any trapezoidal distortion of the projector with the adjusters When the projector is installed on the Remote Commander. Adjusting the Focus, Size, and Position of the Projected image Focus Size (Zoom) Position (Lens shift...
Operating Instructions
Page 22
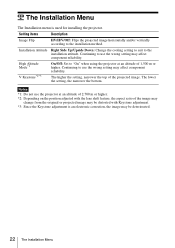
... lower the setting, the narrower the bottom. The Installation Menu The Installation menu is an electronic correction, the image may be distorted with Keystone adjustment. *3: Since the Keystone adjustment is used for installing the projector. Continuing to use the wrong setting may affect component... reliability. Notes *1: Do not use the wrong setting may affect component reliability. Continuing to use the projector at an altitude of the projected ...
... lower the setting, the narrower the bottom. The Installation Menu The Installation menu is an electronic correction, the image may be distorted with Keystone adjustment. *3: Since the Keystone adjustment is used for installing the projector. Continuing to use the wrong setting may affect component... reliability. Notes *1: Do not use the wrong setting may affect component reliability. Continuing to use the projector at an altitude of the projected ...
Operating Instructions
Page 27
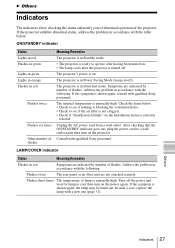
...if the air filter is not clogged. • Check if "Installation Attitude" on the Installation menu is correctly selected. Check the items below . If the symptom is unusually high. The projector's power is on the projector. Flashes twice The rear panel or air filter unit are indicated by...in orange Flashes in red Flashes twice Flashes six times Other number of flashes. Consult with qualified Sony personnel. If the symptom is shown again, consult with qualified Sony personnel. Unplug the AC power cord from a wall outlet. B Others Indicators The indicators allow ...
...if the air filter is not clogged. • Check if "Installation Attitude" on the Installation menu is correctly selected. Check the items below . If the symptom is unusually high. The projector's power is on the projector. Flashes twice The rear panel or air filter unit are indicated by...in orange Flashes in red Flashes twice Flashes six times Other number of flashes. Consult with qualified Sony personnel. If the symptom is shown again, consult with qualified Sony personnel. Unplug the AC power cord from a wall outlet. B Others Indicators The indicators allow ...
Operating Instructions
Page 28
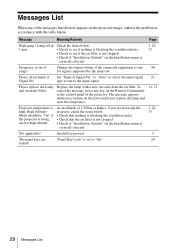
Lamp off in accordance with a new one 40 for signals supported by the projector. Please check Input-A Set "Input-A Signal Sel." The message appears whenever you turn on the Installation menu is correctly selected. 3, 22, 33 Not applicable! At an altitude of 1,500 m or higher, if you ... image, address the problem in 1 min. High Altitude Mode should be "On" if the projector is not clogged. • Check if "Installation Attitude" on the Remote Commander or the control panel of the projector. Message Meaning/Remedy Page High temp.! Check the items below . • Check that the...
Lamp off in accordance with a new one 40 for signals supported by the projector. Please check Input-A Set "Input-A Signal Sel." The message appears whenever you turn on the Installation menu is correctly selected. 3, 22, 33 Not applicable! At an altitude of 1,500 m or higher, if you ... image, address the problem in 1 min. High Altitude Mode should be "On" if the projector is not clogged. • Check if "Installation Attitude" on the Remote Commander or the control panel of the projector. Message Meaning/Remedy Page High temp.! Check the items below . • Check that the...
Operating Instructions
Page 30
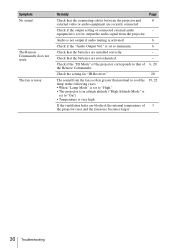
... high 19, 22 If the ventilation holes are installed correctly. - Check the setting for output the audio signal from the fan is often greater than normal to cool the lamp in the following cases. • When "Lamp Mode" is set to "High." • The projector is in at high altitude ("High Altitude...
... high 19, 22 If the ventilation holes are installed correctly. - Check the setting for output the audio signal from the fan is often greater than normal to cool the lamp in the following cases. • When "Lamp Mode" is set to "High." • The projector is in at high altitude ("High Altitude...
Operating Instructions
Page 32
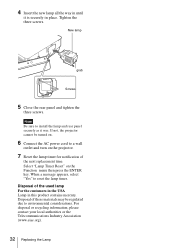
If not, the projector cannot be regulated due to install the lamp and rear panel securely as it is securely in this product contains mercury. Select "Lamp Timer Reset" on the projector. 7 Reset the lamp timer for notification of the next replacement time. For disposal or recycling information, please contact your local authorities or...
If not, the projector cannot be regulated due to install the lamp and rear panel securely as it is securely in this product contains mercury. Select "Lamp Timer Reset" on the projector. 7 Reset the lamp timer for notification of the next replacement time. For disposal or recycling information, please contact your local authorities or...
Operating Instructions
Page 34
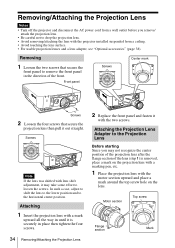
...mark Screws 2 Loosen the four screws that secure the front panel to loosen the screws. Screws Note If the lens was shifted with the projector installed suspended from a wall outlet before you may take some effort to remove the front panel in the direction of the lens (step 1) ... lens with a marking pen, etc. 1 Place the projection lens with the two screws. Removing/Attaching the Projection Lens Notes • Turn off the projector and disconnect the AC power cord from a ceiling. • Avoid touching the lens surface. • For usable projection lenses and a lens adapter, see...
...mark Screws 2 Loosen the four screws that secure the front panel to loosen the screws. Screws Note If the lens was shifted with the projector installed suspended from a wall outlet before you may take some effort to remove the front panel in the direction of the lens (step 1) ... lens with a marking pen, etc. 1 Place the projection lens with the two screws. Removing/Attaching the Projection Lens Notes • Turn off the projector and disconnect the AC power cord from a ceiling. • Avoid touching the lens surface. • For usable projection lenses and a lens adapter, see...


