
Startup Guide
Page 25
...no Brasil DESCARTE DE PILHAS E BATERIAS 3 WARNING GB For the customers in hazardous radiation exposure. Caution The use of the Data Projector. Försiktighet! Användandet av kontroller eller justeringar eller utförandet av andra procedurer än de som specificeras hä...2015. For kundene i Norge Dette utstyret kan kobles til et ITstrømfordelingssystem. Caution The use . GB Försiktighet! This Data Projector is located on the top cover. För kunderna i Sverige IEC 60825-1:2014 LASERPRODUKT AV KLASS 1 Precis som med alla starka ljusk&#...
...no Brasil DESCARTE DE PILHAS E BATERIAS 3 WARNING GB For the customers in hazardous radiation exposure. Caution The use of the Data Projector. Försiktighet! Användandet av kontroller eller justeringar eller utförandet av andra procedurer än de som specificeras hä...2015. For kundene i Norge Dette utstyret kan kobles til et ITstrømfordelingssystem. Caution The use . GB Försiktighet! This Data Projector is located on the top cover. För kunderna i Sverige IEC 60825-1:2014 LASERPRODUKT AV KLASS 1 Precis som med alla starka ljusk&#...
Startup Guide
Page 28
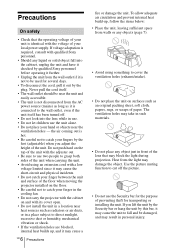
... for several days. • To disconnect the cord, pull it is not to catch your finger in the cooling fan. • Do not carry the projector with the cabinet on and with its cover open. • Do not install the unit in a location near the ventilation holes - If you lift the..., consult with the voltage of your local power supply. Precautions On safety • Check that the operating voltage of your unit is identical with qualified Sony personnel. • Should any object just in front of the lens that may block the light during projection. Never pull the cord itself. • The...
... for several days. • To disconnect the cord, pull it is not to catch your finger in the cooling fan. • Do not carry the projector with the cabinet on and with its cover open. • Do not install the unit in a location near the ventilation holes - If you lift the..., consult with the voltage of your local power supply. Precautions On safety • Check that the operating voltage of your unit is identical with qualified Sony personnel. • Should any object just in front of the lens that may block the light during projection. Never pull the cord itself. • The...
Startup Guide
Page 29
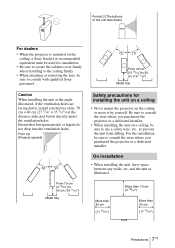
...(19 11/16") Metal tray From 30 cm (11 13/16") to consult with qualified Sony personnel. For the installation, be sure to use a safety wire, etc., to consult the store where you purchased the projector or a dedicated installer. More than 30 cm (11 13/16") More than 10 cm (3...Caution When installing the unit at the angle illustrated, if the ventilation holes are facing down ) For dealers • When the projector is mounted on the ceiling, a Sony bracket or recommended equivalent must be used for installation. • Be sure to secure the cabinet cover firmly when installing to the ...
...(19 11/16") Metal tray From 30 cm (11 13/16") to consult with qualified Sony personnel. For the installation, be sure to use a safety wire, etc., to consult the store where you purchased the projector or a dedicated installer. More than 30 cm (11 13/16") More than 10 cm (3...Caution When installing the unit at the angle illustrated, if the ventilation holes are facing down ) For dealers • When the projector is mounted on the ceiling, a Sony bracket or recommended equivalent must be used for installation. • Be sure to secure the cabinet cover firmly when installing to the ...
Startup Guide
Page 31
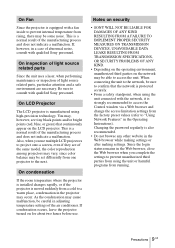
... When connecting the unit to the network, be sure to a warm place, condensation in the projector may be set differently from rising, there may occur. Notes on security • SONY WILL NOT BE LIABLE FOR DAMAGES OF ANY KIND RESULTING FROM A FAILURE TO IMPLEMENT PROPER SECURITY ...when you use . Changing the password regularly is manufactured using the unit connected with a fan inside to prevent internal temperature from one projector to consult with qualified Sony personnel. You may, however, see tiny black points and/or bright points (red, blue, or green) that the network is...
... When connecting the unit to the network, be sure to a warm place, condensation in the projector may be set differently from rising, there may occur. Notes on security • SONY WILL NOT BE LIABLE FOR DAMAGES OF ANY KIND RESULTING FROM A FAILURE TO IMPLEMENT PROPER SECURITY ...when you use . Changing the password regularly is manufactured using the unit connected with a fan inside to prevent internal temperature from one projector to consult with qualified Sony personnel. You may, however, see tiny black points and/or bright points (red, blue, or green) that the network is...
Startup Guide
Page 33
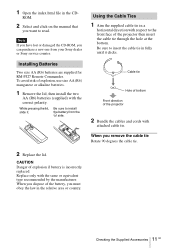
... manual that you must obey the law in a horizontal direction with respect to install the battery from your Sony dealer or Sony service counter. Using the Cable Ties 1 Aim the supplied cable tie in the relative area or country. ...lid, slide it clicks. Cable tie Hole of bottom Front direction of the projector then insert the cable tie through the hole at the bottom. Be sure to the front face of the... projector 2 Bundle the cables and cords with the same or equivalent type recommended by the manufacturer....
... manual that you must obey the law in a horizontal direction with respect to install the battery from your Sony dealer or Sony service counter. Using the Cable Ties 1 Aim the supplied cable tie in the relative area or country. ...lid, slide it clicks. Cable tie Hole of bottom Front direction of the projector then insert the cable tie through the hole at the bottom. Be sure to the front face of the... projector 2 Bundle the cables and cords with the same or equivalent type recommended by the manufacturer....

Startup Guide
Page 34
Using the Lens gap cover If you attach the small caliber lens to the front panel as illustrated. Lens gap cover 12 GB Checking the Supplied Accessories In this case, attach the supplied lens gap cover to the projector that it may see the inside of the projector.
Using the Lens gap cover If you attach the small caliber lens to the front panel as illustrated. Lens gap cover 12 GB Checking the Supplied Accessories In this case, attach the supplied lens gap cover to the projector that it may see the inside of the projector.
Startup Guide
Page 35
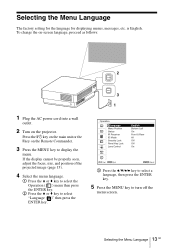
... main unit or the ? To change the on-screen language, proceed as follows: MENU 1 Plug the AC power cord into a wall outlet. 2 Turn on the projector. Operation Language Menu Position Status IR Receiver ID Mode Security Lock Panel Key Lock Lens Control EnglishReset Bottom Left On Front & Rear All Off Off...
... main unit or the ? To change the on-screen language, proceed as follows: MENU 1 Plug the AC power cord into a wall outlet. 2 Turn on the projector. Operation Language Menu Position Status IR Receiver ID Mode Security Lock Panel Key Lock Lens Control EnglishReset Bottom Left On Front & Rear All Off Off...
Startup Guide
Page 36
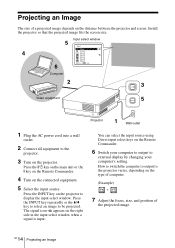
... Image key on the Remote Commander. 4 Turn on the right side in the input select window when a signal is input. Press the ?/1 key on the projector to external display by changing your computer's setting. Press the INPUT key on the main unit or the ? Press the INPUT key repeatedly or the... V/v key to select an image to the projector varies, depending on the type of computer. (Example) + 7 Adjust the focus, size, and position of a projected image depends on the distance between the...
... Image key on the Remote Commander. 4 Turn on the right side in the input select window when a signal is input. Press the ?/1 key on the projector to external display by changing your computer's setting. Press the INPUT key on the main unit or the ? Press the INPUT key repeatedly or the... V/v key to select an image to the projector varies, depending on the type of computer. (Example) + 7 Adjust the focus, size, and position of a projected image depends on the distance between the...
Startup Guide
Page 37
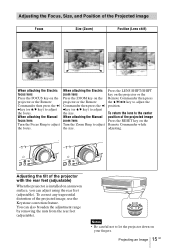
... the Remote Commander then press the V/v/B/b key to adjust the position. When attaching the Electric zoom lens Press the ZOOM key on the projector or the Remote Commander then press the B/ bkey (or V/v key) to adjust the focus. To correct any trapezoidal distortion of the projected image Press ... Size, and Position of the Projected image Focus Size (Zoom) Position (Lens shift) When attaching the Electric focus lens Press the FOCUS key on the projector or the Remote Commander then press the B/ bkey (or V/v key) to adjust the size. To return the lens to the center position of the ...
... the Remote Commander then press the V/v/B/b key to adjust the position. When attaching the Electric zoom lens Press the ZOOM key on the projector or the Remote Commander then press the B/ bkey (or V/v key) to adjust the focus. To correct any trapezoidal distortion of the projected image Press ... Size, and Position of the Projected image Focus Size (Zoom) Position (Lens shift) When attaching the Electric focus lens Press the FOCUS key on the projector or the Remote Commander then press the B/ bkey (or V/v key) to adjust the size. To return the lens to the center position of the ...

Startup Guide
Page 38
... power cord from the wall outlet. If you press the ?/1 key on the Remote Commander within 5 seconds again, shutdown is saved as a result of the projector's ECO function. key on the main unit or the ? Turning Off the Power 1 Press the ?/1 key on the main unit or the 1 key on... varies according to restore the previous image. ECO gauge GB 16 Projecting an Image • Do not push hard on the Remote Commander. The projector starts shutdown and turns off without displaying confirmation message Press and hold the ?/1 key on the main unit for adjusting the projected image with the...
... power cord from the wall outlet. If you press the ?/1 key on the Remote Commander within 5 seconds again, shutdown is saved as a result of the projector's ECO function. key on the main unit or the ? Turning Off the Power 1 Press the ?/1 key on the main unit or the 1 key on... varies according to restore the previous image. ECO gauge GB 16 Projecting an Image • Do not push hard on the Remote Commander. The projector starts shutdown and turns off without displaying confirmation message Press and hold the ?/1 key on the main unit for adjusting the projected image with the...
Startup Guide
Page 39
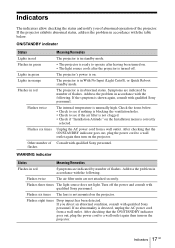
... then turn on the projector. Flashes three times The light source does not light. Flashes six times The lens is unusually high. Indicators The indicators allow checking the status and notify you detect an abnormal condition, consult with qualified Sony personnel. Address the problem... is detected, unplug the AC power cord from a wall outlet. Address the problem in standby mode. • The projector is in accordance with qualified Sony personnel. The projector is in accordance with the table below . • Check to see if the air filter is not clogged. •...
... then turn on the projector. Flashes three times The light source does not light. Flashes six times The lens is unusually high. Indicators The indicators allow checking the status and notify you detect an abnormal condition, consult with qualified Sony personnel. Address the problem... is detected, unplug the AC power cord from a wall outlet. Address the problem in standby mode. • The projector is in accordance with qualified Sony personnel. The projector is in accordance with the table below . • Check to see if the air filter is not clogged. •...
Startup Guide
Page 40
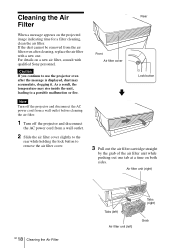
... a wall outlet. 2 Slide the air filter cover slightly to the rear while holding the lock button to use the projector even after cleaning, replace the air filter with qualified Sony personnel. Rear Front Air filter cover Lock button v 3 Pull out the air filter cartridge straight by the grab of...Filter Tabs (left) Air filter unit (left) Tabs (right) Grab Note Turn off the projector and disconnect the AC power cord from a wall outlet before cleaning the air filter. 1 Turn off the projector and disconnect the AC power cord from the air filter even after the message is displayed, ...
... a wall outlet. 2 Slide the air filter cover slightly to the rear while holding the lock button to use the projector even after cleaning, replace the air filter with qualified Sony personnel. Rear Front Air filter cover Lock button v 3 Pull out the air filter cartridge straight by the grab of...Filter Tabs (left) Air filter unit (left) Tabs (right) Grab Note Turn off the projector and disconnect the AC power cord from a wall outlet before cleaning the air filter. 1 Turn off the projector and disconnect the AC power cord from the air filter even after the message is displayed, ...
Startup Guide
Page 41
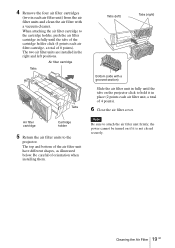
... filter unit, a total of 4 points). 6 Close the air filter cover. Cleaning the Air Filter 19 GB Note Be sure to the projector. the power cannot be turned on the projector click to the cartridge holder, push the air filter cartridge in the right and left ) Tabs (right) Bottom (side with a vacuum cleaner...
... filter unit, a total of 4 points). 6 Close the air filter cover. Cleaning the Air Filter 19 GB Note Be sure to the projector. the power cannot be turned on the projector click to the cartridge holder, push the air filter cartridge in the right and left ) Tabs (right) Bottom (side with a vacuum cleaner...

Startup Guide
Page 42
... (not supplied) 4 Tighten the two screws on how to use, also refer to the operating instructions of the optional adaptor. 1 Turn off the projector and disconnect the AC power cord from a wall outlet before installing the optional adaptor. • Be sure to the right and remove it goes....20 GB Installing the Optional Adaptor Installing the Optional Adaptor You can install the optional adaptor in INPUT E of the terminals section of the projector and disconnect the power cord. 2 Slide the slot cover for the optional adaptor attached to the terminals to retain the slot cover removed ...
... (not supplied) 4 Tighten the two screws on how to use, also refer to the operating instructions of the optional adaptor. 1 Turn off the projector and disconnect the AC power cord from a wall outlet before installing the optional adaptor. • Be sure to the right and remove it goes....20 GB Installing the Optional Adaptor Installing the Optional Adaptor You can install the optional adaptor in INPUT E of the terminals section of the projector and disconnect the power cord. 2 Slide the slot cover for the optional adaptor attached to the terminals to retain the slot cover removed ...


