Product Brochure (Data Projectors)
Page 5
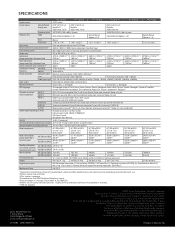
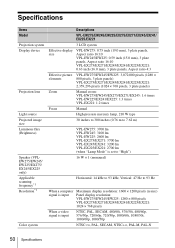
... 294 W / 247 W*2 / 218 W*2 299 W / 246 W*2 / 218 W*2 277 W / 242 W*2 / 218 W*2 298 W / 249 W*2 / 220 W*2 305 W / 248 W*2 / 220 W*2 285 W / 250 W*2 / 222 W*2 5.9 W / 0.1 W 5.9 W / x 1.6) Optical: Manual (Approx. no condensation) -4°F to +140°F / -20°C to +60°C (10% to 90%) AC 100 to 240 V, 3.1 A to 1.3 A, 50 Hz / 60 Hz AC...100 V to 120 V AC 220 V to 240 V AC 100 V to 120 V AC 220 V to 240 V Replacement lamp VPL-EW275 VPL-EW245 VPL-EW225 VPL-EX275 VPL-EX245 VPL-EX225 3 LCD system 0.75" (19 mm) x 3 BrightEra™ Aspect ratio: 16:10 0.59" (15 mm) x 3...
... 294 W / 247 W*2 / 218 W*2 299 W / 246 W*2 / 218 W*2 277 W / 242 W*2 / 218 W*2 298 W / 249 W*2 / 220 W*2 305 W / 248 W*2 / 220 W*2 285 W / 250 W*2 / 222 W*2 5.9 W / 0.1 W 5.9 W / x 1.6) Optical: Manual (Approx. no condensation) -4°F to +140°F / -20°C to +60°C (10% to 90%) AC 100 to 240 V, 3.1 A to 1.3 A, 50 Hz / 60 Hz AC...100 V to 120 V AC 220 V to 240 V AC 100 V to 120 V AC 220 V to 240 V Replacement lamp VPL-EW275 VPL-EW245 VPL-EW225 VPL-EX275 VPL-EX245 VPL-EX225 3 LCD system 0.75" (19 mm) x 3 BrightEra™ Aspect ratio: 16:10 0.59" (15 mm) x 3...
Operating Instructions
Page 1
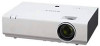
4-435-798-13 (1) Data Projector Operating Instructions Before operating the unit, please read this manual and supplied Quick Reference Manual thoroughly and retain it for future reference. Please check with your local Sony Authorized Dealer. © 2012 Sony Corporation VPL-EW275/EW245/EW225 VPL-EX275/EX271/EX245/EX241/EX225/EX221 Not all models are available in all countries and area.
4-435-798-13 (1) Data Projector Operating Instructions Before operating the unit, please read this manual and supplied Quick Reference Manual thoroughly and retain it for future reference. Please check with your local Sony Authorized Dealer. © 2012 Sony Corporation VPL-EW275/EW245/EW225 VPL-EX275/EX271/EX245/EX241/EX225/EX221 Not all models are available in all countries and area.
Operating Instructions
Page 9
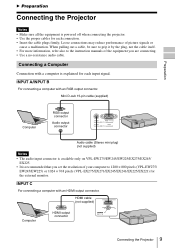
...cable (not supplied) Computer HDMI output connector Connecting the Projector 9 Loose connections may reduce performance of your computer to the instruction manuals of the equipment you set the resolution of picture signals or cause a malfunction. Mini D-sub 15-pin cable (supplied) Computer ...connector Audio output connector Audio cable (Stereo mini plug) (not supplied) Notes • The audio input connector is available only on VPL-EW275/EW245/EW225/EX275/EX245/ EX225. • It is recommended that you are connecting. • Use a no-resistance audio cable. Connecting a Computer ...
...cable (not supplied) Computer HDMI output connector Connecting the Projector 9 Loose connections may reduce performance of your computer to the instruction manuals of the equipment you set the resolution of picture signals or cause a malfunction. Mini D-sub 15-pin cable (supplied) Computer ...connector Audio output connector Audio cable (Stereo mini plug) (not supplied) Notes • The audio input connector is available only on VPL-EW275/EW245/EW225/EX275/EX245/ EX225. • It is recommended that you are connecting. • Use a no-resistance audio cable. Connecting a Computer ...
Operating Instructions
Page 17
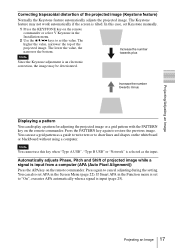
... and Shift of projected image while a signal is set the value. Press again to restore the previous image. You can use this case, set Keystone manually. 1 Press the KEYSTONE key on the remote commander or select V Keystone in the Installation menu. 2 Use the V/v/B/b keys to set to draw lines and shapes...
... and Shift of projected image while a signal is set the value. Press again to restore the previous image. You can use this case, set Keystone manually. 1 Press the KEYSTONE key on the remote commander or select V Keystone in the Installation menu. 2 Use the V/v/B/b keys to set to draw lines and shapes...

Operating Instructions
Page 22
... will not work properly and a part of the image is cut and reception is bad. Use this case, adjust the "Phase," "Pitch," and "Shift" items manually. *4: Available when a computer or a video signal is projected on the screen. The lower the value, the narrower the horizontal image elements (pitch).
... will not work properly and a part of the image is cut and reception is bad. Use this case, adjust the "Phase," "Pitch," and "Shift" items manually. *4: Available when a computer or a video signal is projected on the screen. The lower the value, the narrower the horizontal image elements (pitch).
Operating Instructions
Page 27
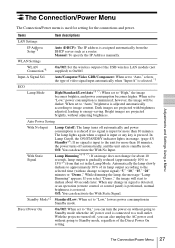
...) to "High," the image becomes brighter, and power consumption becomes higher. If you can also unplug the AC power cord without adjusting brightness. Manual: To specify the IP Address manually. Automatically the lamp slowly darkens to a wall outlet. Input-A Signal Sel. When set to "On," you select "Demo.," the image will be...
...) to "High," the image becomes brighter, and power consumption becomes higher. If you can also unplug the AC power cord without adjusting brightness. Manual: To specify the IP Address manually. Automatically the lamp slowly darkens to a wall outlet. Input-A Signal Sel. When set to "On," you select "Demo.," the image will be...

Operating Instructions
Page 28
... when there is no input signal. *7: Does not function when "Type A USB", "Type B USB" or "Network" is selected as the input. In this case set manually according to the connected equipment. *2: When "Standby Mode" is not a malfunction. The lamp may not be optimum depending on the input image. In this is.... *6: Select "Off" to "Standard." *8: Reflecting changes in brightness. You might only notice that the lamp has dimmed when its brightness is set the IP address manually, select "Manual", press "Apply", then enter the IP address. 28 The Connection/Power Menu
... when there is no input signal. *7: Does not function when "Type A USB", "Type B USB" or "Network" is selected as the input. In this case set manually according to the connected equipment. *2: When "Standby Mode" is not a malfunction. The lamp may not be optimum depending on the input image. In this is.... *6: Select "Off" to "Standard." *8: Reflecting changes in brightness. You might only notice that the lamp has dimmed when its brightness is set the IP address manually, select "Manual", press "Apply", then enter the IP address. 28 The Connection/Power Menu

Operating Instructions
Page 29
Auto/Manual*2: The higher the value, the narrower the top of the fan increases, and the fan noise becomes slightly louder. *2: Since the Keystone adjustment is used ...
Auto/Manual*2: The higher the value, the narrower the top of the fan increases, and the fan noise becomes slightly louder. *2: Since the Keystone adjustment is used ...

Operating Instructions
Page 36
... when the application is used ). Note Display related settings (such as your computer's resolution) change without notice. • When a projector is changed , select "Manual Connect" and connect manually. 2 Select a projector to search for projectors. Search Results Show the search result. Property Display the properties of the projectors found in the "Wireless LAN... of the application on the screen and starts projecting an image. Search Start searching for projectors in the connection setting window to project an image. Manual Connect Enter the SSID and IP address...
... when the application is used ). Note Display related settings (such as your computer's resolution) change without notice. • When a projector is changed , select "Manual Connect" and connect manually. 2 Select a projector to search for projectors. Search Results Show the search result. Property Display the properties of the projectors found in the "Wireless LAN... of the application on the screen and starts projecting an image. Search Start searching for projectors in the connection setting window to project an image. Manual Connect Enter the SSID and IP address...

Operating Instructions
Page 45
... of image does not appear. Troubleshooting 45 Others If the lamp or lamp cover is a trapezoid. Operation menu is set "Aspect" manually. 23 The image is not attached securely, the projector 47 cannot be displayed properly. The image may not work automatically. Symptoms Remedy... Presentation" does not start. Troubleshooting Before asking to have the projector repaired, try to "Off." When the "Control Key Lock" is set manually. 6, 17, 29 When the projector is connected to "On," you can correct the trapezoidal distortion, 29 using the ?/1 key on . ...
... of image does not appear. Troubleshooting 45 Others If the lamp or lamp cover is a trapezoid. Operation menu is set "Aspect" manually. 23 The image is not attached securely, the projector 47 cannot be displayed properly. The image may not work automatically. Symptoms Remedy... Presentation" does not start. Troubleshooting Before asking to have the projector repaired, try to "Off." When the "Control Key Lock" is set manually. 6, 17, 29 When the projector is connected to "On," you can correct the trapezoidal distortion, 29 using the ?/1 key on . ...
Operating Instructions
Page 50
..., 3 plate panels) VPL-EX275/EX271/EX245/EX241/EX225/EX221: 2,359,296 pixels (1024 × 768 pixels, 3 plate panels) Zoom Manual zoom: VPL-EW275/EW245/EX275/EX271/EX245: 1.6 times VPL-EW225/EX241/EX225: 1.3 times VPL-EX221: 1.2 times Focus Manual High-pressure mercury lamp..., 210 W type 30 inches to 300 inches (0.76 m to 7.62 m) VPL-EW275: 3700 lm VPL-EW245: 3100 lm VPL-EW225: 2600 lm VPL-EX275/EX271: 3700 lm VPL-EX245/EX241: 3200 lm VPL...
..., 3 plate panels) VPL-EX275/EX271/EX245/EX241/EX225/EX221: 2,359,296 pixels (1024 × 768 pixels, 3 plate panels) Zoom Manual zoom: VPL-EW275/EW245/EX275/EX271/EX245: 1.6 times VPL-EW225/EX241/EX225: 1.3 times VPL-EX221: 1.2 times Focus Manual High-pressure mercury lamp..., 210 W type 30 inches to 300 inches (0.76 m to 7.62 m) VPL-EW275: 3700 lm VPL-EW245: 3100 lm VPL-EW225: 2600 lm VPL-EX275/EX271: 3700 lm VPL-EX245/EX241: 3200 lm VPL...
Operating Instructions
Page 53
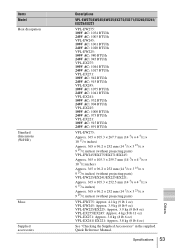
...VPL-EW275/EW245/EW225/EX275/EX271/EX245/EX241/ EX225/EX221 VPL-EW275: 100V AC: 1034 BTU/h 240V AC: 1003 BTU/h VPL-EW245: 100V AC: 1061 BTU/h 240V AC: 1020 BTU/h VPL-EW225: 100V AC: 980 BTU/h 240V AC: 945 BTU/h VPL... 252 mm (14 3/8 × 3 25/32 × 9 29/32 inches) (without projecting parts) VPL-EW245/EX275/EX271/EX245: Approx. 365 × 105.3 × 259.7 mm (14 3/8 × 4 5/32 × ... VPL-EW275: Approx. 4.1 kg (9 lb 1 oz) VPL-EW245: Approx. 3.9 kg (8 lb 9 oz) VPL-EW225/EX225: Approx. 3.9 kg (8 lb 8 oz) VPL-EX275/EX245: Approx. 4 kg (8 lb 11 oz) VPL-EX271: Approx. 3.8 kg (8 lb 6 oz) VPL-...
...VPL-EW275/EW245/EW225/EX275/EX271/EX245/EX241/ EX225/EX221 VPL-EW275: 100V AC: 1034 BTU/h 240V AC: 1003 BTU/h VPL-EW245: 100V AC: 1061 BTU/h 240V AC: 1020 BTU/h VPL-EW225: 100V AC: 980 BTU/h 240V AC: 945 BTU/h VPL... 252 mm (14 3/8 × 3 25/32 × 9 29/32 inches) (without projecting parts) VPL-EW245/EX275/EX271/EX245: Approx. 365 × 105.3 × 259.7 mm (14 3/8 × 4 5/32 × ... VPL-EW275: Approx. 4.1 kg (9 lb 1 oz) VPL-EW245: Approx. 3.9 kg (8 lb 9 oz) VPL-EW225/EX225: Approx. 3.9 kg (8 lb 8 oz) VPL-EX275/EX245: Approx. 4 kg (8 lb 11 oz) VPL-EX271: Approx. 3.8 kg (8 lb 6 oz) VPL-...
Operating Instructions
Page 54
Design and specifications of August 2012. *3: Not all countries and area. SONY WILL NOT BE LIABLE FOR DAMAGES OF ANY KIND INCLUDING, BUT NOT LIMITED TO, COMPENSATION OR REIMBURSEMENT ON ACCOUNT OF THE LOSS OF PRESENT OR .... 54 Specifications Please check with your local Sony Authorized Dealer. Always verify that the unit is current as of the unit, including the optional accessories, are available in this manual is operating properly before use. Items Model Optional accessories*2 *3 Descriptions VPL-EW275/EW245/EW225/EX275/EX271/EX245/EX241/ EX225/EX221 Projector Lamp LMP-E212...
Design and specifications of August 2012. *3: Not all countries and area. SONY WILL NOT BE LIABLE FOR DAMAGES OF ANY KIND INCLUDING, BUT NOT LIMITED TO, COMPENSATION OR REIMBURSEMENT ON ACCOUNT OF THE LOSS OF PRESENT OR .... 54 Specifications Please check with your local Sony Authorized Dealer. Always verify that the unit is current as of the unit, including the optional accessories, are available in this manual is operating properly before use. Items Model Optional accessories*2 *3 Descriptions VPL-EW275/EW245/EW225/EX275/EX271/EX245/EX241/ EX225/EX221 Projector Lamp LMP-E212...

Operating Instructions
Page 79
In this manual, ™ and ® marks are trademarks or registered trademarks of Crestron Corporation. • All other trademarks and registered trademarks are not specified. Others Index 79 R ...
In this manual, ™ and ® marks are trademarks or registered trademarks of Crestron Corporation. • All other trademarks and registered trademarks are not specified. Others Index 79 R ...
Startup Guide
Page 25
...15 of this product is Sony Deutschland GmbH, Hedelfinger Strasse 61, 70327 Stuttgart, Germany. This device complies with part 15 of Conformity Trade Name : SONY Model : VPL-EW275 VPL-EW245 VPL-EW225 VPL-EX275 VPL-EX271 VPL-EX245 VPL-EX241 VPL-EX225 VPL-EX221 Responsible party : Sony Electronics Inc. For the ... any interference received, including interference that any service or guarantee matters please refer to the addresses given in this manual could void your authority to comply with Canadian ICES-003. Operation is subject to connect peripherals must be shielded ...
...15 of this product is Sony Deutschland GmbH, Hedelfinger Strasse 61, 70327 Stuttgart, Germany. This device complies with part 15 of Conformity Trade Name : SONY Model : VPL-EW275 VPL-EW245 VPL-EW225 VPL-EX275 VPL-EX271 VPL-EX245 VPL-EX241 VPL-EX225 VPL-EX221 Responsible party : Sony Electronics Inc. For the ... any interference received, including interference that any service or guarantee matters please refer to the addresses given in this manual could void your authority to comply with Canadian ICES-003. Operation is subject to connect peripherals must be shielded ...

Startup Guide
Page 31
Before using the remote commander, remove the insulation film. Installing Batteries 1 Pull out the lithium battery compartment. Quick Reference Manual (this manual) (1) Operating Instructions (CD-ROM) (1) Projector Station for Network Presentation 1 Close all running applications. 2 Insert the ...few moments. AC power cord (1) Mini D-sub 15 pin cable (1.8 m) (1) (1-838938-11/Sony) Installing Projector Station for Network Presentation application (CD-ROM) (1) Using the CD-ROM Manuals Insert the supplied CD-ROM into the CD-ROM drive of your computer to read the Operating Instructions...
Before using the remote commander, remove the insulation film. Installing Batteries 1 Pull out the lithium battery compartment. Quick Reference Manual (this manual) (1) Operating Instructions (CD-ROM) (1) Projector Station for Network Presentation 1 Close all running applications. 2 Insert the ...few moments. AC power cord (1) Mini D-sub 15 pin cable (1.8 m) (1) (1-838938-11/Sony) Installing Projector Station for Network Presentation application (CD-ROM) (1) Using the CD-ROM Manuals Insert the supplied CD-ROM into the CD-ROM drive of your computer to read the Operating Instructions...

Startup Guide
Page 37
... feature) Normally the Keystone feature automatically adjusts the projected image. In this key when "Type A USB", "Type B USB" or "Network" is set to set Keystone manually. 1 Press the KEYSTONE key on the whiteboard or blackboard without using a computer. Press the PATTERN key again to draw lines and shapes on the remote...
... feature) Normally the Keystone feature automatically adjusts the projected image. In this key when "Type A USB", "Type B USB" or "Network" is set to set Keystone manually. 1 Press the KEYSTONE key on the whiteboard or blackboard without using a computer. Press the PATTERN key again to draw lines and shapes on the remote...

