User Manual
Page 4
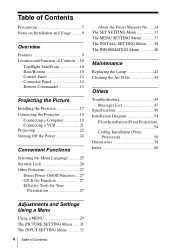
... Side/Front 10 Rear/Bottom 10 Control Panel 12 Connector Panel 14 Remote Commander 15 Projecting the Picture Installing the Projector 17 Connecting the Projector 19 Connecting a Computer 19 Connecting a VCR 21 Projecting 22 Turning Off the Power 24 Convenient Functions Selecting the...The INSTALL SETTING Menu .......38 The INFORMATION Menu 40 Maintenance Replacing the Lamp 42 Cleaning the Air Filter 44 Others Troubleshooting 45 Messages List 47 Specifications 49 Installation Diagram 54 Floor Installation (Front Projection 54 Ceiling Installation (Front Projection 56 Dimensions...
... Side/Front 10 Rear/Bottom 10 Control Panel 12 Connector Panel 14 Remote Commander 15 Projecting the Picture Installing the Projector 17 Connecting the Projector 19 Connecting a Computer 19 Connecting a VCR 21 Projecting 22 Turning Off the Power 24 Convenient Functions Selecting the...The INSTALL SETTING Menu .......38 The INFORMATION Menu 40 Maintenance Replacing the Lamp 42 Cleaning the Air Filter 44 Others Troubleshooting 45 Messages List 47 Specifications 49 Installation Diagram 54 Floor Installation (Front Projection 54 Ceiling Installation (Front Projection 56 Dimensions...
User Manual
Page 45
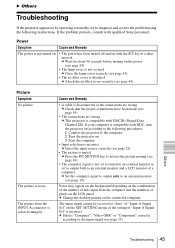
..."Video GBR" or "Component" correctly according to the input signal (see page 44). B Others Troubleshooting If the projector appears to be received at a short interval. Others Troubleshooting 45 Noise may appear on the background depending on the combination of the number of a computer. The...). c This projector is colored strangely. c Set the computer signal to output only to the following instructions. c Press the PIC MUTING key to an external monitor and a LCD monitor of dots input from the INPUT A connector is compatible with qualified Sony personnel. c ...
..."Video GBR" or "Component" correctly according to the input signal (see page 44). B Others Troubleshooting If the projector appears to be received at a short interval. Others Troubleshooting 45 Noise may appear on the background depending on the combination of the number of a computer. The...). c This projector is colored strangely. c Set the computer signal to output only to the following instructions. c Press the PIC MUTING key to an external monitor and a LCD monitor of dots input from the INPUT A connector is compatible with qualified Sony personnel. c ...
User Manual
Page 46
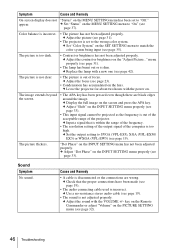
...MENU SETTING menu has been set to SVGA (VPL-ES5), XGA (VPL-EX50/ EX5) or WXGA (VPL-EW5) (see page 19). • The sound is incorrect. Symptom Cause and Remedy On-screen display does not "Status" on the PICTURE SETTING menu (see page 32). 46 Troubleshooting c Set "Status" on the screen and ...press the APA key. The picture is not clear. • The picture is incorrect. • The picture has not been adjusted properly. c Leave the projector for about two hours with a new one (see...
...MENU SETTING menu has been set to SVGA (VPL-ES5), XGA (VPL-EX50/ EX5) or WXGA (VPL-EW5) (see page 19). • The sound is incorrect. Symptom Cause and Remedy On-screen display does not "Status" on the PICTURE SETTING menu (see page 32). 46 Troubleshooting c Set "Status" on the screen and ...press the APA key. The picture is not clear. • The picture is incorrect. • The picture has not been adjusted properly. c Leave the projector for about two hours with a new one (see...
User Manual
Page 47
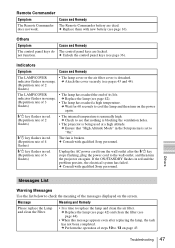
...Repetition rate of 2 flashes) • The internal temperature is set to the wall outlet, and then turn on again. c Consult with qualified Sony personnel. :/1 key flashes in red and the problem persists, the electrical system has failed. c Perform the operation of 4 flashes) The fan is...screen. If the ON/STANDBY flashes in red. (Repetition rate of the messages displayed on page 43 Troubleshooting 47 c Ensure that nothing is blocking the ventilation holes. • The projector is broken. c Attach the cover securely (see that "High Altitude Mode" in the Setup menu ...
...Repetition rate of 2 flashes) • The internal temperature is set to the wall outlet, and then turn on again. c Consult with qualified Sony personnel. :/1 key flashes in red and the problem persists, the electrical system has failed. c Perform the operation of 4 flashes) The fan is...screen. If the ON/STANDBY flashes in red. (Repetition rate of the messages displayed on page 43 Troubleshooting 47 c Ensure that nothing is blocking the ventilation holes. • The projector is broken. c Attach the cover securely (see that "High Altitude Mode" in the Setup menu ...

User Manual
Page 48
Operate the projector with the keys on the SET SETTING menu is set to check the meaning of the projector are locked! c Press the appropriate key. c All the keys on the control panel of the messages displayed on the screen. The panel keys are locked. "Panel Key Lock" on the Remote Commander (see page 36). 48 Troubleshooting Caution Messages Use the list below to "On." You have pressed the wrong key. Message Meaning and Remedy Not applicable!
Operate the projector with the keys on the SET SETTING menu is set to check the meaning of the projector are locked! c Press the appropriate key. c All the keys on the control panel of the messages displayed on the screen. The panel keys are locked. "Panel Key Lock" on the Remote Commander (see page 36). 48 Troubleshooting Caution Messages Use the list below to "On." You have pressed the wrong key. Message Meaning and Remedy Not applicable!
User Manual
Page 61
rear remote control detector 36 Reset resetting an item 30 RS-232C connector 51 S Screen size 17, 18 Security bar 11 Security Lock 26, 38 Security lock 11 Sharpness 31 Shift 33 Smart APA 35 Specifications 49 Start Up Image 37 Status 37 Supplied accessories 50 T Troubleshooting 45 V V Keystone 38 Volume 32 Index 61 Others
rear remote control detector 36 Reset resetting an item 30 RS-232C connector 51 S Screen size 17, 18 Security bar 11 Security Lock 26, 38 Security lock 11 Sharpness 31 Shift 33 Smart APA 35 Specifications 49 Start Up Image 37 Status 37 Supplied accessories 50 T Troubleshooting 45 V V Keystone 38 Volume 32 Index 61 Others

