Quick Reference Guide
Page 20
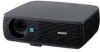
..., not the cable itself. Projecting Connecting the Projector When you connect the projector, make sure to the AUDIO INPUT A/B connector for each connection. • Insert the cable plugs firmly. Note For stereo audio connection, connect the stereo audio connecting cable to the AUDIO connector for VPL-ES4, or to : • Turn off all equipment...
..., not the cable itself. Projecting Connecting the Projector When you connect the projector, make sure to the AUDIO INPUT A/B connector for each connection. • Insert the cable plugs firmly. Note For stereo audio connection, connect the stereo audio connecting cable to the AUDIO connector for VPL-ES4, or to : • Turn off all equipment...
Quick Reference Guide
Page 22
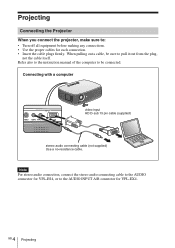
Projecting Before connecting the equipments, plug the AC power cord into a wall outlet. 1 Press the ?/1 (on/standby) key. 2 Turn on the equipment connected to the projector. 3 Press the INPUT key to select the input source. 4 When the computer is connected, set it to output the signal to only the external monitor. Connecting with a computer 1 2 Power INPUT A INPUT B (VPL-EX4 only) VIDEO S VIDEO 4 F7 Fx or Fn 6 GB Projecting
Projecting Before connecting the equipments, plug the AC power cord into a wall outlet. 1 Press the ?/1 (on/standby) key. 2 Turn on the equipment connected to the projector. 3 Press the INPUT key to select the input source. 4 When the computer is connected, set it to output the signal to only the external monitor. Connecting with a computer 1 2 Power INPUT A INPUT B (VPL-EX4 only) VIDEO S VIDEO 4 F7 Fx or Fn 6 GB Projecting
Quick Reference Guide
Page 23
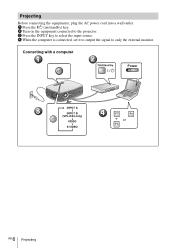
For details, see the Operating Instructions contained in the CD-ROM. 2 3 1 7 Projecting GB The projector is equipped with the PICTURE SETTING menu to select the picture mode, and the INPUT SETTING menu to select the appropriate aspect ratio of the picture. 3 Adjust the focus. Adjusting the Projector 1 Adjust the position of the picture. 2 Adjust the size of the picture.
For details, see the Operating Instructions contained in the CD-ROM. 2 3 1 7 Projecting GB The projector is equipped with the PICTURE SETTING menu to select the picture mode, and the INPUT SETTING menu to select the appropriate aspect ratio of the picture. 3 Adjust the focus. Adjusting the Projector 1 Adjust the position of the picture. 2 Adjust the size of the picture.
Quick Reference Guide
Page 24
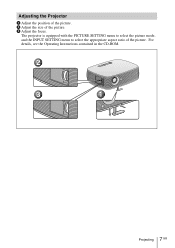
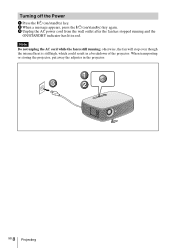
When transporting or storing the projector, put away the adjuster in red. Note Do not unplug the AC cord while the fan is still high, which could result in a breakdown of the projector. otherwise, the fan will stop even though the internal heat is still running and the ON/STANDBY indicator has lit in the projector. 1 3 2 8 GB Projecting Turning off the Power 1 Press the ?/1 (on/standby) key. 2 When a message appears, press the ?/1 (on/standby) key again. 3 Unplug the AC power cord from the wall outlet after the fan has stopped running ;
When transporting or storing the projector, put away the adjuster in red. Note Do not unplug the AC cord while the fan is still high, which could result in a breakdown of the projector. otherwise, the fan will stop even though the internal heat is still running and the ON/STANDBY indicator has lit in the projector. 1 3 2 8 GB Projecting Turning off the Power 1 Press the ?/1 (on/standby) key. 2 When a message appears, press the ?/1 (on/standby) key again. 3 Unplug the AC power cord from the wall outlet after the fan has stopped running ;
Quick Reference Guide
Page 25
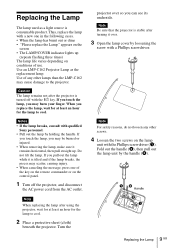
...8226; When removing the lamp, make sure it over so you replace the lamp, wait for at least an hour for the lamp to the projector. Note When replacing the lamp after turning it remains horizontal, then pull straight up (repeats flashing three times) The lamp life varies depending on... the control panel. 1 Turn off with a Phillips screwdriver. Handle 9 Replacing the Lamp GB Thus, replace the lamp with qualified Sony personnel. • Pull out the lamp by holding the handle. Use of use. When you can see its underside. Do not tilt the lamp. ...
...8226; When removing the lamp, make sure it over so you replace the lamp, wait for at least an hour for the lamp to the projector. Note When replacing the lamp after turning it remains horizontal, then pull straight up (repeats flashing three times) The lamp life varies depending on... the control panel. 1 Turn off with a Phillips screwdriver. Handle 9 Replacing the Lamp GB Thus, replace the lamp with qualified Sony personnel. • Pull out the lamp by holding the handle. Use of use. When you can see its underside. Do not tilt the lamp. ...
Quick Reference Guide
Page 26
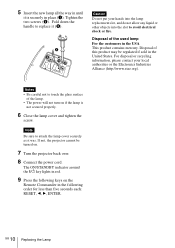
... attach the lamp cover securely as it was. Note Be sure to touch the glass surface of this product may be turned on. 7 Turn the projector back over. 8 Connect the power cord. The ON/STANDBY indicator around the ?/1 key lights in red. 9 Press the following order for less than five seconds... each: RESET, b, B, ENTER. If not, the projector cannot be regulated if sold in the USA This product contains mercury. 5 Insert the new lamp all the way in until it is not secured...
... attach the lamp cover securely as it was. Note Be sure to touch the glass surface of this product may be turned on. 7 Turn the projector back over. 8 Connect the power cord. The ON/STANDBY indicator around the ?/1 key lights in red. 9 Press the following order for less than five seconds... each: RESET, b, B, ENTER. If not, the projector cannot be regulated if sold in the USA This product contains mercury. 5 Insert the new lamp all the way in until it is not secured...
Quick Reference Guide
Page 27
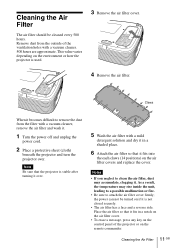
..., remove the air filter and wash it. 1 Turn the power off and unplug the power cord. 2 Place a protective sheet (cloth) beneath the projector and turn the projector over. Notes • If you neglect to clean the air filter, dust may rise inside the unit, leading to a possible malfunction or fire. &#...8226; Be sure to remove the dust from the outside of the projector or on the environment or how the projector is used. 3 Remove the air filter cover. 4 Remove the air filter. the power can not be cleaned every 500 hours. ...
..., remove the air filter and wash it. 1 Turn the power off and unplug the power cord. 2 Place a protective sheet (cloth) beneath the projector and turn the projector over. Notes • If you neglect to clean the air filter, dust may rise inside the unit, leading to a possible malfunction or fire. &#...8226; Be sure to remove the dust from the outside of the projector or on the environment or how the projector is used. 3 Remove the air filter cover. 4 Remove the air filter. the power can not be cleaned every 500 hours. ...
Quick Reference Guide
Page 28
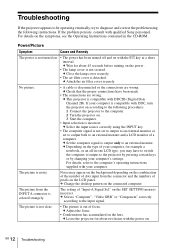
... strangely. c Depending on the type of your computer, for about two hours with qualified Sony personnel. c Check that the proper connections have to switch the computer to output to the projector by pressing certain keys or by changing your computer. If your computer is compatible with your... picture is incorrect. The picture is not clear. • The picture is out of pixels on the LCD panel. c Attach the air filter cover securely. Troubleshooting If the projector appears to be operating erratically, try to diagnose and correct the problem using the INPUT key. • ...
... strangely. c Depending on the type of your computer, for about two hours with qualified Sony personnel. c Check that the proper connections have to switch the computer to output to the projector by pressing certain keys or by changing your computer. If your computer is compatible with your... picture is incorrect. The picture is not clear. • The picture is out of pixels on the LCD panel. c Attach the air filter cover securely. Troubleshooting If the projector appears to be operating erratically, try to diagnose and correct the problem using the INPUT key. • ...
Quick Reference Guide
Page 29
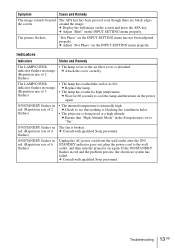
... properly. c Adjust "Dot Phase" on the INPUT SETTING menu properly. c Ensure that nothing is blocking the ventilation holes. • The projector is unusually high. red. (Repetition rate of its life. If the ON/STANDBY flashes in orange. around the image. The picture flickers. ... flashes) ON/STANDBY flashes in orange. (Repetition rate of 3 flashes) • The lamp has reached the end of 4 c Consult with qualified Sony personnel. c Attach the cover securely. (Repetition rate of 2 flashes) The LAMP/COVER indicator flashes in red. (Repetition rate of 2 flashes) &#...
... properly. c Adjust "Dot Phase" on the INPUT SETTING menu properly. c Ensure that nothing is blocking the ventilation holes. • The projector is unusually high. red. (Repetition rate of its life. If the ON/STANDBY flashes in orange. around the image. The picture flickers. ... flashes) ON/STANDBY flashes in orange. (Repetition rate of 3 flashes) • The lamp has reached the end of 4 c Consult with qualified Sony personnel. c Attach the cover securely. (Repetition rate of 2 flashes) The LAMP/COVER indicator flashes in red. (Repetition rate of 2 flashes) &#...
Quick Reference Guide
Page 30
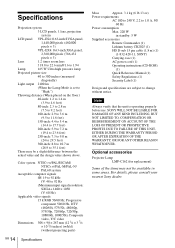
... PERIOD OR AFTER EXPIRATION OF THE WARRANTY, OR FOR ANY OTHER REASON WHATSOEVER. For details, please consult your nearest Sony dealer. Optional accessories Projector Lamp LMP-C162 (for replacement) Some of the items may be available in standby: 5 W Supplied accessories Remote ...1.0 A, 50/ 60 Hz Power consumption Max. 220 W in some areas. Specifications Projection system 3 LCD panels, 1 lens, projection system LCD panel VPL-ES4: 0.63-inch SVGA panel, 1,440,000 pixels (480,000 pixels × 3) VPL-EX4: 0.63-inch XGA panel, 2,360,000 pixels (786,432 pixels × 3) Lens 1.2...
... PERIOD OR AFTER EXPIRATION OF THE WARRANTY, OR FOR ANY OTHER REASON WHATSOEVER. For details, please consult your nearest Sony dealer. Optional accessories Projector Lamp LMP-C162 (for replacement) Some of the items may be available in standby: 5 W Supplied accessories Remote ...1.0 A, 50/ 60 Hz Power consumption Max. 220 W in some areas. Specifications Projection system 3 LCD panels, 1 lens, projection system LCD panel VPL-ES4: 0.63-inch SVGA panel, 1,440,000 pixels (480,000 pixels × 3) VPL-EX4: 0.63-inch XGA panel, 2,360,000 pixels (786,432 pixels × 3) Lens 1.2...


