Operating Instructions
Page 1
2-634-403-11 (1) Data Projector Operating Instructions VPL-CX76 VPL-CX70 © 2005 Sony Corporation
2-634-403-11 (1) Data Projector Operating Instructions VPL-CX76 VPL-CX70 © 2005 Sony Corporation
Operating Instructions
Page 2
...of Controls .... 6 Top/Front/Left Side 6 Rear/Right Side/Bottom 6 Control Panel 7 Connector Panel 8 Remote Commander 9 Presentation Tool (VPL-CX76 only 11 Adjustments and Settings Using a Menu Using a MENU 24 The PICTURE SETTING Menu ......26 The INPUT SETTING Menu ...........27 About the ...The MENU SETTING Menu ...........31 The INSTALL SETTING Menu .......32 The INFORMATION Menu 34 Projecting the Picture Installing the Projector 12 Connecting the Projector 13 Connecting a Computer 13 Connecting a VCR 14 Projecting 15 Turning Off the Power 18 Convenient Functions Selecting ...
...of Controls .... 6 Top/Front/Left Side 6 Rear/Right Side/Bottom 6 Control Panel 7 Connector Panel 8 Remote Commander 9 Presentation Tool (VPL-CX76 only 11 Adjustments and Settings Using a Menu Using a MENU 24 The PICTURE SETTING Menu ......26 The INPUT SETTING Menu ...........27 About the ...The MENU SETTING Menu ...........31 The INSTALL SETTING Menu .......32 The INFORMATION Menu 34 Projecting the Picture Installing the Projector 12 Connecting the Projector 13 Connecting a Computer 13 Connecting a VCR 14 Projecting 15 Turning Off the Power 18 Convenient Functions Selecting ...
Operating Instructions
Page 3
...) This is not necessary to the projector via wireless LAN. This instruction is an application software for this product. Operating Instructions (for the VPLCX86/VPL-CX80) (on the CD-ROM, but are not used for the VPL-CX76/ VPL-CX70. For the VPL-CX70, read only the Operating Instructions ... This Operating Instructions describes the setup and operations of this unit. USB Wireless LAN Module Utility (VPL-CX76 only) (English only) This is an software for setting the USB wireless LAN module. (When the projector is used in simple mode, it is an application software for creating the...
...) This is not necessary to the projector via wireless LAN. This instruction is an application software for this product. Operating Instructions (for the VPLCX86/VPL-CX80) (on the CD-ROM, but are not used for the VPL-CX76/ VPL-CX70. For the VPL-CX70, read only the Operating Instructions ... This Operating Instructions describes the setup and operations of this unit. USB Wireless LAN Module Utility (VPL-CX76 only) (English only) This is an software for setting the USB wireless LAN module. (When the projector is used in simple mode, it is an application software for creating the...

Operating Instructions
Page 4
... use . The "Projector Station for Presentation" software is very short, approximately 2.4 m (7.8 feet), when projecting an 80-inch image, which allows projection on the supplied CD-ROM. Variety of network presentations (VPL-CX76 only) Air Shot Air Shot features data transmission from the side of a "Memory Stick" enables you are using the wireless LAN for projection...
... use . The "Projector Station for Presentation" software is very short, approximately 2.4 m (7.8 feet), when projecting an 80-inch image, which allows projection on the supplied CD-ROM. Variety of network presentations (VPL-CX76 only) Air Shot Air Shot features data transmission from the side of a "Memory Stick" enables you are using the wireless LAN for projection...
Operating Instructions
Page 5
... prevent projection of Sony Corporation. This prevents the projector from the installation location..., SVGA, XGA and SXGA are registered trademarks of the International Business Machines Corporation, U.S.A. • Kensington is a registered trademark of...projector is disconnected. This enables you to obtain projector status information such as the lamp timer status or to another location immediately after the power is turned off . Features 5 System expandability using a network (VPL-CX76 only) Connection to a wireless LAN allows you to move the projector to control the projector...
... prevent projection of Sony Corporation. This prevents the projector from the installation location..., SVGA, XGA and SXGA are registered trademarks of the International Business Machines Corporation, U.S.A. • Kensington is a registered trademark of...projector is disconnected. This enables you to obtain projector status information such as the lamp timer status or to another location immediately after the power is turned off . Features 5 System expandability using a network (VPL-CX76 only) Connection to a wireless LAN allows you to move the projector to control the projector...
Operating Instructions
Page 7
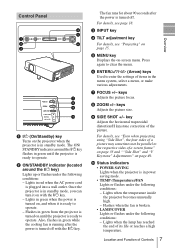
...fan is plugged into a wall outlet. For details, see "Projecting" on page 15. Control Panel a ?/1 (On/Standby) key Turns on the projector when the projector is in standby mode, you can turn it is ready to the respective sides of a screen frame." Lights in green when the power is... in red when the AC power cord is broken. • LAMP/COVER Lights or flashes under the following conditions: - Lights when the temperature inside the projector becomes unusually high. - h ZOOM +/- c INPUT key d TILT adjustment key For details, see page 18. e MENU key Displays the on page 49. For...
...fan is plugged into a wall outlet. For details, see "Projecting" on page 15. Control Panel a ?/1 (On/Standby) key Turns on the projector when the projector is in standby mode, you can turn it is ready to the respective sides of a screen frame." Lights in green when the power is... in red when the AC power cord is broken. • LAMP/COVER Lights or flashes under the following conditions: - Lights when the temperature inside the projector becomes unusually high. - h ZOOM +/- c INPUT key d TILT adjustment key For details, see page 18. e MENU key Displays the on page 49. For...
Operating Instructions
Page 8
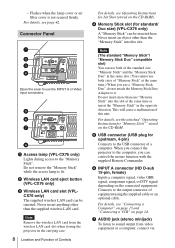
... eject button (VPL-CX76 only) c Wireless LAN card slot (VPLCX76 only) The supplied wireless LAN card can be inserted. Do not insert more ...Stick Duo" compatible slot) You can control the mouse function with the supplied Remote Commander. a Access lamp (VPL-CX76 only) Lights during access to it. When you use both sizes of "Memory Stick" at the same time..."Memory Stick" into the slot at the same time.) When you connect the projector to sound output from the wireless LAN card slot when storing the projector in the opposite direction. f INPUT A connector (HD D-sub 15-pin, ...
... eject button (VPL-CX76 only) c Wireless LAN card slot (VPLCX76 only) The supplied wireless LAN card can be inserted. Do not insert more ...Stick Duo" compatible slot) You can control the mouse function with the supplied Remote Commander. a Access lamp (VPL-CX76 only) Lights during access to it. When you use both sizes of "Memory Stick" at the same time..."Memory Stick" into the slot at the same time.) When you connect the projector to sound output from the wireless LAN card slot when storing the projector in the opposite direction. f INPUT A connector (HD D-sub 15-pin, ...
Operating Instructions
Page 9
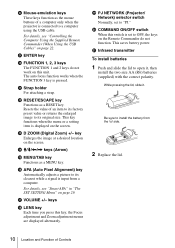
Use the arrow keys (M/m/ c INPUT key d TILT/KEYSTONE (Vertical/ horizontal trapezoidal distortion correction) key Adjusts the tilt of the projector, or the horizonal/vertical trapezoidal distortion of the video equipment or the computer. Each time you press this jack to temporarily cut off the picture. ...
Use the arrow keys (M/m/ c INPUT key d TILT/KEYSTONE (Vertical/ horizontal trapezoidal distortion correction) key Adjusts the tilt of the projector, or the horizonal/vertical trapezoidal distortion of the video equipment or the computer. Each time you press this jack to temporarily cut off the picture. ...
Operating Instructions
Page 10
... factory preset value or returns the enlarged image to a computer using the USB cable. m D ZOOM (Digital Zoom) +/- Resets the value of a computer only when the projector is pressed. n M/m/ key Enlarges the image at a desired location on the screen. h Mouse-emulation keys These keys function as a RESET key. i ENTER key j FUNCTION 1, 2, 3 keys...
... factory preset value or returns the enlarged image to a computer using the USB cable. m D ZOOM (Digital Zoom) +/- Resets the value of a computer only when the projector is pressed. n M/m/ key Enlarges the image at a desired location on the screen. h Mouse-emulation keys These keys function as a RESET key. i ENTER key j FUNCTION 1, 2, 3 keys...
Operating Instructions
Page 11
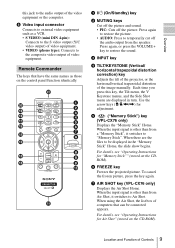
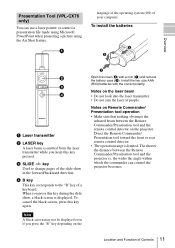
...Commander/ Presentation tool operation • Make sure that nothing obstructs the infrared beam between the Remote Commander/Presentation tool and the projector is emitted from the laser transmitter while you press this key again. Location and Function of a keyboard. To install the ...control a presentation file made using Microsoft PowerPoint when projecting a picture using the Air Shot feature. Presentation Tool (VPL-CX76 only) You can control the projector becomes. The shorter the distance between the Remote Commander/Presentation tool and the remote control detector on the Open...
...Commander/ Presentation tool operation • Make sure that nothing obstructs the infrared beam between the Remote Commander/Presentation tool and the projector is emitted from the laser transmitter while you press this key again. Location and Function of a keyboard. To install the ...control a presentation file made using Microsoft PowerPoint when projecting a picture using the Air Shot feature. Presentation Tool (VPL-CX76 only) You can control the projector becomes. The shorter the distance between the Remote Commander/Presentation tool and the remote control detector on the Open...
Operating Instructions
Page 12
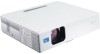
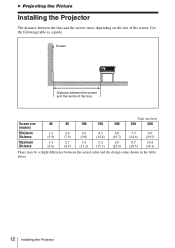
B Projecting the Picture Installing the Projector The distance between the lens and the screen varies depending on the size of the lens Screen size (inches) Minimum Distance Maximum Distance Unit: m (feet) ... screen. Use the following table as a guide. Screen Distance between the actual value and the design value shown in the table above. 12 Installing the Projector
B Projecting the Picture Installing the Projector The distance between the lens and the screen varies depending on the size of the lens Screen size (inches) Minimum Distance Maximum Distance Unit: m (feet) ... screen. Use the following table as a guide. Screen Distance between the actual value and the design value shown in the table above. 12 Installing the Projector
Operating Instructions
Page 13
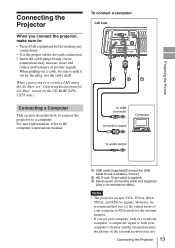
...3 21 Connecting a Computer This section describes how to connect the projector to use a wireless mouse.) B HD D-sub 15-pin cable (supplied) C Stereo audio connecting cable (not supplied) (Use a no-resistance cable.) Notes • The projector accepts VGA, SVGA, XGA, SXGA, and SXGA+ signals. loose...performance of your computer to a wireless LAN using the Air Shot, see "Operating Instructions for the external monitor. • If you connect the projector, make sure to the computer's instruction manual. Projecting the Picture Connecting the Projector To connect a computer Left ...
...3 21 Connecting a Computer This section describes how to connect the projector to use a wireless mouse.) B HD D-sub 15-pin cable (supplied) C Stereo audio connecting cable (not supplied) (Use a no-resistance cable.) Notes • The projector accepts VGA, SVGA, XGA, SXGA, and SXGA+ signals. loose...performance of your computer to a wireless LAN using the Air Shot, see "Operating Instructions for the external monitor. • If you connect the projector, make sure to the computer's instruction manual. Projecting the Picture Connecting the Projector To connect a computer Left ...

Operating Instructions
Page 14
... • Your computer may not start correctly when connected to the projector using the USB cable, wireless mouse functions become available. • A "Memory Stick" inserted into the Memory Stick slot on the projector cannot be used on the computer. • Operations are connecting. ...the USB human interface device (wireless mouse function) automatically. In this case, disconnect the USB cable, restart the computer, then connect the computer to a computer using the USB cable. • This projector is not guaranteed for Presentation (VPL-CX76 only). Set your computer. appear...
... • Your computer may not start correctly when connected to the projector using the USB cable, wireless mouse functions become available. • A "Memory Stick" inserted into the Memory Stick slot on the projector cannot be used on the computer. • Operations are connecting. ...the USB human interface device (wireless mouse function) automatically. In this case, disconnect the USB cable, restart the computer, then connect the computer to a computer using the USB cable. • This projector is not guaranteed for Presentation (VPL-CX76 only). Set your computer. appear...
Operating Instructions
Page 15
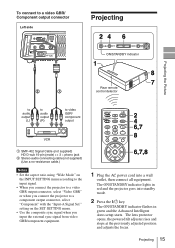
... the Advanced Intelligent Auto-setup starts. Projecting 15 setting on the INPUT SETTING menu according to the input signal. • When you connect the projector to a component output connector, select "Component" with the "Input-A Signal Sel." To connect to a video GBR/ Component output connector Left side...• Set the aspect ratio using "Wide Mode" on the SET SETTING menu. • Use the composite sync signal when you connect the projector to a video GBR output connector, select "Video GBR" or when you input the external sync signal from video GBR/component equipment. 1 Plug ...
... the Advanced Intelligent Auto-setup starts. Projecting 15 setting on the INPUT SETTING menu according to the input signal. • When you connect the projector to a component output connector, select "Component" with the "Input-A Signal Sel." To connect to a video GBR/ Component output connector Left side...• Set the aspect ratio using "Wide Mode" on the SET SETTING menu. • Use the composite sync signal when you connect the projector to a video GBR output connector, select "Video GBR" or when you input the external sync signal from video GBR/component equipment. 1 Plug ...
Operating Instructions
Page 16
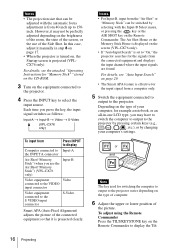
... switches as follows: Input-A t Input-B t Video t S-Video (VPL-CX76 only) To input from Press INPUT to display Computer connected to display the Tilt 16 Projecting In this case, adjust it may have to switch the computer to output to the projector by pressing certain keys (e.g., / , LCD VGA / , etc.), or by selecting with the automatic...
... switches as follows: Input-A t Input-B t Video t S-Video (VPL-CX76 only) To input from Press INPUT to display Computer connected to display the Tilt 16 Projecting In this case, adjust it may have to switch the computer to output to the projector by pressing certain keys (e.g., / , LCD VGA / , etc.), or by selecting with the automatic...

Operating Instructions
Page 17
Projecting the Picture menu and adjust the tilt using the M/m/
Projecting the Picture menu and adjust the tilt using the M/m/
Operating Instructions
Page 18
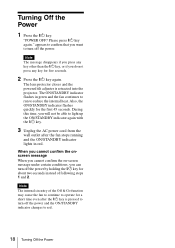
... up the ON/STANDBY indicator again with the ?/1 key. 3 Unplug the AC power cord from the wall outlet after the ?/1 key is retracted into the projector. Turning Off the Power 1 Press the ?/1 key. Note The message disappears if you press any key other than the ?/1 key, or if you want to...
... up the ON/STANDBY indicator again with the ?/1 key. 3 Unplug the AC power cord from the wall outlet after the ?/1 key is retracted into the projector. Turning Off the Power 1 Press the ?/1 key. Note The message disappears if you press any key other than the ?/1 key, or if you want to...
Operating Instructions
Page 19
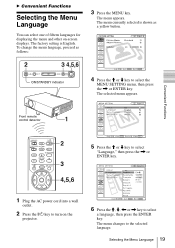
B Convenient Functions Selecting the Menu Language You can select one of fifteen languages for displaying the menu and other on the projector. 6 Press the M, m, < or , key to select the MENU SETTING menu, then press the , or ENTER key. The menu currently selected is English. The menu changes ...
B Convenient Functions Selecting the Menu Language You can select one of fifteen languages for displaying the menu and other on the projector. 6 Press the M, m, < or , key to select the MENU SETTING menu, then press the , or ENTER key. The menu currently selected is English. The menu changes ...
Operating Instructions
Page 20
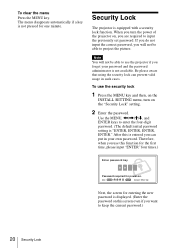
... input the previously set password. If you do not input the correct password, you will not be able to project the picture. To use the projector if you forget your password and the password administrator is not pressed for one minute. Use the MENU, Be please aware that using the security.... When you are required to use the security lock 1 Press the MENU key and then, on the INSTALL SETTING menu, turn the power of the projector on, you turn on the "Security Lock" setting. 2 Enter the password. To clear the menu Press the MENU key. Security Lock The...
... input the previously set password. If you do not input the correct password, you will not be able to project the picture. To use the projector if you forget your password and the password administrator is not pressed for one minute. Use the MENU, Be please aware that using the security.... When you are required to use the security lock 1 Press the MENU key and then, on the INSTALL SETTING menu, turn the power of the projector on, you turn on the "Security Lock" setting. 2 Enter the password. To clear the menu Press the MENU key. Security Lock The...

Operating Instructions
Page 21
...Security Lock 21 Power-on the menu screen, perform this case, press the ?/1 key to enter the correct password after three tries, the projector cannot be performed without the password. The security lock is displayed, enter the password that was set. Security certification When the password screen is ...time. Note If you call the customer service center because you have forgotten the password, you will need to be able to verify the projector's serial number and your identity. (This process may differ in other countries/regions.) Once your identity has been confirmed, we will provide you...
...Security Lock 21 Power-on the menu screen, perform this case, press the ?/1 key to enter the correct password after three tries, the projector cannot be performed without the password. The security lock is displayed, enter the password that was set. Security certification When the password screen is ...time. Note If you call the customer service center because you have forgotten the password, you will need to be able to verify the projector's serial number and your identity. (This process may differ in other countries/regions.) Once your identity has been confirmed, we will provide you...


