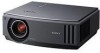

Operating Instructions
Page 3
... trademarks or registered trademarks of HDMI Licensing LLC. 3 Disposal of these materials may be regulated due to those of a fluorescent lamp, so you should be disposed of properly. Consult your local authorities or the Electronic Industries Alliance (www.eiae.org). are trademarks of...recycling information, please contact your local authorities regarding safe disposal. The material contained in this product contains mercury. Trademark Information "BRAVIA" and Sony Corporation. Disposal of Used Lamp This projector's lamp contains mercury and should dispose of it in the same way.
... trademarks or registered trademarks of HDMI Licensing LLC. 3 Disposal of these materials may be regulated due to those of a fluorescent lamp, so you should be disposed of properly. Consult your local authorities or the Electronic Industries Alliance (www.eiae.org). are trademarks of...recycling information, please contact your local authorities regarding safe disposal. The material contained in this product contains mercury. Trademark Information "BRAVIA" and Sony Corporation. Disposal of Used Lamp This projector's lamp contains mercury and should dispose of it in the same way.
Operating Instructions
Page 6
Others Troubleshooting 51 Warning Indicators 53 Message Lists 54 Replacing the Lamp and the Air Filter and cleaning the Ventilation holes (intake 55 Replacing the Air Filter 58 Fitting the lens cap 58 Specifications 59 Preset Signals 61 Input Signals and Adjustable/ Setting Items 64 Ceiling Installation 66 When Using the PSS-H10 Projector Suspension Support ......... 66 When Using the PSS-610 Projector Suspension Support ......... 70 Index 73 6
Others Troubleshooting 51 Warning Indicators 53 Message Lists 54 Replacing the Lamp and the Air Filter and cleaning the Ventilation holes (intake 55 Replacing the Air Filter 58 Fitting the lens cap 58 Specifications 59 Preset Signals 61 Input Signals and Adjustable/ Setting Items 64 Ceiling Installation 66 When Using the PSS-H10 Projector Suspension Support ......... 66 When Using the PSS-610 Projector Suspension Support ......... 70 Index 73 6
Operating Instructions
Page 7
... the cooling fan is still running. Checking the model name of the projector Check the model name of the projector (Example: VPL-AW15). The model name is equipped with ventilation holes (intake) and ventilation holes (exhaust). Caution The projector is located at the factory. On repacking Save the original shipping carton... is identical with the voltage of your local power supply. • Should any liquid or solid object fall into the lens while the lamp is hot. The air coming out is on. • Do not place your hand or objects near the ventilation holes. Never pull ...
... the cooling fan is still running. Checking the model name of the projector Check the model name of the projector (Example: VPL-AW15). The model name is equipped with ventilation holes (intake) and ventilation holes (exhaust). Caution The projector is located at the factory. On repacking Save the original shipping carton... is identical with the voltage of your local power supply. • Should any liquid or solid object fall into the lens while the lamp is hot. The air coming out is on. • Do not place your hand or objects near the ventilation holes. Never pull ...
Operating Instructions
Page 8
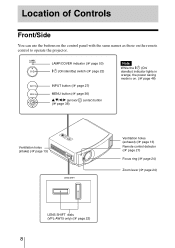
... (intake) (1 page 13) Ventilation holes (exhaust) (1 page 13) Remote control detector (1 page 21) Focus ring (1 page 24) Zoom lever (1 page 24) LENS SHIFT dials (VPL-AW15 only) (1 page 22) 8 LAMP/COVER indicator (1 page 53) ?/1 (On/standby) switch (1 page 22) INPUT button (1 page 27) MENU button (1 page 36) v/V/b/B (arrow)/ (enter) button (1 page 36) Note...
... (intake) (1 page 13) Ventilation holes (exhaust) (1 page 13) Remote control detector (1 page 21) Focus ring (1 page 24) Zoom lever (1 page 24) LENS SHIFT dials (VPL-AW15 only) (1 page 22) 8 LAMP/COVER indicator (1 page 53) ?/1 (On/standby) switch (1 page 22) INPUT button (1 page 27) MENU button (1 page 36) v/V/b/B (arrow)/ (enter) button (1 page 36) Note...
Operating Instructions
Page 9
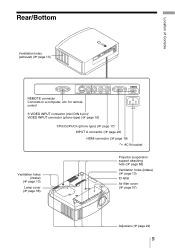
AC IN socket Ventilation holes (intake) (1 page 13) Lamp cover (1 page 56) Projector suspension support attaching hole (1 page 66) Ventilation holes (intake) (1 page 13) ID label Air filter cover (1 page 57) Adjusters (1 page 24) 9 Location of Controls Rear/Bottom Ventilation holes (exhaust) (1 page 13) REMOTE connector Connects to a computer, etc. for remote control S VIDEO INPUT connector (mini DIN 4-pin)/ VIDEO INPUT connector (phono type) (1 page 19) Y/PB/CB/PR/CR (phono type) (1 page 17) INPUT A connector (1 page 20) HDMI connector (1 page 18) -
AC IN socket Ventilation holes (intake) (1 page 13) Lamp cover (1 page 56) Projector suspension support attaching hole (1 page 66) Ventilation holes (intake) (1 page 13) ID label Air filter cover (1 page 57) Adjusters (1 page 24) 9 Location of Controls Rear/Bottom Ventilation holes (exhaust) (1 page 13) REMOTE connector Connects to a computer, etc. for remote control S VIDEO INPUT connector (mini DIN 4-pin)/ VIDEO INPUT connector (phono type) (1 page 19) Y/PB/CB/PR/CR (phono type) (1 page 17) INPUT A connector (1 page 20) HDMI connector (1 page 18) -
Operating Instructions
Page 13
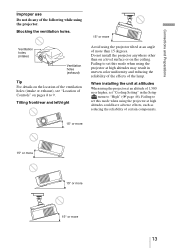
...projector at an altitude of the following while using the projector.... Connections and Preparations Improper use Do not do any of 1,500 m or higher, set "Cooling Setting" in uneven color uniformity and reducing the reliability of the effects of Controls" on pages 8 to 9. Do not install the projector... anywhere other than 15 degrees. When installing the unit at altitudes When using the projector... at high altitudes may result in the Setup menu to set this mode when using the projector...; or more Avoid using the projector at an angle of certain components...
...projector at an altitude of the following while using the projector.... Connections and Preparations Improper use Do not do any of 1,500 m or higher, set "Cooling Setting" in uneven color uniformity and reducing the reliability of the effects of Controls" on pages 8 to 9. Do not install the projector... anywhere other than 15 degrees. When installing the unit at altitudes When using the projector... at high altitudes may result in the Setup menu to set this mode when using the projector...; or more Avoid using the projector at an angle of certain components...

Operating Instructions
Page 39
When changing the adjustment level To increase the value, press M/,. To decrease the value, press m/ Using the Menus 4 Make the setting or adjustment of an item.
When changing the adjustment level To increase the value, press M/,. To decrease the value, press m/ Using the Menus 4 Make the setting or adjustment of an item.
Operating Instructions
Page 41
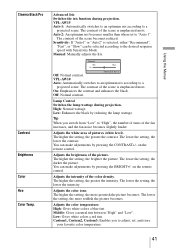
...You can make adjustments by reducing the lamp wattage. The lower the setting, the darker the picture. Adjusts the color tone. Adjusts the color temperature. Cinema Black Pro Advanced Iris Switches the iris function during projection. VPL-AW15 Auto 1: .Automatically switches to an optimum...The contrast of the fan increases, and the fan noise becomes slightly louder. VPL-AW10 Auto: Automatically switches to an optimum iris according to a projected scene. Lamp Control Switches the lamp wattage during projection. The higher the setting, the brighter the picture. Adjusts...
...You can make adjustments by reducing the lamp wattage. The lower the setting, the darker the picture. Adjusts the color tone. Adjusts the color temperature. Cinema Black Pro Advanced Iris Switches the iris function during projection. VPL-AW15 Auto 1: .Automatically switches to an optimum...The contrast of the fan increases, and the fan noise becomes slightly louder. VPL-AW10 Auto: Automatically switches to an optimum iris according to a projected scene. Lamp Control Switches the lamp wattage during projection. The higher the setting, the brighter the picture. Adjusts...
Operating Instructions
Page 47
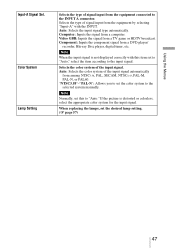
... automatically. Selects the color system of signal input from among NTSC3.58, PAL, SECAM, NTSC4.43, PAL-M, PAL-N, or PAL60. When replacing the lamps, set the color system to the selected system manually. Computer: Inputs the signal from a DVD player/ recorder, Blu-ray Disc player, digital tuner... "Auto," select the item according to the INPUT A connector. If the picture is not displayed correctly with the INPUT. Color System Lamp Setting Selects the type of the input signal. Selects the type of the input signal automatically from the equipment connected to the input signal...
... automatically. Selects the color system of signal input from among NTSC3.58, PAL, SECAM, NTSC4.43, PAL-M, PAL-N, or PAL60. When replacing the lamps, set the color system to the selected system manually. Computer: Inputs the signal from a DVD player/ recorder, Blu-ray Disc player, digital tuner... "Auto," select the item according to the INPUT A connector. If the picture is not displayed correctly with the INPUT. Color System Lamp Setting Selects the type of the input signal. Selects the type of the input signal automatically from the equipment connected to the input signal...
Operating Instructions
Page 50
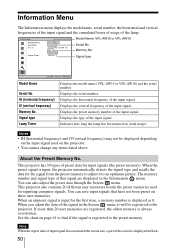
...serial number, the horizontal and vertical frequencies of the input signal and the cumulated hours of usage of the input signal. Model Name: VPL-AW15 or VPL-AW10 Serial No. fH (horizontal frequency) fV (vertical frequency) Memory No. When an unpreset signal is displayed in the Information menu... Lamp Timer Displays the model name (VPL-AW15 or VPL-AW10) and the serial number. Displays the preset memory number of the signal in the Screen menu, it to the preset memory. You can save input signals that signal are registered, the oldest memory is input, the projector automatically...
...serial number, the horizontal and vertical frequencies of the input signal and the cumulated hours of usage of the input signal. Model Name: VPL-AW15 or VPL-AW10 Serial No. fH (horizontal frequency) fV (vertical frequency) Memory No. When an unpreset signal is displayed in the Information menu... Lamp Timer Displays the model name (VPL-AW15 or VPL-AW10) and the serial number. Displays the preset memory number of the signal in the Screen menu, it to the preset memory. You can save input signals that signal are registered, the oldest memory is input, the projector automatically...
Operating Instructions
Page 51
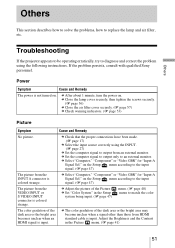
... to the input signal. (1 page 47) The picture from an external monitor. Troubleshooting If the projector appears to be operating erratically, try to diagnose and correct the problem using the INPUT. (1 page...of the dark area or the bright area becomes unclear when an HDMI signal is colored strange. c Close the lamp cover securely, then tighten the screws securely. (1 page 56) c Close the air filter cover securely. (1 page...for "Input-A Signal Sel." If the problem persists, consult with qualified Sony personnel. Power Symptom Cause and Remedy The power is not turned on .
... to the input signal. (1 page 47) The picture from an external monitor. Troubleshooting If the projector appears to be operating erratically, try to diagnose and correct the problem using the INPUT. (1 page...of the dark area or the bright area becomes unclear when an HDMI signal is colored strange. c Close the lamp cover securely, then tighten the screws securely. (1 page 56) c Close the air filter cover securely. (1 page...for "Input-A Signal Sel." If the problem persists, consult with qualified Sony personnel. Power Symptom Cause and Remedy The power is not turned on .
Operating Instructions
Page 52
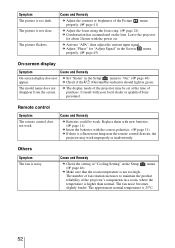
... room temperature is not too high. The fan noise becomes slightly louder. c Activate "APA", then adjust the current input signal. Leave the projector for "Adjust Signal" in the Screen menu properly. (1 page 45) On-screen display Symptom Cause and Remedy On-screen display does not c...c The display mode of "Cooling Setting" in a room, where the temperature is a fluorescent lamp near the remote control detector, the projector may be weak. Consult with your local dealer or qualified Sony personnel. Symptom The picture is not clear. Cause and Remedy c Batteries could be set at ...
... room temperature is not too high. The fan noise becomes slightly louder. c Activate "APA", then adjust the current input signal. Leave the projector for "Adjust Signal" in the Screen menu properly. (1 page 45) On-screen display Symptom Cause and Remedy On-screen display does not c...c The display mode of "Cooling Setting" in a room, where the temperature is a fluorescent lamp near the remote control detector, the projector may be weak. Consult with your local dealer or qualified Sony personnel. Symptom The picture is not clear. Cause and Remedy c Batteries could be set at ...
Operating Instructions
Page 53
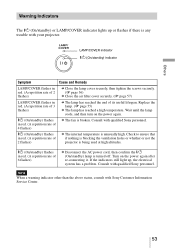
... When a warning indicator other than the above status, consult with qualified Sony personnel. ?/1 (On/standby) flashes in red. (A repetition rate of its useful lifespan. Consult with your projector. Replace the lamp. (1 page 55) c The lamp has reached a high temperature. Wait until the lamp cools, and then turn on the power again after re-connecting it...
... When a warning indicator other than the above status, consult with qualified Sony personnel. ?/1 (On/standby) flashes in red. (A repetition rate of its useful lifespan. Consult with your projector. Replace the lamp. (1 page 55) c The lamp has reached a high temperature. Wait until the lamp cools, and then turn on the power again after re-connecting it...
Operating Instructions
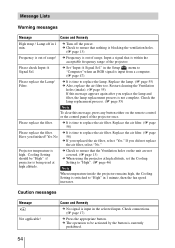
Page 54
...Caution messages Message x Not applicable! c The operation to "Computer" when an RGB signal is out of the projector once. c Set "Input-A Signal Sel." in 1 minute, then the fan speed increases. Replace the lamp. (1 page 55) c Also, replace the air filter too. Replace the air filter. (1 page 58) ... page 55) If this message, press any button either on the unit are not covered. (1 page 13) c When using the projector at high altitude. Check the lamp replacement process. (1 page 55) Note To clear this message appears again after you finished? c It is high. Have you replace the...
...Caution messages Message x Not applicable! c The operation to "Computer" when an RGB signal is out of the projector once. c Set "Input-A Signal Sel." in 1 minute, then the fan speed increases. Replace the lamp. (1 page 55) c Also, replace the air filter too. Replace the air filter. (1 page 58) ... page 55) If this message, press any button either on the unit are not covered. (1 page 13) c When using the projector at high altitude. Check the lamp replacement process. (1 page 55) Note To clear this message appears again after you finished? c It is high. Have you replace the...
Operating Instructions
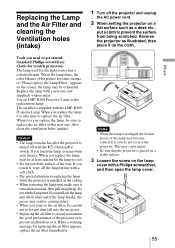
Page 55
... wipe off the fingerprints with the LMP-H160 Projector Lamp. If you do not reverse the projector. If you pull out the lamp unit while tilted and if the lamp breaks, the pieces may scatter, causing injury. • When you replace the lamp, wait for at least an hour for replacing... attention to replace the air filter. Caution • The lamp remains hot after the projector is crucial to maintain the good performance of the lamp may burn your fingers. Replace the lamp with the ?/1 (On/standby) switch. Use an LMP-H160 Projector Lamp as a desk etc., put a cloth to it remains ...
... wipe off the fingerprints with the LMP-H160 Projector Lamp. If you do not reverse the projector. If you pull out the lamp unit while tilted and if the lamp breaks, the pieces may scatter, causing injury. • When you replace the lamp, wait for at least an hour for replacing... attention to replace the air filter. Caution • The lamp remains hot after the projector is crucial to maintain the good performance of the lamp may burn your fingers. Replace the lamp with the ?/1 (On/standby) switch. Use an LMP-H160 Projector Lamp as a desk etc., put a cloth to it remains ...
Operating Instructions
Page 56
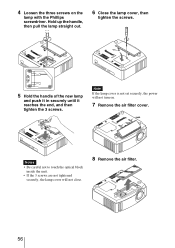
4 Loosen the three screws on . 7 Remove the air filter cover. Note If the lamp cover is not set securely, the power will not close. 8 Remove the air filter. 56 Notes • Be careful not to touch the optical block inside the unit. • If the 3 screws are not tightened securely, the lamp cover will not turn on the lamp with the Phillips screwdriver. Hold up the handle, then pull the lamp straight out. 6 Close the lamp cover, then tighten the screws. 5 Hold the handle of the new lamp and push it in securely until it reaches the end, and then tighten the 3 screws.
4 Loosen the three screws on . 7 Remove the air filter cover. Note If the lamp cover is not set securely, the power will not close. 8 Remove the air filter. 56 Notes • Be careful not to touch the optical block inside the unit. • If the 3 screws are not tightened securely, the lamp cover will not turn on the lamp with the Phillips screwdriver. Hold up the handle, then pull the lamp straight out. 6 Close the lamp cover, then tighten the screws. 5 Hold the handle of the new lamp and push it in securely until it reaches the end, and then tighten the 3 screws.
Operating Instructions
Page 57
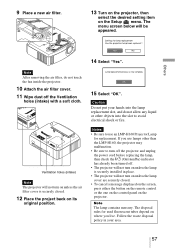
... not turn on unless the air filter cover is securely installed in your hands into the slot to turn off the projector and unplug the power cord before replacing the lamp, then check the ?/1 (On/standby) indicator has already been turned off the Ventilation holes (intake) with a soft ...cloth. Follow the waste disposal policy in place. • The projector will not turn on unless the lamp is securely closed . • To cancel a message displayed on the screen, press either the button on the remote control or the...
... not turn on unless the air filter cover is securely installed in your hands into the slot to turn off the projector and unplug the power cord before replacing the lamp, then check the ?/1 (On/standby) indicator has already been turned off the Ventilation holes (intake) with a soft ...cloth. Follow the waste disposal policy in place. • The projector will not turn on unless the lamp is securely closed . • To cancel a message displayed on the screen, press either the button on the remote control or the...
Operating Instructions
Page 58
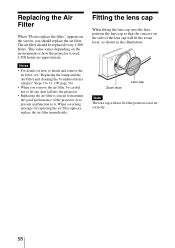
... fit the zoom lever, as shown in the illustration. This value varies depending on how to attach and remove the air filter, see "Replacing the Lamp and the Air Filter and cleaning the Ventilation holes (intake)" Steps 7 to 11. (1 page 56) • When you should be careful not to let any... dust fall into the projector. • Replacing the air filter is crucial to maintain the good performance of the lens cap will not fit if the position is used. 1,500...
... fit the zoom lever, as shown in the illustration. This value varies depending on how to attach and remove the air filter, see "Replacing the Lamp and the Air Filter and cleaning the Ventilation holes (intake)" Steps 7 to 11. (1 page 56) • When you should be careful not to let any... dust fall into the projector. • Replacing the air filter is crucial to maintain the good performance of the lens cap will not fit if the position is used. 1,500...
Operating Instructions
Page 59
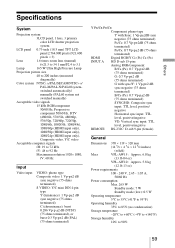
...LCD shutter projection system LCD panel 0.73-inch (18.5 mm) TFT LCD panel 2,764,800 pixels (921,600 pixels × 3) Lens 1.6 times zoom lens (manual) f=21.3 to 34.1 mm/F2.4 to 3.1 Lamp 165 W Ultra High Pressure Lamp...75 ohms terminated) B/CB (PB): 0.7 Vp-p±2 dB (75 ohms terminated) SYNC/HD: Composite sync input: TTL level, positive/ negative Horizontal sync input: TTL level, positive/...; 320 mm (14 5/8 × 4 3/4 × 12 5/8 inches) (w/h/d) Mass VPL-AW15 : Approx. 6.0 kg (13 lb 04 oz) VPL-AW10 : Approx. 5.8 kg (12 lb 13 oz) Power requirements 100 - 240 V, ...
...LCD shutter projection system LCD panel 0.73-inch (18.5 mm) TFT LCD panel 2,764,800 pixels (921,600 pixels × 3) Lens 1.6 times zoom lens (manual) f=21.3 to 34.1 mm/F2.4 to 3.1 Lamp 165 W Ultra High Pressure Lamp...75 ohms terminated) B/CB (PB): 0.7 Vp-p±2 dB (75 ohms terminated) SYNC/HD: Composite sync input: TTL level, positive/ negative Horizontal sync input: TTL level, positive/...; 320 mm (14 5/8 × 4 3/4 × 12 5/8 inches) (w/h/d) Mass VPL-AW15 : Approx. 6.0 kg (13 lb 04 oz) VPL-AW10 : Approx. 5.8 kg (12 lb 13 oz) Power requirements 100 - 240 V, ...
Operating Instructions
Page 60
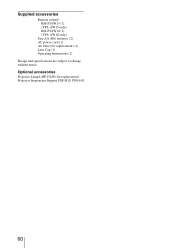
Optional accessories Projector Lamp LMP-H160 (for replacement) (1) Lens Cap (1) Operating Instructions (1) Design and specifications are subject to change without notice. Supplied accessories Remote control RM-PJAW15 (1) (VPL-AW15 only) RM-PJAW10 (1) (VPL-AW10 only) Size AA (R6) batteries (2) AC power cord (1) Air filter (for replacement) Projector Suspension Support PSS-H10, PSS-610 60
Optional accessories Projector Lamp LMP-H160 (for replacement) (1) Lens Cap (1) Operating Instructions (1) Design and specifications are subject to change without notice. Supplied accessories Remote control RM-PJAW15 (1) (VPL-AW15 only) RM-PJAW10 (1) (VPL-AW10 only) Size AA (R6) batteries (2) AC power cord (1) Air filter (for replacement) Projector Suspension Support PSS-H10, PSS-610 60


