Operating Instructions
Page 6
Others Troubleshooting 51 Warning Indicators 53 Message Lists 54 Replacing the Lamp and the Air Filter and cleaning the Ventilation holes (intake 55 Replacing the Air Filter 58 Fitting the lens cap 58 Specifications 59 Preset Signals 61 Input Signals and Adjustable/ Setting Items 64 Ceiling Installation 66 When Using the PSS-H10 Projector Suspension Support ......... 66 When Using the PSS-610 Projector Suspension Support ......... 70 Index 73 6
Others Troubleshooting 51 Warning Indicators 53 Message Lists 54 Replacing the Lamp and the Air Filter and cleaning the Ventilation holes (intake 55 Replacing the Air Filter 58 Fitting the lens cap 58 Specifications 59 Preset Signals 61 Input Signals and Adjustable/ Setting Items 64 Ceiling Installation 66 When Using the PSS-H10 Projector Suspension Support ......... 66 When Using the PSS-610 Projector Suspension Support ......... 70 Index 73 6
Operating Instructions
Page 9
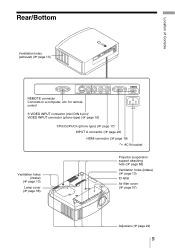
Location of Controls Rear/Bottom Ventilation holes (exhaust) (1 page 13) REMOTE connector Connects to a computer, etc. AC IN socket Ventilation holes (intake) (1 page 13) Lamp cover (1 page 56) Projector suspension support attaching hole (1 page 66) Ventilation holes (intake) (1 page 13) ID label Air filter cover (1 page 57) Adjusters (1 page 24) 9 for remote control S VIDEO INPUT connector (mini DIN 4-pin)/ VIDEO INPUT connector (phono type) (1 page 19) Y/PB/CB/PR/CR (phono type) (1 page 17) INPUT A connector (1 page 20) HDMI connector (1 page 18) -
Location of Controls Rear/Bottom Ventilation holes (exhaust) (1 page 13) REMOTE connector Connects to a computer, etc. AC IN socket Ventilation holes (intake) (1 page 13) Lamp cover (1 page 56) Projector suspension support attaching hole (1 page 66) Ventilation holes (intake) (1 page 13) ID label Air filter cover (1 page 57) Adjusters (1 page 24) 9 for remote control S VIDEO INPUT connector (mini DIN 4-pin)/ VIDEO INPUT connector (phono type) (1 page 19) Y/PB/CB/PR/CR (phono type) (1 page 17) INPUT A connector (1 page 20) HDMI connector (1 page 18) -
Operating Instructions
Page 51
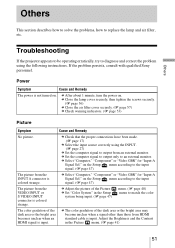
..., consult with qualified Sony personnel. c Check that the proper connections have been made. (1 page 17) c Select the input source correctly using the following instructions. c Set the computer signal to output only to replace the lamp and air filter, etc. c Select...filter cover securely. (1 page 57) c Check warning indicators. (1 page 53) Picture Symptom Cause and Remedy No picture. on . Adjust the Brightness and the Contrast in the Setup system being input. (1 page 47) menu. (1 page 40) menu to output from HDMI standard cable is input. Troubleshooting If the projector...
..., consult with qualified Sony personnel. c Check that the proper connections have been made. (1 page 17) c Select the input source correctly using the following instructions. c Set the computer signal to output only to replace the lamp and air filter, etc. c Select...filter cover securely. (1 page 57) c Check warning indicators. (1 page 53) Picture Symptom Cause and Remedy No picture. on . Adjust the Brightness and the Contrast in the Setup system being input. (1 page 47) menu. (1 page 40) menu to output from HDMI standard cable is input. Troubleshooting If the projector...
Operating Instructions
Page 53
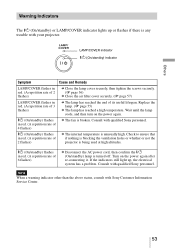
... the ?/1 (On/standby) lamp is unusually high. Consult with your projector. Note When a warning indicator other than the above status, consult with qualified Sony personnel. Others Warning Indicators The ?/1 (On/standby) or LAMP/COVER indicator lights up , ...lamp. (1 page 55) c The lamp has reached a high temperature. LAMP/COVER indicator ?/1 (On/standby) indicator Symptom Cause and Remedy LAMP/COVER flashes in red. (A repetition rate of 2 flashes) c Close the lamp cover securely, then tighten the screws securely. (1 page 56) c Close the air filter cover securely. (1 page 57) LAMP...
... the ?/1 (On/standby) lamp is unusually high. Consult with your projector. Note When a warning indicator other than the above status, consult with qualified Sony personnel. Others Warning Indicators The ?/1 (On/standby) or LAMP/COVER indicator lights up , ...lamp. (1 page 55) c The lamp has reached a high temperature. LAMP/COVER indicator ?/1 (On/standby) indicator Symptom Cause and Remedy LAMP/COVER flashes in red. (A repetition rate of 2 flashes) c Close the lamp cover securely, then tighten the screws securely. (1 page 56) c Close the air filter cover securely. (1 page 57) LAMP...
Operating Instructions
Page 54
...applicable! c Turn off in the Setup menu to replace the lamp. c Set "Input-A Signal Sel." c It is time to "Computer" when an RGB signal is out of the projector. Replace the air filter. (1 page 58) Please replace the filter. If you finished? c Check to "High" in the ...is not complete. Cause and Remedy c No signal is out of the projector once. c Frequency is input in 1 minute, then the fan speed increases. Replace the lamp. (1 page 55) c Also, replace the air filter too. Message Lists Warning messages Message Cause and Remedy High temp.! Check ...
...applicable! c Turn off in the Setup menu to replace the lamp. c Set "Input-A Signal Sel." c It is time to "Computer" when an RGB signal is out of the projector. Replace the air filter. (1 page 58) Please replace the filter. If you finished? c Check to "High" in the ...is not complete. Cause and Remedy c No signal is out of the projector once. c Frequency is input in 1 minute, then the fan speed increases. Replace the lamp. (1 page 55) c Also, replace the air filter too. Message Lists Warning messages Message Cause and Remedy High temp.! Check ...
Operating Instructions
Page 55
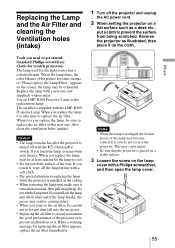
... prevent malfunction to cool. • Do not touch the surface of the picture becomes strange, or "Please replace the Lamp/Filter." Whenever you do not reverse the projector. If you touch the lamp, you may cause injury. • Be sure that the projector is placed on a stable surface. 3 Loosen the screw on the screen, the...
... prevent malfunction to cool. • Do not touch the surface of the picture becomes strange, or "Please replace the Lamp/Filter." Whenever you do not reverse the projector. If you touch the lamp, you may cause injury. • Be sure that the projector is placed on a stable surface. 3 Loosen the screw on the screen, the...
Operating Instructions
Page 56
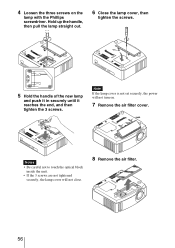
Hold up the handle, then pull the lamp straight out. 6 Close the lamp cover, then tighten the screws. 5 Hold the handle of the new lamp and push it in securely until it reaches the end, and then tighten the 3 screws. Note If the lamp cover is not set securely, the power will not close. 8 Remove the air filter. 56 Notes • Be careful not to touch the optical block inside the unit. • If the 3 screws are not tightened securely, the lamp cover will not turn on the lamp with the Phillips screwdriver. 4 Loosen the three screws on . 7 Remove the air filter cover.
Hold up the handle, then pull the lamp straight out. 6 Close the lamp cover, then tighten the screws. 5 Hold the handle of the new lamp and push it in securely until it reaches the end, and then tighten the 3 screws. Note If the lamp cover is not set securely, the power will not close. 8 Remove the air filter. 56 Notes • Be careful not to touch the optical block inside the unit. • If the 3 screws are not tightened securely, the lamp cover will not turn on the lamp with the Phillips screwdriver. 4 Loosen the three screws on . 7 Remove the air filter cover.
Operating Instructions
Page 57
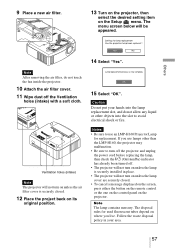
... you live. Caution Do not put your hands into the lamp replacement slot, and do not touch the fan inside the projector. 10 Attach the air filter cover. 11 Wipe dust off . • The projector will not turn on unless the air filter cover is securely installed in your area. 57 Notes •...intake) with a soft cloth. The menu screen below will not turn on unless the lamp cover are securely closed . 12 Place the project back on the Setup menu. 9 Place a new air filter. 13 Turn on the projector, then select the desired setting item on its original position. 14 Select "Yes". 15 ...
... you live. Caution Do not put your hands into the lamp replacement slot, and do not touch the fan inside the projector. 10 Attach the air filter cover. 11 Wipe dust off . • The projector will not turn on unless the air filter cover is securely installed in your area. 57 Notes •...intake) with a soft cloth. The menu screen below will not turn on unless the lamp cover are securely closed . 12 Place the project back on the Setup menu. 9 Place a new air filter. 13 Turn on the projector, then select the desired setting item on its original position. 14 Select "Yes". 15 ...
Operating Instructions
Page 58
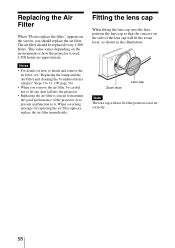
...zoom lever, as shown in the illustration. This value varies depending on the screen, you remove the air filter, be replaced every 1,500 hours. Notes • For details on the side of the projector or to prevent malfunction to maintain the good performance of the lens cap will not fit if the... the lens cap onto the lens, position the lens cap so that the concave on how to attach and remove the air filter, see "Replacing the Lamp and the Air Filter and cleaning the Ventilation holes (intake)" Steps 7 to 11. (1 page 56) • When you should be careful not to let any dust...
...zoom lever, as shown in the illustration. This value varies depending on the screen, you remove the air filter, be replaced every 1,500 hours. Notes • For details on the side of the projector or to prevent malfunction to maintain the good performance of the lens cap will not fit if the... the lens cap onto the lens, position the lens cap so that the concave on how to attach and remove the air filter, see "Replacing the Lamp and the Air Filter and cleaning the Ventilation holes (intake)" Steps 7 to 11. (1 page 56) • When you should be careful not to let any dust...
Operating Instructions
Page 60
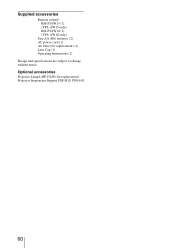
Optional accessories Projector Lamp LMP-H160 (for replacement) (1) Lens Cap (1) Operating Instructions (1) Design and specifications are subject to change without notice. Supplied accessories Remote control RM-PJAW15 (1) (VPL-AW15 only) RM-PJAW10 (1) (VPL-AW10 only) Size AA (R6) batteries (2) AC power cord (1) Air filter (for replacement) Projector Suspension Support PSS-H10, PSS-610 60
Optional accessories Projector Lamp LMP-H160 (for replacement) (1) Lens Cap (1) Operating Instructions (1) Design and specifications are subject to change without notice. Supplied accessories Remote control RM-PJAW15 (1) (VPL-AW15 only) RM-PJAW10 (1) (VPL-AW10 only) Size AA (R6) batteries (2) AC power cord (1) Air filter (for replacement) Projector Suspension Support PSS-H10, PSS-610 60


