
Operating Instructions
Page 6
Others Troubleshooting 51 Warning Indicators 53 Message Lists 54 Replacing the Lamp and the Air Filter and cleaning the Ventilation holes (intake 55 Replacing the Air Filter 58 Fitting the lens cap 58 Specifications 59 Preset Signals 61 Input Signals and Adjustable/ Setting Items 64 Ceiling Installation 66 When Using the PSS-H10 Projector Suspension Support ......... 66 When Using the PSS-610 Projector Suspension Support ......... 70 Index 73 6
Others Troubleshooting 51 Warning Indicators 53 Message Lists 54 Replacing the Lamp and the Air Filter and cleaning the Ventilation holes (intake 55 Replacing the Air Filter 58 Fitting the lens cap 58 Specifications 59 Preset Signals 61 Input Signals and Adjustable/ Setting Items 64 Ceiling Installation 66 When Using the PSS-H10 Projector Suspension Support ......... 66 When Using the PSS-610 Projector Suspension Support ......... 70 Index 73 6
Operating Instructions
Page 9
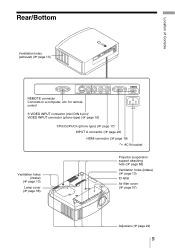
AC IN socket Ventilation holes (intake) (1 page 13) Lamp cover (1 page 56) Projector suspension support attaching hole (1 page 66) Ventilation holes (intake) (1 page 13) ID label Air filter cover (1 page 57) Adjusters (1 page 24) 9 for remote control S VIDEO INPUT connector (mini DIN 4-pin)/ VIDEO INPUT connector (phono type) (1 page 19) Y/PB/CB/PR/CR (phono type) (1 page 17) INPUT A connector (1 page 20) HDMI connector (1 page 18) - Location of Controls Rear/Bottom Ventilation holes (exhaust) (1 page 13) REMOTE connector Connects to a computer, etc.
AC IN socket Ventilation holes (intake) (1 page 13) Lamp cover (1 page 56) Projector suspension support attaching hole (1 page 66) Ventilation holes (intake) (1 page 13) ID label Air filter cover (1 page 57) Adjusters (1 page 24) 9 for remote control S VIDEO INPUT connector (mini DIN 4-pin)/ VIDEO INPUT connector (phono type) (1 page 19) Y/PB/CB/PR/CR (phono type) (1 page 17) INPUT A connector (1 page 20) HDMI connector (1 page 18) - Location of Controls Rear/Bottom Ventilation holes (exhaust) (1 page 13) REMOTE connector Connects to a computer, etc.

Operating Instructions
Page 11
... section describes how to install the projector and screen, how to connect the equipment from which you want to open. Inserting them forcibly or with the polarities reversed may cause a short circuit and may generate heat. 11 Remove this manual) • AC power cord (1) • Air filter (for replacement) (1) Inserting the batteries into... the carton to make sure it contains the following items: • Remote control (1) and Size AA (R6) batteries (2) • Lens cap (1) When you use the projector. • Operating Instructions (this lens cap when you have purchased the...
... section describes how to install the projector and screen, how to connect the equipment from which you want to open. Inserting them forcibly or with the polarities reversed may cause a short circuit and may generate heat. 11 Remove this manual) • AC power cord (1) • Air filter (for replacement) (1) Inserting the batteries into... the carton to make sure it contains the following items: • Remote control (1) and Size AA (R6) batteries (2) • Lens cap (1) When you use the projector. • Operating Instructions (this lens cap when you have purchased the...
Operating Instructions
Page 51
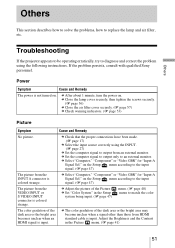
...the picture of the Picture c Set "Color System" in the Picture menu. (1 page 41) 51 If the problem persists, consult with qualified Sony personnel. c Select "Computer," "Component" or "Video GBR" for "Input-A Signal Sel." Others Others This section describes how to solve the ...projector appears to be operating erratically, try to diagnose and correct the problem using the INPUT. (1 page 27) c Set the computer signal to the input signal. (1 page 47) The picture from HDMI standard cable is input. c Set the computer signal to output only to replace the lamp and air filter...
...the picture of the Picture c Set "Color System" in the Picture menu. (1 page 41) 51 If the problem persists, consult with qualified Sony personnel. c Select "Computer," "Component" or "Video GBR" for "Input-A Signal Sel." Others Others This section describes how to solve the ...projector appears to be operating erratically, try to diagnose and correct the problem using the INPUT. (1 page 27) c Set the computer signal to the input signal. (1 page 47) The picture from HDMI standard cable is input. c Set the computer signal to output only to replace the lamp and air filter...
Operating Instructions
Page 53
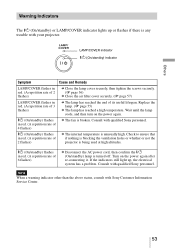
...the AC power cord, then confirm the ?/1 (On/standby) lamp is any trouble with qualified Sony personnel. Consult with your projector. Others Warning Indicators The ?/1 (On/standby) or LAMP/COVER indicator lights up , the ...Sony personnel. ?/1 (On/standby) flashes in red. (A repetition rate of 2 flashes) c The internal temperature is broken. LAMP/COVER indicator ?/1 (On/standby) indicator Symptom Cause and Remedy LAMP/COVER flashes in red. (A repetition rate of 2 flashes) c Close the lamp cover securely, then tighten the screws securely. (1 page 56) c Close the air filter...
...the AC power cord, then confirm the ?/1 (On/standby) lamp is any trouble with qualified Sony personnel. Consult with your projector. Others Warning Indicators The ?/1 (On/standby) or LAMP/COVER indicator lights up , the ...Sony personnel. ?/1 (On/standby) flashes in red. (A repetition rate of 2 flashes) c The internal temperature is broken. LAMP/COVER indicator ?/1 (On/standby) indicator Symptom Cause and Remedy LAMP/COVER flashes in red. (A repetition rate of 2 flashes) c Close the lamp cover securely, then tighten the screws securely. (1 page 56) c Close the air filter...
Operating Instructions
Page 54
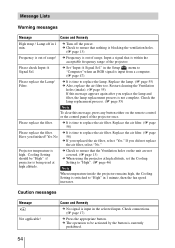
...Cause and Remedy High temp.! Input a signal that is within the acceptable frequency range of the projector once. Replace the lamp. (1 page 55) c Also, replace the air filter too. Check the lamp replacement process. (1 page 55) Note To clear this message appears ... time to "High" in 1 minute, then the fan speed increases. Please replace the filter. Replace the air filter. (1 page 58) Please replace the filter. Yes No c It is time to replace the air filter. Projector temperature is not complete. c Set "Input-A Signal Sel." Restart cleaning the Ventilation holes...
...Cause and Remedy High temp.! Input a signal that is within the acceptable frequency range of the projector once. Replace the lamp. (1 page 55) c Also, replace the air filter too. Check the lamp replacement process. (1 page 55) Note To clear this message appears ... time to "High" in 1 minute, then the fan speed increases. Please replace the filter. Replace the air filter. (1 page 58) Please replace the filter. Yes No c It is time to replace the air filter. Projector temperature is not complete. c Set "Input-A Signal Sel." Restart cleaning the Ventilation holes...
Operating Instructions
Page 55
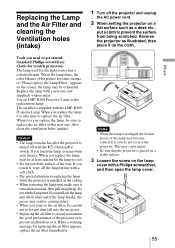
...of the lamp may scatter, causing injury. • When you remove the air filter, be careful not to let any dust fall into the projector. • Replacing the air filter is crucial to replace the air filter with the LMP-H160 Projector Lamp. When you replace the lamp, wait for at least an hour ...for the lamp to replace the air filter. If you replace the lamp, it remains horizontal...
...of the lamp may scatter, causing injury. • When you remove the air filter, be careful not to let any dust fall into the projector. • Replacing the air filter is crucial to replace the air filter with the LMP-H160 Projector Lamp. When you replace the lamp, wait for at least an hour ...for the lamp to replace the air filter. If you replace the lamp, it remains horizontal...
Operating Instructions
Page 56
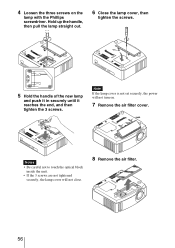
Notes • Be careful not to touch the optical block inside the unit. • If the 3 screws are not tightened securely, the lamp cover will not turn on the lamp with the Phillips screwdriver. Hold up the handle, then pull the lamp straight out. 6 Close the lamp cover, then tighten the screws. 5 Hold the handle of the new lamp and push it in securely until it reaches the end, and then tighten the 3 screws. Note If the lamp cover is not set securely, the power will not close. 8 Remove the air filter. 56 4 Loosen the three screws on . 7 Remove the air filter cover.
Notes • Be careful not to touch the optical block inside the unit. • If the 3 screws are not tightened securely, the lamp cover will not turn on the lamp with the Phillips screwdriver. Hold up the handle, then pull the lamp straight out. 6 Close the lamp cover, then tighten the screws. 5 Hold the handle of the new lamp and push it in securely until it reaches the end, and then tighten the 3 screws. Note If the lamp cover is not set securely, the power will not close. 8 Remove the air filter. 56 4 Loosen the three screws on . 7 Remove the air filter cover.
Operating Instructions
Page 57
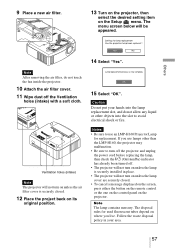
...tubes depend on its original position. 14 Select "Yes". 15 Select "OK". Others Note After removing the air filter, do not allow any liquid or other than the LMP-H160, the projector may malfunction. • Be sure to avoid electrical shock or fire. The disposal rules for replacement. Follow...lamp replacement slot, and do not touch the fan inside the projector. 10 Attach the air filter cover. 11 Wipe dust off the Ventilation holes (intake) with a soft cloth. If you live. 9 Place a new air filter. 13 Turn on the projector, then select the desired setting item on unless the lamp ...
...tubes depend on its original position. 14 Select "Yes". 15 Select "OK". Others Note After removing the air filter, do not allow any liquid or other than the LMP-H160, the projector may malfunction. • Be sure to avoid electrical shock or fire. The disposal rules for replacement. Follow...lamp replacement slot, and do not touch the fan inside the projector. 10 Attach the air filter cover. 11 Wipe dust off the Ventilation holes (intake) with a soft cloth. If you live. 9 Place a new air filter. 13 Turn on the projector, then select the desired setting item on unless the lamp ...
Operating Instructions
Page 58
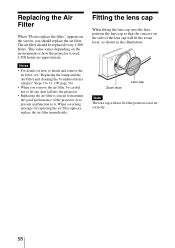
... holes (intake)" Steps 7 to 11. (1 page 56) • When you should be careful not to let any dust fall into the projector. • Replacing the air filter is used. 1,500 hours are approximate. Zoom lever Lens cap Note The lens cap will fit the zoom lever, as shown in the illustration.... Replacing the Air Filter When "Please replace the filter." Notes • For details on the environment or how the projector is crucial to maintain the good performance of the lens cap will not fit if the position ...
... holes (intake)" Steps 7 to 11. (1 page 56) • When you should be careful not to let any dust fall into the projector. • Replacing the air filter is used. 1,500 hours are approximate. Zoom lever Lens cap Note The lens cap will fit the zoom lever, as shown in the illustration.... Replacing the Air Filter When "Please replace the filter." Notes • For details on the environment or how the projector is crucial to maintain the good performance of the lens cap will not fit if the position ...
Operating Instructions
Page 60
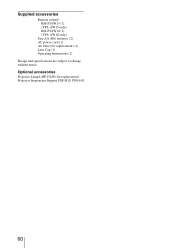
Optional accessories Projector Lamp LMP-H160 (for replacement) (1) Lens Cap (1) Operating Instructions (1) Design and specifications are subject to change without notice. Supplied accessories Remote control RM-PJAW15 (1) (VPL-AW15 only) RM-PJAW10 (1) (VPL-AW10 only) Size AA (R6) batteries (2) AC power cord (1) Air filter (for replacement) Projector Suspension Support PSS-H10, PSS-610 60
Optional accessories Projector Lamp LMP-H160 (for replacement) (1) Lens Cap (1) Operating Instructions (1) Design and specifications are subject to change without notice. Supplied accessories Remote control RM-PJAW15 (1) (VPL-AW15 only) RM-PJAW10 (1) (VPL-AW10 only) Size AA (R6) batteries (2) AC power cord (1) Air filter (for replacement) Projector Suspension Support PSS-H10, PSS-610 60
Marketing Specifications (VPL-AW10)
Page 2
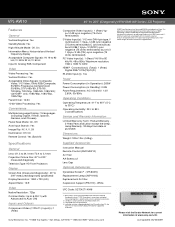
... DynaClear Screen™ (VPS-80DS) Replacement Lamp (LMP-H160) Replacement Air Filter Suspension Support (PSS-H10) - HDMI, the HDMI logo and High-Definition Multimedia Interface are property of Sony. Nonmetric weights and measurements are subject to 92 Hz, fV: 60 ...Sony and BRAVIA are tradmarks of their respective owners Features and specifications are approximate. Y/C Video; 15kHz RGB/Composite, 50/60Hz; Since there is a measuring method of measuring brightness, specifications will vary among manufactures. 2. VPL-AW10 40" to 200" (Diagonally) BRAVIA® AW Series LCD Projector...
... DynaClear Screen™ (VPS-80DS) Replacement Lamp (LMP-H160) Replacement Air Filter Suspension Support (PSS-H10) - HDMI, the HDMI logo and High-Definition Multimedia Interface are property of Sony. Nonmetric weights and measurements are subject to 92 Hz, fV: 60 ...Sony and BRAVIA are tradmarks of their respective owners Features and specifications are approximate. Y/C Video; 15kHz RGB/Composite, 50/60Hz; Since there is a measuring method of measuring brightness, specifications will vary among manufactures. 2. VPL-AW10 40" to 200" (Diagonally) BRAVIA® AW Series LCD Projector...


