

Operating Instructions
Page 1
3-198-141-11 (1) Video Projector Operating Instructions VPL-AW15 VPL-AW10 © 2007 Sony Corporation
3-198-141-11 (1) Video Projector Operating Instructions VPL-AW15 VPL-AW10 © 2007 Sony Corporation
Operating Instructions
Page 2
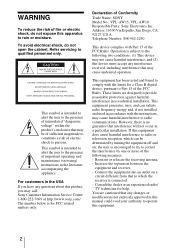
...If you have any changes or modifications not expressly approved in accordance with the instructions, may call: Sony Customer Information Service Center 1-800-222-7669 or http://www.sony.com/ The number below is subject to radio or television reception, which the receiver is connected....open the cabinet. This equipment has been tested and found to comply with Part 15 of Conformity Trade Name: SONY Model No.: VPL-AW15, VPL-AW10 Responsible Party: Sony Electronics Inc. To avoid electrical shock, do not expose this device must accept any interference received, including interference that...
...If you have any changes or modifications not expressly approved in accordance with the instructions, may call: Sony Customer Information Service Center 1-800-222-7669 or http://www.sony.com/ The number below is subject to radio or television reception, which the receiver is connected....open the cabinet. This equipment has been tested and found to comply with Part 15 of Conformity Trade Name: SONY Model No.: VPL-AW15, VPL-AW10 Responsible Party: Sony Electronics Inc. To avoid electrical shock, do not expose this device must accept any interference received, including interference that...
Operating Instructions
Page 5
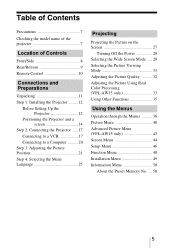
...Side 8 Rear/Bottom 9 Remote Control 10 Connections and Preparations Unpacking 11 Step 1: Installing the Projector .........12 Before Setting Up the Projector 12 Positioning the Projector and a screen 14 Step 2: Connecting the Projector .....17 Connecting to a VCR 17 Connecting to a Computer ..........20 Step 3: Adjusting the ...Picture Viewing Mode 31 Adjusting the Picture Quality .......... 32 Adjusting the Picture Using Real Color Processing (VPL-AW15 only 33 Using Other Functions 35 Using the Menus Operation through the Menus .......... 36 Picture Menu 40 Advanced Picture Menu...
...Side 8 Rear/Bottom 9 Remote Control 10 Connections and Preparations Unpacking 11 Step 1: Installing the Projector .........12 Before Setting Up the Projector 12 Positioning the Projector and a screen 14 Step 2: Connecting the Projector .....17 Connecting to a VCR 17 Connecting to a Computer ..........20 Step 3: Adjusting the ...Picture Viewing Mode 31 Adjusting the Picture Quality .......... 32 Adjusting the Picture Using Real Color Processing (VPL-AW15 only 33 Using Other Functions 35 Using the Menus Operation through the Menus .......... 36 Picture Menu 40 Advanced Picture Menu...
Operating Instructions
Page 7
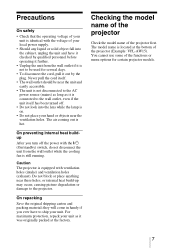
... as long as it checked by the plug. On repacking Save the original shipping carton and packing material; Checking the model name of the projector Check the model name of the functions or menu options for several days. • To disconnect the cord, pull it out by qualified ... • Do not look into the cabinet, unplug the unit and have to the projector. On preventing internal heat buildup After you ever have it was originally packed at the bottom of the projector (Example: VPL-AW15). For maximum protection, repack your unit as it is still running. The model name is...
... as long as it checked by the plug. On repacking Save the original shipping carton and packing material; Checking the model name of the projector Check the model name of the functions or menu options for several days. • To disconnect the cord, pull it out by qualified ... • Do not look into the cabinet, unplug the unit and have to the projector. On preventing internal heat buildup After you ever have it was originally packed at the bottom of the projector (Example: VPL-AW15). For maximum protection, repack your unit as it is still running. The model name is...
Operating Instructions
Page 8
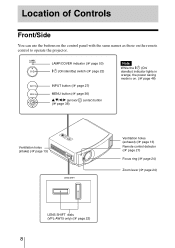
... the projector. Location of Controls Front/Side You can use the buttons on the control panel with the same names as those on . (1 page 46) Ventilation holes (intake) (1 page 13) Ventilation holes (exhaust) (1 page 13) Remote control detector (1 page 21) Focus ring (1 page 24) Zoom lever (1 page 24) LENS SHIFT dials (VPL-AW15...
... the projector. Location of Controls Front/Side You can use the buttons on the control panel with the same names as those on . (1 page 46) Ventilation holes (intake) (1 page 13) Ventilation holes (exhaust) (1 page 13) Remote control detector (1 page 21) Focus ring (1 page 24) Zoom lever (1 page 24) LENS SHIFT dials (VPL-AW15...
Operating Instructions
Page 10
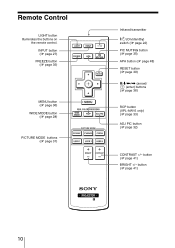
INPUT button (1 page 27) FREEZE button (1 page 35) MENU button (1 page 36) WIDE MODE button (1 page 28) PICTURE MODE buttons (1 page 31) Infrared transmitter ?/1 (On/standby) switch (1 page 22) PIC MUTING button (1 page 35) APA button (1 page 48) RESET button (1 page 39) M/m/ Remote Control LIGHT button Illuminates the buttons on the remote control.
INPUT button (1 page 27) FREEZE button (1 page 35) MENU button (1 page 36) WIDE MODE button (1 page 28) PICTURE MODE buttons (1 page 31) Infrared transmitter ?/1 (On/standby) switch (1 page 22) PIC MUTING button (1 page 35) APA button (1 page 48) RESET button (1 page 39) M/m/ Remote Control LIGHT button Illuminates the buttons on the remote control.
Operating Instructions
Page 14
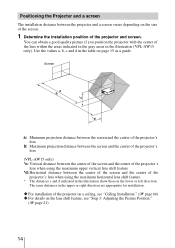
...of the screen and the center of the projector and screen. Screen a: Minimum projection distance between the screen and the center of the projector's lens b: Maximum projection distance between the screen and the center of the projector's lens (VPL-AW15 only) *c: Vertical distance between the center... of the screen and the center of the projector's lens when using the maximum upper vertical lens...
...of the screen and the center of the projector and screen. Screen a: Minimum projection distance between the screen and the center of the projector's lens b: Maximum projection distance between the screen and the center of the projector's lens (VPL-AW15 only) *c: Vertical distance between the center... of the screen and the center of the projector's lens when using the maximum upper vertical lens...

Operating Instructions
Page 15
...) × SS - 44.886 (1 13/16) b (maximum) = 48.239 (1 1/16) × SS - 44.869 (1 13/16) c = 8.0899 (11/32) × SS d = 5.5245 (7/32) × SS *VPL-AW15 only When using the 4:3 aspect ratio screen (projecting a 4:3 picture) Unit: mm (inches) Screen 40 60 70 80 100 120 140 160 180 200 size (inches....609 (1 1/2) × SS - 44.886 (1 13/16) b (maximum) = 59.045 (2 3/8) × SS - 44.869 (1 13/16) c = 9.902 (13/32) × SS d = 6.762 (9/32) × SS *VPL-AW15 only 15
...) × SS - 44.886 (1 13/16) b (maximum) = 48.239 (1 1/16) × SS - 44.869 (1 13/16) c = 8.0899 (11/32) × SS d = 5.5245 (7/32) × SS *VPL-AW15 only When using the 4:3 aspect ratio screen (projecting a 4:3 picture) Unit: mm (inches) Screen 40 60 70 80 100 120 140 160 180 200 size (inches....609 (1 1/2) × SS - 44.886 (1 13/16) b (maximum) = 59.045 (2 3/8) × SS - 44.869 (1 13/16) c = 9.902 (13/32) × SS d = 6.762 (9/32) × SS *VPL-AW15 only 15
Operating Instructions
Page 21
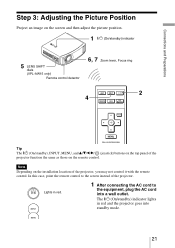
... the picture position. 1 ?/1 (On/standby) indicator 5 LENS SHIFT dials (VPL-AW15 only) Remote control detector 6, 7 Zoom lever, Focus ring 2 4 Tip The ?/1 (On/standby), INPUT, MENU, and v/V/b/B/ (joystick) buttons on the top panel of the projector. The ?/1 (On/standby) indicator lights in red. 1 After connecting the ...AC cord to the screen instead of the projector function the same as those on the installation location of the projector, you may not control it with the remote control. In this case, point the remote control to...
... the picture position. 1 ?/1 (On/standby) indicator 5 LENS SHIFT dials (VPL-AW15 only) Remote control detector 6, 7 Zoom lever, Focus ring 2 4 Tip The ?/1 (On/standby), INPUT, MENU, and v/V/b/B/ (joystick) buttons on the top panel of the projector. The ?/1 (On/standby) indicator lights in red. 1 After connecting the ...AC cord to the screen instead of the projector function the same as those on the installation location of the projector, you may not control it with the remote control. In this case, point the remote control to...
Operating Instructions
Page 22
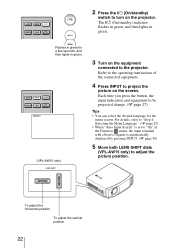
Refer to the operating instructions of the connected equipment. 4 Press INPUT to project the picture on the projector. For details, refer to "Step 4: Selecting the Menu Language". (1 page 25) • When "Auto Input Search" is set to "On" in green. Each...with effective signals is automatically displayed by pressing INPUT. (1 page 48) 5 Move both LENS SHIFT dials (VPL-AW15 only) to adjust the picture position. Flashes in green. (VPL-AW15 only) 3 Turn on the equipment connected to the projector. 2 Press the ?/1 (On/standby) switch to turn on the screen. To adjust the horizontal position ...
Refer to the operating instructions of the connected equipment. 4 Press INPUT to project the picture on the projector. For details, refer to "Step 4: Selecting the Menu Language". (1 page 25) • When "Auto Input Search" is set to "On" in green. Each...with effective signals is automatically displayed by pressing INPUT. (1 page 48) 5 Move both LENS SHIFT dials (VPL-AW15 only) to adjust the picture position. Flashes in green. (VPL-AW15 only) 3 Turn on the equipment connected to the projector. 2 Press the ?/1 (On/standby) switch to turn on the screen. To adjust the horizontal position ...
Operating Instructions
Page 28
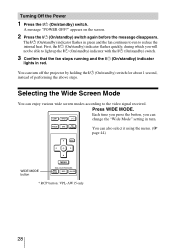
... ?/1 (On/standby) indicator lights in turn off the projector by holding the ?/1 (On/standby) switch for about 1 second, instead of performing the above steps. Selecting the Wide Screen Mode You can also select it using the menu. (1 page 44) WIDE MODE button * RCP button: VPL-AW15 only 28 A message "POWER OFF?" Turning Off...
... ?/1 (On/standby) indicator lights in turn off the projector by holding the ?/1 (On/standby) switch for about 1 second, instead of performing the above steps. Selecting the Wide Screen Mode You can also select it using the menu. (1 page 44) WIDE MODE button * RCP button: VPL-AW15 only 28 A message "POWER OFF?" Turning Off...
Operating Instructions
Page 31
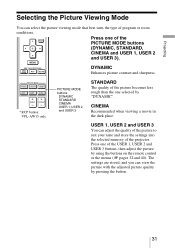
...the button. 31 Press one of program or room conditions. STANDARD The quality of the picture becomes less rough than the one of the projector. The settings are stored, and you can adjust the quality of the picture to suit your taste and store the settings into the ...picture viewing mode that best suits the type of the PICTURE MODE buttons (DYNAMIC, STANDARD, CINEMA and USER 1, USER 2 and USER 3). * RCP button: VPL-AW15 only PICTURE MODE buttons DYNAMIC STANDARD CINEMA USER 1, USER 2 and USER 3 DYNAMIC Enhances picture contrast and sharpness. Press one selected by using the buttons on...
...the button. 31 Press one of program or room conditions. STANDARD The quality of the picture becomes less rough than the one of the projector. The settings are stored, and you can adjust the quality of the picture to suit your taste and store the settings into the ...picture viewing mode that best suits the type of the PICTURE MODE buttons (DYNAMIC, STANDARD, CINEMA and USER 1, USER 2 and USER 3). * RCP button: VPL-AW15 only PICTURE MODE buttons DYNAMIC STANDARD CINEMA USER 1, USER 2 and USER 3 DYNAMIC Enhances picture contrast and sharpness. Press one selected by using the buttons on...

Operating Instructions
Page 32
... by selecting the adjustment items with the remote control. For details, see "Input Signals and Adjustable/Setting Items." (1 page 64) ADJ PIC button * RCP button: VPL-AW15 only Example: To adjust the contrast For details on each picture mode. 1 Press ADJ PIC. Adjusting the Picture Quality You can be stored in sequence...
... by selecting the adjustment items with the remote control. For details, see "Input Signals and Adjustable/Setting Items." (1 page 64) ADJ PIC button * RCP button: VPL-AW15 only Example: To adjust the contrast For details on each picture mode. 1 Press ADJ PIC. Adjusting the Picture Quality You can be stored in sequence...

Operating Instructions
Page 33
... color you want to your taste. Repeat steps 1 and 2 described below to select "Color Select," then press Projecting Adjusting the Picture Using Real Color Processing (VPL-AW15 only) The Real Color Processing (RCP) feature allows you to adjust the color and hue of each target of the video source when you are...
... color you want to your taste. Repeat steps 1 and 2 described below to select "Color Select," then press Projecting Adjusting the Picture Using Real Color Processing (VPL-AW15 only) The Real Color Processing (RCP) feature allows you to adjust the color and hue of each target of the video source when you are...

Operating Instructions
Page 38
Setting menu Adjustment menu Next menu window Setting items (Menu window of VPL-AW15) 38 Pop-up menu Setting items 3 Press M/m to select an item you want to set appear in the pop-up menu, setting menu, adjustment menu, or in the next menu window. The items that can be set or adjust and press , or .
Setting menu Adjustment menu Next menu window Setting items (Menu window of VPL-AW15) 38 Pop-up menu Setting items 3 Press M/m to select an item you want to set appear in the pop-up menu, setting menu, adjustment menu, or in the next menu window. The items that can be set or adjust and press , or .
Operating Instructions
Page 41
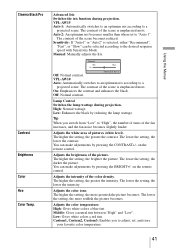
VPL-AW15 Auto 1: .Automatically switches to an optimum iris according to a projected scene. The contrast of the color density. Off: Normal contrast. High: Normal wattage. Adjusts the ... of the scene is emphasized most . Auto 2: An optimum iris becomes smaller than when set , and store your favorite color temperature. 41 Off: Normal contrast. VPL-AW10 Auto: Automatically switches to an optimum iris according to a projected scene. Low: Enhances the black by pressing the CONTRAST+/- Adjusts the brightness of pictures (white...
VPL-AW15 Auto 1: .Automatically switches to an optimum iris according to a projected scene. The contrast of the color density. Off: Normal contrast. High: Normal wattage. Adjusts the ... of the scene is emphasized most . Auto 2: An optimum iris becomes smaller than when set , and store your favorite color temperature. 41 Off: Normal contrast. VPL-AW10 Auto: Automatically switches to an optimum iris according to a projected scene. Low: Enhances the black by pressing the CONTRAST+/- Adjusts the brightness of pictures (white...

Operating Instructions
Page 43
RCP (Real Color Processing) (VPL-AW15 only) You can view the picture with the adjusted picture quality. Once the settings are stored, you can adjust the color and hue of each selected portion of the picture independently. For details, see "Adjusting the Picture Using Real Color Processing". (1 page 33) 43 Off: Cancels this feature. User 1, User 2, User 3: You can adjust the picture using Real Color Processing and store the settings. Using the Menus Advanced Picture Menu (VPL-AW15 only) The Advanced Picture is used for adjusting the picture more.
RCP (Real Color Processing) (VPL-AW15 only) You can view the picture with the adjusted picture quality. Once the settings are stored, you can adjust the color and hue of each selected portion of the picture independently. For details, see "Adjusting the Picture Using Real Color Processing". (1 page 33) 43 Off: Cancels this feature. User 1, User 2, User 3: You can adjust the picture using Real Color Processing and store the settings. Using the Menus Advanced Picture Menu (VPL-AW15 only) The Advanced Picture is used for adjusting the picture more.

Operating Instructions
Page 44
... ratio is provided. Zoom: A normal 16:9 aspect ratio picture is enlarged over the entire screen properly. Full 1: Displays a picture on the installation menu (1 page 49). (VPL-AW15 only) 44 Tip To adjust the display area, refer to "Blanking" on the whole of the screen without changing the aspect ratio of the original...
... ratio is provided. Zoom: A normal 16:9 aspect ratio picture is enlarged over the entire screen properly. Full 1: Displays a picture on the installation menu (1 page 49). (VPL-AW15 only) 44 Tip To adjust the display area, refer to "Blanking" on the whole of the screen without changing the aspect ratio of the original...

Operating Instructions
Page 49
V: Flips the picture vertically. direction) When the top of the trapezoid is longer than the top ( ): Sets a lower value (- H: Flips the picture horizontally. Blanking (VPL-AW15 only) This feature allows you set the V Keystone to adjust the display area. When using the Blanking, make sure that you to "0". 49 Using the ...
V: Flips the picture vertically. direction) When the top of the trapezoid is longer than the top ( ): Sets a lower value (- H: Flips the picture horizontally. Blanking (VPL-AW15 only) This feature allows you set the V Keystone to adjust the display area. When using the Blanking, make sure that you to "0". 49 Using the ...
Operating Instructions
Page 50
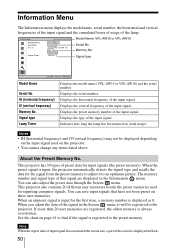
... a part of that have not been preset on page 61 to find if the signal is registered to the projector. Signal type Lamp Timer Displays the model name (VPL-AW15 or VPL-AW10) and the serial number. Notes • fH (horizontal frequency) and fV(vertical frequency) may not be registered... the signal from the preset memory to an optimum picture. Model Name: VPL-AW15 or VPL-AW10 Serial No. Displays the serial number. Displays the type of the input signal. About the Preset Memory No. This projector also contains 20 different user memories beside the preset memories used on (total...
... a part of that have not been preset on page 61 to find if the signal is registered to the projector. Signal type Lamp Timer Displays the model name (VPL-AW15 or VPL-AW10) and the serial number. Notes • fH (horizontal frequency) and fV(vertical frequency) may not be registered... the signal from the preset memory to an optimum picture. Model Name: VPL-AW15 or VPL-AW10 Serial No. Displays the serial number. Displays the type of the input signal. About the Preset Memory No. This projector also contains 20 different user memories beside the preset memories used on (total...


