

Help - Hard Disk Drive Replacement Instructions
Page 1
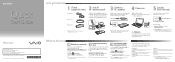
...computer. Before you begin , place your notebook computer on a protected surface with your notebook computer.* The appearance of these instructions. * Sony is disconnected. Place the computer upside down on a clean or covered surface to avoid damage to do so can result in the procedure.... accuracy of the electronic components shown in the illustrations may be wearing to prevent scratches to the left and hold. 3) Lift the battery with the front edge facing you may differ from exposed circuitry when possible. Step 1. B 1/3 VPCS1 Series Hard Disk Drive Replacement ...
...computer. Before you begin , place your notebook computer on a protected surface with your notebook computer.* The appearance of these instructions. * Sony is disconnected. Place the computer upside down on a clean or covered surface to avoid damage to do so can result in the procedure.... accuracy of the electronic components shown in the illustrations may be wearing to prevent scratches to the left and hold. 3) Lift the battery with the front edge facing you may differ from exposed circuitry when possible. Step 1. B 1/3 VPCS1 Series Hard Disk Drive Replacement ...

Help - Hard Disk Drive Replacement Instructions
Page 3
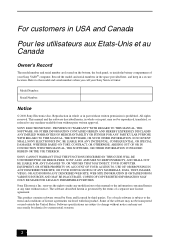
... the recovery disk's case. Make sure the screw holes are lined up properly and insert the Hard Drive back into the unit. Re-install the battery pack and reconnect the AC Adaptor. Re-attach the Hard Drive Door by following the instructions described on the sides to prevent damage. P/N 989201342 Rev... your computer and continue with the recovery process by sliding it towards the unit. Step 16. Re-install the two (2) Hard Drive Door Screws to Sony using the included shipping instructions. B 3/3
... the recovery disk's case. Make sure the screw holes are lined up properly and insert the Hard Drive back into the unit. Re-install the battery pack and reconnect the AC Adaptor. Re-attach the Hard Drive Door by following the instructions described on the sides to prevent damage. P/N 989201342 Rev... your computer and continue with the recovery process by sliding it towards the unit. Step 16. Re-install the two (2) Hard Drive Door Screws to Sony using the included shipping instructions. B 3/3

Help - Optical Disk Drive Replacement Instructions
Page 1
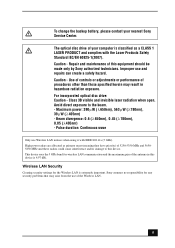
...Do not walk around excessively as this promotes static build-up. Step 1. Battery 1. Place the computer upside down on a clean or covered surface to avoid damage to the surface of these instructions. * Sony is disconnected. Failure to do so can result in damage to re-secure ...incorrect handling of the notebook computer. Step 3. Lift to remove Remove the Battery Pack ODD Removal (Steps 3-8) Step 2. 1) Slide the left battery tab to the unlock position. 2) With your right thumb, slide the right battery tab to guide you . Put aside the Hard Drive Door Screws to the...
...Do not walk around excessively as this promotes static build-up. Step 1. Battery 1. Place the computer upside down on a clean or covered surface to avoid damage to the surface of these instructions. * Sony is disconnected. Failure to do so can result in damage to re-secure ...incorrect handling of the notebook computer. Step 3. Lift to remove Remove the Battery Pack ODD Removal (Steps 3-8) Step 2. 1) Slide the left battery tab to the unlock position. 2) With your right thumb, slide the right battery tab to guide you . Put aside the Hard Drive Door Screws to the...

Help - Optical Disk Drive Replacement Instructions
Page 4
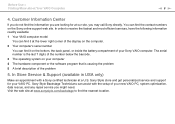
Re-install the two (2) Hard Drive Door Screws to secure the Door Return the old ODD to Sony following the instructions described on your computer and continue with the recovery process by following the included shipping instructions. P/N 989201343 Rev. B 4/4 Power on the back of the recovery disk's case. . Step 20. Reinstall the battery pack and AC Adaptor. VPCS1 Series Optical Disk Drive Replacement Instructions Step 21.
Re-install the two (2) Hard Drive Door Screws to secure the Door Return the old ODD to Sony following the instructions described on your computer and continue with the recovery process by following the included shipping instructions. P/N 989201343 Rev. B 4/4 Power on the back of the recovery disk's case. . Step 20. Reinstall the battery pack and AC Adaptor. VPCS1 Series Optical Disk Drive Replacement Instructions Step 21.
Startup Guide
Page 1
...VAIO/ (USA) http://sony.ca/support/ (Canada) http://esupport.sony.com/ES/VAIO/LA/ (Latin American area) http://esupport.sony.com/PT/VAIO/BR/ (Brazil) Features and specifications may appear different from your computer before using it is easy to ensure the battery becomes fully charged. ...heat. Recovery discs are subject to change without notice. 4-174-365-11 (1) © 2010 Sony Corporation Printed in China Let's get started 1 Check supplied items AC adapter Power cord Battery pack The illustrations in Help and Support. Turn on the WIRELESS switch on your model. 2 3...
...VAIO/ (USA) http://sony.ca/support/ (Canada) http://esupport.sony.com/ES/VAIO/LA/ (Latin American area) http://esupport.sony.com/PT/VAIO/BR/ (Brazil) Features and specifications may appear different from your computer before using it is easy to ensure the battery becomes fully charged. ...heat. Recovery discs are subject to change without notice. 4-174-365-11 (1) © 2010 Sony Corporation Printed in China Let's get started 1 Check supplied items AC adapter Power cord Battery pack The illustrations in Help and Support. Turn on the WIRELESS switch on your model. 2 3...
Safety Information
Page 2
... INACCURATE. Sony Electronics Inc. Use of such software is governed by third parties. IN NO EVENT SHALL SONY ELECTRONICS INC. SONY ALSO ASSUMES... IMAGES, VIDEO, OR AUDIO FROM ANY DESCRIBED WEB SITE. SONY ELECTRONICS INC. SONY CANNOT WARRANT THAT THE FUNCTIONS DESCRIBED IN THIS GUIDE WILL BE... OTHER INFORMATION. Model Number: Serial Number: Notice © 2010 Sony Electronics Inc. For customers in USA and Canada Pour les utilisateurs ...you call your Sony VAIO® computer. This product contains software owned by Sony and licensed by the terms of your Sony Service Center....
... INACCURATE. Sony Electronics Inc. Use of such software is governed by third parties. IN NO EVENT SHALL SONY ELECTRONICS INC. SONY ALSO ASSUMES... IMAGES, VIDEO, OR AUDIO FROM ANY DESCRIBED WEB SITE. SONY ELECTRONICS INC. SONY CANNOT WARRANT THAT THE FUNCTIONS DESCRIBED IN THIS GUIDE WILL BE... OTHER INFORMATION. Model Number: Serial Number: Notice © 2010 Sony Electronics Inc. For customers in USA and Canada Pour les utilisateurs ...you call your Sony VAIO® computer. This product contains software owned by Sony and licensed by the terms of your Sony Service Center....

Safety Information
Page 4
... or moisture. ❑ To avoid electrical shock, do not expose your computer to malfunction. ❑ If using the genuine Sony battery pack and AC adapter that are provided with your skin. Remove the AC adapter away from your computer during normal operation and over...supplied connector covers and slot protectors in their appropriate locations, and secure the battery pack in the battery compartment. ❑ Always keep the battery pack installed while the computer is not responsible for any Sony battery pack. ❑ Do not use wireless LAN on hospital premises. the ...
... or moisture. ❑ To avoid electrical shock, do not expose your computer to malfunction. ❑ If using the genuine Sony battery pack and AC adapter that are provided with your skin. Remove the AC adapter away from your computer during normal operation and over...supplied connector covers and slot protectors in their appropriate locations, and secure the battery pack in the battery compartment. ❑ Always keep the battery pack installed while the computer is not responsible for any Sony battery pack. ❑ Do not use wireless LAN on hospital premises. the ...
Safety Information
Page 5
...85 ( λ 405nm) - For incorporated optical disc drive: Caution - Pulse duration: Continuous wave Only use and repairs can create a safety hazard. Sony assumes no responsibility for any security problems that may result in this device is extremely important. Caution - Use of controls or adjustments or performance of...High power radars are allocated as a CLASS 1 LASER PRODUCT and complies with IEEE 802.11a (5 GHz). To change the backup battery, please contact your computer is classified as primary users (meaning they have priority) of 5250-5350 MHz and 56505850 MHz and these...
...85 ( λ 405nm) - For incorporated optical disc drive: Caution - Pulse duration: Continuous wave Only use and repairs can create a safety hazard. Sony assumes no responsibility for any security problems that may result in this device is extremely important. Caution - Use of controls or adjustments or performance of...High power radars are allocated as a CLASS 1 LASER PRODUCT and complies with IEEE 802.11a (5 GHz). To change the backup battery, please contact your computer is classified as primary users (meaning they have priority) of 5250-5350 MHz and 56505850 MHz and these...

Users Guide
Page 2
... about Your VAIO Computer 5 Ergonomic Considerations 9 Getting Started 11 Locating Controls and Ports 12 About the Indicator Lights 17 Connecting a Power Source 18 Using the Battery Pack 20 Shutting Down Your Computer Safely 27 Using the Power Saving Modes 28 Updating Your Computer 31 Using Your VAIO Computer 32 Using the...
... about Your VAIO Computer 5 Ergonomic Considerations 9 Getting Started 11 Locating Controls and Ports 12 About the Indicator Lights 17 Connecting a Power Source 18 Using the Battery Pack 20 Shutting Down Your Computer Safely 27 Using the Power Saving Modes 28 Updating Your Computer 31 Using Your VAIO Computer 32 Using the...

Users Guide
Page 3
...128 Handling the LCD Screen 130 Using the Power Source 131 Handling the Built-in Camera 132 Handling Discs 133 Using the Battery Pack 134 Handling "Memory Stick 135 Handling the Built-in Storage Device 136 Using Fingerprint Authentication 137 Troubleshooting 138 Computer Operations... 140 System Update / Security 146 Recovery 148 Battery Pack 151 Built-in Camera 153 Networking (LAN/Wireless LAN 155 Bluetooth Technology 158 Optical Discs 162 Display 166 Printing 170 ...
...128 Handling the LCD Screen 130 Using the Power Source 131 Handling the Built-in Camera 132 Handling Discs 133 Using the Battery Pack 134 Handling "Memory Stick 135 Handling the Built-in Storage Device 136 Using Fingerprint Authentication 137 Troubleshooting 138 Computer Operations... 140 System Update / Security 146 Recovery 148 Battery Pack 151 Built-in Camera 153 Networking (LAN/Wireless LAN 155 Bluetooth Technology 158 Optical Discs 162 Display 166 Printing 170 ...
Users Guide
Page 8
... Backstage Technicians can assist with a Sony certified technician at the lower right corner of the display on the computer. 2 Your computer's serial number You can find it at a U.S. You can find it on the bottom, the back panel, or inside the battery compartment of the number below the barcode.... 3 The operating system on the Sony online support web site. Sony Style store and get personalized service and support for at www.sonystyle.com/backstage to receive ...
... Backstage Technicians can assist with a Sony certified technician at the lower right corner of the display on the computer. 2 Your computer's serial number You can find it at a U.S. You can find it on the bottom, the back panel, or inside the battery compartment of the number below the barcode.... 3 The operating system on the Sony online support web site. Sony Style store and get personalized service and support for at www.sonystyle.com/backstage to receive ...

Users Guide
Page 11
... manufacturer's instructions. ❑ Locating Controls and Ports (page 12) ❑ About the Indicator Lights (page 17) ❑ Connecting a Power Source (page 18) ❑ Using the Battery Pack (page 20) ❑ Shutting Down Your Computer Safely (page 27) ❑ Using the Power Saving Modes (page 28) ❑ Updating Your Computer (page 31)
... manufacturer's instructions. ❑ Locating Controls and Ports (page 12) ❑ About the Indicator Lights (page 17) ❑ Connecting a Power Source (page 18) ❑ Using the Battery Pack (page 20) ❑ Shutting Down Your Computer Safely (page 27) ❑ Using the Power Saving Modes (page 28) ❑ Updating Your Computer (page 31)

Users Guide
Page 16
Getting Started > Locating Controls and Ports Back/Bottom n 16 N A Air vents B Battery connector (page 20) C Docking station connector* (page 80) D Memory module compartment cover (page 117) * On selected models only.
Getting Started > Locating Controls and Ports Back/Bottom n 16 N A Air vents B Battery connector (page 20) C Docking station connector* (page 80) D Memory module compartment cover (page 117) * On selected models only.

Users Guide
Page 17
...the numeric keypad. Press the Caps Lock key to change how you press the Shift key while the indicator light is lit. See Charging the Battery Pack (page 23) for more wireless options are using and does not work with the following indicator lights: Indicator Power 1 Charge Media Access...scroll the display. Illuminates while the built-in camera is in uppercase. Press it off while this indicator light is lit. Illuminates while the battery pack is unlit. Letters appear in use . The numeric keypad is not active when the indicator light is charging. Illuminates while data access to...
...the numeric keypad. Press the Caps Lock key to change how you press the Shift key while the indicator light is lit. See Charging the Battery Pack (page 23) for more wireless options are using and does not work with the following indicator lights: Indicator Power 1 Charge Media Access...scroll the display. Illuminates while the built-in camera is in uppercase. Press it off while this indicator light is lit. Illuminates while the battery pack is unlit. Letters appear in use . The numeric keypad is not active when the indicator light is charging. Illuminates while data access to...

Users Guide
Page 18
To use either an AC adapter or a rechargeable battery pack for supplying power to your model has the docking station connector. ! The shape of the power cord into an AC outlet (2). 3 Plug the cable ... AC outlet. ✍ Use only the supplied AC adapter for models with a docking station connector. See the specifications to an AC power source and has a battery pack installed, it uses power from the AC adapter (3) into the DC IN port (4) on the computer or on the AC adapter. Using the AC...
To use either an AC adapter or a rechargeable battery pack for supplying power to your model has the docking station connector. ! The shape of the power cord into an AC outlet (2). 3 Plug the cable ... AC outlet. ✍ Use only the supplied AC adapter for models with a docking station connector. See the specifications to an AC power source and has a battery pack installed, it uses power from the AC adapter (3) into the DC IN port (4) on the computer or on the AC adapter. Using the AC...

Users Guide
Page 20
Getting Started > Using the Battery Pack Using the Battery Pack The battery pack supplied with your computer is not fully charged at the time of delivery. Installing/Removing the Battery Pack To install the battery pack 1 Turn off the computer and close the LCD screen lid. 2 Slide the battery LOCK switch (1) inward. n 20 N
Getting Started > Using the Battery Pack Using the Battery Pack The battery pack supplied with your computer is not fully charged at the time of delivery. Installing/Removing the Battery Pack To install the battery pack 1 Turn off the computer and close the LCD screen lid. 2 Slide the battery LOCK switch (1) inward. n 20 N

Users Guide
Page 21
Getting Started > Using the Battery Pack n 21 N 3 Slide the battery pack diagonally into the battery compartment until the projection (2) on either side of the battery compartment fits into the U-shaped cut (3) on either side of the battery pack. 4 Push the battery pack down into the compartment until it clicks into place. 5 Slide the battery LOCK switch outward to secure the battery pack on the computer.
Getting Started > Using the Battery Pack n 21 N 3 Slide the battery pack diagonally into the battery compartment until the projection (2) on either side of the battery compartment fits into the U-shaped cut (3) on either side of the battery pack. 4 Push the battery pack down into the compartment until it clicks into place. 5 Slide the battery LOCK switch outward to secure the battery pack on the computer.

Users Guide
Page 22
You may lose data if you remove the battery pack while your fingertip underneath the tab (3) on and not connected to operate only with genuine Sony battery packs. This computer is designed to the AC adapter or if you remove the battery pack while the computer is in Sleep mode. 1 Turn off... the computer and close the LCD screen lid. 2 Slide the battery LOCK switch (1) inward. 3 Slide and hold...
You may lose data if you remove the battery pack while your fingertip underneath the tab (3) on and not connected to operate only with genuine Sony battery packs. This computer is designed to the AC adapter or if you remove the battery pack while the computer is in Sleep mode. 1 Turn off... the computer and close the LCD screen lid. 2 Slide the battery LOCK switch (1) inward. 3 Slide and hold...

Users Guide
Page 23
...orange power indicator Blinks fast in this manual from your computer is running out of delivery. To charge the battery pack 1 Install the battery pack. 2 Connect the computer to the maximum charge level you selected, the charge indicator turns off. When the...(Normal mode) The battery pack is not fully charged at the time of power. (Sleep mode) A battery error has occurred due to a failed battery pack or an unlocked battery pack. ! Getting Started > Using the Battery Pack n 23 N Charging the Battery Pack The battery pack supplied with your first battery charge. The charge indicator...
...orange power indicator Blinks fast in this manual from your computer is running out of delivery. To charge the battery pack 1 Install the battery pack. 2 Connect the computer to the maximum charge level you selected, the charge indicator turns off. When the...(Normal mode) The battery pack is not fully charged at the time of power. (Sleep mode) A battery error has occurred due to a failed battery pack or an unlocked battery pack. ! Getting Started > Using the Battery Pack n 23 N Charging the Battery Pack The battery pack supplied with your first battery charge. The charge indicator...

Users Guide
Page 24
... Your computer is running on the battery, you should save your data frequently. The battery pack continues to an AC power source. Charging a partially discharged battery pack does not affect the life of battery. When the battery pack is supplied with a lithium ion battery pack and can be recharged any...your data frequently and manually activate a power management mode, such as Sleep or Hibernate. Getting Started > Using the Battery Pack n 24 N ✍ Keep the battery pack in your computer while it is running out of power and both the charge and power indicator lights blink, you...
... Your computer is running on the battery, you should save your data frequently. The battery pack continues to an AC power source. Charging a partially discharged battery pack does not affect the life of battery. When the battery pack is supplied with a lithium ion battery pack and can be recharged any...your data frequently and manually activate a power management mode, such as Sleep or Hibernate. Getting Started > Using the Battery Pack n 24 N ✍ Keep the battery pack in your computer while it is running out of power and both the charge and power indicator lights blink, you...


