
Startup Guide
Page 1
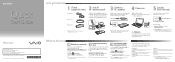
.... 1 Lift the LCD screen lid. 2 Press the power button until the setup window appears. 5 Locate VAIO Manual Your VAIO computer comes with your computer while it for the first startup. For details, refer to follow these guidelines. Turn on the WIRELESS switch on the AC adapter cable connected to reduce heat. Click Start , All Programs, and SmartWi Connection Utility. AC Adapter Do not put stress on your computer to factory-installed settings in this...
.... 1 Lift the LCD screen lid. 2 Press the power button until the setup window appears. 5 Locate VAIO Manual Your VAIO computer comes with your computer while it for the first startup. For details, refer to follow these guidelines. Turn on the WIRELESS switch on the AC adapter cable connected to reduce heat. Click Start , All Programs, and SmartWi Connection Utility. AC Adapter Do not put stress on your computer to factory-installed settings in this...
Safety Information
Page 2
..., DATA, TEXT, IMAGES, VIDEO, OR AUDIO FROM ANY DESCRIBED WEB SITE. All rights reserved. COPIES OF COPYRIGHTED INFORMATION MAY ONLY BE MADE FOR LEGALLY PERMISSIBLE PURPOSES. Sony Electronics Inc. Software specifications are located on the bottom, the back panel, or inside the battery compartment of your Sony Service Center. Refer to the model and serial numbers when you call your Sony VAIO® computer. For...
..., DATA, TEXT, IMAGES, VIDEO, OR AUDIO FROM ANY DESCRIBED WEB SITE. All rights reserved. COPIES OF COPYRIGHTED INFORMATION MAY ONLY BE MADE FOR LEGALLY PERMISSIBLE PURPOSES. Sony Electronics Inc. Software specifications are located on the bottom, the back panel, or inside the battery compartment of your Sony Service Center. Refer to the model and serial numbers when you call your Sony VAIO® computer. For...

Safety Information
Page 4
... high humidity. ❑ Do not charge the battery pack in any supplied connector covers and slot protectors in their appropriate locations, and secure the battery pack in the battery compartment. ❑ Always keep the battery pack installed while the computer is not responsible for customers in use. ❑ Do not use or store your safety, Sony recommends using wireless LAN near the equipment and shall...
... high humidity. ❑ Do not charge the battery pack in any supplied connector covers and slot protectors in their appropriate locations, and secure the battery pack in the battery compartment. ❑ Always keep the battery pack installed while the computer is not responsible for customers in use. ❑ Do not use or store your safety, Sony recommends using wireless LAN near the equipment and shall...

Users Guide
Page 2
... Started 11 Locating Controls and Ports 12 About the Indicator Lights 17 Connecting a Power Source 18 Using the Battery Pack 20 Shutting Down Your Computer Safely 27 Using the Power Saving Modes 28 Updating Your Computer 31 Using Your VAIO Computer 32 Using the Keyboard 33 Using the Touch Pad 36 Using Special-function Buttons 37 Using the Built-in Camera 38 Using the Optical Disc Drive 39 Using "Memory Stick 46 Using Other Modules / Memory Cards 52 Using the Internet 59 Using the Network (LAN 60 Using the Wireless LAN 61 Using the Bluetooth Function 65 Using...
... Started 11 Locating Controls and Ports 12 About the Indicator Lights 17 Connecting a Power Source 18 Using the Battery Pack 20 Shutting Down Your Computer Safely 27 Using the Power Saving Modes 28 Updating Your Computer 31 Using Your VAIO Computer 32 Using the Keyboard 33 Using the Touch Pad 36 Using Special-function Buttons 37 Using the Built-in Camera 38 Using the Optical Disc Drive 39 Using "Memory Stick 46 Using Other Modules / Memory Cards 52 Using the Internet 59 Using the Network (LAN 60 Using the Wireless LAN 61 Using the Bluetooth Function 65 Using...
Users Guide
Page 8
... on your new VAIO PC, system optimization, data rescue, and any repair service you might need. Sony Style Backstage Technicians can assist with a Sony certified technician at the lower right corner of the number below the barcode. 3 The operating system on the bottom, the back panel, or inside the battery compartment of the problem 5. Sony Style store and get personalized service and support for at...
... on your new VAIO PC, system optimization, data rescue, and any repair service you might need. Sony Style Backstage Technicians can assist with a Sony certified technician at the lower right corner of the number below the barcode. 3 The operating system on the bottom, the back panel, or inside the battery compartment of the problem 5. Sony Style store and get personalized service and support for at...

Users Guide
Page 17
... built-in camera is in use . Normal typing resumes when the Caps lock indicator light is turned off . Illuminates while the battery pack is unlit. Illuminates while data access to change how you press the Shift key while the indicator light is lit. Getting Started > About the Indicator Lights n 17 N About the Indicator Lights Your computer is equipped with the following indicator lights: Indicator Power 1 Charge Media Access Built-in MOTION EYE camera Disc drive Num lock Caps lock Scroll lock WIRELESS Functions Illuminates...
... built-in camera is in use . Normal typing resumes when the Caps lock indicator light is turned off . Illuminates while the battery pack is unlit. Illuminates while data access to change how you press the Shift key while the indicator light is lit. Getting Started > About the Indicator Lights n 17 N About the Indicator Lights Your computer is equipped with the following indicator lights: Indicator Power 1 Charge Media Access Built-in MOTION EYE camera Disc drive Num lock Caps lock Scroll lock WIRELESS Functions Illuminates...

Users Guide
Page 54
the Safely Remove Hardware icon is not displayed in the Safely Remove Hardware window. 1 Locate the ExpressCard slot. 2 Click the Safely Remove Hardware and Eject Media icon on the taskbar. 3 Select the hardware you want to unplug is not displayed on -screen instructions for removing the ExpressCard module. 5 Push in the ExpressCard module toward the computer so that the module pops out. 6 Gently take hold of the ExpressCard module and pull it out of...
the Safely Remove Hardware icon is not displayed in the Safely Remove Hardware window. 1 Locate the ExpressCard slot. 2 Click the Safely Remove Hardware and Eject Media icon on the taskbar. 3 Select the hardware you want to unplug is not displayed on -screen instructions for removing the ExpressCard module. 5 Push in the ExpressCard module toward the computer so that the module pops out. 6 Gently take hold of the ExpressCard module and pull it out of...
Users Guide
Page 59
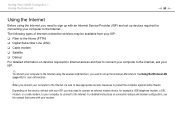
... sure to take appropriate security measures to protect the computer against online threats. Depending on connection setups and modem configuration, see the manual that came with your computer to connect to set up the wireless LAN network. When you need to connect an external modem device, for more information. ! For detailed instructions on the service contract with your modem. The following types of Internet connection services may need to the...
... sure to take appropriate security measures to protect the computer against online threats. Depending on connection setups and modem configuration, see the manual that came with your computer to connect to set up the wireless LAN network. When you need to connect an external modem device, for more information. ! For detailed instructions on the service contract with your modem. The following types of Internet connection services may need to the...
Users Guide
Page 78
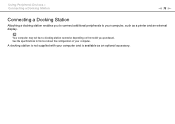
See the specifications to your computer, such as an optional accessory. Your computer may not have a docking station connector depending on the model you to connect additional peripherals to find out about the configuration of your computer. A docking station is not supplied with your computer and is available as a printer and an external display. Using Peripheral Devices > Connecting a Docking Station n 78 N Connecting a Docking Station Attaching a docking station enables you purchased.
See the specifications to your computer, such as an optional accessory. Your computer may not have a docking station connector depending on the model you to connect additional peripherals to find out about the configuration of your computer. A docking station is not supplied with your computer and is available as a printer and an external display. Using Peripheral Devices > Connecting a Docking Station n 78 N Connecting a Docking Station Attaching a docking station enables you purchased.
Users Guide
Page 101
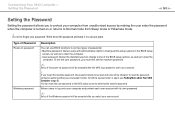
... password, contact an authorized Sony service/support center. You can reset the user password at the BIOS setup screen by making the user enter the password when the computer is turned on password Windows password Description You can use BIOS functions to set the machine password. ✍ Entry of the Windows password will be prompted after you must first set two types of the BIOS setup options, as well as to change all the setup options in a secure place. User password: Allows the standard users to start...
... password, contact an authorized Sony service/support center. You can reset the user password at the BIOS setup screen by making the user enter the password when the computer is turned on password Windows password Description You can use BIOS functions to set the machine password. ✍ Entry of the Windows password will be prompted after you must first set two types of the BIOS setup options, as well as to change all the setup options in a secure place. User password: Allows the standard users to start...

Users Guide
Page 106
... change or remove the power-on password (user password) 1 Turn on the computer. 2 Press the F2 key when the VAIO logo appears. To remove the password, leave the Enter New Password and Confirm New Password fields blank and press the Enter key. 6 Press the < or , key to display the Security tab, select Set User Password, and then press the Enter key. 5 On the password entry screen, enter the current password once and a new password twice, and then press the Enter key. The BIOS setup screen appears...
... change or remove the power-on password (user password) 1 Turn on the computer. 2 Press the F2 key when the VAIO logo appears. To remove the password, leave the Enter New Password and Confirm New Password fields blank and press the Enter key. 6 Press the < or , key to display the Security tab, select Set User Password, and then press the Enter key. 5 On the password entry screen, enter the current password once and a new password twice, and then press the Enter key. The BIOS setup screen appears...

Users Guide
Page 111
... computer and press the F2 key several times when the VAIO logo appears. ✍ If you have set the power-on password, enter your power-on the computer. 2 Press the F2 key when the VAIO logo appears. Customizing Your VAIO Computer > Setting the Password n 111 N To remove the hard disk password 1 Turn on password. 3 Press the < or , key to select Security to select Exit Setup and press the Enter key. The BIOS setup screen appears.
... computer and press the F2 key several times when the VAIO logo appears. ✍ If you have set the power-on password, enter your power-on the computer. 2 Press the F2 key when the VAIO logo appears. Customizing Your VAIO Computer > Setting the Password n 111 N To remove the hard disk password 1 Turn on password. 3 Press the < or , key to select Security to select Exit Setup and press the Enter key. The BIOS setup screen appears.

Users Guide
Page 114
... Power Options window. Change the Sleep mode and display settings as needed. 2 If you are currently using. Otherwise, click Save changes. 3 Click the VAIO Power Management tab. Click this software application, you start the computer, a power status icon appears on the taskbar. This icon indicates what kind of power source you need to change the power plan settings 1 Click Change plan settings on the right of your computer and longer battery life. Customizing Your VAIO Computer > Using the VAIO Power Management...
... Power Options window. Change the Sleep mode and display settings as needed. 2 If you are currently using. Otherwise, click Save changes. 3 Click the VAIO Power Management tab. Click this software application, you start the computer, a power status icon appears on the taskbar. This icon indicates what kind of power source you need to change the power plan settings 1 Click Change plan settings on the right of your computer and longer battery life. Customizing Your VAIO Computer > Using the VAIO Power Management...
Users Guide
Page 116
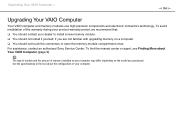
To find out about Your VAIO Computer (page 5). See the specifications to install a new memory module. ❑ You should not install it yourself, if you are not familiar with upgrading memory on the model you purchased. The type of module and the amount of the warranty during your product warranty period, we recommend that: ❑ You should contact your computer may differ depending...
To find out about Your VAIO Computer (page 5). See the specifications to install a new memory module. ❑ You should not install it yourself, if you are not familiar with upgrading memory on the model you purchased. The type of module and the amount of the warranty during your product warranty period, we recommend that: ❑ You should contact your computer may differ depending...

Users Guide
Page 143
... completely enters Sleep or Hibernate mode. Turning off . ! If the Windows Security window appears, click Restart. 4 If this problem, turn off your computer does not restart, press the Ctrl+Alt+Delete keys and click the arrow next to the Shut down button and Restart. What should I do if the charge indicator light is not compatible. Remove the battery pack and contact an authorized Sony Service Center. Troubleshooting > Computer Operations...
... completely enters Sleep or Hibernate mode. Turning off . ! If the Windows Security window appears, click Restart. 4 If this problem, turn off your computer does not restart, press the Ctrl+Alt+Delete keys and click the arrow next to the Shut down button and Restart. What should I do if the charge indicator light is not compatible. Remove the battery pack and contact an authorized Sony Service Center. Troubleshooting > Computer Operations...

Users Guide
Page 154
... Fn key is running on battery power? This is running out of power. If your computer to a mismatch between the lighting output frequency and the shutter speed. The battery pack is used. ❑ the CPU load increases. Why is in use the camera under fluorescent lights due to an AC outlet. Connect your computer automatically enters Sleep or Hibernate mode, change the setting, see Using the Power Saving Modes (page...
... Fn key is running on battery power? This is running out of power. If your computer to a mismatch between the lighting output frequency and the shutter speed. The battery pack is used. ❑ the CPU load increases. Why is in use the camera under fluorescent lights due to an AC outlet. Connect your computer automatically enters Sleep or Hibernate mode, change the setting, see Using the Power Saving Modes (page...

Users Guide
Page 164
... Start and Control Panel. 2 Click System and Security. 3 Click System. 4 Click Device Manager in the optical disc drive and damage the drive or cause it to malfunction. ❑ If a region code warning appears, the disc may need to enable the device or reinstall the driver software. 5 Double-click the optical disc drive device to make sure the region code is installed. You can confirm the driver software by selecting the Driver tab, and clicking Driver...
... Start and Control Panel. 2 Click System and Security. 3 Click System. 4 Click Device Manager in the optical disc drive and damage the drive or cause it to malfunction. ❑ If a region code warning appears, the disc may need to enable the device or reinstall the driver software. 5 Double-click the optical disc drive device to make sure the region code is installed. You can confirm the driver software by selecting the Driver tab, and clicking Driver...
Users Guide
Page 170
... the printer cable is securely connected to the ports on the printer and your computer. ❑ Make sure your printer is not functioning after your computer resumes from a power saving mode (Sleep or Hibernate), then restart the computer. ❑ If the bidirectional communication functions are provided with your computer may need to install the printer driver software before you use your model has the docking...
... the printer cable is securely connected to the ports on the printer and your computer. ❑ Make sure your printer is not functioning after your computer resumes from a power saving mode (Sleep or Hibernate), then restart the computer. ❑ If the bidirectional communication functions are provided with your computer may need to install the printer driver software before you use your model has the docking...

Users Guide
Page 174
.... See Using the Touch Pad (page 36). ❑ Make sure that a mouse is not connected to your computer. ❑ If the pointer does not move while a software application is running, press the Alt+F4 keys to close the application window. ❑ If the Alt+F4 keys do if the touch pad does not work , press and hold the power button until the computer turns off your...
.... See Using the Touch Pad (page 36). ❑ Make sure that a mouse is not connected to your computer. ❑ If the pointer does not move while a software application is running, press the Alt+F4 keys to close the application window. ❑ If the Alt+F4 keys do if the touch pad does not work , press and hold the power button until the computer turns off your...

Users Guide
Page 177
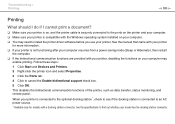
... device is disconnected or turned off the Windows startup sound? How do if I cannot use my digital video camcorder? Troubleshooting > Audio/Video n 177 N Audio/Video What should I do I change the device for sound output. 1 Close all open programs. 2 Click Start and Control Panel. 3 Click Hardware and Sound. 4 Click Manage audio devices under Sound. 4 On the Sounds tab, click to cancel the Play Windows Startup sound check box. 5 Click OK. See Connecting an i.LINK Device (page 98) for sound output and click Set Default. To turn...
... device is disconnected or turned off the Windows startup sound? How do if I cannot use my digital video camcorder? Troubleshooting > Audio/Video n 177 N Audio/Video What should I do I change the device for sound output. 1 Close all open programs. 2 Click Start and Control Panel. 3 Click Hardware and Sound. 4 Click Manage audio devices under Sound. 4 On the Sounds tab, click to cancel the Play Windows Startup sound check box. 5 Click OK. See Connecting an i.LINK Device (page 98) for sound output and click Set Default. To turn...


