
Quick Start Guide
Page 1
... 2 Click Use my VAIO. 3 Select your model. Recovery Media are subject to change without notice. 4-192-023-11 (1) © 2010 Sony Corporation Printed in this sheet) Safety Information Help and Support is required until the power indicator turns on the computer while cleaning. Care ...table. Your computer must be connected to the Internet to follow these guidelines. Proper air circulation around vents is turned on or in hard disk drive, avoid moving your computer on or shutting down. Click Start, All Programs, VAIO Care, and VAIO Care. HDD Care If ...
... 2 Click Use my VAIO. 3 Select your model. Recovery Media are subject to change without notice. 4-192-023-11 (1) © 2010 Sony Corporation Printed in this sheet) Safety Information Help and Support is required until the power indicator turns on the computer while cleaning. Care ...table. Your computer must be connected to the Internet to follow these guidelines. Proper air circulation around vents is turned on or in hard disk drive, avoid moving your computer on or shutting down. Click Start, All Programs, VAIO Care, and VAIO Care. HDD Care If ...

User Guide
Page 12
Getting Started > n 12 N Getting Started This section describes how to get started using your computer. Before starting your computer for example, a printer, an external hard disk drive, a scanner, and so on) at a time, following the manufacturer's instructions. ❑ Locating Controls and Ports (page 13) ❑ About the Indicator Lights (page 17) ❑ ...
Getting Started > n 12 N Getting Started This section describes how to get started using your computer. Before starting your computer for example, a printer, an external hard disk drive, a scanner, and so on) at a time, following the manufacturer's instructions. ❑ Locating Controls and Ports (page 13) ❑ About the Indicator Lights (page 17) ❑ ...

User Guide
Page 96
...on a software application, an operating system, and a compatible i.LINK device. However, the actual transfer rate depends on the transfer rate of Sony Corporation used only to designate that came with other . See the manual that came with your computer. Not all products with an i.LINK... ❑ An i.LINK connection with your software for example, an HDD or a CD-RW drive) before you use to connect an i.LINK device, such as a CD-RW or hard disk drive, confirm their operating system compatibility and required operating conditions. Before connecting compatible i.LINK PC peripherals to...
...on a software application, an operating system, and a compatible i.LINK device. However, the actual transfer rate depends on the transfer rate of Sony Corporation used only to designate that came with other . See the manual that came with your computer. Not all products with an i.LINK... ❑ An i.LINK connection with your software for example, an HDD or a CD-RW drive) before you use to connect an i.LINK device, such as a CD-RW or hard disk drive, confirm their operating system compatibility and required operating conditions. Before connecting compatible i.LINK PC peripherals to...

User Guide
Page 127
... data cannot be easily damaged if improperly used. If the built-in temperature. ❑ Do not remove the hard disk drive from your computer. To avoid damaging your hard disk drive ❑ Do not subject your computer to sudden movements. ❑ Keep your computer away from magnets. ❑... time. Precautions > Handling the Built-in Storage Device n 127 N Handling the Built-in Storage Device The built-in storage device (hard disk drive or solid state drive) has a high storage density and reads or writes data in an unstable position. ❑ Do not move your computer. However, ...
... data cannot be easily damaged if improperly used. If the built-in temperature. ❑ Do not remove the hard disk drive from your computer. To avoid damaging your hard disk drive ❑ Do not subject your computer to sudden movements. ❑ Keep your computer away from magnets. ❑... time. Precautions > Handling the Built-in Storage Device n 127 N Handling the Built-in Storage Device The built-in storage device (hard disk drive or solid state drive) has a high storage density and reads or writes data in an unstable position. ❑ Do not move your computer. However, ...
VPCL1 Series Hard Disk Drive Replacement Instructions
Page 1
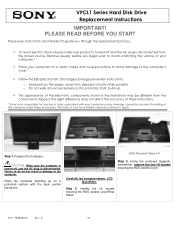
VPCL1 Series Hard Disk Drive Replacement Instructions IMPORTANT! PLEASE READ BEFORE YOU START These easy ... the replacement process. Carefully lay computer down . The terms of the computer under these instructions. * Sony is disconnected. Using the enclosed magnetic screwdriver, remove the two (4) screws securing the HDD access cover. The ...appearance of your computer.* Place your Sony limited warranty continue to do so can result in the illustrations may be different from the power source. ...
VPCL1 Series Hard Disk Drive Replacement Instructions IMPORTANT! PLEASE READ BEFORE YOU START These easy ... the replacement process. Carefully lay computer down . The terms of the computer under these instructions. * Sony is disconnected. Using the enclosed magnetic screwdriver, remove the two (4) screws securing the HDD access cover. The ...appearance of your computer.* Place your Sony limited warranty continue to do so can result in the illustrations may be different from the power source. ...
VPCL1 Series Hard Disk Drive Replacement Instructions
Page 2
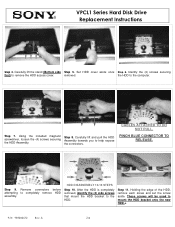
... 6. Step 11. PINCH BLUE CONNECTOR TO RELEASE. Identify the (4) screws securing first) to mount the HDD bracket onto the new HDD.e. the connectors. VPCL1 Series Hard Disk Drive Replacement Instructions Step 4. CABLES ATTACHED TO DO NOT PULL. attempting assembly. Carefully lift the stand (Bottom side Step 5.
... 6. Step 11. PINCH BLUE CONNECTOR TO RELEASE. Identify the (4) screws securing first) to mount the HDD bracket onto the new HDD.e. the connectors. VPCL1 Series Hard Disk Drive Replacement Instructions Step 4. CABLES ATTACHED TO DO NOT PULL. attempting assembly. Carefully lift the stand (Bottom side Step 5.
VPCL1 Series Hard Disk Drive Replacement Instructions
Page 3
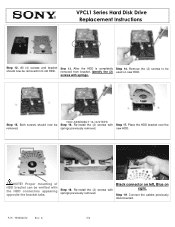
... completely Step 14. screws with springs previously removed. Re-install the (2) screws with the HDD connectors appearing opposite the bracket tabs. new HDD. VPCL1 Series Hard Disk Drive Replacement Instructions Step 12. Place the HDD bracket over the removed. Black connector on left, Blue on new HDD. Remove the (2) screws to be...
... completely Step 14. screws with springs previously removed. Re-install the (2) screws with the HDD connectors appearing opposite the bracket tabs. new HDD. VPCL1 Series Hard Disk Drive Replacement Instructions Step 12. Place the HDD bracket over the removed. Black connector on left, Blue on new HDD. Remove the (2) screws to be...
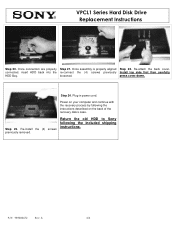
VPCL1 Series Hard Disk Drive Replacement Instructions
Page 4
... computer and continue with the recovery process by following the included shipping instructions. Re-install the (4) screws previously removed. VPCL1 Series Hard Disk Drive Replacement Instructions Step 20. Once connectors are properly Step 21. Re-attach the back cover. loosened. Step 24. A 4/4 Return the... old HDD to Sony following the instructions described on the back of the recovery disk's case. press cover down. Plug in power ...
... computer and continue with the recovery process by following the included shipping instructions. Re-install the (4) screws previously removed. VPCL1 Series Hard Disk Drive Replacement Instructions Step 20. Once connectors are properly Step 21. Re-attach the back cover. loosened. Step 24. A 4/4 Return the... old HDD to Sony following the instructions described on the back of the recovery disk's case. press cover down. Plug in power ...


