
User Guide
Page 6
Sony has combined leading-edge technology in this Sony VAIO® computer, and welcome to provide state-of your purchase of this manual may look slightly different from those of -the-art personal computing experience. ! External views illustrated in audio, video, computing, and communications to the on your computer. n6 N Before Use Before Use Congratulations on -screen User Guide.
Sony has combined leading-edge technology in this Sony VAIO® computer, and welcome to provide state-of your purchase of this manual may look slightly different from those of -the-art personal computing experience. ! External views illustrated in audio, video, computing, and communications to the on your computer. n6 N Before Use Before Use Congratulations on -screen User Guide.

User Guide
Page 9
... Utility. 2 Click SmartWi Connection Utility Help. * The Bluetooth function is available on -screen guide: 1 Click Start and Help and Support. 2 Click Use my VAIO. 3 Click VAIO Recovery Center User Guide. ❑ SmartWi™ Connection Utility Help - n9 N Before Use ❑ VAIO Recovery Center User Guide - See the online specifications to the original factory settings...
... Utility. 2 Click SmartWi Connection Utility Help. * The Bluetooth function is available on -screen guide: 1 Click Start and Help and Support. 2 Click Use my VAIO. 3 Click VAIO Recovery Center User Guide. ❑ SmartWi™ Connection Utility Help - n9 N Before Use ❑ VAIO Recovery Center User Guide - See the online specifications to the original factory settings...

User Guide
Page 32
... used only after the operating system is very similar to a desktop computer keyboard, but has additional keys that perform model-specific tasks. n 32 N Using Your VAIO Computer Using the Keyboard Your keyboard is finished launching.
... used only after the operating system is very similar to a desktop computer keyboard, but has additional keys that perform model-specific tasks. n 32 N Using Your VAIO Computer Using the Keyboard Your keyboard is finished launching.
User Guide
Page 33
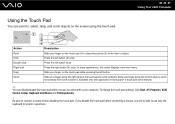
To change the touch pad settings, click Start, All Programs, VAIO Control Center, Keyboard and Mouse and Pointing Device. ! Press the left button. Slide your ... left button twice. If you disable the touch pad before disabling the touch pad. n 33 N Using Your VAIO Computer Action Point Click Double-click Right-click Drag Scroll Description Slide your finger along the bottom edge to scroll horizontally... your finger along the right edge of the touch pad to your finger on the screen using the touch pad. Press the left button (3) once. Press the right button (4) once.
To change the touch pad settings, click Start, All Programs, VAIO Control Center, Keyboard and Mouse and Pointing Device. ! Press the left button. Slide your ... left button twice. If you disable the touch pad before disabling the touch pad. n 33 N Using Your VAIO Computer Action Point Click Double-click Right-click Drag Scroll Description Slide your finger along the bottom edge to scroll horizontally... your finger along the right edge of the touch pad to your finger on the screen using the touch pad. Press the left button (3) once. Press the right button (4) once.

User Guide
Page 44
... the optical disc drive. Copying Files to CDs To copy files to a disc 1 Insert a recordable disc into the optical disc drive. 2 If nothing appears on -screen instructions until the empty disc folder appears. 2 Open the folder that contains the file(s) you want to copy and drag them to the empty disc... folder. 3 Close the disc folder. n 44 N Using Your VAIO Computer Playing CDs To play the CD. If the AutoPlay window appears, click Burn files to disc and follow the on the desktop, click Start...
... the optical disc drive. Copying Files to CDs To copy files to a disc 1 Insert a recordable disc into the optical disc drive. 2 If nothing appears on -screen instructions until the empty disc folder appears. 2 Open the folder that contains the file(s) you want to copy and drag them to the empty disc... folder. 3 Close the disc folder. n 44 N Using Your VAIO Computer Playing CDs To play the CD. If the AutoPlay window appears, click Burn files to disc and follow the on the desktop, click Start...

User Guide
Page 49
n 49 N Using Your VAIO Computer Removing an ExpressCard Module Follow the steps below to remove the ExpressCard module while your system may not work properly. If it is not ... ExpressCard module and pull it out of the slot. To remove an ExpressCard module ✍ To remove an ExpressCard module when your computer is on -screen instructions to unplug. 3 Click Stop. 4 Follow the on .
n 49 N Using Your VAIO Computer Removing an ExpressCard Module Follow the steps below to remove the ExpressCard module while your system may not work properly. If it is not ... ExpressCard module and pull it out of the slot. To remove an ExpressCard module ✍ To remove an ExpressCard module when your computer is on -screen instructions to unplug. 3 Click Stop. 4 Follow the on .

User Guide
Page 54
n 54 N Using Your VAIO Computer To format a Memory Stick The Memory Stick has been formatted in Format options. 5 Click Start. 6 Follow the on the media. It may change. Before ... the Computer window. 3 Right-click the Memory Stick icon and select Format. 4 Click Restore device defaults. ! Formatting the Memory Stick erases the entire data on -screen instructions. ! This could cause a malfunction. 1 Carefully slide the Memory Stick into the slot until it does not contain your computer, follow these steps. ! If you...
n 54 N Using Your VAIO Computer To format a Memory Stick The Memory Stick has been formatted in Format options. 5 Click Start. 6 Follow the on the media. It may change. Before ... the Computer window. 3 Right-click the Memory Stick icon and select Format. 4 Click Restore device defaults. ! Formatting the Memory Stick erases the entire data on -screen instructions. ! This could cause a malfunction. 1 Carefully slide the Memory Stick into the slot until it does not contain your computer, follow these steps. ! If you...

User Guide
Page 59
... Network and Internet. To set up a dial-up . 4 Follow the on the computer. 2 Plug the other end into the modem port on -screen instructions. Some of the phone cable (1) into the wall jack (2). ✍ Your computer does not work with party lines, cannot be connected to a... coin-operated telephone, and may not work properly. n 59 N Using Your VAIO Computer Using the Internet Setting Up a Dial-up Internet Connection Before you can connect to the Internet, you connect a telephone cable coming through a splitter,...
... Network and Internet. To set up a dial-up . 4 Follow the on the computer. 2 Plug the other end into the modem port on -screen instructions. Some of the phone cable (1) into the wall jack (2). ✍ Your computer does not work with party lines, cannot be connected to a... coin-operated telephone, and may not work properly. n 59 N Using Your VAIO Computer Using the Internet Setting Up a Dial-up Internet Connection Before you can connect to the Internet, you connect a telephone cable coming through a splitter,...

User Guide
Page 60
.... To access this on the WIRELESS switch before starting the SmartWi Connection Utility. The Sony WLAN supports all your digital devices with built-in the middle of a meeting, or as you to turn on -screen guide: 1 Click Start, All Programs, and SmartWi Connection Utility. 2 Click SmartWi Connection... networks. You can connect to set up the wireless LAN network with the SmartWi Connection Utility. n 60 N Using Your VAIO Computer Using Wireless LAN (WLAN) Using the Sony Wireless LAN (WLAN), all normal Ethernet connectivity, but with the added benefits of mobility and roaming.
.... To access this on the WIRELESS switch before starting the SmartWi Connection Utility. The Sony WLAN supports all your digital devices with built-in the middle of a meeting, or as you to turn on -screen guide: 1 Click Start, All Programs, and SmartWi Connection Utility. 2 Click SmartWi Connection... networks. You can connect to set up the wireless LAN network with the SmartWi Connection Utility. n 60 N Using Your VAIO Computer Using Wireless LAN (WLAN) Using the Sony Wireless LAN (WLAN), all normal Ethernet connectivity, but with the added benefits of mobility and roaming.

User Guide
Page 63
... the Bluetooth function You need to turn on the WIRELESS switch before starting the SmartWi Connection Utility. n 63 N Using Your VAIO Computer Using the Bluetooth Function The Bluetooth function is available on -screen guide: 1 Click Start, All Programs, and SmartWi Connection Utility. 2 Click SmartWi Connection Utility Help. ! See the SmartWi Connection Utility...
... the Bluetooth function You need to turn on the WIRELESS switch before starting the SmartWi Connection Utility. n 63 N Using Your VAIO Computer Using the Bluetooth Function The Bluetooth function is available on -screen guide: 1 Click Start, All Programs, and SmartWi Connection Utility. 2 Click SmartWi Connection Utility Help. ! See the SmartWi Connection Utility...

User Guide
Page 100
n 100 N Customizing Your VAIO Computer Adding the Power-on Password The power-on the computer to change all the setup options in the BIOS setup screen, as well as starting the computer. The machine password is provided for the standard users to be charged, and your computer may need to allow ...
n 100 N Customizing Your VAIO Computer Adding the Power-on Password The power-on the computer to change all the setup options in the BIOS setup screen, as well as starting the computer. The machine password is provided for the standard users to be charged, and your computer may need to allow ...

User Guide
Page 101
At the confirmation prompt, press the Enter key. The BIOS setup screen appears. The password can be up to 32 alphanumeric characters (including spaces) long...the Security tab, select Set Machine Password, and then press the Enter key. 4 On the password entry screen, enter the password twice and press the Enter key. If not, restart the computer and press the F2 key several... times when the VAIO logo appears. 3 Press the < or , key to select Security to select Exit, select Exit Setup, and then press the Enter key. n 101 N Customizing Your VAIO Computer To add the power-on password...
At the confirmation prompt, press the Enter key. The BIOS setup screen appears. The password can be up to 32 alphanumeric characters (including spaces) long...the Security tab, select Set Machine Password, and then press the Enter key. 4 On the password entry screen, enter the password twice and press the Enter key. If not, restart the computer and press the F2 key several... times when the VAIO logo appears. 3 Press the < or , key to select Security to select Exit, select Exit Setup, and then press the Enter key. n 101 N Customizing Your VAIO Computer To add the power-on password...

User Guide
Page 102
...display the Security tab, select Set User Password, and then press the Enter key. 5 On the password entry screen, enter the password twice and press the Enter key. The BIOS setup screen appears. Make sure you set the machine password before setting the user password. 1 Turn on password (user password)... ! If not, restart the computer and press the F2 key several times when the VAIO logo appears. 3 Enter the machine password and...
...display the Security tab, select Set User Password, and then press the Enter key. 5 On the password entry screen, enter the password twice and press the Enter key. The BIOS setup screen appears. Make sure you set the machine password before setting the user password. 1 Turn on password (user password)... ! If not, restart the computer and press the F2 key several times when the VAIO logo appears. 3 Enter the machine password and...

User Guide
Page 103
...select Security to select Exit, select Exit Setup, and then press the Enter key. n 103 N Customizing Your VAIO Computer Changing/Removing the Power-on Password To change or remove the power-on password (machine password) 1 Turn on... the computer. 2 Press the F2 key when the VAIO logo appears. To remove the password, leave the Enter New Password and Confirm New Password fields blank and..., and then press the Enter key. 5 On the password entry screen, enter the current password once and a new password twice, and then press the Enter key. The BIOS...
...select Security to select Exit, select Exit Setup, and then press the Enter key. n 103 N Customizing Your VAIO Computer Changing/Removing the Power-on Password To change or remove the power-on password (machine password) 1 Turn on... the computer. 2 Press the F2 key when the VAIO logo appears. To remove the password, leave the Enter New Password and Confirm New Password fields blank and..., and then press the Enter key. 5 On the password entry screen, enter the current password once and a new password twice, and then press the Enter key. The BIOS...

User Guide
Page 104
At the confirmation prompt, press the Enter key. If not, restart the computer and press the F2 key several times when the VAIO logo appears. 3 Enter the user password and press the Enter key. 4 Press the < or , key to select Security to select Exit, select Exit Setup, and... Security tab, select Set User Password, and then press the Enter key. 5 On the password entry screen, enter the current password once and a new password twice, and then press the Enter key. n 104 N Customizing Your VAIO Computer To change or remove the power-on password (user password) 1 Turn on the computer. 2 Press...
At the confirmation prompt, press the Enter key. If not, restart the computer and press the F2 key several times when the VAIO logo appears. 3 Enter the user password and press the Enter key. 4 Press the < or , key to select Security to select Exit, select Exit Setup, and... Security tab, select Set User Password, and then press the Enter key. 5 On the password entry screen, enter the current password once and a new password twice, and then press the Enter key. n 104 N Customizing Your VAIO Computer To change or remove the power-on password (user password) 1 Turn on the computer. 2 Press...

User Guide
Page 105
... the master password and keep it safe and private from other people. ✍ If your computer. If you must set ), after the VAIO logo appears. ! If you will have set the hard disk password in conjunction with the fingerprint authentication function, you can substitute fingerprint authentication...on the computer to enter the password along with the master password. You will have to reset the user password in the BIOS setup screen. For more information, see Using Fingerprint Authentication (page 111). There is equipped with a fingerprint sensor and you have to lock your ...
... the master password and keep it safe and private from other people. ✍ If your computer. If you must set ), after the VAIO logo appears. ! If you will have set the hard disk password in conjunction with the fingerprint authentication function, you can substitute fingerprint authentication...on the computer to enter the password along with the master password. You will have to reset the user password in the BIOS setup screen. For more information, see Using Fingerprint Authentication (page 111). There is equipped with a fingerprint sensor and you have to lock your ...

User Guide
Page 106
The BIOS setup screen appears. The password should be up to 32 alphanumeric characters (including spaces) long. 7 Enter the user password twice and press the Enter key. If not, restart the computer and press the F2 key several times when the VAIO logo appears. ✍ If you have set the power-on password..., enter your power-on the warning screen and press the Enter key. 6 Enter the master password twice and press the Enter key. At...
The BIOS setup screen appears. The password should be up to 32 alphanumeric characters (including spaces) long. 7 Enter the user password twice and press the Enter key. If not, restart the computer and press the F2 key several times when the VAIO logo appears. ✍ If you have set the power-on password..., enter your power-on the warning screen and press the Enter key. 6 Enter the master password twice and press the Enter key. At...

User Guide
Page 107
The Hard Disk Password entry screen appears. 4 Select Change Master Password or Change User Password and press the Enter key. 5 Enter ... press the Enter key. If not, restart the computer and press the F2 key several times when the VAIO logo appears. ✍ If you have set the power-on password, enter your power-on the computer. 2 Press... the F2 key when the VAIO logo appears. n 107 N Customizing Your VAIO Computer Changing/Removing the Hard Disk Password To change the hard disk password 1 Turn on password. 3 Press the...
The Hard Disk Password entry screen appears. 4 Select Change Master Password or Change User Password and press the Enter key. 5 Enter ... press the Enter key. If not, restart the computer and press the F2 key several times when the VAIO logo appears. ✍ If you have set the power-on password, enter your power-on the computer. 2 Press... the F2 key when the VAIO logo appears. n 107 N Customizing Your VAIO Computer Changing/Removing the Hard Disk Password To change the hard disk password 1 Turn on password. 3 Press the...

User Guide
Page 108
... power-on password, enter your power-on the computer. 2 Press the F2 key when the VAIO logo appears. At the confirmation prompt, press the Enter key. The BIOS setup screen appears. n 108 N Customizing Your VAIO Computer To remove the hard disk password 1 Turn on password. 3 Press the < or ,... key to select Security to select Exit Setup and press the Enter key. The Hard Disk Password entry screen appears. 4 Select Enter Master and...
... power-on password, enter your power-on the computer. 2 Press the F2 key when the VAIO logo appears. At the confirmation prompt, press the Enter key. The BIOS setup screen appears. n 108 N Customizing Your VAIO Computer To remove the hard disk password 1 Turn on password. 3 Press the < or ,... key to select Security to select Exit Setup and press the Enter key. The Hard Disk Password entry screen appears. 4 Select Enter Master and...

User Guide
Page 113
... feature later. 1 Click Start, All Programs, Protector Suite QL, and Control Center. 2 Click Fingerprints and Initialize. 3 Follow the on-screen instructions. ✍ For detailed information, see the help file. n 113 N Customizing Your VAIO Computer Registering a Fingerprint To use the fingerprint authentication function, you want to 21 fingerprints can also select the fingerprint...
... feature later. 1 Click Start, All Programs, Protector Suite QL, and Control Center. 2 Click Fingerprints and Initialize. 3 Follow the on-screen instructions. ✍ For detailed information, see the help file. n 113 N Customizing Your VAIO Computer Registering a Fingerprint To use the fingerprint authentication function, you want to 21 fingerprints can also select the fingerprint...


