User Guide
Page 2
...the Indicator Lights 19 Connecting a Power Source 20 Using the Battery Pack 21 Shutting Down Your Computer Safely 28 Updating Your Computer 29 Using Your VAIO Computer 30 Using the Keyboard 31 Using the Touch Pad 32 Using Special-function Buttons 33 Using the Built-in Camera 35 Using the Optical... Modes 99 Using the Multiple Monitors Function 101 Connecting an External Microphone 104 Connecting a USB Device 105 Connecting an i.LINK Device 107 Customizing Your VAIO Computer 109 Setting the Password 110 Using the VAIO Control Center 117 Using the Power Saving Modes 118 Using the...
...the Indicator Lights 19 Connecting a Power Source 20 Using the Battery Pack 21 Shutting Down Your Computer Safely 28 Updating Your Computer 29 Using Your VAIO Computer 30 Using the Keyboard 31 Using the Touch Pad 32 Using Special-function Buttons 33 Using the Built-in Camera 35 Using the Optical... Modes 99 Using the Multiple Monitors Function 101 Connecting an External Microphone 104 Connecting a USB Device 105 Connecting an i.LINK Device 107 Customizing Your VAIO Computer 109 Setting the Password 110 Using the VAIO Control Center 117 Using the Power Saving Modes 118 Using the...
User Guide
Page 4
... following URLs: ❑ For customers in USA http://esupport.sony.com/EN/VAIO/ ❑ For customers in Canada http://www.sony.ca/support/ ❑ For customers in Spanish-speaking Latin American countries or areas http://esupport.sony.com/LA/ ❑ For customers in the supplied manuals... communications to provide state-of-the-art personal computing experience. ! Before Use > n4 N Before Use Congratulations on your purchase of this Sony VAIO® computer, and welcome to the on your computer. How to find specifications Some features, options, and supplied items may look slightly ...
... following URLs: ❑ For customers in USA http://esupport.sony.com/EN/VAIO/ ❑ For customers in Canada http://www.sony.ca/support/ ❑ For customers in Spanish-speaking Latin American countries or areas http://esupport.sony.com/LA/ ❑ For customers in the supplied manuals... communications to provide state-of-the-art personal computing experience. ! Before Use > n4 N Before Use Congratulations on your purchase of this Sony VAIO® computer, and welcome to the on your computer. How to find specifications Some features, options, and supplied items may look slightly ...
User Guide
Page 5
... and Support - To access Help and Support: 1 Click Start and Help and Support. 2 Choose from the following categories to the original factory settings - Use my VAIO Access interactive help with VAIO Care, system restore, backup and recovery, and contact Sony support. Printed Documentation ❑ Quick Start Guide - VAIO Recovery Center User Guide -
... and Support - To access Help and Support: 1 Click Start and Help and Support. 2 Choose from the following categories to the original factory settings - Use my VAIO Access interactive help with VAIO Care, system restore, backup and recovery, and contact Sony support. Printed Documentation ❑ Quick Start Guide - VAIO Recovery Center User Guide -
User Guide
Page 6
May be available on your computer. Before Use > Finding More about Your VAIO Computer n6 N ❑ Program help menu on a specific program. ❑ SmartWi™ Connection Utility Help (Selected models only) - Information about configuration of your computer. To ...
May be available on your computer. Before Use > Finding More about Your VAIO Computer n6 N ❑ Program help menu on a specific program. ❑ SmartWi™ Connection Utility Help (Selected models only) - Information about configuration of your computer. To ...
User Guide
Page 7
... commonly encountered problems. Type a description of the problem and the Knowledge Database searches for the corresponding solutions online. ❑ For customers in USA http://esupport.sony.com/EN/VAIO/ ❑ For customers in Canada http://www.sony.ca/support/ ❑ For customers in Spanish-speaking Latin American countries or areas http://esupport...
... commonly encountered problems. Type a description of the problem and the Knowledge Database searches for the corresponding solutions online. ❑ For customers in USA http://esupport.sony.com/EN/VAIO/ ❑ For customers in Canada http://www.sony.ca/support/ ❑ For customers in Spanish-speaking Latin American countries or areas http://esupport...
User Guide
Page 8
.../backstage to receive the fastest and most efficient services, have the following information readily available: 1 Your VAIO computer model You can find the information you are looking for your Sony VAIO computer. The serial number is causing the problem 5 A brief description of the number below the barcode.... 3 The operating system on the Sony online support web site. Before Use > Finding More about Your VAIO Computer n8 N 4. Customer Information Center If you do not find it on the bottom, the back panel,...
.../backstage to receive the fastest and most efficient services, have the following information readily available: 1 Your VAIO computer model You can find the information you are looking for your Sony VAIO computer. The serial number is causing the problem 5 A brief description of the number below the barcode.... 3 The operating system on the Sony online support web site. Before Use > Finding More about Your VAIO Computer n8 N 4. Customer Information Center If you do not find it on the bottom, the back panel,...

User Guide
Page 11
Be sure to get started using your system. Getting Started > n 11 N Getting Started This section describes how to start up your VAIO computer. ! Before starting your computer. Upon completion, connect one device (for the first time, do not connect any other hardware that did not originally come ...
Be sure to get started using your system. Getting Started > n 11 N Getting Started This section describes how to start up your VAIO computer. ! Before starting your computer. Upon completion, connect one device (for the first time, do not connect any other hardware that did not originally come ...
User Guide
Page 26
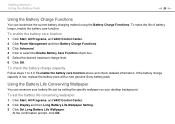
... background. If the battery charge capacity is low, replace the battery pack with a new genuine Sony battery pack. To set the battery life conserving wallpaper 1 Click Start, All Programs, and VAIO Control Center. 2 Click Display and then Long Battery Life Wallpaper Setting. 3 Click Set Long Battery...method using the Battery Charge Functions. At the confirmation prompt, click OK. To enable the battery care function 1 Click Start, All Programs, and VAIO Control Center. 2 Click Power Management and then Battery Charge Functions. 3 Click Advanced. 4 Click to 3 in To enable the battery care ...
... background. If the battery charge capacity is low, replace the battery pack with a new genuine Sony battery pack. To set the battery life conserving wallpaper 1 Click Start, All Programs, and VAIO Control Center. 2 Click Display and then Long Battery Life Wallpaper Setting. 3 Click Set Long Battery...method using the Battery Charge Functions. At the confirmation prompt, click OK. To enable the battery care function 1 Click Start, All Programs, and VAIO Control Center. 2 Click Power Management and then Battery Charge Functions. 3 Click Advanced. 4 Click to 3 in To enable the battery care ...

User Guide
Page 29
Your computer must be connected to the Internet to install the latest updates on your computer with the following software applications so that the computer can run more efficiently. ❑ Windows Update Click Start, All Programs, and Windows Update and then follow the on-screen instructions. ❑ VAIO Update 4 Click Start, All Programs, VAIO Update 4, and VAIO Update Options and then follow the on-screen instructions. ! Getting Started > Updating Your Computer n 29 N Updating Your Computer Be sure to download the updates.
Your computer must be connected to the Internet to install the latest updates on your computer with the following software applications so that the computer can run more efficiently. ❑ Windows Update Click Start, All Programs, and Windows Update and then follow the on-screen instructions. ❑ VAIO Update 4 Click Start, All Programs, VAIO Update 4, and VAIO Update Options and then follow the on-screen instructions. ! Getting Started > Updating Your Computer n 29 N Updating Your Computer Be sure to download the updates.

User Guide
Page 30
... This section describes how to get the most out of using your VAIO computer. ❑ Using the Keyboard (page 31) ❑ Using the Touch Pad (page 32) ❑ Using Special-function Buttons (page 33) ❑ Using the Built-...
... This section describes how to get the most out of using your VAIO computer. ❑ Using the Keyboard (page 31) ❑ Using the Touch Pad (page 32) ❑ Using Special-function Buttons (page 33) ❑ Using the Built-...

User Guide
Page 31
Combinations and Functions with the VAIO Control Center for more information. Toggles among your computer screen. See the help file included with the Fn Key ✍ Some keyboard functions can be ... button to the built-in ), press the Fn+F10 keys. Provides the lowest level of an image or a document displayed on some software. Using Your VAIO Computer > Using the Keyboard n 31 N Using the Keyboard Your keyboard has additional keys that perform model-specific tasks. Combinations/Feature Fn + 8 (F5/F6): brightness control...
Combinations and Functions with the VAIO Control Center for more information. Toggles among your computer screen. See the help file included with the Fn Key ✍ Some keyboard functions can be ... button to the built-in ), press the Fn+F10 keys. Provides the lowest level of an image or a document displayed on some software. Using Your VAIO Computer > Using the Keyboard n 31 N Using the Keyboard Your keyboard has additional keys that perform model-specific tasks. Combinations/Feature Fn + 8 (F5/F6): brightness control...
User Guide
Page 32
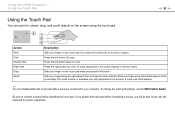
Using Your VAIO Computer > Using the Touch Pad Using the Touch Pad You can disable/enable the touch pad while a mouse is available only with applications that support a ... sure to scroll vertically. n 32 N Action Point Click Double-click Right-click Drag Scroll Description Slide your finger on the touch pad (1) to use the VAIO Control Center. ! Press the left button twice in a row. Slide your finger along the bottom edge to scroll horizontally (the scroll function is connected to...
Using Your VAIO Computer > Using the Touch Pad Using the Touch Pad You can disable/enable the touch pad while a mouse is available only with applications that support a ... sure to scroll vertically. n 32 N Action Point Click Double-click Right-click Drag Scroll Description Slide your finger on the touch pad (1) to use the VAIO Control Center. ! Press the left button twice in a row. Slide your finger along the bottom edge to scroll horizontally (the scroll function is connected to...
User Guide
Page 33
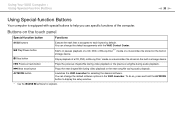
.... x Stop button Stops playback of the computer. You can change the default software options in the VAIO Launcher. AV MODE button Launches the VAIO Launcher for playback. Using Your VAIO Computer > Using Special-function Buttons n 33 N Using Special-function Buttons Your computer is assigned to ...music/video file stored on the touch panel Special-function button Functions S1/S2 buttons Execute the task that is equipped with the VAIO Control Center. Previous track button Plays the previous chapter/file during video playback or the previous song/file during audio playback. >...
.... x Stop button Stops playback of the computer. You can change the default software options in the VAIO Launcher. AV MODE button Launches the VAIO Launcher for playback. Using Your VAIO Computer > Using Special-function Buttons n 33 N Using Special-function Buttons Your computer is assigned to ...music/video file stored on the touch panel Special-function button Functions S1/S2 buttons Execute the task that is equipped with the VAIO Control Center. Previous track button Plays the previous chapter/file during video playback or the previous song/file during audio playback. >...
User Guide
Page 34
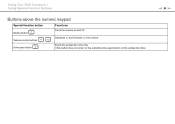
n 34 N Decrease (-) and increase (+) the volume. Using Your VAIO Computer > Using Special-function Buttons Buttons above the numeric keypad Special-function button Muting button Volume control buttons Drive eject button Functions Turns the volume on the optical disc drive. If this button does not work, try the substitute drive eject button on and off. Ejects the optical disc drive tray.
n 34 N Decrease (-) and increase (+) the volume. Using Your VAIO Computer > Using Special-function Buttons Buttons above the numeric keypad Special-function button Muting button Volume control buttons Drive eject button Functions Turns the volume on the optical disc drive. If this button does not work, try the substitute drive eject button on and off. Ejects the optical disc drive tray.
User Guide
Page 35
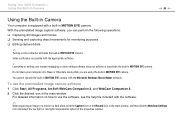
... window. For detailed information on the computer activates the built-in MOTION EYE camera. You cannot operate the built-in MOTION EYE camera. Using Your VAIO Computer > Using the Built-in Camera n 35 N Using the Built-in Camera Your computer is possible with the appropriate software. ! With the preinstalled image capture...
... window. For detailed information on the computer activates the built-in MOTION EYE camera. You cannot operate the built-in MOTION EYE camera. Using Your VAIO Computer > Using the Built-in Camera n 35 N Using the Built-in Camera Your computer is possible with the appropriate software. ! With the preinstalled image capture...
User Guide
Page 36
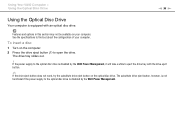
... be available on your computer. If the power supply to the optical disc drive is disabled by the VAIO Power Management, it will take a while to the optical disc drive is disabled by the VAIO Power Management. To insert a disc 1 Turn on the computer. 2 Press the drive eject button (1) to ... supply to eject the drive tray with an optical disc drive. The drive tray slides out. ! See the specifications to open the drive. Using Your VAIO Computer > Using the Optical Disc Drive n 36 N Using the Optical Disc Drive Your computer is equipped with the drive eject button. ✍ If ...
... be available on your computer. If the power supply to the optical disc drive is disabled by the VAIO Power Management, it will take a while to the optical disc drive is disabled by the VAIO Power Management. To insert a disc 1 Turn on the computer. 2 Press the drive eject button (1) to ... supply to eject the drive tray with an optical disc drive. The drive tray slides out. ! See the specifications to open the drive. Using Your VAIO Computer > Using the Optical Disc Drive n 36 N Using the Optical Disc Drive Your computer is equipped with the drive eject button. ✍ If ...

User Guide
Page 37
Do not remove the optical disc when your computer is in gently. ! Be sure to bring the computer back into place. 4 Close the drive tray by pushing it in a power saving mode (Sleep or Hibernate). Using Your VAIO Computer > Using the Optical Disc Drive n 37 N 3 Place a disc in the middle of the drive tray with the label side facing upward and gently push it down until the disc clicks into Normal mode before removing the disc.
Do not remove the optical disc when your computer is in gently. ! Be sure to bring the computer back into place. 4 Close the drive tray by pushing it in a power saving mode (Sleep or Hibernate). Using Your VAIO Computer > Using the Optical Disc Drive n 37 N 3 Place a disc in the middle of the drive tray with the label side facing upward and gently push it down until the disc clicks into Normal mode before removing the disc.

User Guide
Page 38
... model you purchased. Video Music CD CD-R/ DVD- BD- DVD- PR: playable and recordable P: playable but not recordable -: not playable or recordable CD- Using Your VAIO Computer > Using the Optical Disc Drive n 38 N Supported Disc Media Your computer plays and records CDs, DVDs, and Blu-ray Disc media, depending on your...
... model you purchased. Video Music CD CD-R/ DVD- BD- DVD- PR: playable and recordable P: playable but not recordable -: not playable or recordable CD- Using Your VAIO Computer > Using the Optical Disc Drive n 38 N Supported Disc Media Your computer plays and records CDs, DVDs, and Blu-ray Disc media, depending on your...
User Guide
Page 39
...Protection (HDCP) standard, you buy pre-recorded or blank discs for some contents on this product because it does not conform to malfunction. VAIO computers may limit compatibility or prevent Blu-ray Disc media playback. Unless your external display is not possible. Be aware that conform to standard.... It is designed to play on DVD and BD-ROM Disc media. This may cause the computer to the CD Standard. Sony does NOT guarantee the compatibility of VAIO optical disc drives with the official "CD," "DVD," or "Blu-ray Disc" standard. This product is strongly recommended that ...
...Protection (HDCP) standard, you buy pre-recorded or blank discs for some contents on this product because it does not conform to malfunction. VAIO computers may limit compatibility or prevent Blu-ray Disc media playback. Unless your external display is not possible. Be aware that conform to standard.... It is designed to play on DVD and BD-ROM Disc media. This may cause the computer to the CD Standard. Sony does NOT guarantee the compatibility of VAIO optical disc drives with the official "CD," "DVD," or "Blu-ray Disc" standard. This product is strongly recommended that ...

User Guide
Page 40
...not plug or unplug the AC adapter while the optical disc drive is playing a disc. Using Your VAIO Computer > Using the Optical Disc Drive n 40 N Notes on Using the Optical Disc Drive Notes on ...writing data to a disc ❑ Only use the VAIO Update, see Updating Your Computer (page 29). ❑ Depending on system environment, you should follow these...able to play such contents normally, download and install the latest updates for the WinDVD BD using the VAIO Update. Do not use discs in any other shape (star, heart, card, etc.), as this ...
...not plug or unplug the AC adapter while the optical disc drive is playing a disc. Using Your VAIO Computer > Using the Optical Disc Drive n 40 N Notes on Using the Optical Disc Drive Notes on ...writing data to a disc ❑ Only use the VAIO Update, see Updating Your Computer (page 29). ❑ Depending on system environment, you should follow these...able to play such contents normally, download and install the latest updates for the WinDVD BD using the VAIO Update. Do not use discs in any other shape (star, heart, card, etc.), as this ...

