
User Guide
Page 2
......13 Locating Controls and Ports...14 About the Indicator Lights ...20 Setting Up Your Computer ...21 Shutting Down Your Computer Safely ...36 Using Your VAIO Computer ...37 Using the Keyboard ...38 Using the Touch Pad ...42 Using the Mouse ...43 Using the Optical Disc Drive ...46 Using the TV... Function ...55 Using the HDMI Input Function ...74 Using the ExpressCard Module ...82 Using the Memory Stick ...86 Using the SD Memory Card ...92 Using the CF Memory Card ...95 Using the Internet...99 Using Wireless LAN (WLAN) ...100 Using the Bluetooth Function ...103
......13 Locating Controls and Ports...14 About the Indicator Lights ...20 Setting Up Your Computer ...21 Shutting Down Your Computer Safely ...36 Using Your VAIO Computer ...37 Using the Keyboard ...38 Using the Touch Pad ...42 Using the Mouse ...43 Using the Optical Disc Drive ...46 Using the TV... Function ...55 Using the HDMI Input Function ...74 Using the ExpressCard Module ...82 Using the Memory Stick ...86 Using the SD Memory Card ...92 Using the CF Memory Card ...95 Using the Internet...99 Using Wireless LAN (WLAN) ...100 Using the Bluetooth Function ...103

User Guide
Page 3
n3 N Using Peripheral Devices ...108 Connecting External Speakers ...109 Connecting an External Display ...111 Selecting Display Modes...115 Using the Multiple Monitors Function ...116 Connecting a Universal Serial Bus (USB) Device...118 Connecting a Printer ...120 Connecting an i.LINK Device ...121 Connecting to a Network (LAN) ...123 Customizing Your VAIO Computer ...125 Setting the Password ...126 Setting Up Your Computer with VAIO Control Center 131 Using the Power Saving Mode...132 Upgrading Your VAIO Computer...135 Adding and Removing Memory...136 Replacing the Hard Disk Drive ...143
n3 N Using Peripheral Devices ...108 Connecting External Speakers ...109 Connecting an External Display ...111 Selecting Display Modes...115 Using the Multiple Monitors Function ...116 Connecting a Universal Serial Bus (USB) Device...118 Connecting a Printer ...120 Connecting an i.LINK Device ...121 Connecting to a Network (LAN) ...123 Customizing Your VAIO Computer ...125 Setting the Password ...126 Setting Up Your Computer with VAIO Control Center 131 Using the Power Saving Mode...132 Upgrading Your VAIO Computer...135 Adding and Removing Memory...136 Replacing the Hard Disk Drive ...143

User Guide
Page 4
n4 N Precautions ...155 Handling the LCD Screen ...156 Using the Power Source ...157 Handling Your Computer ...158 Handling Floppy Disks ...161 Handling Discs ...162 Using Headphones ...163 Handling the Memory Stick ...164 Handling the Hard Disk ...165 Updating Your Computer ...166 Troubleshooting ...167 Computer ...169 System Security ...175 Networking ...176 Bluetooth Technology ...179 Optical Discs ...183 Display ...187 Printing ...188 Microphone ...189 Mouse ...190 Speakers ...191 Touch Pad...193 Keyboard...194 Floppy Disks ...195
n4 N Precautions ...155 Handling the LCD Screen ...156 Using the Power Source ...157 Handling Your Computer ...158 Handling Floppy Disks ...161 Handling Discs ...162 Using Headphones ...163 Handling the Memory Stick ...164 Handling the Hard Disk ...165 Updating Your Computer ...166 Troubleshooting ...167 Computer ...169 System Security ...175 Networking ...176 Bluetooth Technology ...179 Optical Discs ...183 Display ...187 Printing ...188 Microphone ...189 Mouse ...190 Speakers ...191 Touch Pad...193 Keyboard...194 Floppy Disks ...195

User Guide
Page 16
n 16 N Getting Started A Air exhaust vent (page 159) B Top HARD DISK DRIVE ACCESS BAY (Port 1) cover (page 143) C Bottom HARD DISK DRIVE ACCESS BAY (Port 0) cover (page 143) D Left cable clamps (page 24) E Right cable clamp (page 26) F Memory module compartment cover (page 136) ! Be sure to wait until the main unit cools down before you touch the top surface. The aluminum part in the vicinity of the air exhaust vent (1) on the top surface of the main unit becomes hot while your computer is on.
n 16 N Getting Started A Air exhaust vent (page 159) B Top HARD DISK DRIVE ACCESS BAY (Port 1) cover (page 143) C Bottom HARD DISK DRIVE ACCESS BAY (Port 0) cover (page 143) D Left cable clamps (page 24) E Right cable clamp (page 26) F Memory module compartment cover (page 136) ! Be sure to wait until the main unit cools down before you touch the top surface. The aluminum part in the vicinity of the air exhaust vent (1) on the top surface of the main unit becomes hot while your computer is on.
User Guide
Page 19
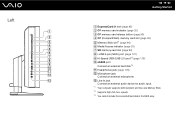
... RAID array. Left n 19 N Getting Started A ExpressCard/34 slot (page 82) B CF memory card indicator (page 20) C CF memory card release button (page 95) D CF (CompactFlash) memory card slot (page 95) E Memory Stick slot*1 (page 86) F Media Access indicator (page 20) G SD memory card slot (page 92) H i.LINK 4-pin (S400) port (page 121) I Hi-Speed...
... RAID array. Left n 19 N Getting Started A ExpressCard/34 slot (page 82) B CF memory card indicator (page 20) C CF memory card release button (page 95) D CF (CompactFlash) memory card slot (page 95) E Memory Stick slot*1 (page 86) F Media Access indicator (page 20) G SD memory card slot (page 92) H i.LINK 4-pin (S400) port (page 121) I Hi-Speed...

User Guide
Page 20
...or written to the HDMI INPUT port is on . Illuminates when the computer is on and/or when the HDMI-compatible device connected to a memory card. (Do not place the computer into Sleep mode or turn it off when this indicator is lit.) When the indicator is unlit, the... is turned off . n 20 N Getting Started About the Indicator Lights Your computer is equipped with the following indicator lights: Indicator Power 1 System power CF memory card Media Access HDMI SELECT DISPLAY OFF Hard disk drive/Optical disc drive WIRELESS Functions Illuminates in green when the computer is on, illuminates in...
...or written to the HDMI INPUT port is on . Illuminates when the computer is on and/or when the HDMI-compatible device connected to a memory card. (Do not place the computer into Sleep mode or turn it off when this indicator is lit.) When the indicator is unlit, the... is turned off . n 20 N Getting Started About the Indicator Lights Your computer is equipped with the following indicator lights: Indicator Power 1 System power CF memory card Media Access HDMI SELECT DISPLAY OFF Hard disk drive/Optical disc drive WIRELESS Functions Illuminates in green when the computer is on, illuminates in...
User Guide
Page 37
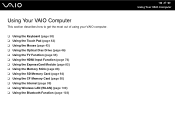
... This section describes how to get the most out of using your VAIO computer. ❑ Using the Keyboard (page 38) ❑ Using the Touch Pad (page 42) ❑ Using the Mouse (page 43) ❑ Using the Optical Disc ...) ❑ Using the HDMI Input Function (page 74) ❑ Using the ExpressCard Module (page 82) ❑ Using the Memory Stick (page 86) ❑ Using the SD Memory Card (page 92) ❑ Using the CF Memory Card (page 95) ❑ Using the Internet (page 99) ❑ Using Wireless LAN (WLAN) (page 100) ❑ Using...
... This section describes how to get the most out of using your VAIO computer. ❑ Using the Keyboard (page 38) ❑ Using the Touch Pad (page 42) ❑ Using the Mouse (page 43) ❑ Using the Optical Disc ...) ❑ Using the HDMI Input Function (page 74) ❑ Using the ExpressCard Module (page 82) ❑ Using the Memory Stick (page 86) ❑ Using the SD Memory Card (page 92) ❑ Using the CF Memory Card (page 95) ❑ Using the Internet (page 99) ❑ Using Wireless LAN (WLAN) (page 100) ❑ Using...

User Guide
Page 50
...use with a DVD recorded layer on one side and a digital audio layer on...Digital Audio standard specifications (CD Standard). Note that are required for use memory-resident utility software while the optical disc drive is strongly recommended that the .... USING NON-COMPLIANT DISCS CAN CAUSE FATAL DAMAGE TO YOUR VAIO PC OR CREATE SOFTWARE CONFLICTS AND CAUSE SYSTEM HANGING. Some contents may restrict video output to... BD-ROM Disc media. VAIO computers may limit compatibility or prevent Blu-ray Disc media playback. A DualDisc is not supported. ! Sony does NOT guarantee the compatibility...
...use with a DVD recorded layer on one side and a digital audio layer on...Digital Audio standard specifications (CD Standard). Note that are required for use memory-resident utility software while the optical disc drive is strongly recommended that the .... USING NON-COMPLIANT DISCS CAN CAUSE FATAL DAMAGE TO YOUR VAIO PC OR CREATE SOFTWARE CONFLICTS AND CAUSE SYSTEM HANGING. Some contents may restrict video output to... BD-ROM Disc media. VAIO computers may limit compatibility or prevent Blu-ray Disc media playback. A DualDisc is not supported. ! Sony does NOT guarantee the compatibility...

User Guide
Page 86
Because it is a compact, portable, and versatile IC recording media especially designed for external data storage. n 86 N Using Your VAIO Computer Using the Memory Stick Memory Stick is removable, it can be used for exchanging and sharing digital data with compatible products, such as digital cameras, mobile phones, and other devices.
Because it is a compact, portable, and versatile IC recording media especially designed for external data storage. n 86 N Using Your VAIO Computer Using the Memory Stick Memory Stick is removable, it can be used for exchanging and sharing digital data with compatible products, such as digital cameras, mobile phones, and other devices.
User Guide
Page 87
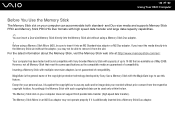
... the copyright law to remove it into the Memory Stick slot without the adaptor, you recorded without using a Memory Stick Micro (M2), be used only within the law. n 87 N Using Your VAIO Computer Before You Use the Memory Stick The Memory Stick slot on your computer does not support... with capacity of May 2008. For the latest information about the Memory Stick, visit the Memory Stick web site at http://www.memorystick.com/en/. ! Your computer has been tested and found compatible with Sony branded Memory Stick with high speed data transfer and large data capacity capabilities....
... the copyright law to remove it into the Memory Stick slot without the adaptor, you recorded without using a Memory Stick Micro (M2), be used only within the law. n 87 N Using Your VAIO Computer Before You Use the Memory Stick The Memory Stick slot on your computer does not support... with capacity of May 2008. For the latest information about the Memory Stick, visit the Memory Stick web site at http://www.memorystick.com/en/. ! Your computer has been tested and found compatible with Sony branded Memory Stick with high speed data transfer and large data capacity capabilities....

User Guide
Page 88
The Memory Stick is automatically detected by your system and the contents on the desktop, click Start, Computer, and double-click the Memory Stick icon. If nothing appears on the Memory Stick are displayed. n 88 N Using Your VAIO Computer Inserting a Memory Stick To insert a Memory Stick 1 Locate the Memory Stick slot (page 19). 2 Hold the Memory Stick with the arrow pointing toward the slot. 3 Carefully slide the Memory Stick into the slot until it clicks into place.
The Memory Stick is automatically detected by your system and the contents on the desktop, click Start, Computer, and double-click the Memory Stick icon. If nothing appears on the Memory Stick are displayed. n 88 N Using Your VAIO Computer Inserting a Memory Stick To insert a Memory Stick 1 Locate the Memory Stick slot (page 19). 2 Hold the Memory Stick with the arrow pointing toward the slot. 3 Carefully slide the Memory Stick into the slot until it clicks into place.

User Guide
Page 89
Be sure to view the list of the media may damage both your computer or the Memory Stick, do not force the Memory Stick into the slot if you insert it smoothly. Improper insertion of data files saved in the correct direction as you cannot insert it ... To view the contents on the Memory Stick 1 Click Start and Computer to open the Computer window. 2 Double-click the Memory Stick icon to hold the Memory Stick with the arrow pointing in the Memory Stick. Do not insert more than one Memory Stick into the slot. n 89 N Using Your VAIO Computer ! To avoid damaging your computer...
Be sure to view the list of the media may damage both your computer or the Memory Stick, do not force the Memory Stick into the slot if you insert it smoothly. Improper insertion of data files saved in the correct direction as you cannot insert it ... To view the contents on the Memory Stick 1 Click Start and Computer to open the Computer window. 2 Double-click the Memory Stick icon to hold the Memory Stick with the arrow pointing in the Memory Stick. Do not insert more than one Memory Stick into the slot. n 89 N Using Your VAIO Computer ! To avoid damaging your computer...

User Guide
Page 90
...file system may take time to use . It may change. Do not select NTFS from the slot while formatting. Be sure to format the Memory Stick depending on the media type. Before formatting the media, make sure that is ready for use the device that it may cause a ... select Format. 4 Click Restore device defaults. ! Do not remove the Memory Stick from the File system drop-down list as it does not contain your computer, follow these steps. ! n 90 N Using Your VAIO Computer To format a Memory Stick The Memory Stick has been formatted in Format options. 5 Click Start. 6 Follow ...
...file system may take time to use . It may change. Do not select NTFS from the slot while formatting. Be sure to format the Memory Stick depending on the media type. Before formatting the media, make sure that is ready for use the device that it may cause a ... select Format. 4 Click Restore device defaults. ! Do not remove the Memory Stick from the File system drop-down list as it does not contain your computer, follow these steps. ! n 90 N Using Your VAIO Computer To format a Memory Stick The Memory Stick has been formatted in Format options. 5 Click Start. 6 Follow ...

User Guide
Page 91
To remove a Memory Stick 1 Check that the Media Access indicator light is unlit before removing the Memory Stick. Large volumes of the slot. ! Do not remove the Memory Stick while the Media Access indicator light is lit. If you do, you may pop out unexpectedly. The Memory Stick ejects. 3 Pull the Memory Stick out of data may take time to load, so make sure the indicator is unlit. 2 Push in the Memory Stick toward the computer and release. n 91 N Using Your VAIO Computer Removing a Memory Stick ! Always remove the Memory Stick gently, or it may lose data.
To remove a Memory Stick 1 Check that the Media Access indicator light is unlit before removing the Memory Stick. Large volumes of the slot. ! Do not remove the Memory Stick while the Media Access indicator light is lit. If you do, you may pop out unexpectedly. The Memory Stick ejects. 3 Pull the Memory Stick out of data may take time to load, so make sure the indicator is unlit. 2 Push in the Memory Stick toward the computer and release. n 91 N Using Your VAIO Computer Removing a Memory Stick ! Always remove the Memory Stick gently, or it may lose data.
User Guide
Page 92
...damage to your computer supports the following memory cards: ❑ SD memory card ❑ SDHC memory card ❑ MultiMediaCard (MMC) For the latest information on compatible memory cards, see Sony Support Information (page 204) to insert an SD memory card or SD memory card adapter of up to transfer data ...site. ! Your computer has been tested and found compatible with major memory cards available as the compatible media are guaranteed of the SD memory card and the SDHC memory card. n 92 N Using Your VAIO Computer Using the SD Memory Card Your computer is equipped with an SD...
...damage to your computer supports the following memory cards: ❑ SD memory card ❑ SDHC memory card ❑ MultiMediaCard (MMC) For the latest information on compatible memory cards, see Sony Support Information (page 204) to insert an SD memory card or SD memory card adapter of up to transfer data ...site. ! Your computer has been tested and found compatible with major memory cards available as the compatible media are guaranteed of the SD memory card and the SDHC memory card. n 92 N Using Your VAIO Computer Using the SD Memory Card Your computer is equipped with an SD...

User Guide
Page 93
Do not force the card into the slot. ✍ If the SD memory card does not go into place. Inserting an SD Memory Card To insert an SD memory card 1 Locate the SD memory card slot (page 19). 2 Hold the SD memory card with the arrow pointing toward the slot. n 93 N Using Your VAIO Computer 3 Carefully slide the SD memory card into the slot until it clicks into the slot easily, remove it gently and verify you are inserting it in the proper direction.
Do not force the card into the slot. ✍ If the SD memory card does not go into place. Inserting an SD Memory Card To insert an SD memory card 1 Locate the SD memory card slot (page 19). 2 Hold the SD memory card with the arrow pointing toward the slot. n 93 N Using Your VAIO Computer 3 Carefully slide the SD memory card into the slot until it clicks into the slot easily, remove it gently and verify you are inserting it in the proper direction.

User Guide
Page 94
The SD memory card ejects. 3 Pull the SD memory card out of the slot. Do not remove an SD memory card while the Media Access indicator light is unlit. 2 Push in the SD memory card toward the computer and release. If you do, the card or its data may become damaged. To remove an SD memory card 1 Check that the Media Access indicator light is lit. n 94 N Using Your VAIO Computer Removing an SD Memory Card !
The SD memory card ejects. 3 Pull the SD memory card out of the slot. Do not remove an SD memory card while the Media Access indicator light is unlit. 2 Push in the SD memory card toward the computer and release. If you do, the card or its data may become damaged. To remove an SD memory card 1 Check that the Media Access indicator light is lit. n 94 N Using Your VAIO Computer Removing an SD Memory Card !
User Guide
Page 95
... data among digital cameras, camcorders, music players, and other audio/video devices. ! The CF (CompactFlash) memory card slot on your computer. n 95 N Using Your VAIO Computer Using the CF Memory Card Your computer is equipped with a CF (CompactFlash) memory card slot. You can use this slot to 16 GB have been tested and found...
... data among digital cameras, camcorders, music players, and other audio/video devices. ! The CF (CompactFlash) memory card slot on your computer. n 95 N Using Your VAIO Computer Using the CF Memory Card Your computer is equipped with a CF (CompactFlash) memory card slot. You can use this slot to 16 GB have been tested and found...

User Guide
Page 96
... time so that the slot protector pops out. 4 Gently take hold of the slot protector and pull it out of the slot. 5 Hold the CF memory card with a slot protector in or out of the slot. Do not force it clicks into the slot. Do not force the card into place.... Use care when inserting or removing the CF memory card from the slot. n 96 N Using Your VAIO Computer Inserting a CF Memory Card ! Your computer is supplied with the arrow facing toward the slot. 6 Carefully slide the CF...
... time so that the slot protector pops out. 4 Gently take hold of the slot protector and pull it out of the slot. 5 Hold the CF memory card with a slot protector in or out of the slot. Do not force it clicks into the slot. Do not force the card into place.... Use care when inserting or removing the CF memory card from the slot. n 96 N Using Your VAIO Computer Inserting a CF Memory Card ! Your computer is supplied with the arrow facing toward the slot. 6 Carefully slide the CF...

User Guide
Page 97
n 97 N Using Your VAIO Computer ! Insert the CF (CompactFlash) memory card slot protector to insert the CF (CompactFlash) memory card slot protector into the slot. ✍ If the memory card does not go into the slot easily, remove it gently and verify you are inserting it in the proper direction. Before moving your computer, be sure to block any particles from entering the slot when not using an CF memory card.
n 97 N Using Your VAIO Computer ! Insert the CF (CompactFlash) memory card slot protector to insert the CF (CompactFlash) memory card slot protector into the slot. ✍ If the memory card does not go into the slot easily, remove it gently and verify you are inserting it in the proper direction. Before moving your computer, be sure to block any particles from entering the slot when not using an CF memory card.


