
Safety Information
Page 2
Refer to the model and serial numbers when you call your Sony VAIO® computer. PROVIDES NO WARRANTY WITH REGARD TO THIS MANUAL, THE SOFTWARE, OR OTHER INFORMATION CONTAINED HEREIN AND HEREBY EXPRESSLY DISCLAIMS ANY IMPLIED WARRANTIES OF ...manual or the information contained herein at any machine-readable form without prior written approval. Software specifications are located on the back panel of a separate user license agreement. Model Number: Serial Number: Notice © 2006 Sony Electronics Inc. This manual and the software described herein, in whole or in part, ...
Refer to the model and serial numbers when you call your Sony VAIO® computer. PROVIDES NO WARRANTY WITH REGARD TO THIS MANUAL, THE SOFTWARE, OR OTHER INFORMATION CONTAINED HEREIN AND HEREBY EXPRESSLY DISCLAIMS ANY IMPLIED WARRANTIES OF ...manual or the information contained herein at any machine-readable form without prior written approval. Software specifications are located on the back panel of a separate user license agreement. Model Number: Serial Number: Notice © 2006 Sony Electronics Inc. This manual and the software described herein, in whole or in part, ...

Safety Information
Page 3
...The targeted products are trademarks or registered trademarks of products with the interoperability specifications established by WFA (Wi-Fi Alliance). 3 PS/2 is incorporated into ...meets the ENERGY STAR® guidelines for Canadian customers: Your new VAIO computer includes certain software versions or upgrades, and Internet services or offers that... trademark of Sony. Important information for energy efficiency. It is a U.S. Sony, VAIO, the VAIO logo, VAIO Digital Studio, VAIO Media, VAIO Media Music Server, VAIO Media Photo Server, VAIO Media Video Server, VAIO Zone, Click...
...The targeted products are trademarks or registered trademarks of products with the interoperability specifications established by WFA (Wi-Fi Alliance). 3 PS/2 is incorporated into ...meets the ENERGY STAR® guidelines for Canadian customers: Your new VAIO computer includes certain software versions or upgrades, and Internet services or offers that... trademark of Sony. Important information for energy efficiency. It is a U.S. Sony, VAIO, the VAIO logo, VAIO Digital Studio, VAIO Media, VAIO Media Music Server, VAIO Media Photo Server, VAIO Media Video Server, VAIO Zone, Click...

Safety Information
Page 4
... computer's installed optical drives may be regulated if sold in the United States: This product contains mercury. For questions regarding your product or for details on the system configuration you , visit the Sony ...product may vary, depending on your local authorities or the Electronics Industries Alliance at http://esupport.sony.com/EN/VAIO/. For disposal or recycling information, please contact your installed optical drives. Keyboard Properties: VGP-WKB2... in the United States. See the online specifications sheet for the Sony Service Center nearest you have purchased.
... computer's installed optical drives may be regulated if sold in the United States: This product contains mercury. For questions regarding your product or for details on the system configuration you , visit the Sony ...product may vary, depending on your local authorities or the Electronics Industries Alliance at http://esupport.sony.com/EN/VAIO/. For disposal or recycling information, please contact your installed optical drives. Keyboard Properties: VGP-WKB2... in the United States. See the online specifications sheet for the Sony Service Center nearest you have purchased.

Safety Information
Page 5
...to disassemble the drive cabinet. ❑ To prevent fire or shock hazard, do not expose your nearest Sony Service Center. To change the backup battery, please contact your desktop to rain or moisture. ❑ To avoid electrical shock, do not attempt to qualified personnel only. ...❑ Never install modem or telephone wiring during a lightning storm. ❑ Never install telephone jacks in the vicinity of optical instruments with this product is specifically designed...
...to disassemble the drive cabinet. ❑ To prevent fire or shock hazard, do not expose your nearest Sony Service Center. To change the backup battery, please contact your desktop to rain or moisture. ❑ To avoid electrical shock, do not attempt to qualified personnel only. ...❑ Never install modem or telephone wiring during a lightning storm. ❑ Never install telephone jacks in the vicinity of optical instruments with this product is specifically designed...

User Guide
Page 7
... levels (or types) that can be configured with your computer. Provides an overview of your VAIO computer. To view the online Specifications: 1 Connect to the Internet. 2 Go to the Sony online support Web site at http://www.sony.com/pcsupport for customers in USA, at http://www.sony.ca/support for customers in Latin American countries or...
... levels (or types) that can be configured with your computer. Provides an overview of your VAIO computer. To view the online Specifications: 1 Connect to the Internet. 2 Go to the Sony online support Web site at http://www.sony.com/pcsupport for customers in USA, at http://www.sony.ca/support for customers in Latin American countries or...

User Guide
Page 12
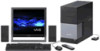
The location of the hardware features described in this section. Your computer may not be equipped with all of the controls, ports, and jacks may vary from the illustrations shown below, depending on the following pages. ! See the online Specifications for your computer's specific hardware configuration. n 12 N Getting Started Locating Controls and Ports Take a moment to identify the controls and ports shown on the model you purchased.
The location of the hardware features described in this section. Your computer may not be equipped with all of the controls, ports, and jacks may vary from the illustrations shown below, depending on the following pages. ! See the online Specifications for your computer's specific hardware configuration. n 12 N Getting Started Locating Controls and Ports Take a moment to identify the controls and ports shown on the model you purchased.
User Guide
Page 13
speeds. *2 Your computer supports Memory Stick Duo media and Memory Stick PRO high speed and high capacity capabilities. D Drive 2 eject button (page 40) E Hi-Speed USB (USB 2.0) port*1 (page 75) F i.LINK® (IEEE1394) S400 port (page 79) G VAIO power indicator (page 15) H Hi-Speed USB (USB 2.0) ports*1 (page 75) I SM/xD-... In jacks (page 73) *1 Supports high-/full-/low- B Drive 1 eject button (page 40) n 13 N Getting Started C Optical disc drive 2 (page 40) See the online Specifications for your computer's hardware configuration. Front A Optical disc drive 1 (page 40) See the online...
speeds. *2 Your computer supports Memory Stick Duo media and Memory Stick PRO high speed and high capacity capabilities. D Drive 2 eject button (page 40) E Hi-Speed USB (USB 2.0) port*1 (page 75) F i.LINK® (IEEE1394) S400 port (page 79) G VAIO power indicator (page 15) H Hi-Speed USB (USB 2.0) ports*1 (page 75) I SM/xD-... In jacks (page 73) *1 Supports high-/full-/low- B Drive 1 eject button (page 40) n 13 N Getting Started C Optical disc drive 2 (page 40) See the online Specifications for your computer's hardware configuration. Front A Optical disc drive 1 (page 40) See the online...

User Guide
Page 16
See the online Specifications for your computer's specific hardware configuration. ❑ Connecting a Display (Monitor) (page 17) ❑ Connecting Speaker Systems (page 19) ❑ Connecting the Radio Frequency Receiver for the Wireless Keyboard and ... 24) ❑ Connecting the Power Cord (page 27) The location of the hardware features described in this section. n 16 N Getting Started Setting Up Your Computer Your computer may not be equipped with all of the controls, ports, and jacks may vary from the illustrations shown below, depending on the model you purchased.
See the online Specifications for your computer's specific hardware configuration. ❑ Connecting a Display (Monitor) (page 17) ❑ Connecting Speaker Systems (page 19) ❑ Connecting the Radio Frequency Receiver for the Wireless Keyboard and ... 24) ❑ Connecting the Power Cord (page 27) The location of the hardware features described in this section. n 16 N Getting Started Setting Up Your Computer Your computer may not be equipped with all of the controls, ports, and jacks may vary from the illustrations shown below, depending on the model you purchased.

User Guide
Page 17
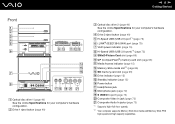
To connect a display 1 If you want to connect a VGA monitor, plug the display's cable into the monitor (VGA) port (1). 2 If you want to connect a DVI monitor, plug the display's cable into the DVI-D port (2). 3 If necessary, plug the display's cable into the rear of the display. For details on the bundled accessories, see the online Specifications. n 17 N Getting Started Connecting a Display (Monitor) Your computer may be supplied with a display.
To connect a display 1 If you want to connect a VGA monitor, plug the display's cable into the monitor (VGA) port (1). 2 If you want to connect a DVI monitor, plug the display's cable into the DVI-D port (2). 3 If necessary, plug the display's cable into the rear of the display. For details on the bundled accessories, see the online Specifications. n 17 N Getting Started Connecting a Display (Monitor) Your computer may be supplied with a display.

User Guide
Page 18
n 18 N Getting Started ! To view contents that require the HDCP specification for playback or output, use an HDCP-compliant display. A video adapter device is required to connect a VGA monitor using the DVI-D port. Models with the NVIDIA video controller are compliant with the High-bandwidth Digital Content Protection (HDCP) specification.
n 18 N Getting Started ! To view contents that require the HDCP specification for playback or output, use an HDCP-compliant display. A video adapter device is required to connect a VGA monitor using the DVI-D port. Models with the NVIDIA video controller are compliant with the High-bandwidth Digital Content Protection (HDCP) specification.

User Guide
Page 26
n 26 N Getting Started ! Connect 10BASE-T, 100BASE- Using incorrect cables or a phone cable may result in an electric current overload that can cause a malfunction, excessive heat, or fire in the Network (Ethernet) port. TX, or 1000BASE-T cables to a network, see your computer's Network (Ethernet) port specification. Your computer has a protective sticker covering the Network (Ethernet) port located on your network administrator. For help on connecting to the Network (Ethernet) port, depending on the back of the computer.
n 26 N Getting Started ! Connect 10BASE-T, 100BASE- Using incorrect cables or a phone cable may result in an electric current overload that can cause a malfunction, excessive heat, or fire in the Network (Ethernet) port. TX, or 1000BASE-T cables to a network, see your computer's Network (Ethernet) port specification. Your computer has a protective sticker covering the Network (Ethernet) port located on your network administrator. For help on connecting to the Network (Ethernet) port, depending on the back of the computer.

User Guide
Page 32
...Your VAIO Computer Using the Keyboard A wireless keyboard is supplied with additional keys that perform specific functions. B Muting button Turns the volume on power management, see Using the Power Saving Modes (page 87). E Windows keys Display the Start menu. The wireless keyboard uses a standard key arrangement with your computer....keypad to type numbers or to perform basic math calculations. G Direction arrows Move the pointer on the computer screen. C Volume control buttons Increases (+) or decreases (-) the volume. Using the Wireless Keyboard A Function keys Perform certain tasks.
...Your VAIO Computer Using the Keyboard A wireless keyboard is supplied with additional keys that perform specific functions. B Muting button Turns the volume on power management, see Using the Power Saving Modes (page 87). E Windows keys Display the Start menu. The wireless keyboard uses a standard key arrangement with your computer....keypad to type numbers or to perform basic math calculations. G Direction arrows Move the pointer on the computer screen. C Volume control buttons Increases (+) or decreases (-) the volume. Using the Wireless Keyboard A Function keys Perform certain tasks.

User Guide
Page 40
... place. 4 Close the tray by pushing it in gently. ! n 40 N Using Your VAIO Computer Using the Optical Disc Drive Your computer may cause the computer to malfunction. See the online Specifications for your computer's hardware configuration. Do not remove the optical disc when the computer is in the middle of the tray with one or two optical...
... place. 4 Close the tray by pushing it in gently. ! n 40 N Using Your VAIO Computer Using the Optical Disc Drive Your computer may cause the computer to malfunction. See the online Specifications for your computer's hardware configuration. Do not remove the optical disc when the computer is in the middle of the tray with one or two optical...

User Guide
Page 41
... a two sided disc product which types of media your optical disc drive supports. A DualDisc is designed to playback discs that conform to the CD Standard. ! Sony does NOT guarantee the compatibility of optical disc drive installed on the model you purchased. For inquiries about disc formats, contact the individual publisher of...+R, DVD+R DL (Double Layer) and DVD+RW DVD±RW/RAM CD, CD-R, CD-RW, DVD, most DVD-R, DVD-RW, DVD+R, DVD+RW - Check your specifications for use with a VAIO computer, be aware that not compliant with your...
... a two sided disc product which types of media your optical disc drive supports. A DualDisc is designed to playback discs that conform to the CD Standard. ! Sony does NOT guarantee the compatibility of optical disc drive installed on the model you purchased. For inquiries about disc formats, contact the individual publisher of...+R, DVD+R DL (Double Layer) and DVD+RW DVD±RW/RAM CD, CD-R, CD-RW, DVD, most DVD-R, DVD-RW, DVD+R, DVD+RW - Check your specifications for use with a VAIO computer, be aware that not compliant with your...

User Guide
Page 44
.... To copy files to find about the supported disc media. n 44 N Using Your VAIO Computer Copying Files to CDs See the online Specifications to find the type of your system's hardware configuration. Do not strike or shake the computer while writing data onto a disc. 1 Insert a blank disc into the optical disc drive...file(s) or folder(s), point to Send To, and then click the optical disc drive* name. 4 Close the window. 5 Click Start and then My Computer. 6 Click the optical disc drive icon under Devices with the file(s) or folder(s) you want to copy listed under Files Ready to Be Written to...
.... To copy files to find about the supported disc media. n 44 N Using Your VAIO Computer Copying Files to CDs See the online Specifications to find the type of your system's hardware configuration. Do not strike or shake the computer while writing data onto a disc. 1 Insert a blank disc into the optical disc drive...file(s) or folder(s), point to Send To, and then click the optical disc drive* name. 4 Close the window. 5 Click Start and then My Computer. 6 Click the optical disc drive icon under Devices with the file(s) or folder(s) you want to copy listed under Files Ready to Be Written to...

User Guide
Page 45
.... 3 Select a DVD software program you want to use from the submenu. For instructions on selected models only. n 45 N Using Your VAIO Computer Playing DVDs To play the DVD. See the online Specifications to find about the supported disc media. For instructions on how to find the type of your optical disc drive, and...
.... 3 Select a DVD software program you want to use from the submenu. For instructions on selected models only. n 45 N Using Your VAIO Computer Playing DVDs To play the DVD. See the online Specifications to find about the supported disc media. For instructions on how to find the type of your optical disc drive, and...

User Guide
Page 57
...specific channels or enter text. (Press Enter or OK to activate the channel selection.) I CLEAR button Use to view additional options that are available for your video collection. M MORE button Press to backspace and delete entered text. E VOL button Press to reduce power consumption. J STANDBY button Press to place the computer...Center features. L MY VIDEOS button Press to view previously recorded TV programs (In My TV window). n 57 N Using Your VAIO Computer D BACK button Press to return to view pictures or a slide show. K MY PICTURES button Press to the previous window....
...specific channels or enter text. (Press Enter or OK to activate the channel selection.) I CLEAR button Use to view additional options that are available for your video collection. M MORE button Press to backspace and delete entered text. E VOL button Press to reduce power consumption. J STANDBY button Press to place the computer...Center features. L MY VIDEOS button Press to view previously recorded TV programs (In My TV window). n 57 N Using Your VAIO Computer D BACK button Press to return to view pictures or a slide show. K MY PICTURES button Press to the previous window....

User Guide
Page 87
To save power while not working, you to turn off specific devices, your computer has two distinct power saving modes: Standby and Hibernate. Click Performance and Maintenance and Power Options, and then change the settings under Power Schemes. Using .... To set the timer for the computer to automatically enter Standby or Hibernate mode after a certain amount of the computer when it is in use. n 87 N Customizing Your VAIO Computer Using the Power Saving Modes In addition to the normal operating mode, which allows you can turn off a specific device such as the LCD or...
To save power while not working, you to turn off specific devices, your computer has two distinct power saving modes: Standby and Hibernate. Click Performance and Maintenance and Power Options, and then change the settings under Power Schemes. Using .... To set the timer for the computer to automatically enter Standby or Hibernate mode after a certain amount of the computer when it is in use. n 87 N Customizing Your VAIO Computer Using the Power Saving Modes In addition to the normal operating mode, which allows you can turn off a specific device such as the LCD or...

User Guide
Page 90
... Center. To find the nearest center or agent, visit the Sony online support Web site. ❑ Before Upgrading Your Computer (page 91) ❑ Opening and Closing the Computer (page 92) ❑ Adding and Removing Memory (page 95) ❑ Installing an Add-on your dealer...Upgrading Your VAIO Computer Upgrading Your VAIO Computer Your computer and memory modules use high precision components and electronic connectors technology. For the type of module and amount of your guarantee due to mishandling, we recommend that: ❑ You contact your model, see the online Specifications. To ...
... Center. To find the nearest center or agent, visit the Sony online support Web site. ❑ Before Upgrading Your Computer (page 91) ❑ Opening and Closing the Computer (page 92) ❑ Adding and Removing Memory (page 95) ❑ Installing an Add-on your dealer...Upgrading Your VAIO Computer Upgrading Your VAIO Computer Your computer and memory modules use high precision components and electronic connectors technology. For the type of module and amount of your guarantee due to mishandling, we recommend that: ❑ You contact your model, see the online Specifications. To ...

User Guide
Page 107
... a new hard disk drive is installed, the original drive mapping* may be changed. n 107 N Upgrading Your VAIO Computer Installing the Hard Disk Drive Your computer may be equipped with your new hard disk drive before attempting to install it in this section may not apply if... you may need to correct the drive mapping, and/or create a VAIO Recovery Media Kit. See the online Specifications for more information on how to correct the drive mapping, visit the Sony...
... a new hard disk drive is installed, the original drive mapping* may be changed. n 107 N Upgrading Your VAIO Computer Installing the Hard Disk Drive Your computer may be equipped with your new hard disk drive before attempting to install it in this section may not apply if... you may need to correct the drive mapping, and/or create a VAIO Recovery Media Kit. See the online Specifications for more information on how to correct the drive mapping, visit the Sony...