

User Guide
Page 11
Back panel 1 AC Input port Connection for the supplied power cord. 2 Mouse port Connection for a PS/2® mouse. 3 Keyboard port Connection for a PS/2 keyboard. 4 Printer port Connection for details on the computer model purchased. About the Back Panel The back panel of your computer. The icons on the back panel locate and identify the ports...
Back panel 1 AC Input port Connection for the supplied power cord. 2 Mouse port Connection for a PS/2® mouse. 3 Keyboard port Connection for a PS/2 keyboard. 4 Printer port Connection for details on the computer model purchased. About the Back Panel The back panel of your computer. The icons on the back panel locate and identify the ports...
User Guide
Page 16
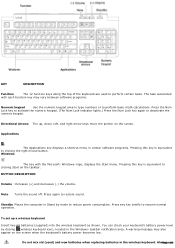
...Do not mix old (used to clicking the right mouse button. Directional Arrows The up a wireless keyboard Insert two AA batteries (supplied) into the wireless keyboard as shown. Pressing this key is equivalent to perform basic math calculations. The task associated with the ...Volume Increases (+) and decreases (-) the volume. Press any key briefly to deactivate the numeric keypad. Press again to reduce power consumption. Standby Places the computer in Stand by clicking (wireless keyboard icon), located in the Windows® taskbar notification area. You can check your ...
...Do not mix old (used to clicking the right mouse button. Directional Arrows The up a wireless keyboard Insert two AA batteries (supplied) into the wireless keyboard as shown. Pressing this key is equivalent to perform basic math calculations. The task associated with the ...Volume Increases (+) and decreases (-) the volume. Press any key briefly to deactivate the numeric keypad. Press again to reduce power consumption. Standby Places the computer in Stand by clicking (wireless keyboard icon), located in the Windows® taskbar notification area. You can check your ...

User Guide
Page 20
Wireless m ouse (Side and bottom ) 1 Power switch Slide power switch to turn the mouse on the LCD screen. 3 Right mouse button Press to use the wireless optical mouse with a wireless optical mouse1. Before attempting ... perform specific mouse functions. Wireless m ouse (top) 1 Left mouse button Press to perform specific mouse functions. 2 Wheel Rotate the wheel to enable communication between your computer, see the section, Connecting the Wireless Optical Mouse. To set up or down on or off. 2 CONNECT button Press to scroll up the wireless mouse...
Wireless m ouse (Side and bottom ) 1 Power switch Slide power switch to turn the mouse on the LCD screen. 3 Right mouse button Press to use the wireless optical mouse with a wireless optical mouse1. Before attempting ... perform specific mouse functions. Wireless m ouse (top) 1 Left mouse button Press to perform specific mouse functions. 2 Wheel Rotate the wheel to enable communication between your computer, see the section, Connecting the Wireless Optical Mouse. To set up or down on or off. 2 CONNECT button Press to scroll up the wireless mouse...

User Guide
Page 21
...of time, remove the batteries to be replaced. Using incompatible batteries or mixing used/new batteries can check your mouse's battery power level by clicking (wireless mouse icon), located in the wireless mouse. Inserting batteries into the wireless mouse as shown. Insert two AA batteries... (supplied) into the wireless m ouse If your wireless mouse does not operate properly, the batteries may need to avoid possible damage from battery ...
...of time, remove the batteries to be replaced. Using incompatible batteries or mixing used/new batteries can check your mouse's battery power level by clicking (wireless mouse icon), located in the wireless mouse. Inserting batteries into the wireless mouse as shown. Insert two AA batteries... (supplied) into the wireless m ouse If your wireless mouse does not operate properly, the batteries may need to avoid possible damage from battery ...

User Guide
Page 22
Before attempting to enable communication between your computer, see the section, Connecting the Wireless Optical Mouse. Wireless m ouse (Side and bottom ) 1 Power switch Slide power switch to turn the mouse on the LCD screen. 3 Right mouse button Press to perform specific mouse functions. To set up or down on or ... mouse button Press to perform specific mouse functions. 2 Wheel Rotate the wheel to scroll up the wireless mouse Page 22 About the Wireless Mouse Your VAIO® computer may be supplied with your VAIO® computer and the wireless mouse.
Before attempting to enable communication between your computer, see the section, Connecting the Wireless Optical Mouse. Wireless m ouse (Side and bottom ) 1 Power switch Slide power switch to turn the mouse on the LCD screen. 3 Right mouse button Press to perform specific mouse functions. To set up or down on or ... mouse button Press to perform specific mouse functions. 2 Wheel Rotate the wheel to scroll up the wireless mouse Page 22 About the Wireless Mouse Your VAIO® computer may be supplied with your VAIO® computer and the wireless mouse.

User Guide
Page 23
Insert two AA batteries (supplied) into the wireless m ouse If your wireless mouse does not operate properly, the batteries may need to avoid possible damage from battery leakage. 1See your c ... check your wireless mouse is not being used ) and new batteries when replacing batteries in the Windows® taskbar notification area. When your mouse's battery power level by clicking (wireless mouse icon), located in the wireless mouse. Inserting batteries into the wireless mouse as shown. You can damage the mouse. Do...
Insert two AA batteries (supplied) into the wireless m ouse If your wireless mouse does not operate properly, the batteries may need to avoid possible damage from battery leakage. 1See your c ... check your wireless mouse is not being used ) and new batteries when replacing batteries in the Windows® taskbar notification area. When your mouse's battery power level by clicking (wireless mouse icon), located in the wireless mouse. Inserting batteries into the wireless mouse as shown. You can damage the mouse. Do...

User Guide
Page 28
The total power supplied by the 6-pin i.LINK port does not exceed 6 watts. Use the symbol to locate the i.LINK port on your compatible i.LINK device and on installation and use. Connecting an i.LINK (IEEE 1394) device 1. About the i.LINK Port Your VAIO® computer is equipped with ...a 4-pin and a 6-pin i.LINK® port. See the instructions supplied with your i.LINK device for more information on your computer. Page 28 A 6-pin i.LINK port can supply power (10V to 12V) to a connected i.LINK ...
The total power supplied by the 6-pin i.LINK port does not exceed 6 watts. Use the symbol to locate the i.LINK port on your compatible i.LINK device and on installation and use. Connecting an i.LINK (IEEE 1394) device 1. About the i.LINK Port Your VAIO® computer is equipped with ...a 4-pin and a 6-pin i.LINK® port. See the instructions supplied with your i.LINK device for more information on your computer. Page 28 A 6-pin i.LINK port can supply power (10V to 12V) to a connected i.LINK ...

User Guide
Page 35
... 2. Connecting the Wireless Optical Mouse Your VAIO® computer may be within 2 feet of the VAIO® computer. Confirm that the supplied AA batteries are properly inserted into the mouse before your computer or wireless mouse, as mirrors, smooth ...computer and the mouse. To connect your mouse to use the same type and manufacture of battery. When attempting to provide precision pointing and tracking. Use surfaces such as plain paper, card stock, or fabric that the AA batteries (supplied) are properly installed. Turn the wireless mouse over and slide the power...
... 2. Connecting the Wireless Optical Mouse Your VAIO® computer may be within 2 feet of the VAIO® computer. Confirm that the supplied AA batteries are properly inserted into the mouse before your computer or wireless mouse, as mirrors, smooth ...computer and the mouse. To connect your mouse to use the same type and manufacture of battery. When attempting to provide precision pointing and tracking. Use surfaces such as plain paper, card stock, or fabric that the AA batteries (supplied) are properly installed. Turn the wireless mouse over and slide the power...

User Guide
Page 67
See the instructions supplied with the add-on the computer. Reconnect the power cord and all peripheral devices. 9. Page 67 See Replacing the cover. 8. Turn on card. 7. 6. Replace the side cover. Attach any internal cables that the card requires.
See the instructions supplied with the add-on the computer. Reconnect the power cord and all peripheral devices. 9. Page 67 See Replacing the cover. 8. Turn on card. 7. 6. Replace the side cover. Attach any internal cables that the card requires.

User Guide
Page 72
Configure the jumpers on its side. Slide the drive holder out. Page 72 Detach the power and drive cables from the chassis by removing the drive holder screw(s). 7. Do not overtighten these screws... original hard disk drive in your new drive as a slave, using the configuration instructions supplied with the necessary screws. Attaching the driv e screws Your new hard disk drive is supplied with the drive. 5. Realign the drive holder with screws. Slide the new drive into... holder. 10. Rem ov ing the driv e holder 8. 3. Remove the side cover and place the unit on your computer. 6.
Configure the jumpers on its side. Slide the drive holder out. Page 72 Detach the power and drive cables from the chassis by removing the drive holder screw(s). 7. Do not overtighten these screws... original hard disk drive in your new drive as a slave, using the configuration instructions supplied with the necessary screws. Attaching the driv e screws Your new hard disk drive is supplied with the drive. 5. Realign the drive holder with screws. Slide the new drive into... holder. 10. Rem ov ing the driv e holder 8. 3. Remove the side cover and place the unit on your computer. 6.
User Guide
Page 73
... format. 1Drive mapping refers to the as s ignment of the disk and then right-click to the new drive, following the instructions supplied with red marking). Replace the side cover. Log on the red side of the ribbon cable with memory c ard readers . Connect... the second drive connector to Windows® as an extended partition in the Windows taskbar, then right-click My Computer. Connect the second power connector to display a shortcut menu. 7. Reconnect the power cord to a s pec ific drive, s uc h as Drive C or Drive D whic h identify the original hard ...
... format. 1Drive mapping refers to the as s ignment of the disk and then right-click to the new drive, following the instructions supplied with red marking). Replace the side cover. Log on the red side of the ribbon cable with memory c ard readers . Connect... the second drive connector to Windows® as an extended partition in the Windows taskbar, then right-click My Computer. Connect the second power connector to display a shortcut menu. 7. Reconnect the power cord to a s pec ific drive, s uc h as Drive C or Drive D whic h identify the original hard ...

User Guide
Page 75
... that it is plugged into an appropriate power source and that the computer is turned on. Verify that the brightness or contrast control dials are adjusted correctly. (See the manual supplied with a floppy dis k drive. About VAIO Computer Functions My computer does not start. Verify that the computer is plugged into a power source and turned on.
... that it is plugged into an appropriate power source and that the computer is turned on. Verify that the brightness or contrast control dials are adjusted correctly. (See the manual supplied with a floppy dis k drive. About VAIO Computer Functions My computer does not start. Verify that the computer is plugged into a power source and turned on.
User Guide
Page 76
...Power Supply (UPS), make sure the power strip or UPS is turned on and working. Verify that the monitor is plugged into an appropriate power source and that the computer is turned on. Verify that the brightness or contrast control dials are adjusted correctly. (See the manual supplied with a floppy dis k drive. About VAIO Computer... Functions My computer does not start. Verify that the computer is plugged into a power source and that it is plugged into a power source and turned on. If...
...Power Supply (UPS), make sure the power strip or UPS is turned on and working. Verify that the monitor is plugged into an appropriate power source and that the computer is turned on. Verify that the brightness or contrast control dials are adjusted correctly. (See the manual supplied with a floppy dis k drive. About VAIO Computer... Functions My computer does not start. Verify that the computer is plugged into a power source and that it is plugged into a power source and turned on. If...

User Guide
Page 119
...-serviceable parts in an area that may occur during a brief period of the power supply to open the power supply. To remove power from the computer, you do not intend to your computer caused by power surges. Page 119 AC derived from the wall outlet or power strip. Do not place heavy objects on . To disconnect the...
...-serviceable parts in an area that may occur during a brief period of the power supply to open the power supply. To remove power from the computer, you do not intend to your computer caused by power surges. Page 119 AC derived from the wall outlet or power strip. Do not place heavy objects on . To disconnect the...

User Guide
Page 120
...its ventilation slots. Do not place your computer on loose surfaces (such as it . Do not use cut or damaged connection cables. Always switch the power off before operating it is adversely affecting ...61607; Do not exceed a maximum distance of 2 feet between your VAIO® computer and your wireless device. Verify that may condense inside your Sony Service Center. You may bill you correct the problem. Do not ... vibration or shock Strong magnets or speakers that the supplied AA batteries are not magnetically shielded Ambient temperature of your...
...its ventilation slots. Do not place your computer on loose surfaces (such as it . Do not use cut or damaged connection cables. Always switch the power off before operating it is adversely affecting ...61607; Do not exceed a maximum distance of 2 feet between your VAIO® computer and your wireless device. Verify that may condense inside your Sony Service Center. You may bill you correct the problem. Do not ... vibration or shock Strong magnets or speakers that the supplied AA batteries are not magnetically shielded Ambient temperature of your...

Safety Information
Page 3
...STAR® Office Equipment Program is not supplied with functions that promotes energy saving through the use of computers and other office equipment. Keyboard Properties: VGP-WKB2 (This keyboard is not supplied with all VAIO® computer models) Carrier frequency Output power 27.095 - 27.145MHz Less than ... this product may vary, depending on the back panel of your local authorities or the Electronics Industries Alliance at http://www.sony.com/pcsupport. It is a U.S. registered trademark of the Environmental Protection Agency. Owner's Record The model number and serial number...
...STAR® Office Equipment Program is not supplied with functions that promotes energy saving through the use of computers and other office equipment. Keyboard Properties: VGP-WKB2 (This keyboard is not supplied with all VAIO® computer models) Carrier frequency Output power 27.095 - 27.145MHz Less than ... this product may vary, depending on the back panel of your local authorities or the Electronics Industries Alliance at http://www.sony.com/pcsupport. It is a U.S. registered trademark of the Environmental Protection Agency. Owner's Record The model number and serial number...
Marketing Specifications
Page 2
...vary) Dimensions 7.13"(W) x 16.9"(H) x 15.24"(D) Supplied Accessories VAIO® Keyboard PS/2® USB Mouse Speakers Power Cord Software Operating System Microsoft® Windows® XP Media Center Edition 2005 Sony Original Software Click to change without written permission is compatible.... Some repairs may make any particular software packages and/or non-Sony add-on the Sony Desktop Computer are subject to be reduced under certain operating conditions. 2. VGC-RB52 VAIO® RB Series Desktop PC Hardware Processor Intel® Pentium® D Processor 820 (2.80GHz1...
...vary) Dimensions 7.13"(W) x 16.9"(H) x 15.24"(D) Supplied Accessories VAIO® Keyboard PS/2® USB Mouse Speakers Power Cord Software Operating System Microsoft® Windows® XP Media Center Edition 2005 Sony Original Software Click to change without written permission is compatible.... Some repairs may make any particular software packages and/or non-Sony add-on the Sony Desktop Computer are subject to be reduced under certain operating conditions. 2. VGC-RB52 VAIO® RB Series Desktop PC Hardware Processor Intel® Pentium® D Processor 820 (2.80GHz1...


