

Safety Information
Page 3
... support Web site at http://www.eiae.org. The program backs the development and dissemination of your Sony Service Center. ENERGY STAR is not supplied with all VAIO® computer models) Carrier frequency Output power 27.045 MHz Less than 1,800 nW Mouse Properties: PCVA-MS2 (This mouse is a U.S. Owner's Record The model number and...
... support Web site at http://www.eiae.org. The program backs the development and dissemination of your Sony Service Center. ENERGY STAR is not supplied with all VAIO® computer models) Carrier frequency Output power 27.045 MHz Less than 1,800 nW Mouse Properties: PCVA-MS2 (This mouse is a U.S. Owner's Record The model number and...

User Guide (primary user manual)
Page 11
... optional accessories. About the Back Panel The back panel of your computer may vary from those shown in this illustration, based on the computer model purchased. Back panel 1 AC Input port Connection for the supplied power cord. 2 Mouse port Connection for a PS/2® mouse. 3 Keyboard port Connection for a PS/2 keyboard. 4 Printer port Connection for...
... optional accessories. About the Back Panel The back panel of your computer may vary from those shown in this illustration, based on the computer model purchased. Back panel 1 AC Input port Connection for the supplied power cord. 2 Mouse port Connection for a PS/2® mouse. 3 Keyboard port Connection for a PS/2 keyboard. 4 Printer port Connection for...
User Guide (primary user manual)
Page 16
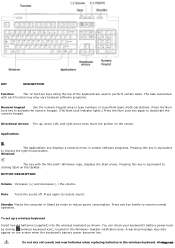
... the Microsoft® Windows® logo, displays the Start menu. Directional Arrows The up a wireless keyboard Insert two AA batteries (supplied) into the wireless keyboard as shown. Press again to deactivate the numeric keypad. Press any key briefly to perform basic math calculations.... with each function key may also appear on the screen when the keyboard's battery power becomes low. Pressing this key is equivalent to clicking the right mouse button. Standby Places the computer in Stand by clicking (wireless keyboard icon), located in the wireless keyboard. BUTTON ...
... the Microsoft® Windows® logo, displays the Start menu. Directional Arrows The up a wireless keyboard Insert two AA batteries (supplied) into the wireless keyboard as shown. Press again to deactivate the numeric keypad. Press any key briefly to perform basic math calculations.... with each function key may also appear on the screen when the keyboard's battery power becomes low. Pressing this key is equivalent to clicking the right mouse button. Standby Places the computer in Stand by clicking (wireless keyboard icon), located in the wireless keyboard. BUTTON ...

User Guide (primary user manual)
Page 20
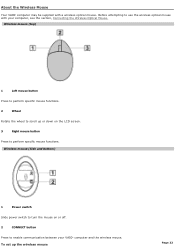
...power switch to turn the mouse on the LCD screen. 3 Right mouse button Press to scroll up the wireless mouse Page 20 Wireless m ouse (top) 1 Left mouse button Press to perform specific mouse functions. 2 Wheel Rotate the wheel to perform specific mouse functions. About the Wireless Mouse Your VAIO® computer may be supplied... with your VAIO® computer and the wireless mouse.
...power switch to turn the mouse on the LCD screen. 3 Right mouse button Press to scroll up the wireless mouse Page 20 Wireless m ouse (top) 1 Left mouse button Press to perform specific mouse functions. 2 Wheel Rotate the wheel to perform specific mouse functions. About the Wireless Mouse Your VAIO® computer may be supplied... with your VAIO® computer and the wireless mouse.
User Guide (primary user manual)
Page 21
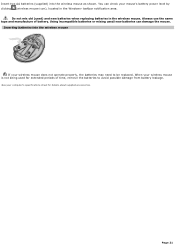
...to be replaced. When your wireless mouse is not being used for details about s upplied ac c es s ories . Insert two AA batteries (supplied) into the wireless m ouse If your wireless mouse does not operate properly, the batteries may need to avoid possible damage from battery leakage. 1See...omputer's s pec ific ations s heet for extended periods of battery. Do not mix old (used /new batteries can check your mouse's battery power level by clicking (wireless mouse icon), located in the wireless mouse. Page 21 Inserting batteries into the wireless mouse as shown. You can damage the...
...to be replaced. When your wireless mouse is not being used for details about s upplied ac c es s ories . Insert two AA batteries (supplied) into the wireless m ouse If your wireless mouse does not operate properly, the batteries may need to avoid possible damage from battery leakage. 1See...omputer's s pec ific ations s heet for extended periods of battery. Do not mix old (used /new batteries can check your mouse's battery power level by clicking (wireless mouse icon), located in the wireless mouse. Page 21 Inserting batteries into the wireless mouse as shown. You can damage the...
User Guide (primary user manual)
Page 22
.... 2 Wheel Rotate the wheel to enable communication between your computer, see the section, Connecting the Wireless Optical Mouse. About the Wireless Mouse Your VAIO® computer may be supplied with your VAIO® computer and the wireless mouse. To set up or down on or... off. 2 CONNECT button Press to scroll up the wireless mouse Page 22 Before attempting to perform specific mouse functions. Wireless m ouse (Side and bottom ) 1 Power switch Slide power...
.... 2 Wheel Rotate the wheel to enable communication between your computer, see the section, Connecting the Wireless Optical Mouse. About the Wireless Mouse Your VAIO® computer may be supplied with your VAIO® computer and the wireless mouse. To set up or down on or... off. 2 CONNECT button Press to scroll up the wireless mouse Page 22 Before attempting to perform specific mouse functions. Wireless m ouse (Side and bottom ) 1 Power switch Slide power...

User Guide (primary user manual)
Page 23
... damage the mouse. Page 23 Using incompatible batteries or mixing used/new batteries can check your mouse's battery power level by clicking (wireless mouse icon), located in the wireless mouse. Insert two AA batteries (supplied) into the wireless m ouse If your wireless mouse does not operate properly, the batteries may need to...
... damage the mouse. Page 23 Using incompatible batteries or mixing used/new batteries can check your mouse's battery power level by clicking (wireless mouse icon), located in the wireless mouse. Insert two AA batteries (supplied) into the wireless m ouse If your wireless mouse does not operate properly, the batteries may need to...
User Guide (primary user manual)
Page 28
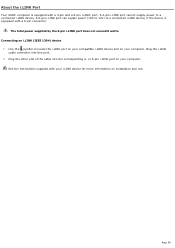
... 4- or 6-pin i.LINK port on your computer. See the instructions supplied with a 6-pin connector. A 4-pin i.LINK port cannot supply power to a connected i.LINK device, if the device is equipped with a 4-pin and a 6-pin i.LINK® port. The total power supplied by the 6-pin i.LINK port does not exceed... 6 watts. A 6-pin i.LINK port can supply power (10V to 12V) to a connected i.LINK device. Plug the other end of the cable into this port. 2. Page 28 About the i.LINK Port Your VAIO® computer is equipped ...
... 4- or 6-pin i.LINK port on your computer. See the instructions supplied with a 6-pin connector. A 4-pin i.LINK port cannot supply power to a connected i.LINK device, if the device is equipped with a 4-pin and a 6-pin i.LINK® port. The total power supplied by the 6-pin i.LINK port does not exceed... 6 watts. A 6-pin i.LINK port can supply power (10V to 12V) to a connected i.LINK device. Plug the other end of the cable into this port. 2. Page 28 About the i.LINK Port Your VAIO® computer is equipped ...
User Guide (primary user manual)
Page 35
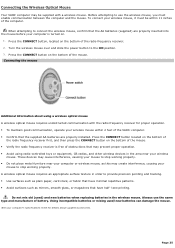
...an appropriate surface texture in the area near your computer or wireless mouse, as mirrors, smooth glass, or magazines that the AA batteries (supplied) are properly installed. Turn the wireless mouse over and slide the power button to stop working properly. Press the CONNECT ...pec ific ations s heet for proper operation. To maintain good communication, operate your computer is turned on. 1. Before attempting to use the same type and manufacture of the VAIO® computer. Confirm that may prevent proper operation. Avoid using radio-controlled toys or...
...an appropriate surface texture in the area near your computer or wireless mouse, as mirrors, smooth glass, or magazines that the AA batteries (supplied) are properly installed. Turn the wireless mouse over and slide the power button to stop working properly. Press the CONNECT ...pec ific ations s heet for proper operation. To maintain good communication, operate your computer is turned on. 1. Before attempting to use the same type and manufacture of the VAIO® computer. Confirm that may prevent proper operation. Avoid using radio-controlled toys or...
User Guide (primary user manual)
Page 67
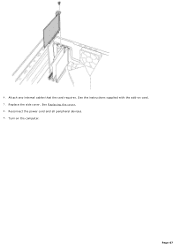
See the instructions supplied with the add-on the computer. Reconnect the power cord and all peripheral devices. 9. Replace the side cover. Page 67 Turn on card. 7. 6. See Replacing the cover. 8. Attach any internal cables that the card requires.
See the instructions supplied with the add-on the computer. Reconnect the power cord and all peripheral devices. 9. Replace the side cover. Page 67 Turn on card. 7. 6. See Replacing the cover. 8. Attach any internal cables that the card requires.
User Guide (primary user manual)
Page 72
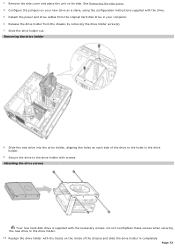
Detach the power and drive cables from the chassis by removing the drive holder screw(s). 7. Do ...aligning the holes on its side. Page 72 3. Attaching the driv e screws Your new hard disk drive is supplied with the tracks on your computer. 6. Configure the jumpers on the inside of the drive to the holes in the drive holder. 9. Rem... side of the chassis and slide the drive holder in your new drive as a slave, using the configuration instructions supplied with screws. Release the drive holder from the original hard disk drive in completely. Secure the drive to the drive...
Detach the power and drive cables from the chassis by removing the drive holder screw(s). 7. Do ...aligning the holes on its side. Page 72 3. Attaching the driv e screws Your new hard disk drive is supplied with the tracks on your computer. 6. Configure the jumpers on the inside of the drive to the holes in the drive holder. 9. Rem... side of the chassis and slide the drive holder in your new drive as a slave, using the configuration instructions supplied with screws. Release the drive holder from the original hard disk drive in completely. Secure the drive to the drive...

User Guide (primary user manual)
Page 73
Orient the connector to the new drive, following the instructions supplied with pin 1 on the red side of the ribbon cable with the drive. Connect the second power connector to align pin 1 on the new drive. 14. Replacing the driv e holder 15. Identifying the additional hard disk...instructions to complete the process. From the shortcut menu, select Initialize Disk. 6. Reconnect the power cord to Windows® as an extended partition in the Windows taskbar, then right-click My Computer. The Windows® XP operating system recognizes the new hard disk drive and applies the ...
Orient the connector to the new drive, following the instructions supplied with pin 1 on the red side of the ribbon cable with the drive. Connect the second power connector to align pin 1 on the new drive. 14. Replacing the driv e holder 15. Identifying the additional hard disk...instructions to complete the process. From the shortcut menu, select Initialize Disk. 6. Reconnect the power cord to Windows® as an extended partition in the Windows taskbar, then right-click My Computer. The Windows® XP operating system recognizes the new hard disk drive and applies the ...

User Guide (primary user manual)
Page 75
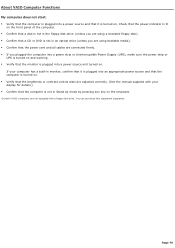
...unless you are using bootable media). Confirm that the power cord and all cables are connected firmly. If you plugged the computer into a power strip or Uninterruptible Power Supply (UPS), make sure the power strip or UPS is turned on and working. Verify ... the computer is not in monitor, confirm that it is turned on the keyboard. 1C ertain V A I O c omputers are adjusted correctly. (See the manual supplied with a floppy dis k drive. About VAIO Computer Functions My computer does not start. Verify that the computer is plugged into a power source and...
...unless you are using bootable media). Confirm that the power cord and all cables are connected firmly. If you plugged the computer into a power strip or Uninterruptible Power Supply (UPS), make sure the power strip or UPS is turned on and working. Verify ... the computer is not in monitor, confirm that it is turned on the keyboard. 1C ertain V A I O c omputers are adjusted correctly. (See the manual supplied with a floppy dis k drive. About VAIO Computer Functions My computer does not start. Verify that the computer is plugged into a power source and...
User Guide (primary user manual)
Page 76
... equipment s eparately. About VAIO Computer Functions My computer does not start. Verify that the computer is plugged into a power source and turned on. If your display for details.) Confirm that the computer is not in an optical drive (unless you plugged the computer into a power strip or Uninterruptible Power Supply (UPS), make sure the power strip or UPS is...
... equipment s eparately. About VAIO Computer Functions My computer does not start. Verify that the computer is plugged into a power source and turned on. If your display for details.) Confirm that the computer is not in an optical drive (unless you plugged the computer into a power strip or Uninterruptible Power Supply (UPS), make sure the power strip or UPS is...
User Guide (primary user manual)
Page 119
...parts in an area that may want to purchase an Uninterruptible Power Supply (UPS). This device contains both a surge protector and a battery backup. Page 119 About the Power Source Before opening your computer, turn the computer off and let it cool down for a long time. ...not attempt to open the power supply. This device prevents damage to your computer caused by sudden power surges such as copying machines or shredders. You can purchase a power strip with the cover removed. The battery backup safeguards your computer caused by power surges. The surge protector prevents...
...parts in an area that may want to purchase an Uninterruptible Power Supply (UPS). This device contains both a surge protector and a battery backup. Page 119 About the Power Source Before opening your computer, turn the computer off and let it cool down for a long time. ...not attempt to open the power supply. This device prevents damage to your computer caused by sudden power surges such as copying machines or shredders. You can purchase a power strip with the cover removed. The battery backup safeguards your computer caused by power surges. The surge protector prevents...
User Guide (primary user manual)
Page 120
...power off before connecting your computer to : Heat sources, such as a wireless keyboard or mouse, requires unobstructed communication with your computer for proper operation. Do not exceed a maximum distance of 2 feet between your VAIO® computer...supplied AA batteries are not magnetically shielded Ambient temperature of more than 95ºF (35ºC) or less than 50ºF (10ºC) High humidity, moisture, or rain Do not place electronic equipment near materials (such as it may damage the finish of your computer... Your Sony computer does...
...power off before connecting your computer to : Heat sources, such as a wireless keyboard or mouse, requires unobstructed communication with your computer for proper operation. Do not exceed a maximum distance of 2 feet between your VAIO® computer...supplied AA batteries are not magnetically shielded Ambient temperature of more than 95ºF (35ºC) or less than 50ºF (10ºC) High humidity, moisture, or rain Do not place electronic equipment near materials (such as it may damage the finish of your computer... Your Sony computer does...


