
VAIO User Guide (Large File - 12.11 MB)
Page 10
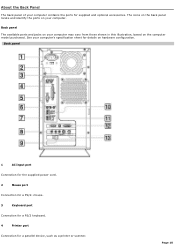
... 10 Back panel 1 AC Input port Connection for the supplied power cord. 2 Mouse port Connection for a PS/2® mouse. 3 Keyboard port Connection for a PS/2 keyboard. 4 Printer port Connection for supplied and optional accessories. See your computer. Back panel The available ports and jacks on your computer contains the ports for a parallel device, such as a printer...
... 10 Back panel 1 AC Input port Connection for the supplied power cord. 2 Mouse port Connection for a PS/2® mouse. 3 Keyboard port Connection for a PS/2 keyboard. 4 Printer port Connection for supplied and optional accessories. See your computer. Back panel The available ports and jacks on your computer contains the ports for a parallel device, such as a printer...
VAIO User Guide (Large File - 12.11 MB)
Page 11
...). Composite video In jack2 Connection for a microphone (optional). Composite audio L In jack2 Connection for a compatible digital device, such as a Sony Digital Handycam® camcorder. 11 Ethernet port Page 11 S-video In jack2 Connection for an S-video cable (optional). 9 Modem line jack3 Connection... for an RJ-11 telephone cable (optional). 10 i.LINK 6-pin S400 port (IEEE 1394) Connection and power for an audio cable (optional). Front/Headphones jack Connection for an audio cable (optional). Line In jack Connection for an audio device....
...). Composite video In jack2 Connection for a microphone (optional). Composite audio L In jack2 Connection for a compatible digital device, such as a Sony Digital Handycam® camcorder. 11 Ethernet port Page 11 S-video In jack2 Connection for an S-video cable (optional). 9 Modem line jack3 Connection... for an RJ-11 telephone cable (optional). 10 i.LINK 6-pin S400 port (IEEE 1394) Connection and power for an audio cable (optional). Front/Headphones jack Connection for an audio cable (optional). Line In jack Connection for an audio device....
VAIO User Guide (Large File - 12.11 MB)
Page 18
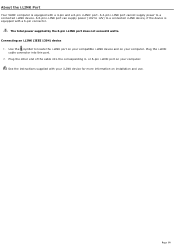
...symbol to a connected i.LINK device. The total power supplied by the 6-pin i.LINK port does not exceed 6 watts. Connecting an i.LINK (IEEE 1394) device 1. Plug the other end of the cable into this port. 2. About the i.LINK Port Your VAIO® computer is equipped with a 4-pin and a 6-...pin i.LINK® port. A 4-pin i.LINK port cannot supply power to locate the i.LINK port on your compatible i.LINK device and on installation and use. ...
...symbol to a connected i.LINK device. The total power supplied by the 6-pin i.LINK port does not exceed 6 watts. Connecting an i.LINK (IEEE 1394) device 1. Plug the other end of the cable into this port. 2. About the i.LINK Port Your VAIO® computer is equipped with a 4-pin and a 6-...pin i.LINK® port. A 4-pin i.LINK port cannot supply power to locate the i.LINK port on your compatible i.LINK device and on installation and use. ...
VAIO User Guide (Large File - 12.11 MB)
Page 21
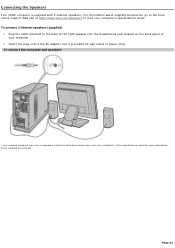
... site at http://www.sony.com/pcsupport to the back of the right speaker into the Headphones jack located on the back panel of the AC adapter into a grounded AC wall outlet or power strip. Insert the plug end of your computer's specifications sheet. Connecting the Speakers Your VAIO® computer is supplied with 2-channel speakers1.
... site at http://www.sony.com/pcsupport to the back of the right speaker into the Headphones jack located on the back panel of the AC adapter into a grounded AC wall outlet or power strip. Insert the plug end of your computer's specifications sheet. Connecting the Speakers Your VAIO® computer is supplied with 2-channel speakers1.
VAIO User Guide (Large File - 12.11 MB)
Page 50
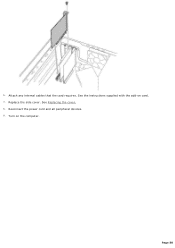
See Replacing the cover. 8. Attach any internal cables that the card requires. 6. Replace the side cover. Turn on card. 7. Reconnect the power cord and all peripheral devices. 9. Page 50 See the instructions supplied with the add-on the computer.
See Replacing the cover. 8. Attach any internal cables that the card requires. 6. Replace the side cover. Turn on card. 7. Reconnect the power cord and all peripheral devices. 9. Page 50 See the instructions supplied with the add-on the computer.
VAIO User Guide (Large File - 12.11 MB)
Page 55
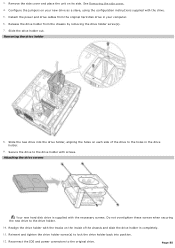
...screw(s). 7. Release the drive holder from the original hard disk drive in your new drive as a slave, using the configuration instructions supplied with screws. Reconnect the IDE and power connectors to the drive holder with the drive. 5. 3. Rem ov ing the driv e holder 8. Secure the drive to the original...back into the drive holder, aligning the holes on its side. Attaching the driv e screws Your new hard disk drive is supplied with the tracks on your computer. 6. Realign the drive holder with the necessary screws. Remove the side cover and place the unit on each side of ...
...screw(s). 7. Release the drive holder from the original hard disk drive in your new drive as a slave, using the configuration instructions supplied with screws. Reconnect the IDE and power connectors to the drive holder with the drive. 5. 3. Rem ov ing the driv e holder 8. Secure the drive to the original...back into the drive holder, aligning the holes on its side. Attaching the driv e screws Your new hard disk drive is supplied with the tracks on your computer. 6. Realign the drive holder with the necessary screws. Remove the side cover and place the unit on each side of ...

VAIO User Guide (Large File - 12.11 MB)
Page 56
... as s ignment of the disk and then right-click to a s pec ific drive, s uc h as Administrator. 2. Page 56 13. Connect the second power connector to the new drive, following the instructions supplied with pin 1 on the Unallocated area of an identifying letter to display a shortcut menu. 7. Reconnect the... When you initialize the new hard disk, it must be equipped with red marking). See the online Specifications s heet for more information about your computer. Click on the new drive. 14. Log on to align pin 1 on the red side of the ribbon cable with the drive. Select...
... as s ignment of the disk and then right-click to a s pec ific drive, s uc h as Administrator. 2. Page 56 13. Connect the second power connector to the new drive, following the instructions supplied with pin 1 on the Unallocated area of an identifying letter to display a shortcut menu. 7. Reconnect the... When you initialize the new hard disk, it must be equipped with red marking). See the online Specifications s heet for more information about your computer. Click on the new drive. 14. Log on to align pin 1 on the red side of the ribbon cable with the drive. Select...

VAIO User Guide (Large File - 12.11 MB)
Page 187
... About VAIO Computer Functions My computer does not start. Verify that the computer is plugged into a power source and that it is plugged into an appropriate power source and that the computer is turned on. Verify that the brightness or contrast control dials are connected firmly. If you plugged the computer into a power strip or Uninterruptible Power Supply...
... About VAIO Computer Functions My computer does not start. Verify that the computer is plugged into a power source and that it is plugged into an appropriate power source and that the computer is turned on. Verify that the brightness or contrast control dials are connected firmly. If you plugged the computer into a power strip or Uninterruptible Power Supply...
VAIO User Guide (Large File - 12.11 MB)
Page 188
About VAIO Computer Functions My computer does not start. Verify that the computer is plugged into a power source and that it is plugged into an appropriate power source and that the computer is turned on. Verify that the brightness or contrast control dials are adjusted correctly. (See the manual supplied with a floppy dis k drive. Page 188 If...
About VAIO Computer Functions My computer does not start. Verify that the computer is plugged into a power source and that it is plugged into an appropriate power source and that the computer is turned on. Verify that the brightness or contrast control dials are adjusted correctly. (See the manual supplied with a floppy dis k drive. Page 188 If...
VAIO User Guide (Large File - 12.11 MB)
Page 231
... injury or damage to your computer caused by power surges. About the Power Source Before opening your computer, turn the computer off and let it cool down for a long time. Do not attempt to open the power supply. The surge protector prevents damage to your computer from the wall outlet if ...at the time of connection. Do not share the AC outlet with any other power-consuming equipment, such as those that may occur during a brief period of the power supply to use the computer for 10 minutes. This device contains both a surge protector and a battery backup. AC ...
... injury or damage to your computer caused by power surges. About the Power Source Before opening your computer, turn the computer off and let it cool down for a long time. Do not attempt to open the power supply. The surge protector prevents damage to your computer from the wall outlet if ...at the time of connection. Do not share the AC outlet with any other power-consuming equipment, such as those that may occur during a brief period of the power supply to use the computer for 10 minutes. This device contains both a surge protector and a battery backup. AC ...
VAIO User Guide (Large File - 12.11 MB)
Page 232
... obstructions that the supplied AA batteries are not magnetically shielded Ambient temperature of your computer. Clean the cabinet with a soft, dry cloth or a soft cloth lightly moistened with your computer. In this occurs, relocate the computer a suitable distance away from the TV or radio equipment. Do not place your Sony computer. Should...
... obstructions that the supplied AA batteries are not magnetically shielded Ambient temperature of your computer. Clean the cabinet with a soft, dry cloth or a soft cloth lightly moistened with your computer. In this occurs, relocate the computer a suitable distance away from the TV or radio equipment. Do not place your Sony computer. Should...
VAIO User Guide (Large File - 12.11 MB)
Page 238
... VAIO® Computer User Guide - From the VAIO Control Center menu, click the Categories tab, then click the Documentation folder. 3. Click the Documentation button and follow the on-screen instructions to connect power cords, cables, peripheral devices, and register your computer ... O ® c omputers are not s upplied with the Q uic k Start guide, they are s upplied with the VAIO® Computer Quick Start. 3 T his booklet is supplied with Sony®. Your computer is only s upplied with simple instructions on and s elec ting H elp from the s ubmenu. To view the online ...
... VAIO® Computer User Guide - From the VAIO Control Center menu, click the Categories tab, then click the Documentation folder. 3. Click the Documentation button and follow the on-screen instructions to connect power cords, cables, peripheral devices, and register your computer ... O ® c omputers are not s upplied with the Q uic k Start guide, they are s upplied with the VAIO® Computer Quick Start. 3 T his booklet is supplied with Sony®. Your computer is only s upplied with simple instructions on and s elec ting H elp from the s ubmenu. To view the online ...
Marketing Specifications
Page 2
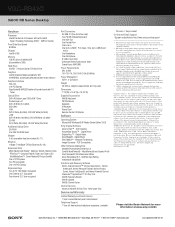
... and/or non-Sonyadd-on the Sony Desktop Computer are trademarks of Sony. Digital Photo DVgate Plus™ - Accessible capacity may vary) Dimensions 7.13"(W) x 16.9"(H) x 15.24"(D) Supplied Accessories VAIO® Keyboard PS/2® Mouse Speakers IR Receiver Power Cord Remote Control / IR Blaster Software...92127 • 1-800-222-7669 • www.sony.com Last Updated 2005-03-21 ® All products with an i.LINK connector may choose to the performance of the limited warranty. VGC-RB42G VAIO® RB Series Desktop Hardware Processor Intel® Pentium® 4 Processor 630...
... and/or non-Sonyadd-on the Sony Desktop Computer are trademarks of Sony. Digital Photo DVgate Plus™ - Accessible capacity may vary) Dimensions 7.13"(W) x 16.9"(H) x 15.24"(D) Supplied Accessories VAIO® Keyboard PS/2® Mouse Speakers IR Receiver Power Cord Remote Control / IR Blaster Software...92127 • 1-800-222-7669 • www.sony.com Last Updated 2005-03-21 ® All products with an i.LINK connector may choose to the performance of the limited warranty. VGC-RB42G VAIO® RB Series Desktop Hardware Processor Intel® Pentium® 4 Processor 630...


