
VGC-RBxx Series Hard Disk Drive Replacement Instructions
Page 1
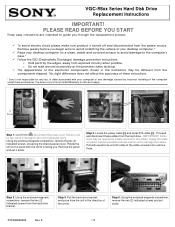
... to apply. 2 Screws [1] [2] Step 1. Step 5. o Do not walk around excessively as this promotes static build-up. ü The appearance of your desktop computer.* ü Place your Sony Limited Warranty continue to avoid scratching the surface of the electronic components shown in the direction of the cables. Locate the power cable [1] and... through the replacement process. ü To avoid electric shock please make sure product is turned off and disconnected from exposed circuitry when possible. VGC-RBxx Series Hard Disk Drive Replacement Instructions IMPORTANT!
... to apply. 2 Screws [1] [2] Step 1. Step 5. o Do not walk around excessively as this promotes static build-up. ü The appearance of your desktop computer.* ü Place your Sony Limited Warranty continue to avoid scratching the surface of the electronic components shown in the direction of the cables. Locate the power cable [1] and... through the replacement process. ü To avoid electric shock please make sure product is turned off and disconnected from exposed circuitry when possible. VGC-RBxx Series Hard Disk Drive Replacement Instructions IMPORTANT!
VGC-RBxx Series Hard Disk Drive Replacement Instructions
Page 2
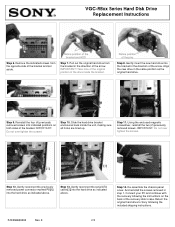
VGC-RBxx Series Hard Disk Drive Replacement Instructions Step 6. IMPORTANT! Gently insert the new hard drive into indicated positions on the back of the drive inside the unit, making sure all holes are lined up. Reinstall the four (4) previously...previously removed screws . Align the new drive in step 1. Gently reconnect the previously removed power connector marked P8 [1] into the hard drive as indicated above . Return the original hard drive to Sony following the instructions on both sides of the arrow. Re-assemble the chassis panel cover. Notice position of the arrow. Do...
VGC-RBxx Series Hard Disk Drive Replacement Instructions Step 6. IMPORTANT! Gently insert the new hard drive into indicated positions on the back of the drive inside the unit, making sure all holes are lined up. Reinstall the four (4) previously...previously removed screws . Align the new drive in step 1. Gently reconnect the previously removed power connector marked P8 [1] into the hard drive as indicated above . Return the original hard drive to Sony following the instructions on both sides of the arrow. Re-assemble the chassis panel cover. Notice position of the arrow. Do...


