

VAIO User Guide
Page 10
... purchased. The icons on the back panel locate and identify the ports on your computer contains the ports for a parallel device, such as a printer or scanner. Back panel 1 AC Input port Connection for the supplied power cord. 2 Mouse port Connection for a PS/2® mouse. 3 Keyboard port Connection for a PS/2 keyboard. 4 Printer port Connection...
... purchased. The icons on the back panel locate and identify the ports on your computer contains the ports for a parallel device, such as a printer or scanner. Back panel 1 AC Input port Connection for the supplied power cord. 2 Mouse port Connection for a PS/2® mouse. 3 Keyboard port Connection for a PS/2 keyboard. 4 Printer port Connection...

VAIO User Guide
Page 11
... Connections for compatible high/full/low-speed USB devices. 8 Composite audio R In jack2 Connection for a compatible digital device, such as a Sony Digital Handycam® camcorder. 11 Ethernet port Page 11 S-video In jack2 Connection for an S-video cable (optional). 9 Modem line jack3 ...Connection for an RJ-11 telephone cable (optional). 10 i.LINK 6-pin S400 port (IEEE 1394) Connection and power for an audio cable (optional). Composite video In jack2 Connection for an audio cable (optional). Composite audio L In jack2 Connection for ...
... Connections for compatible high/full/low-speed USB devices. 8 Composite audio R In jack2 Connection for a compatible digital device, such as a Sony Digital Handycam® camcorder. 11 Ethernet port Page 11 S-video In jack2 Connection for an S-video cable (optional). 9 Modem line jack3 ...Connection for an RJ-11 telephone cable (optional). 10 i.LINK 6-pin S400 port (IEEE 1394) Connection and power for an audio cable (optional). Composite video In jack2 Connection for an audio cable (optional). Composite audio L In jack2 Connection for ...
VAIO User Guide
Page 19
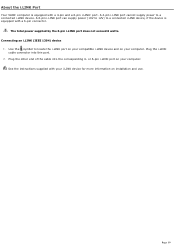
Use the symbol to a connected i.LINK device. See the instructions supplied with a 6-pin connector. Connecting an i.LINK (IEEE 1394) device 1. Plug the other end of the cable into this port. 2. A 6-pin i.LINK port can supply power (10V to 12V) to a connected i.LINK device, if the device is ... and on your computer. Plug the i.LINK cable connector into the corresponding 4- About the i.LINK Port Your VAIO® computer is equipped with your i.LINK device for more information on installation and use. or 6-pin i.LINK port on your computer. The total power supplied by the 6-pin...
Use the symbol to a connected i.LINK device. See the instructions supplied with a 6-pin connector. Connecting an i.LINK (IEEE 1394) device 1. Plug the other end of the cable into this port. 2. A 6-pin i.LINK port can supply power (10V to 12V) to a connected i.LINK device, if the device is ... and on your computer. Plug the i.LINK cable connector into the corresponding 4- About the i.LINK Port Your VAIO® computer is equipped with your i.LINK device for more information on installation and use. or 6-pin i.LINK port on your computer. The total power supplied by the 6-pin...

VAIO User Guide
Page 22
...computer. 3. See your computer's specifications sheet. To connect 2-channel speakers (supplied) 1. Page 22 Plug the cable attached to view your c omputer's online s pec ific ations s heet for more information about supplied accessories, go to the Sony online support Web site at http://www.sony....com/pcsupport to the back of the left speaker into the Headphones jack located on the back of the AC adapter into a grounded AC wall outlet or power... VAIO® computer is supplied with 2-channel speakers1.
...computer. 3. See your computer's specifications sheet. To connect 2-channel speakers (supplied) 1. Page 22 Plug the cable attached to view your c omputer's online s pec ific ations s heet for more information about supplied accessories, go to the Sony online support Web site at http://www.sony....com/pcsupport to the back of the left speaker into the Headphones jack located on the back of the AC adapter into a grounded AC wall outlet or power... VAIO® computer is supplied with 2-channel speakers1.

VAIO User Guide
Page 54
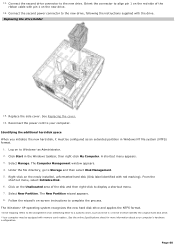
Replace the side cover. Attach any internal cables that the card requires. See the instructions supplied with the add-on the computer. See Replacing the cover. 8. Turn on card. 7. Reconnect the power cord and all peripheral devices. 9. Page 54 6.
Replace the side cover. Attach any internal cables that the card requires. See the instructions supplied with the add-on the computer. See Replacing the cover. 8. Turn on card. 7. Reconnect the power cord and all peripheral devices. 9. Page 54 6.

VAIO User Guide
Page 59
...holder with the drive. 5. Configure the jumpers on its side. Slide the drive holder out. Reconnect the IDE and power connectors to the drive holder. 10. Page 59 Detach the power and drive cables from the chassis by removing the drive holder screw(s). 7. 3. See Removing the side cover. 4. ...the drive holder in the drive holder. 9. Attaching the driv e screws Your new hard disk drive is supplied with screws. Remove the side cover and place the unit on your computer. 6. Do not overtighten these screws when securing the new drive to the original drive. Rem ov ing ...
...holder with the drive. 5. Configure the jumpers on its side. Slide the drive holder out. Reconnect the IDE and power connectors to the drive holder. 10. Page 59 Detach the power and drive cables from the chassis by removing the drive holder screw(s). 7. 3. See Removing the side cover. 4. ...the drive holder in the drive holder. 9. Attaching the driv e screws Your new hard disk drive is supplied with screws. Remove the side cover and place the unit on your computer. 6. Do not overtighten these screws when securing the new drive to the original drive. Rem ov ing ...
VAIO User Guide
Page 60
...on the new drive. 14. See the online Specifications s heet for more information about your computer. Connect the second drive connector to display a shortcut menu. 7. Reconnect the power cord to Storage and then select Disk Management. 5. Identifying the additional hard disk space When...drive. 2 Y our c omputer may be configured as Administrator. 2. Right-click on -screen instructions to the new drive, following the instructions supplied with red marking). Follow the wizard's on the newly installed, unformatted hard disk (Disk label identified with the drive. Replacing the driv e...
...on the new drive. 14. See the online Specifications s heet for more information about your computer. Connect the second drive connector to display a shortcut menu. 7. Reconnect the power cord to Storage and then select Disk Management. 5. Identifying the additional hard disk space When...drive. 2 Y our c omputer may be configured as Administrator. 2. Right-click on -screen instructions to the new drive, following the instructions supplied with red marking). Follow the wizard's on the newly installed, unformatted hard disk (Disk label identified with the drive. Replacing the driv e...
VAIO User Guide
Page 62
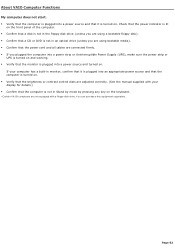
... by mode by pressing any key on . About VAIO Computer Functions My computer does not start. Verify that the computer is plugged into a power source and that it is turned on the keyboard. 1 C ertain V A I O c omputers are not equipped with your computer has a built-in monitor, confirm that it is...using a bootable floppy disk). Confirm that a CD or DVD is not in an optical drive (unless you plugged the computer into a power strip or Uninterruptible Power Supply (UPS), make sure the power strip or UPS is turned on and working. Verify that the monitor is plugged into...
... by mode by pressing any key on . About VAIO Computer Functions My computer does not start. Verify that the computer is plugged into a power source and that it is turned on the keyboard. 1 C ertain V A I O c omputers are not equipped with your computer has a built-in monitor, confirm that it is...using a bootable floppy disk). Confirm that a CD or DVD is not in an optical drive (unless you plugged the computer into a power strip or Uninterruptible Power Supply (UPS), make sure the power strip or UPS is turned on and working. Verify that the monitor is plugged into...

VAIO User Guide
Page 63
... that the brightness or contrast control dials are adjusted correctly. (See the manual supplied with a floppy dis k drive. Page 63 About VAIO Computer Functions My computer does not start. Verify that the computer is plugged into a power source and that the computer is not in Stand by mode by pressing any key on the keyboard. 1 C ertain...
... that the brightness or contrast control dials are adjusted correctly. (See the manual supplied with a floppy dis k drive. Page 63 About VAIO Computer Functions My computer does not start. Verify that the computer is plugged into a power source and that the computer is not in Stand by mode by pressing any key on the keyboard. 1 C ertain...
VAIO User Guide
Page 104
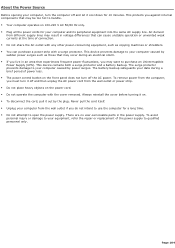
... share the AC outlet with any other power-consuming equipment, such as those that may want to purchase an Uninterruptible Power Supply (UPS). This device prevents damage to your computer from the computer, you may occur during a brief period of power loss. The power control button on . To ...objects on 100-220 V AC 50/60 Hz only. Plug all the power cords for a long time. Do not attempt to open the power supply. The battery backup safeguards your computer caused by the plug. The surge protector prevents damage to your data during an electrical...
... share the AC outlet with any other power-consuming equipment, such as those that may want to purchase an Uninterruptible Power Supply (UPS). This device prevents damage to your computer from the computer, you may occur during a brief period of power loss. The power control button on . To ...objects on 100-220 V AC 50/60 Hz only. Plug all the power cords for a long time. Do not attempt to open the power supply. The battery backup safeguards your computer caused by the plug. The surge protector prevents damage to your data during an electrical...

VAIO User Guide
Page 105
...connection cables. Always switch the power off before connecting your computer. Your computer, keyboard, and mouse consist of obstructions that the supplied AA batteries are not magnetically shielded Ambient temperature of your Sony computer. Should any solid object or... proper operation. Do not exceed a maximum distance of 2 feet between your VAIO® computer and your wireless device. Verify that your Sony Service Center. The computer's electromagnetic field may not work with party lines, cannot be connected to a coin-operated...
...connection cables. Always switch the power off before connecting your computer. Your computer, keyboard, and mouse consist of obstructions that the supplied AA batteries are not magnetically shielded Ambient temperature of your Sony computer. Should any solid object or... proper operation. Do not exceed a maximum distance of 2 feet between your VAIO® computer and your wireless device. Verify that your Sony Service Center. The computer's electromagnetic field may not work with party lines, cannot be connected to a coin-operated...
VAIO User Guide
Page 111
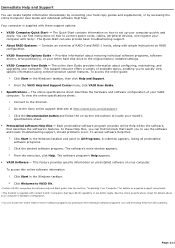
...taskbar, then click Help and Support. 2. Click Welcome to locate your computer. See the online s pec ific ations s heet for details about your entire hard disk drive to connect power cords, cables, peripheral devices, and register your hard copy guides and ... on s upplied s upport doc uments . 2 T his booklet is supplied with simple instructions on RAID configuration. VAIO® Recovery Options Guide - Immediate Help and Support You can locate helpful information immediately by consulting your computer with Sony®. See the s ec tion, "U npac king Y our C ...
...taskbar, then click Help and Support. 2. Click Welcome to locate your computer. See the online s pec ific ations s heet for details about your entire hard disk drive to connect power cords, cables, peripheral devices, and register your hard copy guides and ... on s upplied s upport doc uments . 2 T his booklet is supplied with simple instructions on RAID configuration. VAIO® Recovery Options Guide - Immediate Help and Support You can locate helpful information immediately by consulting your computer with Sony®. See the s ec tion, "U npac king Y our C ...
Welcome Mat
Page 1
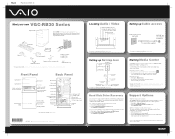
... Support. 2 From the VAIO Help And Support Center menu, click VAIO Recovery Options. Black Pantone 2925 C Meet your new VGC-RB30 Series System unit Keyboard Your VAIO® computer is available on certain VAIO® computers. This feature is enhanced with all VAIO® computer models. Using the remote ...Click Start > Media Center. 2 Use the mouse to http://www.sony.com/pcsupport*. 3 Click the Documentation link and follow the on the accessories supplied with all VAIO® computer models. Speakers Power cord Mouse TV coaxial cable* STANDBY MY MUSIC MY PICTURES MY VIDEOS...
... Support. 2 From the VAIO Help And Support Center menu, click VAIO Recovery Options. Black Pantone 2925 C Meet your new VGC-RB30 Series System unit Keyboard Your VAIO® computer is available on certain VAIO® computers. This feature is enhanced with all VAIO® computer models. Using the remote ...Click Start > Media Center. 2 Use the mouse to http://www.sony.com/pcsupport*. 3 Click the Documentation link and follow the on the accessories supplied with all VAIO® computer models. Speakers Power cord Mouse TV coaxial cable* STANDBY MY MUSIC MY PICTURES MY VIDEOS...
Marketing Specifications
Page 1
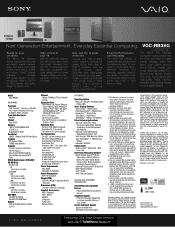
... non-Sony add-on the Sony Desktop Computer are subject to designate that this disclaimer. Any such services are subject to DVD™ for DVD creation, and Sonic Stage® for your TV memories and Versatility Computer comes loaded with respect to connect. Onsite Service may vary) Dimensions (CPU) 7.13"(W) x 16.9"(H) x 15.24"(D) Supplied Accessories VAIO®...
... non-Sony add-on the Sony Desktop Computer are subject to designate that this disclaimer. Any such services are subject to DVD™ for DVD creation, and Sonic Stage® for your TV memories and Versatility Computer comes loaded with respect to connect. Onsite Service may vary) Dimensions (CPU) 7.13"(W) x 16.9"(H) x 15.24"(D) Supplied Accessories VAIO®...


