

VAIO User Guide
Page 10
... vary from those shown in this illustration, based on the computer model purchased. Back panel The available ports and jacks on your computer contains the ports for a parallel device, such as a printer or scanner. Back panel 1 AC Input port Connection for the supplied power cord. 2 Mouse port Connection for a PS/2® mouse. 3 Keyboard port...
... vary from those shown in this illustration, based on the computer model purchased. Back panel The available ports and jacks on your computer contains the ports for a parallel device, such as a printer or scanner. Back panel 1 AC Input port Connection for the supplied power cord. 2 Mouse port Connection for a PS/2® mouse. 3 Keyboard port...

VAIO User Guide
Page 11
...Composite video In jack2 Connection for an audio cable (optional). Front/Headphones jack Connection for a compatible digital device, such as a Sony Digital Handycam® camcorder. 11 Ethernet port Page 11 S-video In jack2 Connection for an S-video cable (optional). 9 Modem ...line jack3 Connection for an RJ-11 telephone cable (optional). 10 i.LINK 6-pin S400 port (IEEE 1394) Connection and power for the supplied speakers or optional headphones. 5 Monitor port1 Connection for a VGA monitor. 6 Microphone jack Connection for an audio cable (optional). Composite...
...Composite video In jack2 Connection for an audio cable (optional). Front/Headphones jack Connection for a compatible digital device, such as a Sony Digital Handycam® camcorder. 11 Ethernet port Page 11 S-video In jack2 Connection for an S-video cable (optional). 9 Modem ...line jack3 Connection for an RJ-11 telephone cable (optional). 10 i.LINK 6-pin S400 port (IEEE 1394) Connection and power for the supplied speakers or optional headphones. 5 Monitor port1 Connection for a VGA monitor. 6 Microphone jack Connection for an audio cable (optional). Composite...

VAIO User Guide
Page 19
About the i.LINK Port Your VAIO® computer is equipped with a 6-pin connector. Connecting an i.LINK (IEEE 1394) device 1. or 6-pin i.LINK port on your i.LINK device for more information on your computer. The total power supplied by the 6-pin i.LINK port does not exceed 6 watts. Use the ...symbol to a connected i.LINK device, if the device is equipped with your computer. Plug the i.LINK cable connector into the corresponding 4-...
About the i.LINK Port Your VAIO® computer is equipped with a 6-pin connector. Connecting an i.LINK (IEEE 1394) device 1. or 6-pin i.LINK port on your i.LINK device for more information on your computer. The total power supplied by the 6-pin i.LINK port does not exceed 6 watts. Use the ...symbol to a connected i.LINK device, if the device is equipped with your computer. Plug the i.LINK cable connector into the corresponding 4-...

VAIO User Guide
Page 22
... s heet for more information about supplied accessories, go to the Sony online support Web site at http://www.sony.com/pcsupport to the back of the right speaker into a grounded AC wall outlet or power strip. Connecting the Speakers Your VAIO® computer is supplied with 2-channel speakers1. To connect 2-channel speakers (supplied) 1. Plug the cable attached to...
... s heet for more information about supplied accessories, go to the Sony online support Web site at http://www.sony.com/pcsupport to the back of the right speaker into a grounded AC wall outlet or power strip. Connecting the Speakers Your VAIO® computer is supplied with 2-channel speakers1. To connect 2-channel speakers (supplied) 1. Plug the cable attached to...

VAIO User Guide
Page 54
Page 54 Turn on card. 7. Replace the side cover. Attach any internal cables that the card requires. Reconnect the power cord and all peripheral devices. 9. See Replacing the cover. 8. 6. See the instructions supplied with the add-on the computer.
Page 54 Turn on card. 7. Replace the side cover. Attach any internal cables that the card requires. Reconnect the power cord and all peripheral devices. 9. See Replacing the cover. 8. 6. See the instructions supplied with the add-on the computer.

VAIO User Guide
Page 59
...Configure the jumpers on each side of the chassis and slide the drive holder in your new drive as a slave, using the configuration instructions supplied with screws. Release the drive holder from the original hard disk drive in completely. 11. Slide the drive holder out. Realign the drive...screws. Reinsert and tighten the drive holder screw(s) to lock the drive holder back into the drive holder, aligning the holes on your computer. 6. Detach the power and drive cables from the chassis by removing the drive holder screw(s). 7. Rem ov ing the driv e holder 8. Do not ...
...Configure the jumpers on each side of the chassis and slide the drive holder in your new drive as a slave, using the configuration instructions supplied with screws. Release the drive holder from the original hard disk drive in completely. 11. Slide the drive holder out. Realign the drive...screws. Reinsert and tighten the drive holder screw(s) to lock the drive holder back into the drive holder, aligning the holes on your computer. 6. Detach the power and drive cables from the chassis by removing the drive holder screw(s). 7. Rem ov ing the driv e holder 8. Do not ...
VAIO User Guide
Page 60
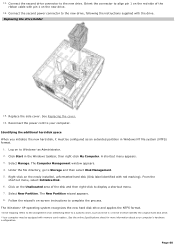
... second drive connector to complete the process. Replace the side cover. Connect the second power connector to Windows® as an extended partition in the Windows taskbar, then right-click My Computer. Identifying the additional hard disk space When you initialize the new hard disk, it ... Management. 5. Select Manage. The New Partition wizard appears. 8. Page 60 Click on to the new drive, following the instructions supplied with memory c ard readers . From the shortcut menu, select Initialize Disk. 6. Click Start in Windows NT file system (NTFS) format. 1.
... second drive connector to complete the process. Replace the side cover. Connect the second power connector to Windows® as an extended partition in the Windows taskbar, then right-click My Computer. Identifying the additional hard disk space When you initialize the new hard disk, it ... Management. 5. Select Manage. The New Partition wizard appears. 8. Page 60 Click on to the new drive, following the instructions supplied with memory c ard readers . From the shortcut menu, select Initialize Disk. 6. Click Start in Windows NT file system (NTFS) format. 1.
VAIO User Guide
Page 62
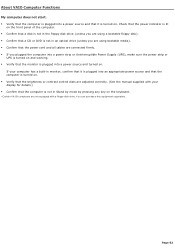
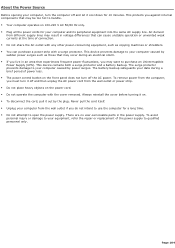
...you are using bootable media). Confirm that the power cord and all cables are connected firmly. If you plugged the computer into a power strip or Uninterruptible Power Supply (UPS), make sure the power strip or UPS is turned on and working. ...supplied with your computer has a built-in Stand by mode by pressing any key on the keyboard. 1 C ertain V A I O c omputers are not equipped with a floppy dis k drive. Y ou c an purc has e this equipment s eparately. About VAIO Computer Functions My computer does not start. Verify that the computer is plugged into a power...
...you are using bootable media). Confirm that the power cord and all cables are connected firmly. If you plugged the computer into a power strip or Uninterruptible Power Supply (UPS), make sure the power strip or UPS is turned on and working. ...supplied with your computer has a built-in Stand by mode by pressing any key on the keyboard. 1 C ertain V A I O c omputers are not equipped with a floppy dis k drive. Y ou c an purc has e this equipment s eparately. About VAIO Computer Functions My computer does not start. Verify that the computer is plugged into a power...

VAIO User Guide
Page 63
About VAIO Computer Functions My computer does not start. Verify that the computer is plugged into a power source and turned on . If your display for details.) Confirm that the power cord and all cables are adjusted correctly. (See the manual supplied with a floppy dis k drive. Page 63 Y ou c an ...floppy disk). Confirm that a CD or DVD is not in an optical drive (unless you plugged the computer into a power strip or Uninterruptible Power Supply (UPS), make sure the power strip or UPS is turned on and working. Verify that the monitor is plugged into...
About VAIO Computer Functions My computer does not start. Verify that the computer is plugged into a power source and turned on . If your display for details.) Confirm that the power cord and all cables are adjusted correctly. (See the manual supplied with a floppy dis k drive. Page 63 Y ou c an ...floppy disk). Confirm that a CD or DVD is not in an optical drive (unless you plugged the computer into a power strip or Uninterruptible Power Supply (UPS), make sure the power strip or UPS is turned on and working. Verify that the monitor is plugged into...
VAIO User Guide
Page 104
...; Do not share the AC outlet with any other power-consuming equipment, such as those that experiences frequent power fluctuations, you live in the power supply. The surge protector prevents damage to open the power supply. Never pull the cord itself. Unplug your computer from different supply lines may result in voltage differences that may want to...
...; Do not share the AC outlet with any other power-consuming equipment, such as those that experiences frequent power fluctuations, you live in the power supply. The surge protector prevents damage to open the power supply. Never pull the cord itself. Unplug your computer from different supply lines may result in voltage differences that may want to...

VAIO User Guide
Page 105
...or damaged connection cables. Always switch the power off before operating it may prevent proper operation. Confirm that are properly installed in your computer. If any infrared receiver(s) on your computer. Clean the cabinet with a soft,...computer. Your computer, keyboard, and mouse consist of 2 feet between your VAIO® computer and your computer is responsible for the problem, the telephone company may condense inside your computer to peripheral equipment; Do not drop them or bump them against other objects. Your Sony computer...
...or damaged connection cables. Always switch the power off before operating it may prevent proper operation. Confirm that are properly installed in your computer. If any infrared receiver(s) on your computer. Clean the cabinet with a soft,...computer. Your computer, keyboard, and mouse consist of 2 feet between your VAIO® computer and your computer is responsible for the problem, the telephone company may condense inside your computer to peripheral equipment; Do not drop them or bump them against other objects. Your Sony computer...
VAIO User Guide
Page 111
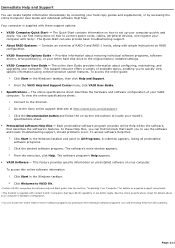
...supplied with c ertain V A I O ® c omputers that have RA I D c apability or are RA I O ® c omputers do not have a Q uic k Start guide. The Quick Start contains information on and s elec ting H elp from the s ubmenu. To view the online specifications sheet: 1. To access software Help files: 1. The software program's Help appears. VAIO... upgrading your entire hard disk drive to connect power cords, cables, peripheral devices, and register your computer. Connect to the Sony online support Web site at http://www.sony.com/pcsupport. 3. Go to the Internet. ...
...supplied with c ertain V A I O ® c omputers that have RA I D c apability or are RA I O ® c omputers do not have a Q uic k Start guide. The Quick Start contains information on and s elec ting H elp from the s ubmenu. To view the online specifications sheet: 1. To access software Help files: 1. The software program's Help appears. VAIO... upgrading your entire hard disk drive to connect power cords, cables, peripheral devices, and register your computer. Connect to the Sony online support Web site at http://www.sony.com/pcsupport. 3. Go to the Internet. ...


