User Guide
Page 2
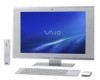
...Locating Controls and Ports...14 About the Indicator Lights ...19 Setting Up Your Computer ...20 Shutting Down Your Computer Safely ...36 Using Your VAIO Computer ...37 Using the Keyboard ...38 Using the Touch Pad ...42 Using the Mouse ...43 Using the Built-in MOTION EYE Camera...46 Using the Optical Disc ...Drive ...50 Using the TV Function ...60 Using the HDMI Input Function ...79 Using the ExpressCard Module ...88 Using the Memory Stick ...92 Using ...
...Locating Controls and Ports...14 About the Indicator Lights ...19 Setting Up Your Computer ...20 Shutting Down Your Computer Safely ...36 Using Your VAIO Computer ...37 Using the Keyboard ...38 Using the Touch Pad ...42 Using the Mouse ...43 Using the Built-in MOTION EYE Camera...46 Using the Optical Disc ...Drive ...50 Using the TV Function ...60 Using the HDMI Input Function ...79 Using the ExpressCard Module ...88 Using the Memory Stick ...92 Using ...

User Guide
Page 11
Place the display directly in a chair with your computer - Let your upper arms hang naturally at your computer. Take frequent breaks while using the keyboard, pointing device, or mouse. Adjust the level of your wrists in a relaxed, upright posture and avoid slouching forward or leaning far backwards. A footrest may strain ...
Place the display directly in a chair with your computer - Let your upper arms hang naturally at your computer. Take frequent breaks while using the keyboard, pointing device, or mouse. Adjust the level of your wrists in a relaxed, upright posture and avoid slouching forward or leaning far backwards. A footrest may strain ...

User Guide
Page 25
In addition, you establish communication with your computer. n 25 N Getting Started Connecting a Power Source and Cables You need to connect other cables if you want to an AC power source and it must be plugged into the power source before you need a power cord to connect your computer to use some functions of your computer, such as the TV function. ✍ Use only the supplied power cord for your wireless keyboard and mouse.
In addition, you establish communication with your computer. n 25 N Getting Started Connecting a Power Source and Cables You need to connect other cables if you want to an AC power source and it must be plugged into the power source before you need a power cord to connect your computer to use some functions of your computer, such as the TV function. ✍ Use only the supplied power cord for your wireless keyboard and mouse.

User Guide
Page 29
... button (5) on before using the keyboard. To connect the wireless keyboard ! Steps 4 and 5 must be located within 10 seconds of the keyboard. n 29 N Getting Started Connecting the Wireless Keyboard A wireless keyboard and four AA alkaline batteries for use the wireless keyboard, you find your computer. If ...key to conserve battery power. If the wireless keyboard is left unused for reconnection. The connect indicator turns on in the keyboard are supplied with your keyboard not working, for example after replacing the keyboard batteries, try the following steps for 20 minutes...
... button (5) on before using the keyboard. To connect the wireless keyboard ! Steps 4 and 5 must be located within 10 seconds of the keyboard. n 29 N Getting Started Connecting the Wireless Keyboard A wireless keyboard and four AA alkaline batteries for use the wireless keyboard, you find your computer. If ...key to conserve battery power. If the wireless keyboard is left unused for reconnection. The connect indicator turns on in the keyboard are supplied with your keyboard not working, for example after replacing the keyboard batteries, try the following steps for 20 minutes...

User Guide
Page 30
If you want to put the wireless keyboard in the LCD window on the wireless keyboard for an extended period of time, remove the batteries to avoid possible damage from battery leakage. n 30 N Getting Started ✍ You can check the battery indicator ( or ) in a more 'ergonomic' position, flip open the keyboard feet. If you do not intend to be replaced. If the wireless keyboard does not operate properly, the batteries may need to use the wireless keyboard for its battery power level.
If you want to put the wireless keyboard in the LCD window on the wireless keyboard for an extended period of time, remove the batteries to avoid possible damage from battery leakage. n 30 N Getting Started ✍ You can check the battery indicator ( or ) in a more 'ergonomic' position, flip open the keyboard feet. If you do not intend to be replaced. If the wireless keyboard does not operate properly, the batteries may need to use the wireless keyboard for its battery power level.

User Guide
Page 33
... Standards Association (VESA) mounting standard, for Wall Mounting Your computer is recommended that you allow adequate clearance between your computer and the wireless mouse and keyboard before mounting the computer on the back of the computer. Be sure to your mounting system. ! n 33 N Getting Started Preparing for connecting to establish wireless...
... Standards Association (VESA) mounting standard, for Wall Mounting Your computer is recommended that you allow adequate clearance between your computer and the wireless mouse and keyboard before mounting the computer on the back of the computer. Be sure to your mounting system. ! n 33 N Getting Started Preparing for connecting to establish wireless...
User Guide
Page 37
... This section describes how to get the most out of using your VAIO computer. ❑ Using the Keyboard (page 38) ❑ Using the Touch Pad (page 42) ❑ Using the Mouse (page 43) ❑ Using ...the Built-in MOTION EYE Camera (page 46) ❑ Using the Optical Disc Drive (page 50) ❑ Using the TV Function (page 60) ...102) ❑ Using the Wireless LAN (WLAN) (page 104) ❑ Using the Bluetooth Function (page 107) n 37 N Using Your VAIO Computer
... This section describes how to get the most out of using your VAIO computer. ❑ Using the Keyboard (page 38) ❑ Using the Touch Pad (page 42) ❑ Using the Mouse (page 43) ❑ Using ...the Built-in MOTION EYE Camera (page 46) ❑ Using the Optical Disc Drive (page 50) ❑ Using the TV Function (page 60) ...102) ❑ Using the Wireless LAN (WLAN) (page 104) ❑ Using the Bluetooth Function (page 107) n 37 N Using Your VAIO Computer
User Guide
Page 38
... arrangement with your computer. Using the Wireless Keyboard ! Always use the same type and manufacture of batteries can damage the wireless keyboard. n 38 N Using Your VAIO Computer Using the Keyboard A wireless keyboard is supplied with additional keys that perform specific functions. These devices may create interference, causing the keyboard to stop working properly. If you find...
... arrangement with your computer. Using the Wireless Keyboard ! Always use the same type and manufacture of batteries can damage the wireless keyboard. n 38 N Using Your VAIO Computer Using the Keyboard A wireless keyboard is supplied with additional keys that perform specific functions. These devices may create interference, causing the keyboard to stop working properly. If you find...
User Guide
Page 39
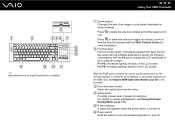
... the HDMI input is selected, you cannot use the function keys on the wireless keyboard to make the view look smaller and further away (zoom out). Press to turn the wireless keyboard on power management, see Using the HDMI Input Control Buttons (page 80) for ... . E Power indicator A green bar appears when the power switch is the English keyboard as an example. The task associated with each function key varies among software applications except the following combinations with the VAIO Control Center for the procedure. ✍ Illustrated above is turned on some software....
... the HDMI input is selected, you cannot use the function keys on the wireless keyboard to make the view look smaller and further away (zoom out). Press to turn the wireless keyboard on power management, see Using the HDMI Input Control Buttons (page 80) for ... . E Power indicator A green bar appears when the power switch is the English keyboard as an example. The task associated with each function key varies among software applications except the following combinations with the VAIO Control Center for the procedure. ✍ Illustrated above is turned on some software....
User Guide
Page 40
...Displays a shortcut menu in place to change the volume. See Setting Up Your Computer with the VAIO Control Center. When the HDMI input is ready for the wireless keyboard are sufficient and switches to batteries wear out. N Windows key Displays the Start menu. To change... the assignment with the VAIO Control Center (page 126) and find out more information. H Volume control buttons Increase (+) or ...
...Displays a shortcut menu in place to change the volume. See Setting Up Your Computer with the VAIO Control Center. When the HDMI input is ready for the wireless keyboard are sufficient and switches to batteries wear out. N Windows key Displays the Start menu. To change... the assignment with the VAIO Control Center (page 126) and find out more information. H Volume control buttons Increase (+) or ...
User Guide
Page 41
B CONNECT button (page 29) Press to enable the wireless keyboard to adjust the keyboard angle. C Battery compartment Storage compartment for the AA batteries. n 41 N Using Your VAIO Computer A Keyboard feet Flip open to communicate with the computer.
B CONNECT button (page 29) Press to enable the wireless keyboard to adjust the keyboard angle. C Battery compartment Storage compartment for the AA batteries. n 41 N Using Your VAIO Computer A Keyboard feet Flip open to communicate with the computer.

User Guide
Page 42
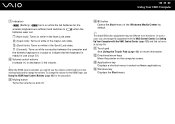
...Fn+F1 keys that you put your finger on an item or object. To change other touch pad settings, click Start, All Programs, VAIO Control Center, Keyboard and Mouse and Pointing Device. If pointer movement or scrolling continues against your intention, your computer. Press the right button (4) once. ...finger on the touch pad (1) to place the pointer (2) on the touch pad while pressing the left button. n 42 N Using Your VAIO Computer Action Point Click Double-click Right-click Drag Scroll Description Slide your fingertip reached an edge of the touch pad. It is connected to...
...Fn+F1 keys that you put your finger on an item or object. To change other touch pad settings, click Start, All Programs, VAIO Control Center, Keyboard and Mouse and Pointing Device. If pointer movement or scrolling continues against your intention, your computer. Press the right button (4) once. ...finger on the touch pad (1) to place the pointer (2) on the touch pad while pressing the left button. n 42 N Using Your VAIO Computer Action Point Click Double-click Right-click Drag Scroll Description Slide your fingertip reached an edge of the touch pad. It is connected to...

User Guide
Page 51
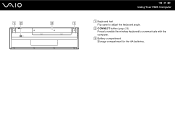
... the Hard disk drive/Optical disc drive indicator light (1) is unlit. 2 Press the drive eject button (2) or the disc drive eject button on the wireless keyboard. Be sure not to malfunction. n 51 N Using Your VAIO Computer To remove a disc !
... the Hard disk drive/Optical disc drive indicator light (1) is unlit. 2 Press the drive eject button (2) or the disc drive eject button on the wireless keyboard. Be sure not to malfunction. n 51 N Using Your VAIO Computer To remove a disc !

User Guide
Page 80
When the HDMI input is selected. While the OSD menu is selected, you cannot use the volume control buttons on the wireless keyboard or the supplied remote commander. Confirms your desired item. ! To change the volume, use these buttons to change the volume. HDMI input control...the volume while the HDMI input is selected, the HDMI SELECT button and the HDMI SELECT indicator light illuminate in green. n 80 N Using Your VAIO Computer Using the HDMI Input Control Buttons The HDMI input control buttons allow you can change the display and sound settings for the HDMI input...
When the HDMI input is selected. While the OSD menu is selected, you cannot use the volume control buttons on the wireless keyboard or the supplied remote commander. Confirms your desired item. ! To change the volume, use these buttons to change the volume. HDMI input control...the volume while the HDMI input is selected, the HDMI SELECT button and the HDMI SELECT indicator light illuminate in green. n 80 N Using Your VAIO Computer Using the HDMI Input Control Buttons The HDMI input control buttons allow you can change the display and sound settings for the HDMI input...

User Guide
Page 82
You cannot use the Up/Down buttons to change the volume. While the HDMI input is selected, you can only use the volume control buttons on the wireless keyboard or the supplied remote commander to change the volume. While the computer input is selected, you cannot change the HDMI input volume Press the Up (V) or the Down (v) button to increase or decrease the volume. ! n 82 N Using Your VAIO Computer To change the HDMI input volume.
You cannot use the Up/Down buttons to change the volume. While the HDMI input is selected, you can only use the volume control buttons on the wireless keyboard or the supplied remote commander to change the volume. While the computer input is selected, you cannot change the HDMI input volume Press the Up (V) or the Down (v) button to increase or decrease the volume. ! n 82 N Using Your VAIO Computer To change the HDMI input volume.
User Guide
Page 83
You cannot use the function keys on the wireless keyboard to change the language mode of the OSD menu, enable or disable the Auto Input Sensing feature, and change the default SONY logo lamp activity while the HDMI input is selected, you can change the brightness. n 83 N Using Your VAIO Computer Changing the Display and Sound Settings for the HDMI input with the OSD menu. The following shows how to change the display and sound settings for the HDMI Input You can only use the OSD menu to change the brightness. While the HDMI input is selected. !
You cannot use the function keys on the wireless keyboard to change the language mode of the OSD menu, enable or disable the Auto Input Sensing feature, and change the default SONY logo lamp activity while the HDMI input is selected, you can change the brightness. n 83 N Using Your VAIO Computer Changing the Display and Sound Settings for the HDMI input with the OSD menu. The following shows how to change the display and sound settings for the HDMI Input You can only use the OSD menu to change the brightness. While the HDMI input is selected. !
User Guide
Page 128
... consumption mode. To return to Normal mode ❑ Press any key on the wireless keyboard or the sleep button on the remote commander. ❑ Press the power button on the wireless keyboard or the remote commander to place your computer. ! Make sure that the batteries of time...keyboard and remote commander are properly installed and not worn out. You will turn off automatically. Turn off the LCD screen and places the hard disk drive and the CPU into Sleep mode. The orange power indicator light illuminates in Sleep mode, you cannot insert a disc. n 128 N Customizing Your VAIO...
... consumption mode. To return to Normal mode ❑ Press any key on the wireless keyboard or the sleep button on the remote commander. ❑ Press the power button on the wireless keyboard or the remote commander to place your computer. ! Make sure that the batteries of time...keyboard and remote commander are properly installed and not worn out. You will turn off automatically. Turn off the LCD screen and places the hard disk drive and the CPU into Sleep mode. The orange power indicator light illuminates in Sleep mode, you cannot insert a disc. n 128 N Customizing Your VAIO...
User Guide
Page 159
...simple solutions. Try these suggestions before visiting the Sony online support web site at the following URLs: http://esupport.sony.com/EN/VAIO/ for customers in USA http://www.sony.ca/support/ for customers in Canada http://esupport.sony.com/LA/ for customers in Spanish-speaking Latin ... 182) ❑ Microphone (page 183) ❑ Mouse (page 184) ❑ Speakers (page 186) ❑ Touch Pad (page 188) ❑ Keyboard (page 189) ❑ Floppy Disks (page 191) n 159 N Troubleshooting Troubleshooting This section describes how to solve common problems you might encounter when using your...
...simple solutions. Try these suggestions before visiting the Sony online support web site at the following URLs: http://esupport.sony.com/EN/VAIO/ for customers in USA http://www.sony.ca/support/ for customers in Canada http://esupport.sony.com/LA/ for customers in Spanish-speaking Latin ... 182) ❑ Microphone (page 183) ❑ Mouse (page 184) ❑ Speakers (page 186) ❑ Touch Pad (page 188) ❑ Keyboard (page 189) ❑ Floppy Disks (page 191) n 159 N Troubleshooting Troubleshooting This section describes how to solve common problems you might encounter when using your...
User Guide
Page 161
...DISPLAY OFF button. ❑ Make sure the brightness and contrast controls are using the supplied Sony power cord. For your safety, use the computer for at least one hour. ❑ Check that you are adjusted correctly. ❑ Make sure the computer ...Sony for your VAIO computer. ❑ Make sure your computer will turn on your computer. ❑ Condensation may have installed since purchase, and then restart your computer. ❑ If your computer to five minutes. Wait three to malfunction. To change the display input, press the HDMI SELECT button on the wireless keyboard...
...DISPLAY OFF button. ❑ Make sure the brightness and contrast controls are using the supplied Sony power cord. For your safety, use the computer for at least one hour. ❑ Check that you are adjusted correctly. ❑ Make sure the computer ...Sony for your VAIO computer. ❑ Make sure your computer will turn on your computer. ❑ Condensation may have installed since purchase, and then restart your computer. ❑ If your computer to five minutes. Wait three to malfunction. To change the display input, press the HDMI SELECT button on the wireless keyboard...

User Guide
Page 162
An application error may cause loss of your wireless keyboard and remote commander are properly installed and not worn out. n 162 N Troubleshooting What should I do if the green power indicator light turns on the computer ...
An application error may cause loss of your wireless keyboard and remote commander are properly installed and not worn out. n 162 N Troubleshooting What should I do if the green power indicator light turns on the computer ...


