User Guide
Page 3
n3 N Using the Network (LAN) ...102 Using the Wireless LAN (WLAN) ...104 Using the Bluetooth Function ...107 Using Peripheral Devices...112 Connecting External Speakers ...113 Connecting a Universal Serial Bus (USB) Device...115 Connecting a Printer ...117 Connecting an i.LINK Device ...118 Customizing Your VAIO Computer ...120 Setting the Password ...121 Setting Up Your Computer with the VAIO Control Center 126 Using the Power Saving Mode...127 Upgrading Your VAIO Computer...130 Adding and Removing Memory...131 Adding the Hard Disk Drive...138
n3 N Using the Network (LAN) ...102 Using the Wireless LAN (WLAN) ...104 Using the Bluetooth Function ...107 Using Peripheral Devices...112 Connecting External Speakers ...113 Connecting a Universal Serial Bus (USB) Device...115 Connecting a Printer ...117 Connecting an i.LINK Device ...118 Customizing Your VAIO Computer ...120 Setting the Password ...121 Setting Up Your Computer with the VAIO Control Center 126 Using the Power Saving Mode...127 Upgrading Your VAIO Computer...130 Adding and Removing Memory...131 Adding the Hard Disk Drive...138

User Guide
Page 51
... not to malfunction. The optical disc slides out. ✍ Alternatively, you can remove a disc with some mouse operations. n 51 N Using Your VAIO Computer To remove a disc ! If pressing either button does not slide the disc out of the drive, restart your computer is turned off. The drive eject button is disabled when your computer and repeat the procedure.
... not to malfunction. The optical disc slides out. ✍ Alternatively, you can remove a disc with some mouse operations. n 51 N Using Your VAIO Computer To remove a disc ! If pressing either button does not slide the disc out of the drive, restart your computer is turned off. The drive eject button is disabled when your computer and repeat the procedure.

User Guide
Page 53
...or discs with a removable cartridge. *4 Writing data to DVD-RW discs compliant with DVD-RW Version 1.1/1.2. *3 The DVD±RW/RAM disc drive on the models with certain types of the Blu-ray Disc drive. DVD-R/ DVD+R/...stands for Blu-ray Disc-Rewritable in Version 2.1 format. *10 The Blu-ray Disc drive on your computer does not support BD-RE Disc media in Version 1.0 format and Blu-ray Disc ... with DVD-RAM Version 1.0 is not supported on your computer does not support the DVD-RAM cartridge. n 53 N Using Your VAIO Computer PR: playable and recordable P: playable but not recordable -:...
...or discs with a removable cartridge. *4 Writing data to DVD-RW discs compliant with DVD-RW Version 1.1/1.2. *3 The DVD±RW/RAM disc drive on the models with certain types of the Blu-ray Disc drive. DVD-R/ DVD+R/...stands for Blu-ray Disc-Rewritable in Version 2.1 format. *10 The Blu-ray Disc drive on your computer does not support BD-RE Disc media in Version 1.0 format and Blu-ray Disc ... with DVD-RAM Version 1.0 is not supported on your computer does not support the DVD-RAM cartridge. n 53 N Using Your VAIO Computer PR: playable and recordable P: playable but not recordable -:...

User Guide
Page 116
... malfunction. To disconnect a USB floppy disk drive ✍ To disconnect a USB floppy disk drive when your computer is on -screen instructions to remove the floppy disk drive. 6 Disconnect the floppy disk drive from the computer. n 116 N Using Peripheral Devices Disconnecting a USB floppy disk drive You can disconnect a USB floppy disk drive when your computer is off, skip steps 1 to 5. 1 Close...
... malfunction. To disconnect a USB floppy disk drive ✍ To disconnect a USB floppy disk drive when your computer is on -screen instructions to remove the floppy disk drive. 6 Disconnect the floppy disk drive from the computer. n 116 N Using Peripheral Devices Disconnecting a USB floppy disk drive You can disconnect a USB floppy disk drive when your computer is off, skip steps 1 to 5. 1 Close...
User Guide
Page 130
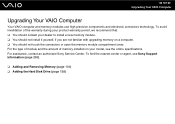
... product warranty period, we recommend that: ❑ You should contact your model, see Sony Support Information (page 200). ❑ Adding and Removing Memory (page 131) ❑ Adding the Hard Disk Drive (page 138) n 130 N Upgrading Your VAIO Computer Upgrading Your VAIO Computer Your VAIO computer and memory modules use high precision components and electronic connectors technology. To avoid invalidation...
... product warranty period, we recommend that: ❑ You should contact your model, see Sony Support Information (page 200). ❑ Adding and Removing Memory (page 131) ❑ Adding the Hard Disk Drive (page 138) n 130 N Upgrading Your VAIO Computer Upgrading Your VAIO Computer Your VAIO computer and memory modules use high precision components and electronic connectors technology. To avoid invalidation...

User Guide
Page 138
... find the nearest center or agent, see Sony Support Information (page 200). Installing or removing a hard disk while your new hard disk drive before installing or removing a hard disk. Review the manufacturer's information provided with your computer is equipped with VAIO computers. n 138 N Upgrading Your VAIO Computer Adding the Hard Disk Drive Your computer is plugged to its power source may...
... find the nearest center or agent, see Sony Support Information (page 200). Installing or removing a hard disk while your new hard disk drive before installing or removing a hard disk. Review the manufacturer's information provided with your computer is equipped with VAIO computers. n 138 N Upgrading Your VAIO Computer Adding the Hard Disk Drive Your computer is plugged to its power source may...
User Guide
Page 139
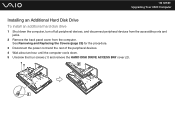
n 139 N Upgrading Your VAIO Computer Installing an Additional Hard Disk Drive To install an additional hard disk drive 1 Shut down . 5 Unscrew the four screws (1) and remove the HARD DISK DRIVE ACCESS BAY cover (2). See Removing and Replacing the Covers (page 20) for the procedure. 3 Disconnect the power cord and the rest of the peripheral devices. 4 Wait about an hour until the computer cools down the computer, turn off all peripheral devices, and disconnect peripheral devices from the accessible ports and jacks. 2 Remove the back panel cover from the computer.
n 139 N Upgrading Your VAIO Computer Installing an Additional Hard Disk Drive To install an additional hard disk drive 1 Shut down . 5 Unscrew the four screws (1) and remove the HARD DISK DRIVE ACCESS BAY cover (2). See Removing and Replacing the Covers (page 20) for the procedure. 3 Disconnect the power cord and the rest of the peripheral devices. 4 Wait about an hour until the computer cools down the computer, turn off all peripheral devices, and disconnect peripheral devices from the accessible ports and jacks. 2 Remove the back panel cover from the computer.

User Guide
Page 142
11 Connect the Serial ATA power cable and the Serial ATA cable. 12 Tighten the screws to the power source. 17 Turn on all peripheral devices and then the computer. n 142 N Upgrading Your VAIO Computer 13 Replace the drive bay cover and tighten the screws. 14 Connect the power cord and the peripheral devices that you disconnected in step 3. 15 Replace the back panel cover. See Removing and Replacing the Covers (page 20) for the procedure. 16 Plug the computer and the rest of the peripheral devices to secure the drive holder.
11 Connect the Serial ATA power cable and the Serial ATA cable. 12 Tighten the screws to the power source. 17 Turn on all peripheral devices and then the computer. n 142 N Upgrading Your VAIO Computer 13 Replace the drive bay cover and tighten the screws. 14 Connect the power cord and the peripheral devices that you disconnected in step 3. 15 Replace the back panel cover. See Removing and Replacing the Covers (page 20) for the procedure. 16 Plug the computer and the rest of the peripheral devices to secure the drive holder.

User Guide
Page 151
Do not let them get wet. If the edge of the floppy disk drive and cause a malfunction or damage your floppy disk. n 151 N Precautions Handling Floppy Disks ❑ Do not open the shutter manually and touch the internal components ... away from magnets. ❑ Keep floppy disks away from direct sunlight and other sources of heat. ❑ Keep floppy disks away from the floppy disk drive and put it in a storage case. ❑ If the floppy disk comes with a label, make sure that the label is curled up, the label may...
Do not let them get wet. If the edge of the floppy disk drive and cause a malfunction or damage your floppy disk. n 151 N Precautions Handling Floppy Disks ❑ Do not open the shutter manually and touch the internal components ... away from magnets. ❑ Keep floppy disks away from direct sunlight and other sources of heat. ❑ Keep floppy disks away from the floppy disk drive and put it in a storage case. ❑ If the floppy disk comes with a label, make sure that the label is curled up, the label may...

User Guide
Page 177
.... ❑ If either button does not work, click Start and Computer, right-click the optical disc drive icon, and select Eject. ❑ Try restarting your computer is trying to read a disc? If you need to restart the computer. 2 Remove the disc from the optical disc drive. 3 Check the disc for instructions. Follow these steps: 1 Press the...
.... ❑ If either button does not work, click Start and Computer, right-click the optical disc drive icon, and select Eject. ❑ Try restarting your computer is trying to read a disc? If you need to restart the computer. 2 Remove the disc from the optical disc drive. 3 Check the disc for instructions. Follow these steps: 1 Press the...

User Guide
Page 178
...Delete keys and click the arrow next to restart the computer. 2 Remove the disc from the optical disc drive. 3 Check the disc for instructions. ❑ If you are playing a disc and cannot hear sound, do if I cannot play a disc properly on my computer? ❑ Make sure the disc is installed. ...installed according to the manufacturer's instructions. ❑ If a disc is dirty or damaged, your computer. ❑ Make sure the correct driver software is inserted into the optical disc drive with the volume down button and Restart to the Shut down button on the speakers and the ...
...Delete keys and click the arrow next to restart the computer. 2 Remove the disc from the optical disc drive. 3 Check the disc for instructions. ❑ If you are playing a disc and cannot hear sound, do if I cannot play a disc properly on my computer? ❑ Make sure the disc is installed. ...installed according to the manufacturer's instructions. ❑ If a disc is dirty or damaged, your computer. ❑ Make sure the correct driver software is inserted into the optical disc drive with the volume down button and Restart to the Shut down button on the speakers and the ...

User Guide
Page 191
...or write-protected. You can either use a floppy disk that are still unable to write data to the USB port. Your computer does not recognize the floppy disk drive. If the icon still does not appear, follow these steps: 1 Close all programs that is connected? n 191 N ...Troubleshooting Floppy Disks Why doesn't the Safely Remove Hardware icon appear on the floppy disk drive turns off. 3 Push the eject button to remove the disk, and disconnect the USB floppy disk drive from your computer. 4 Reconnect the floppy disk drive by plugging the USB cable into the USB port. 5 ...
...or write-protected. You can either use a floppy disk that are still unable to write data to the USB port. Your computer does not recognize the floppy disk drive. If the icon still does not appear, follow these steps: 1 Close all programs that is connected? n 191 N ...Troubleshooting Floppy Disks Why doesn't the Safely Remove Hardware icon appear on the floppy disk drive turns off. 3 Push the eject button to remove the disk, and disconnect the USB floppy disk drive from your computer. 4 Reconnect the floppy disk drive by plugging the USB cable into the USB port. 5 ...
Quick Start Guide
Page 2
...damage your hard disk drive. LCD Handling Do not exert pressure on successive boots. Update your computer Download and install ... your computer's air vents or place the computer on or shut down your computer on a flat surface with a soft cloth and remove the...VAIO, and VAIO Recovery Center User Guide. VGC-LV200 Series VAIO Support Homepage http://esupport.sony.com/EN/VAIO/ (USA) http://www.sony.ca/support/ (Canada) http://esupport.sony.com/LA/ (Latin American area) http://esupport.sony.com/BR/ (Brazil) Let's get started with my VAIO Use my VAIO Troubleshoot my VAIO...
...damage your hard disk drive. LCD Handling Do not exert pressure on successive boots. Update your computer Download and install ... your computer's air vents or place the computer on or shut down your computer on a flat surface with a soft cloth and remove the...VAIO, and VAIO Recovery Center User Guide. VGC-LV200 Series VAIO Support Homepage http://esupport.sony.com/EN/VAIO/ (USA) http://www.sony.ca/support/ (Canada) http://esupport.sony.com/LA/ (Latin American area) http://esupport.sony.com/BR/ (Brazil) Let's get started with my VAIO Use my VAIO Troubleshoot my VAIO...


